|
|||||||


| Sponsored Links (Register now to hide all advertisements) |
|
|

|
Thread Tools | Display Modes |


 11-05-2012, 12:19 PM
|
#18 |
|
Senior Member

Join Date: May 2010
Location: Mpls, MN
Posts: 27,582
|
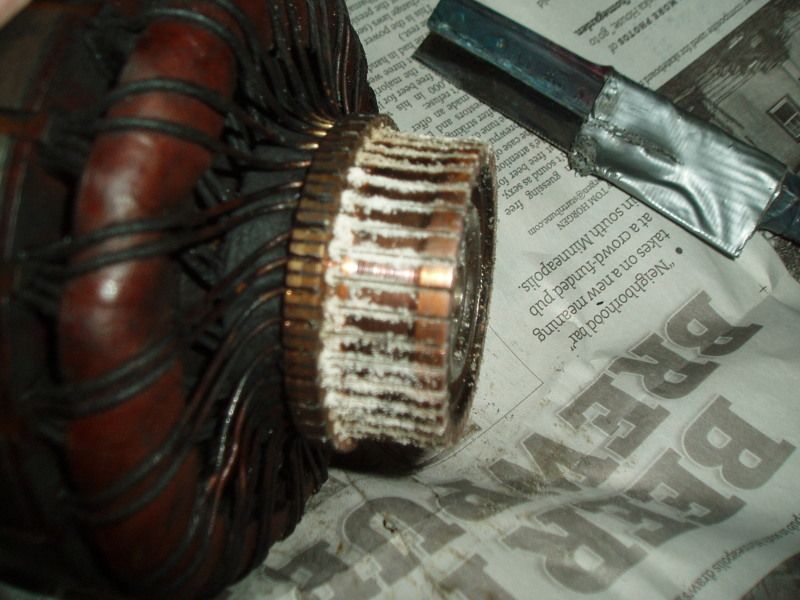 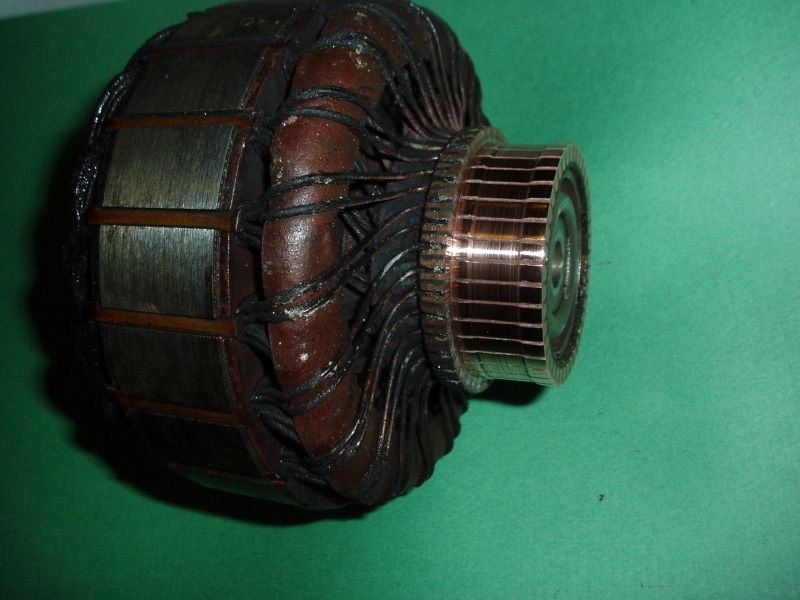  The top picture shows what the commutator looks like after I undercut it. I leave the dust until I finish the undercutting, as that makes it easier to tell which slots have been done. The second picture shows the armature after I polished the commutator with fine crocus cloth. Since I'm using the same brushes and brush holder, there was really no need to turn the commutator to remove the unworn higher ends on the bars. To check for commutator concentricity, just spin the armature and watch the brushes. If the brushes don't move in and out at all then it's perfectly concentric. The powerhouse is so well sealed that you will rarely see any rust inside, but I'll wipe an oily rag over the armature core to keep it looking good. The third picture shows an Autolite armature from a K 5 dated generator that I cleaned up yesterday. Someone had a thick coat of red paint over a fairly heavy coat of rust. This is a hard to find generator because only a few were made with the long taper on the front and the bushing on the rear. I've seen 2 or 3 like this with a K 4 date stamp on the band, but this is the only K 5 I've seen with the long taper still on the front. During April 1930 the taper changed to a short taper with a shorter pulley hub, and the rear ball bearing in a stamped steel end plate was changed to a bushing in a cast iron end plate. The output stud was also moved from the front end to the rear end of the case, and the pulley bolt was changed from 1/4" to 5/16", both fine thread. As you can see this generator had very little use, as shown by the full diameter commutator with no wear. The armature core had rust, which I removed on the wire wheel. Just wear cloth gloves and hold the armature against the wire wheel. The cloth gloves will allow the armature to spin as you clean, then flip it end for end, so you attack the rust from the other direction also. I gave the undercut a couple strokes to be sure it was clean in each slot, then I polished it with fine crocus cloth. After cleaning it with some gas and blow drying I wrapped some paper around the commutator and gave it a light coat of clear laquer. I didn't use tape because I don't want any sticky residue left on the commutator. The insulation paper was looking very dry and some of the insulation fell off the wires over the years. The clear laquer will preserve the original look and help protect it. This armature has no date stamp, but many do. |

|

|
«
Previous Thread
|
Next Thread
»


 Threaded Mode
|
|

| Sponsored Links (Register now to hide all advertisements) |
|
|
All times are GMT -5. The time now is 11:35 AM.