|
|||||||


| Sponsored Links (Register now to hide all advertisements) |
|
|
 |

|
Thread Tools | Display Modes |
 07-13-2025, 08:51 PM
|
#1 |
|
Member
Join Date: Sep 2022
Posts: 53
|
I've read through the green book several times, tried searching around the internet, still can't figure it out.
What's the procedure for adjusting timing on a 47 v8 flathead. It's a round type distributor but the fan hub, fan belt, and radiator are in the way so I can't really get at it to see anything but the cap. Anyone have good documentation on that? Do I need to drain and pull the radiator, or take the head off to adjust cylinders? Do I just adjust what I assume is the vacuum break along the top, and listen to see what happens? Literally never done a timing adjustment before and this one's a little odd because of the placement. |

|

|
|
07-13-2025, 09:52 PM
|
#2 |
|
Senior Member
Join Date: Dec 2013
Location: Corsicana, Texas
Posts: 1,551
|
Simply a matter of removing the distributor from the engine. Timing and maintenance adjustments are done on the bench. Once you remove it, you'll see that the distributor drive has an offset drive lug that will only install one way.
http://www.vanpeltsales.com/FH_web/F...1946-48pic.jpg |
|
|
|
| Sponsored Links (Register now to hide all advertisements) |
|
|
|
07-13-2025, 09:52 PM
|
#3 |
|
Senior Member
Join Date: Dec 2024
Location: central coast california
Posts: 593
|
some information on whether the car is running as is and the timing adjustment will be essentially a tuning of the timing would be helpful to those interested in responding. or OTOH, the distributor has been removed from the engine and possibly been rebuilt and so needs a more extensive timing work.
|

|
|
|
07-13-2025, 09:58 PM
|
#4 | |
|
Member
Join Date: Sep 2022
Posts: 53
|
Quote:
|
|
|
|
|

|
07-13-2025, 10:01 PM
|
#5 | |
|
Member
Join Date: Sep 2022
Posts: 53
|
Quote:
|
|
|
|
|
|
07-13-2025, 10:11 PM
|
#6 | |
|
Senior Member
Join Date: Dec 2013
Location: Corsicana, Texas
Posts: 1,551
|
Sponsored Links (Register now to hide all advertisements)
Quote:
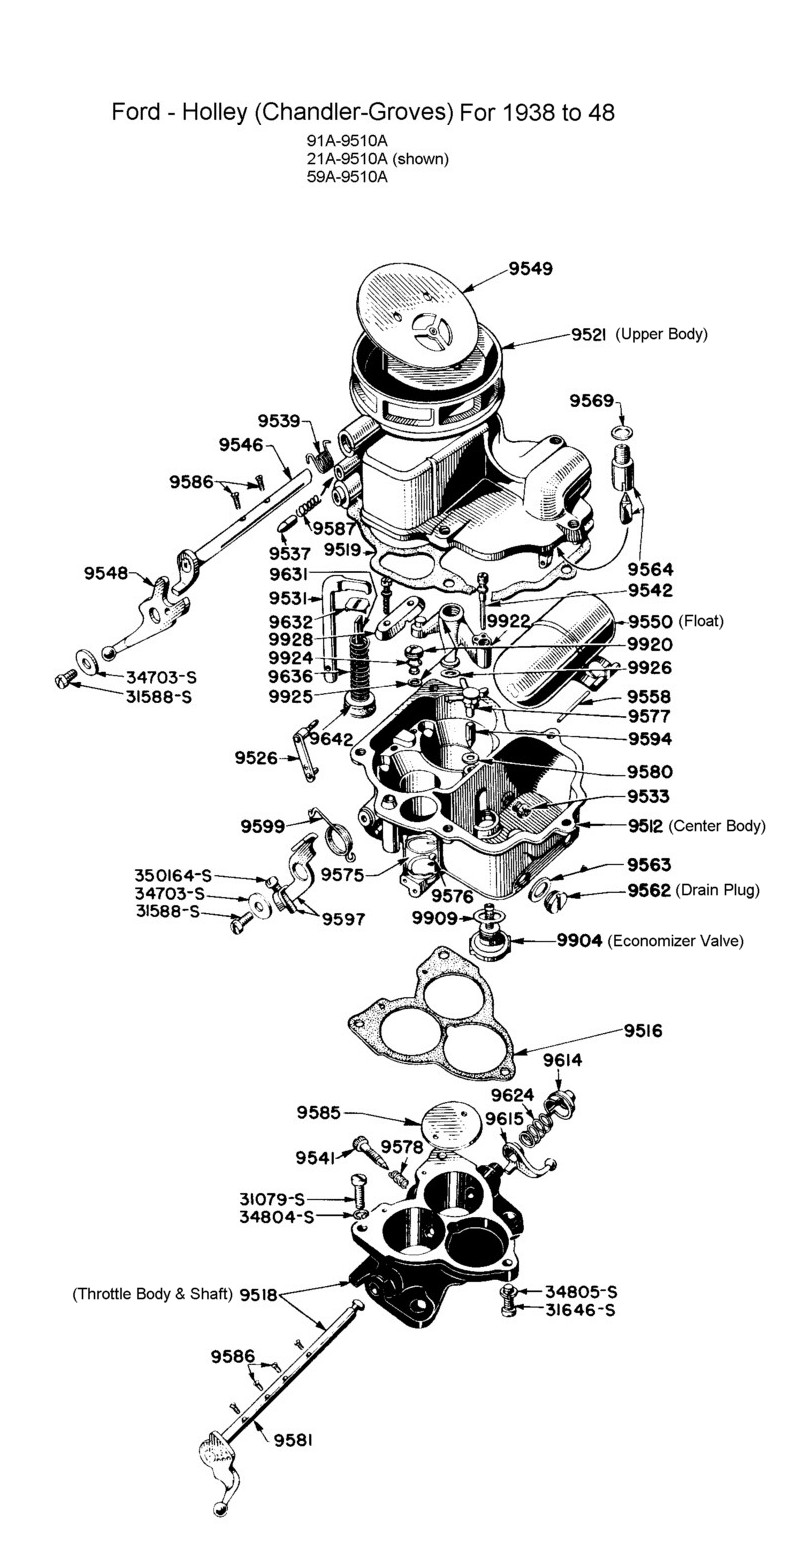
Check out the link below - the economizer valve is part #9904. If you're not sure about the valve, replace it while you have the carb apart. http://www.vanpeltsales.com/FH_web/F...rd1938to48.jpg |
|
|
|
|
|
07-13-2025, 11:16 PM
|
#7 |
|
Senior Member
Join Date: Dec 2024
Location: central coast california
Posts: 593
|
i wouldn't think of the timing as an issue if running rich and wouldn't consider issues involving the radiator or anything extensive.
and it would of interest as to the symptoms leading to the thinking of the engine running rich. |
|
|
|
|
07-13-2025, 11:20 PM
|
#8 | |
|
Senior Member

Join Date: May 2015
Posts: 11,643
|
Quote:
|
|
|
|
|
|
07-13-2025, 11:27 PM
|
#9 | |
|
Member
Join Date: Sep 2022
Posts: 53
|
Quote:
Its a long story and theres a previous thread with more information if you are interested (https://www.fordbarn.com/forum/showthread.php?t=350464) but I was hoping on getting more information on how hard it is to pull and re,ove the distributor anyway so I can figure out what is easy and what is hard. I was hoping it was just a matter of fiddling with a screw similar to simple carb tuning but if its pulling the distributor off fully I think the radiator needs to come off. Which would mean draining the brand new coolant, again. Im building a list though. Pull off carb and check (somehow, if you have reference materials that would be great.. aside from gunk, I dont know what to really look for, Ill read up on this though). A question I have though is since I dont have the original carb (the previous one wasnt even original) I wonder if I should just sink the money into something more known. Maybe a rebuilt original? Pull plugs, clean and regap (theyre new but this is easy). I did this before but Ill do it again. I got a new gap checker thats way easier to use even for a dummy like me. Get an original air filter since the one on there is tiny if I dont replace the entire carb. Then come back here and figure out how to pull the distributor off. The manual doesnt explain that, but maybe thats my answer. Take parts off until I can get to it. |
|
|
|
|
|
07-13-2025, 11:31 PM
|
#10 | |
|
Member
Join Date: Sep 2022
Posts: 53
|
Quote:
That being said, I agree. Its likely the carb. But I want to know anyway which is why Im asking. So I can be prepared eventually. Or buy a better guide that will help me. |
|
|
|
|
|
07-14-2025, 01:17 AM
|
#11 |
|
Senior Member
Join Date: Aug 2020
Posts: 323
|
From memory, it's easier to remove the distributor from underneath the car, I think you can remove it without taking off the fan.
Make sure the drive is engaged in the slot on the end of the camshaft when reinstalling. You don't need to remove the radiator. |
|
|
|
|
07-14-2025, 01:19 AM
|
#12 |
|
Senior Member

Join Date: May 2010
Location: Yucaipa, CA
Posts: 1,492
|
This is before timing lights were invented. If you ever have the #1 head off, you can make timing marks on the pulley and make a timing pointer that screws into the timing cover. If you're going old school and you don't have the KRW timing box to set it up with, I have a 1948 Motors manual that shows you how to set up the timing by using two steel straight edges with the distributer off. I tried it one day and then compared it to the marks I had made on the crank pulley for a modern timing light. I was pretty impressed; it was only off 2 degrees.
Last edited by Flathead Fever; 07-14-2025 at 01:25 AM. |
|
|
|
|
07-14-2025, 06:31 AM
|
#13 |
|
Senior Member

Join Date: Sep 2014
Location: Mid-Coast Maine
Posts: 3,346
|
This is a post I made a while back showing how to easily set the crab distributor timing, mechanically.
https://www.fordbarn.com/forum/showp...47&postcount=8 And this from Vanpelt's tech tips. http://www.vanpeltsales.com/FH_web/f...str-timing.htm
__________________
Archives of historical but relevant older articles: ------------- Hover mouse over the links below and click! ~~~~~~~~~~~~~~~~~--------------- Rumble Seats Notes Techno Source for the 1932 thru 1953 Flathead Ford |
|
|
|
|
07-14-2025, 08:53 AM
|
#14 |
|
Senior Member
Join Date: Sep 2021
Location: summerton, sc
Posts: 543
|
Make sure you get power valve from dealers on this form or daytona carb in fl, the seal needs to be made for the carb to fit correctly or it will leak (run rich)
|
|
|
|
|
07-14-2025, 07:51 PM
|
#15 |
|
Senior Member

Join Date: May 2012
Location: u-rah-rah-Wisconsin
Posts: 1,269
|
The radiator doesn't need to be removed to extract the distributor. You do want to protect the rad with cardboard or similar as you'll be removing the fan assembly to gain access.
If you aren't ready to try the straight-edge timing method (that actually worked quite well for me) consider sending yours to Third Gen Auto in Tenn and have Michael rebuild it.
__________________
19 and 49 F1 - jes' like Henry II built 1946 Deluxe - as Henry built it |
|
|
|
|
07-14-2025, 11:16 PM
|
#16 |
|
Member
Join Date: Sep 2022
Posts: 53
|
This was all very helpful! Thank you everybody! I feel a lot more confident if and when I need to do this.
|
|
|
|
|
«
Previous Thread
|
Next Thread
»
 Linear Mode

|
|

| Sponsored Links (Register now to hide all advertisements) |
|
|
All times are GMT -5. The time now is 01:21 AM.