|
|||||||


| Sponsored Links (Register now to hide all advertisements) |
|
|
 |

|
Thread Tools | Display Modes |
 02-11-2011, 12:04 PM
|
#1 |
|
Senior Member
Join Date: May 2010
Location: Lakeville, MN
Posts: 5,187
|
I tried to shrink some sheetmetal a year or two ago and had a pretty bad experience. The splash apron I was trying to remove some "oil canning" from turned out worse than when I started. I have tried a shrinking disc and it kind of works, but real slow and not very well for me. I think the 19 ga. model A metal is a little thick to heat it up enough to shrink it very well. I thought I might try to use a torch again, but don't want to screw up the panel I want to do shrinking on. I have heard that the dime sized heated area should be quenched with a water soaked rag (also makes the metal brittle I've heard) and I have also heard that the red hot metal should be tapped down with a dolly and hammer to gather up metal. I think a lot depends on where you heat the metal and that is what I don't know. Does anyone with some torch shrinking experience have any helpful points or a place to get information? I have watched a couple of videos on YouTube, but they don't help much.
Thanks for any advise. Rusty Nelson |

|

|
|
02-11-2011, 12:10 PM
|
#2 |
|
Senior Member

Join Date: May 2010
Location: Eastern Tennessee
Posts: 11,578
|
19 gauge metal such as Henry's works VERY WELL to shrink with. There are some things that you must realize though. Shrinking only works on stretched metal. Shrinking is a direct product of how much crown a panel already has in it. You must be able to "read" a panel and be able to tell where the trauma areas are. This is just something that comes with practice and experience. This is an art that takes a long time to perfect. It takes a lot of patience and perseverance to achieve perfection. Don't believe everything you hear aboput making the metal brittle. Finally, applying too much heat is not the way you shrink metal.
. |
|
|
|
 )
)| Sponsored Links (Register now to hide all advertisements) |
|
|
|
02-11-2011, 12:11 PM
|
#3 |
|
Senior Member

Join Date: May 2010
Location: near Hershey, PA
Posts: 876
|
any chance you can show a photo of the part with the problem area circled?
it would make a difference how you solve it, with the size and location of your problem... Zach
__________________
-WANTED-
Pre-War Speed Equipment Davies or Morrison Intake Manifold 77-6050B, 81AS - 81SB - 99AS - 99SB 19AS cylinder heads |
|
|
|
|
02-11-2011, 12:40 PM
|
#4 |
|
Senior Member
Join Date: May 2010
Location: Lakeville, MN
Posts: 5,187
|
Here are the two spots I need to shrink. They are in the upper right side of my phaetons rear panel. The areas aren't all that large. Typically I just tap down the raised are a little, but these two sports wont drop well with just a hammer and dolly.
Rusty Nelson 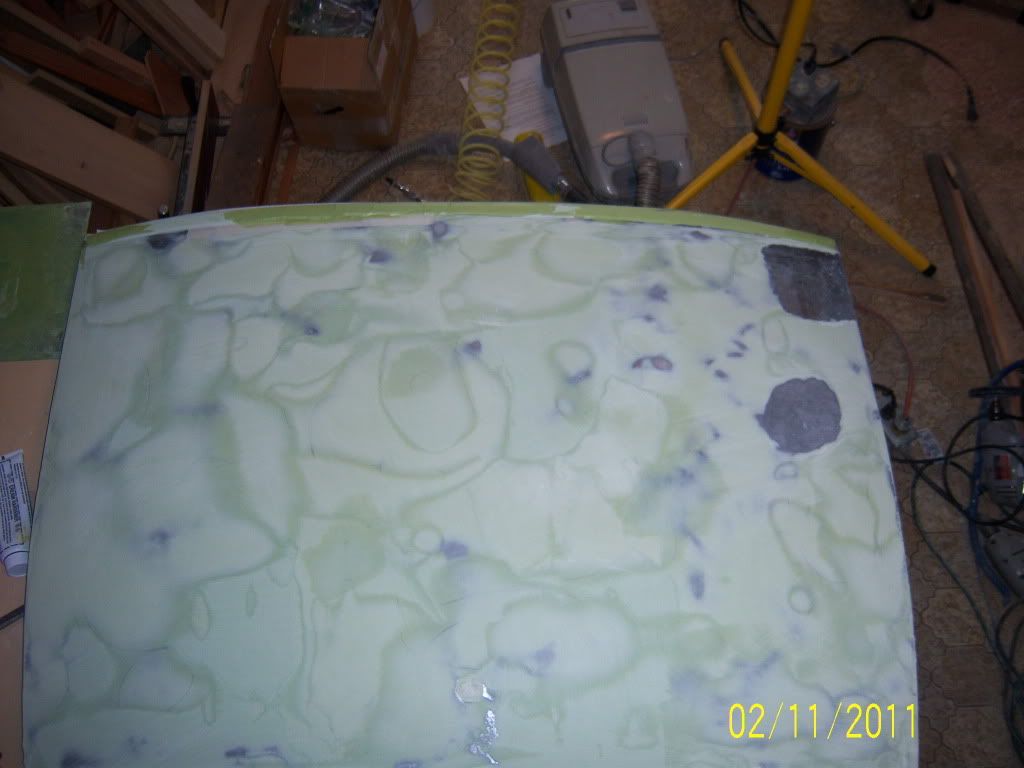 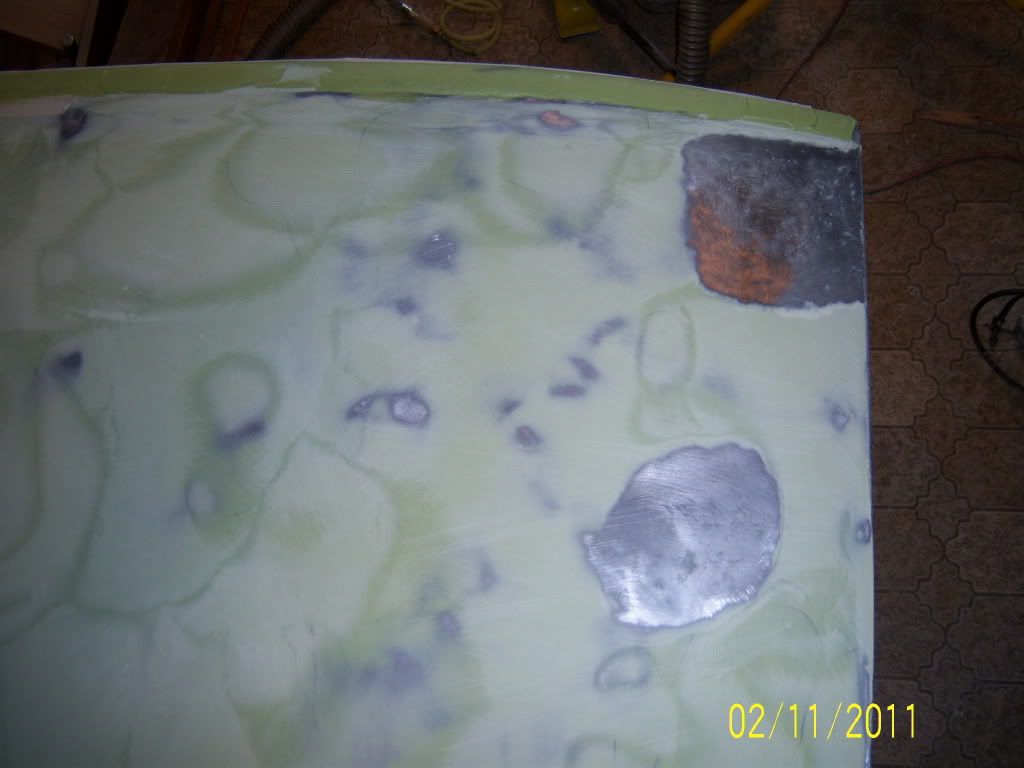
|
|
|
|
|
02-11-2011, 01:30 PM
|
#5 |
|
Senior Member

Join Date: May 2010
Location: Fresno, Ca.
Posts: 3,636
|
After the dime size spot is heated, I tap AROUND the spot too gather up
the extra metal to the center. Brent,...correct or NOT?? |
|
|
|
|
02-11-2011, 01:30 PM
|
#6 |
|
Senior Member
Join Date: May 2010
Location: South East NJ
Posts: 3,398
|
Sponsored Links (Register now to hide all advertisements)
It is important to figure out why there is an issue. Many oil cans are really due to a shrink point in the panel. This can be from a dent or kink in a high crown panel or from any welding done on the panel. My initial thought is that the panel looks too screwed up. Look at all the high and low spots you have with the lines in the filler you used. That panel is wavy enough to surf on and has fundamental issues way beyond your one corner. First thing I would do is strip it back down to bare metal and work on leveling the metal on the whole panel. The oil can may be from a distortion on the other side of the panel or more likely the sum total of the distortion one can see in the layers of sanded fill. It gets a bit complicated from there. Once you have the bead area properly worked to shape, then attack the flatter metal. If ANY heat was used in the bead area then you can have some significant issues locked in the bead. I would think you might be able to level by slowly (very slowly) working on picking and using the shrinking disk. If you find that you need to shrink you need to proceed slowly with caution. A small spot brought up to just around blue color. Then you must let it cool down past the plastic state before cooling further. When doing a shrinking disk or a torch shrink the biggest mistake you can make is to not give the panel enough time to equalize in temp. A little temp difference can make it appear that you still have a problem. To help rush things along I may use cold water to bring the metal temp down so it equalizes faster, but only after allowing the metal to cool some first. Doing a torch shrink with hammer and dolly will cause a significant shrink. This is more appropriate when doing significant metal forming like when making crowned panel from scratch. Putting a wet rag on a torch shrink spot causes the panel to lock in a funny shape and increases the amount of shrink. It is much harder to work the panel back to level with hammer and dolly. The sheet metal is a low carbon steel and it does not cause the metal to get much harder. What I have found is you need to do a substantial amount of work to get a hard spot. One other thing I would be concerned about is panel fitment. With the level of damage I see potentially in that panel I would want to test fit the panel for squareness before I went too far. You should be mocking it up tight into the other panels and make sure it is going to give you a square body when you are done. Kind of learned that the hard way myself. Last edited by Kevin in NJ; 02-11-2011 at 01:37 PM. |
|
|
|
|
02-11-2011, 01:37 PM
|
#7 |
|
Senior Member

Join Date: May 2010
Location: Yakima, WA
Posts: 479
|
By the looks of your panel, with all of the plastic in the panel, it would be hard to tell you what to do. It looks like there could be many things happening.
You might be trying to shrink an area that is caused by another area that needs to be stretched. |
|
|
|
|
02-11-2011, 01:44 PM
|
#8 |
|
Senior Member
Join Date: May 2010
Location: Eastern Tennessee
Posts: 11,578
|
WOW, Rusty. I am really hestitant to to even say anything for fear of hurting your feelings, but since I have met you a few times in person and spoken with you on the phone, I am going to say this with some reservations. What you are trying to accomplish in this task is not that easy. If it were, then everyone would be doing it!!
What I am seeing based on the panel is you have not mastered the basics of 'defining shape' yet. Until you do, I'm not sure you will ever be successful at this. Each one of those rings appears to be where you have added more filler over the top of previous filler. The darker areas appear to be low spots that are getting moved around as more "mountains" are created. Just as in screeding & leveling freshly poured concrete, the forms or the edges are your starting point. Your edges are all filled with filler so how do you have a starting point? Also, using a torch or a shrinking disc at this stage of your panel is a little too late. The straightening of the sheetmetal should happen prior to the bodywork process. Only if by chance a small area shows up can you work it down with a hammer & dolly. I am really going to suggest that if you want to be successful in this, you need to consider getting some professional instruction (NOT YouTube or Videos!!) from someplace like McPherson College (CLICK ON NAME) where you can spend a week learning the foundational basics, and then what to look for regarding shapes & form when you are working a panel. I am going to share something about a fellow Fordbarner here who will remain nameless by me at the moment unless he decides to chime in. This gentleman I am speaking of is one of the most talented individuals that I know who is perfectionist oriented and has great mind-to-hand coordination. Even with all of his attributes, he attends 3 or 4 schools or workshops annually just to make his skills even better. Some of these 2-5 day long classes require well into the thousands of dollars for him to attend however he realizes that restoring Model A's to the level he desires takes strong commitment to learning and then dedication & practice to master a skill. This world has gotten into a mindset that everything we need to know in life can be learned watching a DVD or a video on YouTube. Even to the point my daughter was trying to take some on-line college courses to suppliment her regular curriculum at college. My wife & I finally said NO, all of her college classes would be taken on campus in front of a "live" college professor where she can have interaction with that professor. A 'Craft' or skill used to be taught under an Apprenticeship program where the understudy worked along-side of the experienced craftsman in a live environment where the Journeyman could interact and correct the little mistakes the understudy was making. Someone decided that actual work experience was not totally necessary and thus they developed a mindset where it would be spoken by a professor using a textbook as a way of showing what needed to be done and having classroom interaction on theoretical scenarios. Now it seems everyone just wants to see it done in a 30 minute DVD/Video, ....and "fast-forward" thru the parts of the DVD that seem boring, --i.e.: learning the basics first! Rusty, please understand I am not being cruel or trying to belittle you whatsoever (--AND I feel like there are plenty others in the same boat as you) but I truly feel it would be in your best interest to stop your current restoration projects and spend some time & money working on your skills through professional education so your end result will be much better. This time & $$ will be returned to you in huge dividends from savings of money on materials, saving your time on the project tasks from doing it incorrectly, ...and the end results of the restoration project will be much superior IMHO! . Last edited by BRENT in 10-uh-C; 02-11-2011 at 01:55 PM. Reason: Deleting some parts since others posted the same while I was writing. |
|
|
|
|
02-11-2011, 01:55 PM
|
#9 |
|
Senior Member
Join Date: May 2010
Location: Fresno, Ca.
Posts: 3,636
|
Kevin,
I'm just trying to improve, that's why I asked. I agree about the "islands"( don't know what else to call them ) on the panel. UHH...full of crap in Ca. |
|
|
|
|
02-11-2011, 06:29 PM
|
#10 |
|
Senior Member

Join Date: May 2010
Location: Yucaipa, CA
Posts: 1,120
|
Thirty years ago I took an auto body class at the local college. It was taught buy a master sheet metal man that had been doing auto body work since the 40s. This guy could metal finish a major dent before you grind the paint off and smear body filler on it. He used to smash dents in two different fenders and then race the students for fun.
Before we got to play with plastic filler, he taught us to hammer weld, then braze and finally metal shrinking. The first two weeks were a lesson in trying to control warping while using a torch, When it came to the metal shrinking lesson, you chose a fender from the pile and then proceeded to hammer and dolly the crap out of it until you had stretched the metal and created a large high spot. You want a small tip like a "00" or "000" that will rapidly heat a small spot before the heat spreads out and starts warping the entire panel. You heat a spot about the size of a dime then quickly quench it. sometimes just a couple shrinks will eliminate the high spot and other times it takes lots and lots of them. The instructor did not like to hammer on the shrink while it was red hot because he said all you would be doing is stretching the metal. Shrinking is not very hard but you can warp the crap out of something in a hurry, it all depends on how much crown the panel has to it. My best advice is to find an old fender with flat and curved areas and stretch it in different spots with a hammer and dolly and then practice shrinking it. You need something that you dont have an emotional attachment to, try a Chevy part |
|
|
|
|
02-11-2011, 07:49 PM
|
#11 |
|
Senior Member

Join Date: May 2010
Location: petal mississippi
Posts: 550
 |
Hang in there rusty, lot of good advice here from everyone.
Going to put in my two cents, When i tackle a job i go far 100 percent perfect, will wind up with about 80, but that will look great, so what I see is what Brent said, your dumping filler on small areas and then just to find theres a high spot and its a never ending thing, so what i would do is blast the panel entire clean and then lets go far straighting the panel, if you have a spot that bumps back and forth you will need to shrink it, I use a henrob 2000 torch it will let you heat a small area quick and then i strike it with a body hammer with a sharp pick, then quickly change to a dolly and hammer back the other way,Always shaping the area, remember filler must not exceed 1/4 are it will crack. so keep dolly the panel until you fell it is close . Now when apply the filler use the best i like rage gold it seems to flow better and will allow you to work with it longer. when you apply it you will wipe the entire panel. Not little areas when sanding I only use stick you can make your own see the pictures, the 3 foot long one it one of my favorites, the sand paper is peel and stick in a roll starting with 80 and work up to 180 then 400, what ever you do hang it there remember no one was born with this keep trying and find what works for you AL Last edited by allen; 02-11-2011 at 10:29 PM. Reason: spelling |
|
|
|
|
02-11-2011, 09:10 PM
|
#12 |
|
Member

Join Date: Sep 2010
Location: Campbell River BC Canada
Posts: 59
|
I also use a shrinking tip on my stud gun, that works really well for me. I have also had good luck with the shrinking disk but it is slow.
|
|
|
|
|
02-11-2011, 09:26 PM
|
#13 |
|
Senior Member

Join Date: Oct 2010
Posts: 837
|
This has worked for me more than once. Leave the putty in place and free hammer the back side in a small area. Stop and rough sand the putty lump down to blend with the surrounding putty. At some point metal will appear through the putty when sanding. Stop and move to another nearby area and repeat. Continue until there is more metal than putty. Keep the work area small and work slowly. Flying putty shrapnel can be harmful to your health.
|
|
|
|
|
«
Previous Thread
|
Next Thread
»
 Linear Mode

|
|

| Sponsored Links (Register now to hide all advertisements) |
|
|
All times are GMT -5. The time now is 10:21 PM.