|
|||||||


| Sponsored Links (Register now to hide all advertisements) |
|
|
 |

|
Thread Tools | Display Modes |
 02-06-2013, 03:36 PM
|
#61 |
|
Senior Member
Join Date: Jan 2012
Location: Eastern Canada NB
Posts: 166
|
I just built one...will put up some pics
|

|

|
|
02-16-2013, 08:48 AM
|
#62 |
|
Junior Member
Join Date: Jan 2013
Posts: 7
|
I agree with Tom 100%
Its just not worth the material and time to do your own I am nearly complete in restoring my Father in Laws 1930 pickup We could not proceed without that rear spreader. My Father inlaw is a make it yourself kind of guys Thats great and he does a great job 1 inch away from the shackles and the home made spreader bent Nothing happened but it was a message Snyders has the Heavy Duty spreaders cheap. Shipping is lightening fast 2 days after we used the spreader we have 2 guys waiting to buy it from us Just a thought My website for those interested in some pics of our bent spreader and the new one http://teddyk1.wix.com/verlans-model-a |
|
|
|
| Sponsored Links (Register now to hide all advertisements) |
|
|
|
01-18-2015, 08:51 PM
|
#63 | |
|
Senior Member

Join Date: Jan 2015
Location: Birkdale, Qld,Aust
Posts: 170
|
Quote:
About to use this as a guide to make one. Anything you would change Tom seeing as this was 4 years ago and you have no doubt used it a few times. Thanks, John. |
|
|
|
|

|
01-18-2015, 10:00 PM
|
#64 |
|
Senior Member

Join Date: May 2010
Location: Mpls, MN
Posts: 27,582
|
It's worked fine for me. As I recall, I used 3/4" threaded rod and 1" square tubing. You might like to use 1" threaded rod and 1 1/4" square tubing, as the added strength would be more safety margin.
|
|
|
|
|
01-18-2015, 10:20 PM
|
#65 | |
|
Senior Member
Join Date: Jan 2015
Location: Birkdale, Qld,Aust
Posts: 170
|
Quote:
Your still alive so the 3/4 must be adequate. 
|
|
|
|
|
|
01-18-2015, 10:25 PM
|
#66 |
|
Senior Member
Join Date: May 2010
Location: Mpls, MN
Posts: 27,582
|
Sponsored Links (Register now to hide all advertisements)
|
|
|
|
|
01-18-2015, 11:29 PM
|
#67 |
|
Senior Member
Join Date: Jan 2015
Location: Birkdale, Qld,Aust
Posts: 170
|
Point taken. Il'l see what I have here. Will go 1" if I have some. Thanks for the input. John.
|
|
|
|
|
01-19-2015, 12:00 AM
|
#68 |
|
Senior Member

Join Date: May 2010
Location: Wa.
Posts: 5,409
|
Seems no one has ever heard of Porta-power's.
They can be had on Ebay for around $40. 15 minutes to build an adapter for spreading springs and you probably have the safest way to spread a Ford spring. No wrenching or twisting of the spreader while under tension. Just pump the handle. The adapter is 3/8 steel with bungs welded on each end to take the Porta-power extensions. It is asymmetrical because the jack goes on one end. |
|
|
|
|
01-19-2015, 09:53 AM
|
#69 |
|
Senior Member

Join Date: Mar 2014
Location: Cleveland, Ohio
Posts: 2,763
|
This and the other threads on the importants of using spring spreaders is much appreated by this newbie. When the day comes, I shall sure obtain a good quality one.
__________________
-Mike Late 31' Ford Model A Tudor, Miss Daisy I don't work on cars --I'm learning about my Model A. Cleveland, Ohio |
|
|
|
|
01-19-2015, 10:03 AM
|
#70 |
|
Senior Member

Join Date: Oct 2014
Location: Charlotte, NC
Posts: 310
|
PA Joe
Do you have a local club. Most clubs have a tool crib and the spring spreader is usually one of the tools they have. We have an array of tools in our crib (Queen City Model A Club - Charlotte, NC) |
|
|
|
|
01-19-2015, 10:06 AM
|
#71 |
|
Senior Member
Join Date: Oct 2014
Location: Charlotte, NC
Posts: 310
|
I agree, I have always wrapped a chain around even a good spring spreader. Most dangerous procedure on a Model A. Even guys who pull the complete assembly out with the spring attached should put clamps around the spring. If that center spring bolt broke it would send the spring parts flying. I have the utmost respect for the Model A rear spring.
|
|
|
|
|
01-19-2015, 10:36 AM
|
#72 |
|
Senior Member

Join Date: Jun 2012
Location: Waukee, Iowa
Posts: 107
|
We made ours using the plans in the "How to restore your model A" Volume 3 (which came from "The Restorer"). It was written by Beau Lowerr from the Wisconsin Chapter of MAFCA. If you don't want to buy the manual, maybe a web search for Beau or the WI chapter will find it.
|
|
|
|
|
01-19-2015, 06:43 PM
|
#73 |
|
Senior Member
Join Date: May 2010
Location: Trumbull, CT
Posts: 134
|
Buy the good one from brattons. Dont take a chance with your life. latecomer
|
|
|
|
|
07-06-2017, 05:54 AM
|
#74 | |
|
Senior Member
Join Date: May 2010
Posts: 107
|
Quote:
|
|
|
|
|
|
08-06-2017, 09:46 PM
|
#75 |
|
BANNED
Join Date: Apr 2017
Location: Sacramento
Posts: 1,262
|
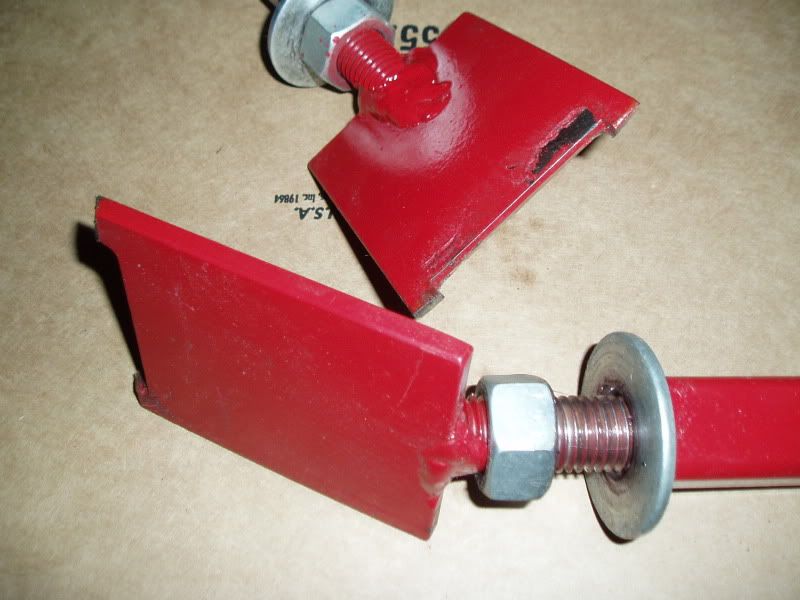
 Schedule 80 tubing,1 inch all thread grade 8,3/8ths 'knives'...works like a champ.on the tubing weld I triple stitched 1/8th 7018 on the tension side,single stitched the compression.full single stitch burn on knive to all thread joints. |
|
|
|
|
08-07-2017, 06:46 AM
|
#76 |
|
Senior Member

Join Date: May 2010
Location: Bucks Co, Pa
Posts: 3,740
|
It look dicey! But it's probably OK. It looks as though it has "Floppy rods". I used 1" pipe liners to take up the space. Your spring looks as though it has seven leaves. My T.S.had ten.
Good job! Terry |
|
|
|
|
08-07-2017, 07:58 AM
|
#77 |
|
BANNED
Join Date: Apr 2017
Location: Sacramento
Posts: 1,262
|
Yep,might spend a little more time on it with guide collars so the screws are aligned in the tubing..No flexing whatsoever,Id give it a try with a ten leave pack.
|
|
|
|
|
08-07-2017, 11:28 AM
|
#78 | |
|
Senior Member

Join Date: May 2010
Location: Northern New Jersey
Posts: 1,262
|
Quote:
bad link............ |
|
|
|
|
|
08-07-2017, 11:30 AM
|
#79 | |
|
Senior Member
Join Date: May 2010
Location: Northern New Jersey
Posts: 1,262
|
Quote:
|
|
|
|
|
|
08-07-2017, 11:40 AM
|
#80 | |
|
Senior Member
Join Date: May 2010
Location: Northern New Jersey
Posts: 1,262
|
Quote:
I made one from the blueprint and have used it many times for over 29 years. I would not use anything less than this heavy duty spreader. |
|
|
|
|
|
«
Previous Thread
|
Next Thread
»
 Linear Mode

|
|

| Sponsored Links (Register now to hide all advertisements) |
|
|
All times are GMT -5. The time now is 02:04 AM.