|
|||||||


| Sponsored Links (Register now to hide all advertisements) |
|
|
 |

|
Thread Tools | Display Modes |
 08-22-2014, 01:45 PM
|
#1 |
|
Senior Member

Join Date: Aug 2014
Location: Rhinebeck, NY
Posts: 765
|
I just bought a 29 special coupe. While trying to aim the headlights, I noticed that the latch for the rim of the headlight hits the socket on the headlight bar and prevents the light from moving. The light body is aimed slightly upward preventing the light from being aimed at the road. Can anyone explain what is wrong?
|

|

|
|
08-22-2014, 02:12 PM
|
#2 |
|
Senior Member

Join Date: Sep 2010
Location: Danville, CA
Posts: 1,557
|
Trying to visualize this situation. Can you post a picture? Might help us help you.
|
|
|
|
| Sponsored Links (Register now to hide all advertisements) |
|
|
|
08-22-2014, 02:20 PM
|
#3 |
|
Senior Member

Join Date: Jul 2010
Location: Pennsylvania
Posts: 1,117
|
Is your headlight bar on backwards? The sockets that the lights bolt into should lean to the front a little.
|
|
|
|
|
08-22-2014, 02:28 PM
|
#4 |
|
Senior Member
Join Date: Aug 2014
Location: Rhinebeck, NY
Posts: 765
|
I can't post a picture because my camera battery is being recharged. The socket on the headlight bar does tilt downward towards the front. The screw for the latch is hitting the front of the socket preventing the light body from turning downward.
|
|
|
|
|
08-22-2014, 03:46 PM
|
#5 |
|
Senior Member

Join Date: May 2010
Location: Mpls, MN
Posts: 27,582
|
I'll have to go look at mine because I can't picture the rim latch even coming close to hitting anything.

|
|
|
|
|
08-22-2014, 04:06 PM
|
#6 |
|
Senior Member
Join Date: Jan 2012
Location: Marquette Mich.
Posts: 125
|
Sponsored Links (Register now to hide all advertisements)
|
|
|
|
|
08-22-2014, 06:02 PM
|
#7 |
|
Senior Member
Join Date: Aug 2014
Location: Rhinebeck, NY
Posts: 765
|
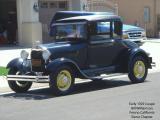
Here are pictures of my problem. The headlights are aimed upward and the latch screw is against the headlight bar.
Last edited by 29spcoupe; 10-12-2017 at 06:55 AM. |
|
|
|
|
08-22-2014, 07:03 PM
|
#8 |
|
Senior Member
Join Date: Aug 2014
Location: Rhinebeck, NY
Posts: 765
|
I don't know if they are repros or not. I will try to put some shims in place.
Thanks |
|
|
|
|
08-22-2014, 07:42 PM
|
#9 |
|
Senior Member

Join Date: May 2010
Location: Nelson. New Zealand
Posts: 2,010
|
H/L bar appers right way but think there is the lower cup on the healight missing as its sitting too low in the h/l bar . Fault looks to be in the headlamp ?
|
|
|
|
|
08-22-2014, 07:51 PM
|
#10 |
|
Senior Member

Join Date: May 2010
Location: Oregon
Posts: 6,022
|
The bar looks backwards too me. Look at how much material is on each side of the cup.
|
|
|
|
|
08-22-2014, 08:01 PM
|
#11 |
|
Senior Member

Join Date: May 2010
Location: Lynden, Wa
Posts: 3,567
|
I think Franklin has it dead on.
Mike
__________________
1930 TownSedan (Briggs) 1957 Country Sedan |
|
|
|
|
08-22-2014, 09:42 PM
|
#12 |
|
Senior Member
Join Date: May 2010
Location: Mpls, MN
Posts: 27,582
|
Look for the square cast for the horn mount. It's only on the bottom side of the left headlamp mount. This will tell you if the bar is on backwards.
|
|
|
|
|
08-22-2014, 11:49 PM
|
#13 |
|
Senior Member
Join Date: May 2010
Location: Mpls, MN
Posts: 27,582
|
I'm going to take a picture of my left headlamp and post it. Something doesn't look right with your picture. Do you have the 1930-1 headlamp rims? Or would they even fit the 1929 Headlamp?
I think I can see the horn mounting pad in your picture, so I don't think the bar is backwards, but it's a bit hard to see. It would be real easy for you to check the mount for the right headlamp. It should be just a smooth rounded pocket with no flat horn mounting pad. |
|
|
|
|
08-23-2014, 12:22 AM
|
#14 |
|
Senior Member
Join Date: May 2010
Location: Mpls, MN
Posts: 27,582
|
OK, here's a picture of my late 28 headlamp/horn mounting. Notice the clip has a good 1/8" clearance.
|
|
|
|
|
08-23-2014, 12:58 AM
|
#15 |
|
Senior Member
Join Date: May 2010
Location: Mpls, MN
Posts: 27,582
|
Look at the angle of the top of the headlamp mounting cup on my bar and on your bar. Also look at the space between my bar and radiator shell, and compare it to your's. I think your bar may have been bent rearward.
|
|
|
|
|
08-23-2014, 06:27 AM
|
#16 |
|
Senior Member
Join Date: Mar 2014
Location: Midland Park,N.J.
Posts: 1,108
|
It appears to me that those headlight rims are awful wide,repro headlights?
|
|
|
|
|
08-23-2014, 07:12 AM
|
#17 |
|
Senior Member

Join Date: Mar 2013
Location: Hudson, NY
Posts: 513
|
Tom, look how deep John's headlight fits into the socket compared to yours. Perhaps the idea of shims that was posted above is the answer. If no shims are available, what about the idea to remove the headlights and put bars in the sockets as levers and twist the bar forwards? Would it kink the tubing??
Frank |
|
|
|
|
08-23-2014, 08:00 AM
|
#18 | |
|
Senior Member
Join Date: May 2010
Location: Mpls, MN
Posts: 27,582
|
Quote:
I also thought the rims looked wide, and that's why I asked if they could be 30-1 rims, but I don't know if the later rims would even fit on a 29 bucket. My next thought was a poorly made repro part, but a picture from the front might help.
|
|
|
|
|

|
08-23-2014, 10:31 AM
|
#19 |
|
Senior Member

Join Date: May 2010
Location: Portland, Oregon
Posts: 5,939
|
I'll put my money on an incorrect headlight door (rim). Bad repro or 30-31.
__________________
Ray Horton, Portland, OR As you go through life, keep your eye on the donut, not the hole. 
|
|
|
|
|
08-23-2014, 11:12 AM
|
#20 | |
|
Senior Member
Join Date: Dec 2010
Location: FRESNO, CA
Posts: 12,560
|
Quote:
 into a cup shape, could be used for a spacer??? into a cup shape, could be used for a spacer???Bill W.
__________________
"THE ASSISTANT GURU OF STUFF" |
|
|
|
|
|
08-23-2014, 11:38 AM
|
#21 |
|
Senior Member
Join Date: May 2010
Location: So Cal
Posts: 8,833
|
Yes the bar looks to close to the radiator.
Bob |
|
|
|
|
08-23-2014, 12:59 PM
|
#22 | |
|
Senior Member

Join Date: Apr 2012
Posts: 1,542
|
Quote:
|
|
|
|
|
| Sponsored Links (Register now to hide all advertisements) |
|
|
|
08-23-2014, 03:42 PM
|
#23 |
|
Senior Member
Join Date: May 2010
Location: Portland, Oregon
Posts: 5,939
|
Could you post a picture from the front?
__________________
Ray Horton, Portland, OR As you go through life, keep your eye on the donut, not the hole.
|
|
|
|
|
08-23-2014, 05:32 PM
|
#24 |
|
Senior Member
Join Date: May 2010
Location: Mpls, MN
Posts: 27,582
|
I'm thinking the owner should run a seat belt or tow strap around the bar (near the end) and then use a come-a-long or such to pull the bar forward.
We need more pictures of the bar from the front and side views. |
|
|
|
|
08-23-2014, 09:01 PM
|
#25 |
|
Senior Member
Join Date: Aug 2014
Location: Rhinebeck, NY
Posts: 765
|
My headlights are too new inside to be originals. I think they are repop. The headlight bar is on correct but I think it is bent backwards toward the radiator. I am going to try the washer technique and later try to bend the bar. Thanks for the info. John
|
|
|
|
|
08-24-2014, 10:33 AM
|
#26 |
|
Senior Member

Join Date: May 2010
Location: new britain,ct 06052
Posts: 9,397
|
Sponsored Links (Register now to hide all advertisements)
Paul in CT |
|
|
|
|
08-24-2014, 05:20 PM
|
#27 |
|
Senior Member
Join Date: Aug 2014
Location: Rhinebeck, NY
Posts: 765
|
I didn't know it could be moved. How much play is there in the bolts?
|
|
|
|
|
08-24-2014, 06:34 PM
|
#28 | |
|
Senior Member
Join Date: Apr 2012
Posts: 1,542
|
Quote:
|
|
|
|
|
|
08-24-2014, 06:56 PM
|
#29 |
|
Senior Member
Join Date: May 2010
Location: Mpls, MN
Posts: 27,582
|
As Ericr said, it's tight at the mount. The first time I removed my headlight bar to change the motor, it took some penetrating oil and light taps with the hammer to get it apart. I greased the bolts and now it comes apart with ease.
I just measure the air gap between the bar and radiator shell on my all original parts and undamaged 1928, and it's 15/16" |
|
|
|
|
08-25-2014, 09:50 AM
|
#30 |
|
Senior Member

Join Date: Jun 2014
Location: Rocklin, CA
Posts: 779
|
You are missing a piece on the headlight that holds the mounting bolt.
|
|
|
|
|
08-25-2014, 05:55 PM
|
#31 |
|
Senior Member
Join Date: Aug 2014
Location: Rhinebeck, NY
Posts: 765
|
I don't see the piece you are talking about. On Tom's light I see a thick piece of metal that is sitting inside the socket. Is this what you mean? I tried putting dished washers in the socket, but they don't change the angle of the socket, so the result is the same.
Regards, John |
|
|
|
|
08-25-2014, 07:07 PM
|
#32 |
|
Senior Member
Join Date: Jul 2010
Location: Pennsylvania
Posts: 1,117
|
The base of the headlight that fits into the socket on the light bar should be semi-ball shaped. There is a slot in it so that the mounting stud can slide from front to back. So you end up with a ball and socket joint that allows the headlight to pivot and then be locked down in place. I can' t tell from your picture if you have this ball, but even if you do, it appears your ball is sitting much deeper in the socket than what I have on my car.
|
|
|
|
|
08-25-2014, 07:56 PM
|
#33 |
|
Senior Member
Join Date: May 2010
Location: Mpls, MN
Posts: 27,582
|
The heavy slotted plate for the mounting bolt has to be there, or the 6 rivets wouldn't be holding anything and the headlamp would fall off the bar. I still think the bar needs to be pulled forward.
What's the air gap from the bar to the radiator shell? |
|
|
|
|
08-26-2014, 06:16 PM
|
#34 |
|
Senior Member
Join Date: Aug 2014
Location: Rhinebeck, NY
Posts: 765
|
Tom, there is 1 1/8 " between the radiator and the light bar. I think the problem is the repro headlights. The 'ball' part of the ball and socket does not appear to be as large as the originals. I tried putting dished washers in the socket, but that does not change the angle of the socket. I instead cut a dished washer in half and placed it in the back of the socket. I am now able to aim the headlights. Not perfect, but it works.
Regards, John |
|
|
|
|
08-27-2014, 07:21 AM
|
#35 |
|
Senior Member
Join Date: Jul 2010
Location: Pennsylvania
Posts: 1,117
|
29spcoupe, nice ingenuity to fix the problem. I bet it's completely invisible too. All those "old farmers" out there would be proud of you.
|
|
|
|
|
08-27-2014, 11:04 AM
|
#36 |
|
Member

Join Date: Sep 2013
Location: Orange, CA
Posts: 43
|
I've messed with a lot of headlamps and I think you may want to look at the swivel bolt that connects to the headlight bar. The round "globe" of the bolt seems to be too small or the well in the headlight bar is too big. I would guess that either the bolt or the headlight bar are repop parts that don't work. I can't imagine what sort of "wear" would have to take place to have "widened" the well for the bolt. The other issue may be the "base" piece that the swivel bolt attaches to. I'd get some "donor" headlights and pull the parts you need from them to avoid any aftermarket issues. The swivel bolts were the same from '28 through '31 so the headlight bar "well" must also be the same (note that I am not saying the headlight bars themselves were the same just the "well")
__________________
Pete - Orange County Model A Ford Club "If I asked people what they wanted they would have said faster horses." -Henry Ford |
|
|
|
|
08-27-2014, 11:05 AM
|
#37 |
|
Member
Join Date: Sep 2013
Location: Orange, CA
Posts: 43
|
Oops didn't see the post from 1930 Coupe. Yep this is exactly where I'd look to solve the problem.
__________________
Pete - Orange County Model A Ford Club "If I asked people what they wanted they would have said faster horses." -Henry Ford |
|
|
|
|
«
Previous Thread
|
Next Thread
»
 Linear Mode

|
|

| Sponsored Links (Register now to hide all advertisements) |
|
|
All times are GMT -5. The time now is 12:51 AM.