|
|||||||


| Sponsored Links (Register now to hide all advertisements) |
|
|
 |

|
Thread Tools | Display Modes |
 07-17-2010, 11:14 AM
|
#1 |
|
Senior Member
Join Date: Jun 2010
Posts: 351
|
In my opinion improper re-torques or an insufficient number of re-torques are two of the biggest reasons for gasket failure on any Model A!!
How many are necessary and when are you done? All you need is an accurate torque wrench and a pencil or felt tip marker ...... yes, that's what I said. You can use the pencil or felt tip marker to help determine if your last re-torque was necessary. But first let me explain the correct procedure which applies to all flat heads and all gasket types: Except for the first one, performed when the engine is warm (explained below)... ALL RE-TORQUES should be performed with the engine completely cooled down...... just like if you turned off the engine, went in the house and came back out in the morning to re-torque the head.... cooled off. The only reason that I tell people to perform the first re-torque with the engine warm is because sometimes the gasket compresses so much the first time and the nuts get so loose that a seepage or small leak might occur while you're waiting for the engine to cool off! Usually 3 initial re-torques are enough. That is: run the engine (by driving the car), come back and let it cool off completely, then re-torque. Moreover, don't forget to follow the 1/8 back off method in sequence, MOST IMPORTANT. Now after about 500 miles or so it wouldn't hurt to perform one last re-torque. BUT re-torques are not something that should have to be performed forever! The gasket will compress as far as it's going to and that's it. Always note the position of the nuts when you re-torque. Before you loosen the nut 1/8 turn, you can mark the position of the nut with a pencil or felt tip marker by making a small mark down the side of the nut onto the stud boss. (Worry about correcting the paint job later or find a marker that removes easy) You can tell when no more re-torques are necessary by how far the nut turns when applying the final re-torque amount as compared to where it was before you loosened it. If ANY of the nuts go much farther, as indicated by the mark on the nut going past the mark on the stud boss, then the re-torque was necessary. However, some may not; that's why I capitalized the word "ANY." If the mark on the nut goes back to where it was (within reason; not necessarily perfect) on all the nuts then you're done. Larry B. P.S. I'll bet most of you sprayed paint all over the tops of the stud bosses when you painted the head. NOT GOOD! The paint can relax and take some of the tension off the nuts thus affecting the torque accuracy from nut to nut. Last edited by Larry Brumfield; 07-17-2010 at 12:39 PM. |

|

|
|
07-17-2010, 12:21 PM
|
#2 |
|
Senior Member

Join Date: May 2010
Location: Hancock, New Hampshire
Posts: 375
|
Larry: thanks, that goes into my looseleaf binder along with other important tips that I keep for future reference.
|
|
|
|
| Sponsored Links (Register now to hide all advertisements) |
|
|
|
07-17-2010, 12:53 PM
|
#3 |
|
Senior Member

Join Date: May 2010
Location: Epping N.H.
Posts: 2,997
|
I took to painting engines with a brush(much thicker)as I feel rattle cans are kind of useless.On the head nut bosses I mask with little round stickers that are sold for price tags on yard sale stuff.They are exactly the right size,if you remove a nut after there is no paint trapped under it.You can buy a book of a hundred or so for a couple of bucks.They're green,yellow,pink,etc.
|
|
|
|
|
07-17-2010, 01:20 PM
|
#4 |
|
Senior Member
Join Date: May 2010
Location: Crete, Illinois
Posts: 296
|
Also the spark-pllug bosses should not be painted either.
|
|
|
|
|
07-17-2010, 01:43 PM
|
#5 | |
|
Senior Member
Join Date: Jun 2010
Posts: 351
|
Quote:
Yes that's right .... and neither should the water neck gasket area, the water pump gasket area including the stud holes, the distributor hole and the bottom gasket surface of the head. I don't even like it on the distributor mounting boss or the side boss for the distributor lock screw nut and the threads in the hole. But this was not the focus of my post above. My focus was accurate and sufficient re-torques. Larry B. Last edited by Larry Brumfield; 07-17-2010 at 01:52 PM. |
|
|
|
|

|
07-17-2010, 02:44 PM
|
#6 |
|
Member
Join Date: May 2010
Location: agawam, ma
Posts: 50
|
Sponsored Links (Register now to hide all advertisements)
|
|
|
|
|
07-17-2010, 03:03 PM
|
#7 | |
|
Senior Member
Join Date: Jun 2010
Posts: 351
|
Quote:
You mean well, Chet, but that would be kind of hard to do. The castings were machined and then painted. Thanks Larry B. |
|
|
|
|
|
07-18-2010, 12:27 AM
|
#8 |
|
Senior Member
Join Date: May 2010
Location: Green Bay WI
Posts: 179
|
I would think that Ford would have machined them, masked the gasket and plug and other areas, and then painted. I am sure someone has the sequence from Ford or photos of this.
Dennis L Oberer Green Bay WI |
|
|
|
|
07-18-2010, 10:03 AM
|
#9 |
|
Banned
Join Date: May 2010
Location: Sturgeon Bay, Wisconsin
Posts: 408
|
"Always note the position of the nuts when you re-torque. Before you loosen the nut 1/8 turn, you can mark the position of the nut with a pencil or felt tip marker by making a small mark down the side of the nut onto the stud boss. (Worry about correcting the paint job later or find a marker that removes easy)"
At Knauz in Lake Forest, Illinois our BMW's came back and the first service necessary was to mark and twist that head nut down 3/4 turn more than factory settings. REGARDLESS of torque. And on the corncob aeroplane engines of Pratt Whitney, the cylinder stud is measured then stretched 'X' amount more with the head bolt. The nut is torqued then twisted even more to make the stretch required to keep the churn together. 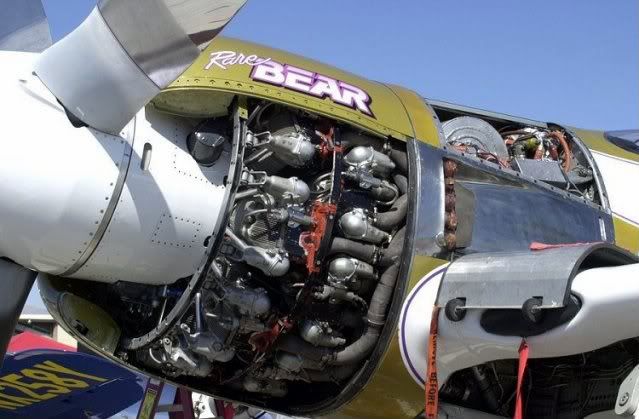 skip. |
|
|
|
|
07-18-2010, 11:02 AM
|
#10 |
|
Senior Member

Join Date: May 2010
Location: California
Posts: 979
|
[QUOTE=Before you loosen the nut 1/8 turn, you can mark the position of the nut with a pencil or felt tip marker by making a small mark down the side of the nut onto the stud boss. (Worry about correcting the paint job later or find a marker that removes easy) [/QUOTE]
I use a piece of tape which is cut in the shape of a triangle. Before I torque a nut I position the tape "pointer" to point at the corner of the nut that I am working on. This allows me to tell if the re-torquing was needed. It does not mess up any finish on the head. Bob |
|
|
|
|
07-18-2010, 11:02 AM
|
#11 |
|
Senior Member

Join Date: May 2010
Location: Didsbury Alberta
Posts: 838
|
Hey Skip ! Sure looks like a nice engine for aircraft racing. Is that yours ?
|
|
|
|
|
07-18-2010, 11:15 AM
|
#12 |
|
Senior Member

Join Date: May 2010
Location: Santee, California
Posts: 3,505
|
Good grief. You guys are trying to make rocket science out of 80 year old technology.
|
|
|
|
|
07-18-2010, 11:17 AM
|
#13 | |
|
Senior Member
Join Date: Jun 2010
Posts: 351
|
Quote:
Skip, if the Model A ers followed your advice the gasket companies would have to hire more people. You can't compare a thick yieldable gasket like on a Model A to a BMW. Larry B. |
|
|
|
|
|
07-18-2010, 11:34 AM
|
#14 | |
|
Senior Member
Join Date: Jun 2010
Posts: 351
|
Quote:
To many Model A ers 80 year old technology IS rocket science. |
|
|
|
|
|
07-18-2010, 12:48 PM
|
#15 |
|
Banned
Join Date: May 2010
Location: Sturgeon Bay, Wisconsin
Posts: 408
|
Sorry Glenn. "Hey Skip ! Sure looks like a nice engine for aircraft racing. Is that yours ?" She ain't mine. Read about stud stretching on P&W's here.
P.S. Larry Brumfield; I never suggested this nut twisting method be used on 'A's. Just many interesting ways to keep the head on the block. I thought I'd share. Many people told Henry Ford that there was no way he could seal the head to the block and to cast dead end cylinders where the pistons come in from the bottom of the cylinders. Like a Crosley engine with there brazed together engine block without a detachable head. Dad had a few of these after the war.  Want to lean about scraping babbitt down by hand and fitting journals using Prussian Blue to reveal high and low spots, without line boring bars and cutters? More then 80 year old technology. A great short story in this book. Mr. Casey wrote about being a 12 year old kid at his Dad's aeroport and fitting bearings on Model 'T' & 'A' flying engines.  Larry, I have a 1918 Dykes Manual that covers carbon removal...let me look~see. Mostly on engines other than the Model 'T's. Later. Gotta go cut grass and add to my fortune at the aeroport. "I watched some codgers clean one out with an acetylene torch." Sounds about right to me. That's how we de-paint used equipment too. Last edited by skip; 07-20-2010 at 04:24 PM. |
|
|
|
|
07-18-2010, 02:30 PM
|
#16 |
|
Senior Member
Join Date: Jun 2010
Posts: 351
|
[QUOTE=skip] "P.S. Larry Brumfield; I never suggested this nut twisting method be used on 'A's. Just many interesting ways to keep the head on the block. I thought I'd share."
[QUOTE=skip] "Many people told Henry Ford that there was no way he could seal the head to the block and to cast dead end cylinders where the pistons come in from the bottom of the cylinders. Like a Crosley engine with there brazed together engine block without a detachable head. Dad had a few of these after the war." Yep, I had a friend with an old Rambler with the heads and cylinders cast in one piece and then each unit bolted separately onto the block. Old engines made that way made cleaning carbon build up a lot of work. Since you collect a lot of old auto books, etc. maybe you have one explaining the proper procedure necessary to clean the carbon out these old cylinders. Years ago, I watched some codgers clean one out with an acetylene torch. Larry B. Last edited by Larry Brumfield; 07-18-2010 at 03:04 PM. |
|
|
|
|
«
Previous Thread
|
Next Thread
»
 Linear Mode

|
|

| Sponsored Links (Register now to hide all advertisements) |
|
|
All times are GMT -5. The time now is 07:50 PM.