|
|||||||


| Sponsored Links (Register now to hide all advertisements) |
|
|
 |

|
Thread Tools | Display Modes |
 01-09-2012, 01:12 PM
|
#1 |
|
Senior Member
Join Date: May 2010
Location: Lakeville, MN
Posts: 5,165
|
I made a flywheel housing alignment tool and measured the alignment a number of times not getting very good measurements - especially at the 3 o'clock position. I finally did the following: I have two .010 horseshoe shims installed on each of the top two bolts, no gasket between the engine & housing, and the bolts torqued to about 50#. Here are the readings I get at four places. 12 o'clock .009, 3 o'clock .017, 6 o'clock .012 and 9 o'clock .008. This is as close as I have gotten. I don't know why I need two shim with no gasket installed and why the 3 o'clock measurement is quite a bit larger than the other measurements. I have attached a picture of my setup below. I am wondering if I should add a .010 shim somehow to the 3 o'clock position to get the measurements closer. Does anyone have a suggestions about what to do to make the alignment better?
Rusty Nelson 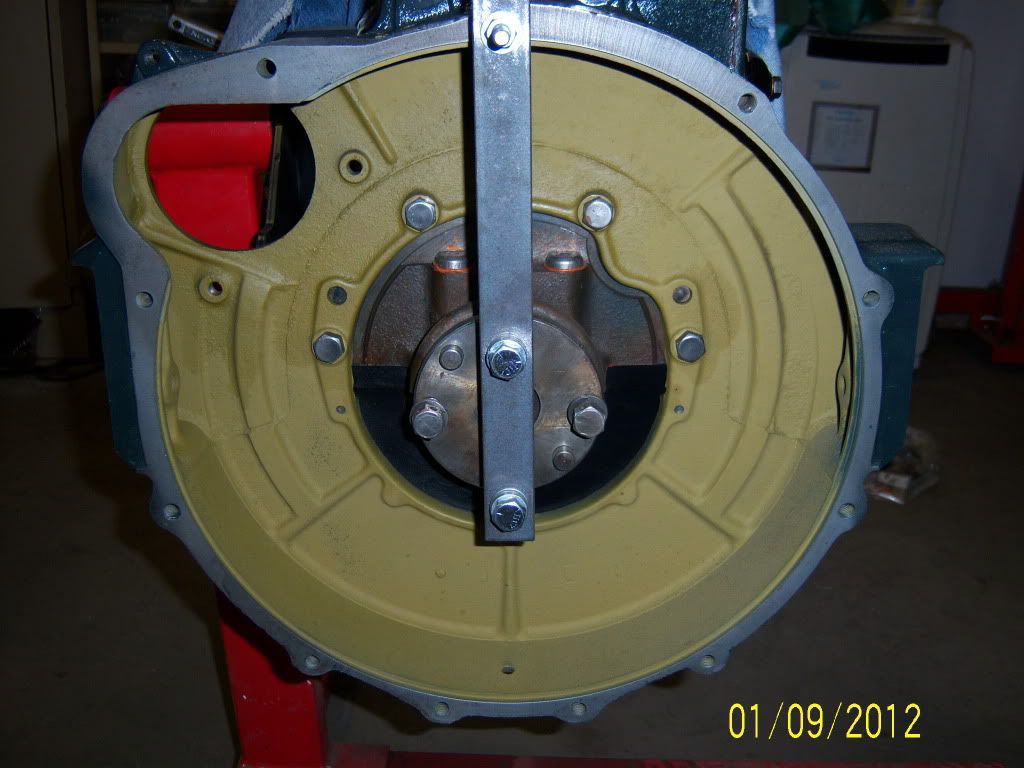
|

|

|
|
01-09-2012, 02:40 PM
|
#2 |
|
Senior Member

Join Date: May 2010
Location: Mpls, MN
Posts: 27,582
|
First you need to turn the engine so the front is DOWN. That way the freeplay will be forward for all measurements.
Secondly forget about the 6 o'clock check. The clutch housing will place the bottom where it wants to go. Thirdly, where is your ZERO spec as a base measurement? BTW, now is a good time to install the cotter in the drain hole, so you don't forget it until after it's all together. Yep, you hopefully only do that ONCE. |
|
|
|
| Sponsored Links (Register now to hide all advertisements) |
|
|
|
01-09-2012, 02:45 PM
|
#3 |
|
Senior Member

Join Date: May 2010
Location: Quincy CA
Posts: 752
|
If you have no gasket between the housing and the block, I would start with NO shims and see what you get, especially if you have added the shims because the bottom is way out. I don't worry too much about the 6:00 number as the bottom of the housing will line itself up with the bell housing when installed.
If you like the numbers with no gasket and no shims, remember to add the same thin layer of RTV to the upper ear contact points as you do to the lower area when you do the final assembly. Everything looks clean and shiny. You did dress the mating surfaces with a file to insure no high spots? Joe
__________________
1929 Tudor since 1962 Feather River A's |
|
|
|
|
01-09-2012, 02:46 PM
|
#4 |
|
Senior Member
Join Date: May 2010
Location: Quincy CA
Posts: 752
|
Gotta type fast around here or Tom will beat you to it.
Joe
__________________
1929 Tudor since 1962 Feather River A's |
|
|
|
|
01-09-2012, 04:34 PM
|
#5 |
|
Senior Member

Join Date: May 2010
Location: Largo Florida
Posts: 7,225
|
Like Tom mentioned, make sure crankshaft end-play is not part of your measurement.. Overall, your numbers don't seem too bad to me as the max is .011" if we consider 9:00 as your zero point.. I think the max should be in the .007"-.008" range..
I've spent hours giggling shims all around and got fed up and took a file to it.. If I remember correctly I left it at .008"[maybe .009"] and everything seems just fine.. Oh, mine started out at .034".. I also took measurements every 45º.. Have you checked flywheel run out yet?? Did you check crankshaft runout ?? And, how did it compare with your figures posted?? |
|
|
|
|
01-09-2012, 04:59 PM
|
#6 |
|
Senior Member
Join Date: May 2010
Location: Lakeville, MN
Posts: 5,165
|
Sponsored Links (Register now to hide all advertisements)
Rusty Nelson |
|
|
|
|
01-09-2012, 05:15 PM
|
#7 | |
|
Senior Member
Join Date: May 2010
Location: Quincy CA
Posts: 752
|
Quote:
You may find that a lot of your variation goes away when you put the engine on end. Joe
__________________
1929 Tudor since 1962 Feather River A's |
|
|
|
|

|
01-09-2012, 06:31 PM
|
#8 |
|
Senior Member
Join Date: May 2010
Location: Lakeville, MN
Posts: 5,165
|
My engine adapter for the engine stand that connects to the side, to work on the flywheel, can only hold the engine the way it is. I suppose I could remove the engine stand adapter using my hoist and drill a couple of additional holes to turn it 90 degrees. I guess I didn't think that the engine orientation would make much difference, but maybe it does.
Rusty Nelson |
|
|
|
|
01-09-2012, 08:47 PM
|
#9 |
|
Senior Member
Join Date: May 2010
Location: Quincy CA
Posts: 752
|
Rusty, the alternative is to hold steady pressure on the crank to make sure it stays fully forward while you are turning it.
Joe
__________________
1929 Tudor since 1962 Feather River A's |
|
|
|
|
01-09-2012, 11:32 PM
|
#10 |
|
Senior Member
Join Date: May 2010
Location: Lakeville, MN
Posts: 5,165
|
Thanks Joe. The engine has new babbit in it and doesn't appear to have much end play. I can check to make sure. I might just drill two more 1/2" holes in the adapter and turn the engine 90 degrees and recheck it.
Rusty Nelson |
|
|
|
|
01-10-2012, 08:50 AM
|
#11 |
|
Senior Member

Join Date: May 2010
Location: Jordan, MN
Posts: 1,411
|
Hi Rusty,
You have a good idea regarding drilling a couple new holes in your adapter. I suggest 45 and 90 degrees from level. Use the 90 degree position to take your flywheel housing readings. Installing the flywheel at the 45 degree position is a breeze. Drilling the two additional holes is well worth the effort. The original spec (early 1928 Service Bulliten) for the housing alignment was .006" when the multiple disk clutch was in production. I have not found an updated spec for the single disk clutch. If you subtract .008" from each of your measurements, you actually have .001, .009, .004 and .000 at 12, 3, 6, and 9 o'clock respectively. You are not that far off of the original spec. Worst case...I think you will be okay if you get 12, 3 and 9 0'clock positions within .009". I agree with the previous posters that the 6 o'clock reading is not very important. I still try to get them within .006 but do not sweat it if I only achieve .009". I work with this issue every time I test run an engine for a client. For your case, start by adding a .006" horseshoe shaped shim under the lowest housing bolt and a similar .002" shim under the upper bolt on the 3 o'clock side. These shims should get you within spec if you keep everything else equal. I know you like things to be like Henry built which leads me to believe you may be adding a paper gasket to the mix. If you add the paper gasket, everything will change. If you omit the gasket (as I do) use a heavy body sealant between the housing and the block. Place a full circle around the camshaft opening to avoid a leak and check the 4 bolt holes as you will find a wet hole which will require sealant on the threads. Place the same sealant on the remaining mating surfaces to create equal bed conditions. I think the best sealant for this purpose is: Permatex® the Right Stuff® Gasket Maker. It is available in various size containers.  Call me if you have any additional questions. I have shim packets if you need them to complete the process. (I could mail them to you or hand them off @ the next Clinic.) Good Day! Dave in MN [email protected] Last edited by Dave in MN; 01-10-2012 at 12:22 PM. |
|
|
|
|
01-10-2012, 01:29 PM
|
#12 |
|
Senior Member
Join Date: May 2010
Location: 60615,330th Ave.,Clare, Iowa, 50524
Posts: 1,457
|
I like to use a gasket, the last one was on the thicker side, and still worked. What I have found in some engines, If you don't use a gasket, nothing to do with leaks, but some times with out the spacing out that the gasket provides, the top two ears that I use for adjusting, will be binding when you tighten the 4 housing bolts, because they are all ready to close, and you will not have the shim adjustment you just about all the time need. The housing shims you buy, are many times to thick at .010 thousandths, we use Model A main shims, and cet off one end.
The first thing we do is get the two sides to read the same, and after that, use the two top bolts with shims, and you can get a good reading clear around, and we use a with in .005 thousandths figure. The last thing, when you think it is as close as you can get it, leave it set for 24 hours, it will change, and worp into to where its wants to go, and then tweak it again, and leave it 24 hours again. I have never had any problem with getting them under .005, or less. Thanks Herm. |
|
|
|
|
01-10-2012, 02:34 PM
|
#13 |
|
Senior Member
Join Date: May 2010
Location: Largo Florida
Posts: 7,225
|
Herm, now that is a good post !! I never thought to use crank shims or to even sand down others.. I'm not taking mine back apart to check it again though..
Do you do this on every engine ?? |
|
|
|
|
01-10-2012, 02:44 PM
|
#14 | |
|
Senior Member
Join Date: May 2010
Location: 60615,330th Ave.,Clare, Iowa, 50524
Posts: 1,457
|
Quote:
|
|
|
|
|
|
«
Previous Thread
|
Next Thread
»
 Linear Mode

|
|

| Sponsored Links (Register now to hide all advertisements) |
|
|
All times are GMT -5. The time now is 10:52 PM.