|
|||||||


| Sponsored Links (Register now to hide all advertisements) |
|
|
 |

|
Thread Tools | Display Modes |
 01-03-2012, 11:56 AM
|
#1 |
|
Senior Member

Join Date: Jun 2010
Location: Portland, Oregon
Posts: 104
|
*INTRODUCTION AND FORWARD* A build thread of epic proportions! There are many of you here that know me and this car from the H.A.M.B.....for those who don't, enjoy  This first time around with the build up of this car, I had not found the Ford Barn, or it's "partner in crime" the H.A.M.B. yet...so I didn't get a chance to to share my build as it progressed. Now I can. The reason behind this re-build is my friend Chris and I's journey to Bonneville for the "Speed Week" this coming summer. It started with just a simple engine rebuild....and ended up engulfing the whole chassis, body removed and all!  ...But this gave me the chance to "right some wrongs" that I was never really happy with. So here follows my past updates starting in August to present and I will be continually updating with new updates. Enjoy, Clayton - Mr.Model T
__________________
MrModelT 1926 Model T Roadster http://www.jalopyjournal.com/forum/s...d.php?t=308741 Last edited by MrModelT; 01-03-2012 at 12:16 PM. |

|

|
|
01-03-2012, 11:58 AM
|
#2 |
|
Senior Member
Join Date: Jun 2010
Location: Portland, Oregon
Posts: 104
|
UPDATE:
A new heart for the beast. It has been quite awhile since I posted a decent update here because I haven't really done anything new on the roadster with the exception of driving the hell out of it. I know that many of you have followed this thread and my many exploits...and those in league with my "partner in crime" Chris Becker (powerwagonmaniac) here on the H.A.M.B. with great interest and respect. For this I am honored. I also know that many of you know of our plans to DRIVE our T's (my roadster and the "Becker Special") to Bonneville for Speed Week in 2012. In light of this somewhat daunting journey, I realize that the "Special" is all new and fresh...yet my ol' roadster is not in it's prime and needs a full "work over" before we go. This "work over" will include an entirely new engine, transmission, rear axle, suspension and general clean up on the under carriage. The new engine will be a bit more of a "monster" then it's predecessor and specs out as follows: '26-'27 block, bored .080 over '26-'27 "EE" series crank Egge .080 pistons .300C full-race cam 289/302 Ford SB V8 valves New babbit bearings (rods/mains) fully balanced engine/transmission Also have a pair of Stromberg 81's on the way from Uncle Max here on the H.A.M.B. to go with my Burns intake. This new "monster" power plant is complete and will be here at the end of next week....so stay tuned for a new update and plenty of pictures! I will also be updating regularly over the next several months as the tear down and rebuild gets into full swing! Here is the link to my "Bonneville 2012...Cruise with me!" thread: http://www.jalopyjournal.com/forum/s...light=mrmodelt ..and the link to the build thread for my roadster's traveling companion: http://www.jalopyjournal.com/forum/s...light=mrmodelt More to come! Stay Tuned! Clayton - Mr.Model T
__________________
MrModelT 1926 Model T Roadster http://www.jalopyjournal.com/forum/s...d.php?t=308741 |
|
|
|
| Sponsored Links (Register now to hide all advertisements) |
|
|
|
01-03-2012, 11:59 AM
|
#3 |
|
Senior Member
Join Date: Jun 2010
Location: Portland, Oregon
Posts: 104
|
UPDATE:
A new heart for the beast: Part Deux! On Saturday morn, my brother and I left the hotel (where we were staying for the wedding we had come to Spokane for) and headed over to the Antique Auto Ranch to pick up the new engine for the roadster. We followed our directions to the industrial side of town to find a small shop (consisting of several older buildings and garages joined together) creating a delightfully awesome shop full of old engines, tools and parts EVERYWHERE! Tom and Mike both met us as entered and Mike gave us the grand tour...including the awesome "wrecking yard" out back. After the tour, we headed back into the shop to get my new motor. $2,400 later (Sooo...worth it  ) we were on the road headed back to the hotel. Her is what we brought home: ) we were on the road headed back to the hotel. Her is what we brought home:The Short Block: The Underside: The new vales (289/302 SB Ford) with new hardened Stainless Steel seats: The bottom side of the valves with new modern style keepers: The rebuilt transmission: I also received my new carburetors on Monday. I have been asking around on the H.A.M.B. as to the type of carbs I should use and if the pair of 97's I had intended to use would be too much. No matter who I talked to, I always got the same answer..."Go for a pair of 81's, you'll be better off" So I got in contact with Uncle Max here on the H.A.M.B. who specializes in Stromberg 48 , 97 and 81's and does AMAZING work! He was kind enough to custom build a set of 81's for this motor. Monday they appeared on my desk at work: That concludes this update, but there shall be more to come as we tear into the roadster to install her new "Heart" .....Stay tuned! Clayton - Mr.ModelT
__________________
MrModelT 1926 Model T Roadster http://www.jalopyjournal.com/forum/s...d.php?t=308741 Last edited by MrModelT; 01-04-2012 at 07:12 PM. |
|
|
|
|
01-03-2012, 12:00 PM
|
#4 |
|
Senior Member
Join Date: Jun 2010
Location: Portland, Oregon
Posts: 104
|
*UPDATE*
A little paint...and little blasting...and some Model A bones Well, not a whole lot to report right now except that the new short block is now in color!.....Red of course, like it's predecessor. I also bead blasted the Burns intake and picked up a fairly complete Model A front axle for parts (courtesy of fellow H.A.M.B.er North Portland Custom) ...as I intend to put the Model A wishbone to work as a replacement for the Laural lowering brackets currently on my car. The Laural brackets don't allow the front suspension to flex much...at all really so as part of the "Bonneville Build up" I am taking the time to completely redesign the front end with a new Model A split wishbone style setup. More to come!
__________________
MrModelT 1926 Model T Roadster http://www.jalopyjournal.com/forum/s...d.php?t=308741 Last edited by MrModelT; 01-09-2012 at 03:28 PM. |
|
|
|
|
01-03-2012, 12:00 PM
|
#5 |
|
Senior Member
Join Date: Jun 2010
Location: Portland, Oregon
Posts: 104
|
*UPDATE*
.....IT BEGINS!.... As much as I hated to do it.....I started pulling the roadster apart last night  ....in preparation for the Bonneville rebuild and new engine! ....in preparation for the Bonneville rebuild and new engine! Here are some pics from the "party"... The new pan....painted and ready! More to come....stay tuned!
__________________
MrModelT 1926 Model T Roadster http://www.jalopyjournal.com/forum/s...d.php?t=308741 Last edited by MrModelT; 01-09-2012 at 03:44 PM. |
|
|
|
|
01-03-2012, 12:01 PM
|
#6 |
|
Senior Member
Join Date: Jun 2010
Location: Portland, Oregon
Posts: 104
|
Sponsored Links (Register now to hide all advertisements)
*UPDATE*
Demolition continues... As painful as it is, I continued my disassembly of the roadster Saturday with removing the body and getting the car taken down to a bare chassis....a state that the car has not been in for 6 years ..But we all have to think positive...it's for a good cause Here are the visuals: After 40 more minutes, the body was off... The body on it's new stands. Bill used these 5 foot tall saw houses for painting for years. Saturday I widened them by 19" to allow the chassis to roll under them. And the final package: It's new storage situation while the chassis is being rebuilt. ...All in a days work Stay tuned for more!
__________________
MrModelT 1926 Model T Roadster http://www.jalopyjournal.com/forum/s...d.php?t=308741 Last edited by MrModelT; 01-09-2012 at 03:35 PM. |
|
|
|
|
01-03-2012, 12:02 PM
|
#7 |
|
Senior Member
Join Date: Jun 2010
Location: Portland, Oregon
Posts: 104
|
*UPDATE* ...More Demolition.... I continued on the disassembly of the roadster this weekend. With the help of my lovely girlfriend, we got the chassis pretty much stripped. Just the suspension remains. Here are the visuals from this weekends exploits: My girlfriend Julia even got into the fun....and had a great time! I did find some damage to the Chicago overdrive which I will need to fix. I will do a post on that next time as I pull it apart. More to come later, stay tuned! Clayton
__________________
MrModelT 1926 Model T Roadster http://www.jalopyjournal.com/forum/s...d.php?t=308741 Last edited by MrModelT; 01-09-2012 at 03:47 PM. |
|
|
|
|
01-03-2012, 12:03 PM
|
#8 |
|
Senior Member
Join Date: Jun 2010
Location: Portland, Oregon
Posts: 104
|
*UPDATE*
Made some drawings... but not much else I haven't made much progress in the last two weeks because me and the girlfriend (SaucyNordicTart here on the H.A.M.B.) are in the midst of a move. I have had some spare time to work out some of the old, still present issues with the suspension. After waking up with the "light bulb" of progress at 2:30 am, I scribbled out my ideas and refined them into the tech drawings bellow the next day: The Front Wishbone Setup: I had intended to do something different for the wishbone and front suspension on this car as early as 2009, but never could work it out like I wanted. The Model A wishbone idea just hit me after staring at it for countless years on a friends T...DUH! The only thing I was not satisfied with was the ball-joint ends at the frame...what to use? They couldn't be newer style, just wouldn't fit...then It hit me: Model A Tie Rod ends! Model T Ball caps and Tie Rod ends have been used in split-bone setups on dirt track and speedsters throughout the 'teens and 20's ...and they are far more "scary" then the Model A rod ends, plus you can buy them complete new tomorrow The Rear Lowering Brackets: The rear axle has been giving me a bit of "bottoming out" problems as of late and I'd like to give the car a slight rake (not too extreme, but she is sagging a bit these days). The only problem is that I have no room for adjustment with the current setup.....then I got this idea for another spin on my current lowering technique. My current spring is hung from the bottom of the axle (with the tubes flipped R for L), This design would flip the tubes back and hang the spring from the top but give me almost 12" of adjustment of ride height. More to come! ... Clayton
__________________
MrModelT 1926 Model T Roadster http://www.jalopyjournal.com/forum/s...d.php?t=308741 Last edited by MrModelT; 01-09-2012 at 03:49 PM. |
|
|
|
|
01-03-2012, 12:03 PM
|
#9 |
|
Senior Member
Join Date: Jun 2010
Location: Portland, Oregon
Posts: 104
|
*UPDATE*
Chicago Breakdown I also had some time in the last few weeks to pull that Chicago apart and go through it. When the motor was pulled out 2 weeks ago, I found some damage to the Chicago Overdrive..in the form of the input shaft bearing retainer which had walked off of it's threads and been rattling around in the void of the rear ball cap for who knows how long. In light of this, I decided to pull the whole gear box apart and go through it: The Chicago Mark-E Overdrive: My original paint work had taken a beating, so I thought it was time for a good repaint.....and a color change: The gear clusters all looked good...Low gear was a bit munched, but that is common in these accessory gearboxes. All bearings are still tight so they will stay: The only bearing that gives me concern is the rear output shaft bearing, who's race contains a large chip. I will replace this bearing: Here is the damaged input shaft bearing retainer. The threads have been wiped out on one side, so Chris and I will need to make a new one: Once I get the new bearing for the output shaft, I will have more pictures of the assembly process. More to come! Clayton
__________________
MrModelT 1926 Model T Roadster http://www.jalopyjournal.com/forum/s...d.php?t=308741 Last edited by MrModelT; 01-09-2012 at 03:51 PM. |
|
|
|
|
01-03-2012, 12:04 PM
|
#10 |
|
Senior Member
Join Date: Jun 2010
Location: Portland, Oregon
Posts: 104
|
*UPDATE*
I'm actually able to make an "Update"...Hooray! It has been far too long since I got the chance to make any progress on the T....3 weeks in fact (moving has that effect sometimes), and I was having withdrawals! ") Last night I made it out to the shop and had the whole place to myself, so I attacked the most important "starting point" of the build: The Frame. When I originally built the T, I "added" a few things to the frame that I was never really happy with...it was also one of the first projects I tackled when I started the project 5 years ago...and it showed I had added some extra bracing to the rear end of the frame, mainly because I thought I would need it for the rumble seat and to add some aesthetic frame "horns" at the rear to match the ones I added at the front....This did not pan out well and looked awful. The frame horns on the rear of the car looked really bad, so I cut them off...leaving the rest of the "monstrosity" (from the end of the "turtle deck" forward) still welded to the frame because removal of the body was required to cut it off. I also had some clearance issues in the rear and did some "cutting and hacking" to try and solve them. So needless to say....that was left to "haunt" me... ..until now Since I had planned to do a major rebuild and was forced to pull the body to remove and replace engines anyway, I decided to strip it down to the bare frame and "right the wrongs" I had made the first time around. I started with cutting off all the "crap" that I had welded on. This photo shows the rear end of the frame in it's original configuration with the added "support" frame still in place: After removing the "crap"....I set about repairing the butchered rear cross member ends. I had made a major (and rather nasty) weld joint right on top of them and had "hacked" on them with the plasma cutter, butchering them pretty good before finally removing them. I had kept the originals that I cut off and had an earlier cross member ends to use as replacements. Sadly, the earlier ends were too narrow, so I decided to use them to patch and rebuild the original ends. After much cutting, welding, grinding and shaping I had the had the rear cross member rebuilt and looking almost as good as new! Here is my handy work: I also noticed that the front frame horn on the RH side was considerably lower than the LH side...so I cut, re-adjusted and re-welded it back in place correctly at the same level as the other. Placed a Level between them and the bubble was perfect I still have much more to do: Front and rear shock mounts, new cross member "amidships" to help support the Chicago O.D. and a few other small cleanup and repair jobs, but I don't mind because I'm doing it right this time...the way I should have and always wanted to. More to come, stay tuned!
__________________
MrModelT 1926 Model T Roadster http://www.jalopyjournal.com/forum/s...d.php?t=308741 Last edited by MrModelT; 01-09-2012 at 03:56 PM. |
|
|
|
|
01-03-2012, 12:05 PM
|
#11 |
|
Senior Member
Join Date: Jun 2010
Location: Portland, Oregon
Posts: 104
|
*UPDATE*
The front end finally underway! I did make a little more progress on the roadster. I got a start on the split wishbones, getting them ground to fit the T axle and Chris turned some pieces on the lathe to finish up the wishbones on Wednesday night. Here is the latest: More to come
__________________
MrModelT 1926 Model T Roadster http://www.jalopyjournal.com/forum/s...d.php?t=308741 Last edited by MrModelT; 01-09-2012 at 04:01 PM. |
|
|
|
|
01-03-2012, 12:06 PM
|
#12 |
|
Senior Member
Join Date: Jun 2010
Location: Portland, Oregon
Posts: 104
|
*UPDATE*
More fun with Wishbones Got a little more work done on the wishbones last night. In my search to find a period alternative to modern split wishbone ball-joint ends, I came across the method of using Model A tie-rod ends and replacement ball joints. I really liked the way it all worked out and I could buy all those components new....so I did. After buying up all the extra parts I would need, I made up a few drawings to get my ideas straight and make sure I do it right the first time. First thing I did last night was re-hang the front spring and center up the axle on the front cross member. Last week I got the radius rods re-ground to fit the T axle. Last night I got the wishbone ends cut and welded in. For the adjustable threaded ends on the 'bones, I bought a second sacrificial tie-rod and took 6" off each end (with the L and RH threads) and welded them into custom adapters that Chris was kind enough to make up for me on the Lathe (to size them up the the ID of the 'bones....then I welded those assemblies into the 'bones... With all that welded in place, this is what I got  ..Was quite pleased with how it turned out...still have some more clean up to do. ..Was quite pleased with how it turned out...still have some more clean up to do....that concludes this weeks efforts, more to come!
__________________
MrModelT 1926 Model T Roadster http://www.jalopyjournal.com/forum/s...d.php?t=308741 Last edited by MrModelT; 01-09-2012 at 04:03 PM. |
|
|
|
|
01-03-2012, 12:06 PM
|
#13 |
|
Senior Member
Join Date: Jun 2010
Location: Portland, Oregon
Posts: 104
|
*UPDATE*
Fun with wishbones Part Deux! This weeks update is rather large, as I made a considerable amount of progress this weekend. My main focus this weekend was completing the wishbones. I had already fab'ed and welded up the the adjustable ball jointed frame mount ends of the wishbones the week prior ....so my first line of business was to get them finished up, by getting the front axle ends modified for the right fit and the correct Castor angle. First I mocked up the frame and the front end to actual ride height...front wheels and all and a little more space between the front cross member and axle this time around. Next, I mocked up the the frame mounting places using a Model A Pittman arm. Next I pulled the 'bones off and carefully cut the tubes so that I could remove the castings. Then I reinstalled the cut 'bones and adjusted the front axle to the appropriate 5 1/2 degrees of castor....actually 6 1/2 which is specified in "The Secrets of Speed" for Ford race cars ...Then they were all welded up My other endeavors for the day were to cut the new shackle plates for the front wisbones.... And I used the ol' press trick to reverse the main leaf.. I have a few parts on order, and a few more things to make, but I should be able to finish this and get the front end complete and hung next weekend. More to come!
__________________
MrModelT 1926 Model T Roadster http://www.jalopyjournal.com/forum/s...d.php?t=308741 |
|
|
|
|
01-03-2012, 12:07 PM
|
#14 |
|
Senior Member
Join Date: Jun 2010
Location: Portland, Oregon
Posts: 104
|
*UPDATE*
Fun with the front shackles continues.... Thanks to "Mr. Machinist", I was able to make some more much needed progress on the front suspension on the T this weekend. After Chris had turned the tubes I needed for the front spring perches, I set about putting them to use as I had intended. I had already cut my spring perch plates the week prior, so all that was left was to trim the tubes down to the right length, machine the holes through the perch plates, set everything up for a test fit and weld it all up. I didn't meet my welding goals, but got everything setup and ready for tomorrow...since I have the day off Her is what I left last night: The fit is still a lil' rough, but I still have some work to do. Look at all the clearance it has now!!! I also drug the rear end over and got it mocked up behind the frame so that when we get the front done....it's on the the rear shackles! More to come
__________________
MrModelT 1926 Model T Roadster http://www.jalopyjournal.com/forum/s...d.php?t=308741 |
|
|
|
|
01-03-2012, 12:08 PM
|
#15 |
|
Senior Member
Join Date: Jun 2010
Location: Portland, Oregon
Posts: 104
|
*UPDATE* Front shackles are DONE and they WORK!!!!!!!! So I took the day off yesterday and went to the shop to play and had a few solid hours to finish up my new front shackles that I fab'ed up Saturday. After spending nearly 35 minutes measuring, adjusting, double and triple checking all of my tolerances, distances and centers....it was time to weld. I first tacked the tubes that Chris made me in place, removed the assemblies and welded the heck out of them. Step two was to assemble the shackles again and weld them to the wishbones. Both went off like a charm and front end is hung and supporting the chassis up front with the blocks removed Here is the latest from yesterday: Also got the outside pieces for the shackle flanges and welded them into place Here is the front end from above Stay tuned for more as I finish the frame mounts for the 'bones ball joint ends and move on to the rear suspension!
__________________
MrModelT 1926 Model T Roadster http://www.jalopyjournal.com/forum/s...d.php?t=308741 |
|
|
|
|
01-03-2012, 12:09 PM
|
#16 |
|
Senior Member
Join Date: Jun 2010
Location: Portland, Oregon
Posts: 104
|
*UPDATE*
Frame mount plates for the split wishbones Put in a little time on Saturday and got the frame mount plates for the split wishbones made up and some clean up work done on the new shackle mounts from the previous week. Got all the welding and fab work done, but didn't get them finished up or mounted....next weeks project More to come!
__________________
MrModelT 1926 Model T Roadster http://www.jalopyjournal.com/forum/s...d.php?t=308741 |
|
|
|
|
01-03-2012, 12:12 PM
|
#17 |
|
Senior Member
Join Date: Jun 2010
Location: Portland, Oregon
Posts: 104
|
*UPDATE*
Well, I know it's not much.....but at least it's somethin'.. I did make it out to the shop last night, but couldn't really start anything major....so I got the front shocks and the head light brackets back on so that I can start on the front shock mounts and the headlight fork repair. I didn't get a whole heck of allot done, but for all of you screaming for updates and starting to go into withdrawals this is something to tide you over....and to stop you all from eating yourselves Basic overview of the front shock arrangement I also rolled it out into the center to get some better shots of the finished wishbones It's startin' to look like a Model T again! I did get some clean-up work on the front shackles ....and for Youngster, the supports on the frame mount ball-stud plates Just a general view More to come this weekend...hopefully. The Christmas holiday has begun to hamper my progress a bit, but I'll be back to it full-force soon!
__________________
MrModelT 1926 Model T Roadster http://www.jalopyjournal.com/forum/s...d.php?t=308741 |
|
|
|
|
01-03-2012, 12:13 PM
|
#18 |
|
Senior Member
Join Date: Jun 2010
Location: Portland, Oregon
Posts: 104
|
*UPDATE*
Front End Work - The Headlight Fork / License Plate Bracket Whew!.... After that whirl wind Christmas holiday, I have been itching to get back to the shop and with Monday off...I made the most of it playing with cars I have a few more small projects to tackle on the front end of the chassis before I can "sign off" on the front end and move to the rear end, so yesterday I worked on another important piece of the puzzle who's finish was not up to my benchmark.....the headlight fork assembly. The forks have never been right since day 1 (I was learning) and since the the car was getting a refresh, I added them to the list. I had collected the correct looking pieces (like the yellow cross bar from a White Truck) for them over the last few years, just never got around to fixing it. I got started by cutting the assembly apart (also found a bad weld in the process): Next I made up some replacement studs (with some awesome old cap nuts I found) for the two forks as the originals were toast and broken off. ...then I got them all welded on: Next, I cut down the cross bar. I removed 1 1/4" from each side to make it fit. I'm quite proud of my welding job The newly welded, trued up and rebuilt headlight forks after clean up work and some bead blasting: All assembled.... Next week, I plan to get the front shock mounts made and at least a start on the front Panhard bar. More to come, stay tuned
__________________
MrModelT 1926 Model T Roadster http://www.jalopyjournal.com/forum/s...d.php?t=308741 |
|
|
|
|
01-03-2012, 12:14 PM
|
#19 |
|
Senior Member
Join Date: Jun 2010
Location: Portland, Oregon
Posts: 104
|
*UPDATE*
Oh...A riveting we will go, a riveting we will go.... Well Happy New Year my fellow Model T-ers and what better way to start off the new year then with another great update! Since I had a 4-day weekend due to the holiday, I was able to get some extra work done....so Friday I headed out to the shop to get my wishbone ball stud plates drilled for Saturday's "Riveting Extravaganza" as I mentioned last week. Most of Friday was spent drilling......10 holes....because Vanadium Steel is VERY HARD and my new plates decided to have a few hard spots  sorry this one is a bit blurry, but it is the finished drilling work The following morning, a good friend of the Shop...Mr. George Lavaco was kind enough to come out with his vintage riveting tools to give me a hand. First thing was to get the rivets laid out on a fire brick (or in our case a cinder block) and get them heated up: Once the rivets were red hot, Our friend Brian would garb them with pliers and put them into the holes in the frame: Then I had to put the big steel forming buck against the rivet head while George hit it with the air hammer from the back side: And after all that (which killed my shoulder!) we got this as our final product: I'm quite pleased how this turned out Next week: Front Panhard bar/Shock mounts. ....Stay tuned
__________________
MrModelT 1926 Model T Roadster http://www.jalopyjournal.com/forum/s...d.php?t=308741 |
|
|
|
|
01-03-2012, 12:33 PM
|
#20 |
|
Senior Member
Join Date: Jun 2010
Location: Portland, Oregon
Posts: 104
|
....Whew!
 ...that was ALLOT of updates! ...that was ALLOT of updates! That should keep you all busy for a little bit anyway..and stay tuned for new updates, posted regularly on Mondays and Thursdays!
__________________
MrModelT 1926 Model T Roadster http://www.jalopyjournal.com/forum/s...d.php?t=308741 |
|
|
|
|
01-03-2012, 06:23 PM
|
#21 |
|
Member

Join Date: May 2010
Location: Manvel, TX
Posts: 53
|
I gotta admit, sir... at first I was worried about what you were gonna do since I have loved your T for sooo long... But I am very happy with your plans. Keep up the good work and don't forget the updates!!!
|
|
|
|
|
01-04-2012, 12:58 AM
|
#22 |
|
Senior Member
Join Date: Jun 2010
Location: Portland, Oregon
Posts: 104
|
26T,
Thanks! I don't intend to change the look of the car at all....just going back over it while I have it apart to improve and correct a few things. I will certainly keep those updates coming.
__________________
MrModelT 1926 Model T Roadster http://www.jalopyjournal.com/forum/s...d.php?t=308741 |
|
|
|
| Sponsored Links (Register now to hide all advertisements) |
|
|
|
01-04-2012, 01:19 AM
|
#23 |
|
Senior Member

Join Date: Apr 2011
Location: South pacific island
Posts: 1,724
|
Thought there was pictures but cannot see them.
|
|
|
|
|
01-04-2012, 11:22 AM
|
#24 | |
|
Senior Member
Join Date: Jun 2010
Location: Portland, Oregon
Posts: 104
|
Quote:
There are....tons of them. Hmmmm...they all show up fine on all of the PC's I have viewed this post on..  Lets try this, tell me if you can see the photo below:
__________________
MrModelT 1926 Model T Roadster http://www.jalopyjournal.com/forum/s...d.php?t=308741 |
|
|
|
|

|
01-04-2012, 06:24 PM
|
#25 |
|
Senior Member
Join Date: Apr 2011
Location: South pacific island
Posts: 1,724
|
i see that one!
|
|
|
|
|
01-05-2012, 12:30 PM
|
#26 |
|
Senior Member
Join Date: Jun 2010
Location: Portland, Oregon
Posts: 104
|
Sponsored Links (Register now to hide all advertisements)
*MID-WEEK UPDATE* "Steering" myself in the right direction.... I made a another big step forward last night and got one of my last two major jobs on the front end done......and I think the title hints at what I'm talking about
Last week I had attempted to tackle this job, but am sorry to say was not my weekend. I attempted to modify some existing steering knuckle arms, but it was a disaster...bringing about frustration and me eventually storming out to cool down and stew over the solution for a few days. Last night, I came up with my solution. After Chris helped me with the ground work, angles and measurements.....I just made my own: The Driver's side: More to come!
__________________
MrModelT 1926 Model T Roadster http://www.jalopyjournal.com/forum/s...d.php?t=308741 |
|
|
|
|
01-09-2012, 11:59 AM
|
#27 |
|
Senior Member
Join Date: Jun 2010
Location: Portland, Oregon
Posts: 104
|
*UPDATE*
"Steering" in the right direction...towards a Panhard bar This weekend was my time to complete the steering knuckle project from last week, so I spent some time filling and cleaning up some welds: I also tackled building the Panhard bar using my old stock Model T tie-rod. I decided to put the tuck the panhard up between the front cross member and the front axle...to keep everything clean, tight and compact. I also made the up most of the shock mount pieces because I planed to integrate the right-hand shock mount plate as the axle mounting point for the Panhard bar. Here are the shock mount plates for the back side of the axle: Next I cut down the old tie-rod and got the lengths I needed measured out: The driver's side frame mount: And the finished Panhard Bar installed ans neatly concealed under the axle: I didn't quite get the shock and the panhard bar done as I had intended, but I did get the basics done and tacked into place...so I will get them finished up Wednesday night so that I can sign off on the front end as complete. Next weekend: We start the REAR SUSPENSION Stay tuned!
__________________
MrModelT 1926 Model T Roadster http://www.jalopyjournal.com/forum/s...d.php?t=308741 |
|
|
|
|
01-09-2012, 12:18 PM
|
#28 |
|
Senior Member
Join Date: May 2010
Location: Orlando
Posts: 149
|
I only see pics in one post..............are there more?
|
|
|
|
|
01-09-2012, 04:09 PM
|
#29 | |
|
Senior Member
Join Date: Jun 2010
Location: Portland, Oregon
Posts: 104
|
Quote:
Yes there should be tons of photos....several in every update. I'm not sure why they are not showing up at all. I have started going back through all the old updates and replacing the photos with new ones re-loaded to my album here on this site. They all show pine here and on my home PC. Which post has visible photos?
__________________
MrModelT 1926 Model T Roadster http://www.jalopyjournal.com/forum/s...d.php?t=308741 |
|
|
|
|
|
01-09-2012, 09:37 PM
|
#30 | |
|
Senior Member
Join Date: May 2010
Location: Orlando
Posts: 149
|
Quote:
Post 24 and 26 |
|
|
|
|
|
01-09-2012, 10:23 PM
|
#31 |
|
Senior Member
Join Date: Jun 2010
Location: Evansville IN U.S.A.
Posts: 395
|
Man,I just have to say that I love what you are doing! THAT is the correct way to build a T hotrod. Shure makes me wanna leave my fenders off and give it an altitude adjustment!
__________________
1925 tudor (restoration) 1941 tudor"street rod" project1964 fairlane tube chassis "street car" 1996 f-350 crew cab 4x stroker! Na, I dont like working on cars...I exist for it! |
|
|
|
|
01-10-2012, 04:29 AM
|
#32 |
|
Senior Member
Join Date: Apr 2011
Location: South pacific island
Posts: 1,724
|
Cannot do those mod's down here without legal trouble, Lots of regulations surrounding getting them legal.
(As for the pictures not showing it looks like the photos on this thread are hosted on the H.A.M.B. board server ((looks like a copy/paste from there)) and show up as single pixels until you changed them for fordbarn ones. Guess if i was logged in to H.A.M.B. too then they would have shown up the first time) |
|
|
|
|
01-10-2012, 08:58 PM
|
#33 |
|
Senior Member
Join Date: May 2010
Location: Orlando
Posts: 149
|
Went over to the HAMB to see the pics
|
|
|
|
|
01-13-2012, 12:03 PM
|
#34 |
|
Senior Member
Join Date: Jun 2010
Location: Portland, Oregon
Posts: 104
|
*UPDATE*
The Front End is......COMPLETE!!!!!  Last night I met my goal to finish the front end....save for some hardware I need to get Saturday morn to mount everything permanent...but all the fab work is done!! The shock mounts: Done. Panhard Bar: Done. Split Wishbones and frame mount plates: Done. Front spring shackles: Done. Headlight forks: Done. Steering knuckle Arms/ Tie-Rod: Done. Like I said, just gotta get some new hardware on the way out Saturday morn so I can bolt it all together.....didn't have what I needed at the shop. Here are last night's victories: The upper shock mounts in all three stages of construction: ...Welding them on: ...All done: ..The Panhard Bar: The complete front suspension: ..Next Update, we start the Rear Suspension... ...Stay tuned!
__________________
MrModelT 1926 Model T Roadster http://www.jalopyjournal.com/forum/s...d.php?t=308741 |
|
|
|
|
01-13-2012, 12:07 PM
|
#35 | |||
|
Senior Member
Join Date: Jun 2010
Location: Portland, Oregon
Posts: 104
|
Quote:
Quote:
Quote:
Sorry guys
__________________
MrModelT 1926 Model T Roadster http://www.jalopyjournal.com/forum/s...d.php?t=308741 |
|||
|
|
|
|
01-13-2012, 03:12 PM
|
#36 |
|
Senior Member
Join Date: Apr 2011
Location: South pacific island
Posts: 1,724
|
The only thing i can see holding the panhard rod on to the axle is a Gclamp may i see a picture of it when you get the bolts you wanted?
Also the rear suspension looks amazing in that last pic' the frame appears to be levitating. |
|
|
|
|
01-13-2012, 04:32 PM
|
#37 | |
|
Senior Member
Join Date: Jun 2010
Location: Portland, Oregon
Posts: 104
|
Quote:
Yeah, lol! Like I said, didn't have enough hardware to get it done. Picking some up this weekend for it and will have some "fully mounted" pics for you all.
__________________
MrModelT 1926 Model T Roadster http://www.jalopyjournal.com/forum/s...d.php?t=308741 |
|
|
|
|
|
01-24-2012, 03:07 PM
|
#38 |
|
Senior Member
Join Date: Jun 2010
Location: Portland, Oregon
Posts: 104
|
*UPDATE*
Gettin' my "rearend" into gear... Now that I have completed the front end of the chassis, it was finally time to move on the aft portion of the chassis...and the rear suspension (something that a few of you are chomping at the bit for ).But first things first! ...there are a few thing we need to tackle before we get to the new suspension...like rebuilding the and setting up the rear axle. I got started by braking down the rear axle for a thorough cleaning and inspection: I'm really glad that I did because I did find some damage to the pinion gear end of the drive shaft. I had noticed several times during the first two years on the road that the 6 spool bolts ( that is the race for the drive shaft Hyatt bearing) commonly worked them selves loose. After 3 or 4 times of this happening, I pulled them out and added lock washers and the problem stopped. Now, 5 years later I found that the bolts coming loose caused a considerable amount of damage to the pinion gear, rear Hyatt bearing. It chipped the teeth on the gear badly, ground up the rollers on the Hyatt and caused the pressed on race to spin, hit the pinion woodriff key....which then split the race down the middle  It also caused some damage to the ring gear in the form of some abnormal wear, but was usable. Just the same, I opted to switch it out too....and correctly safety wire the ring gear bolts of which all were finger tight and had been secured with a untwisted piece of bailing wire  ...undoubtedly an old time repair. ...undoubtedly an old time repair.This was also my chance to flip the rear end halves back to there original locations...Right on the Right, Left on the Left. This put the spring perch locations back to there original place on top of the axle. This will come into play and be explained in one of my next updates: Got some more progress made on the rear axle this weekend. I was always unhappy with the way I had done up the radius rods...the welds were so sloppy and crooked, so it was natural that one of my "little projects" would be fixing them. I also found while inspecting the torque tube, I found that the weld (from the shortening process) had badly cracked by the damage to the drive shaft. This too was corrected... I also took a little time in the morning to mess around with the front end alignment. Had to trim down the tie rod and got it all welded and assembled... *QUICK UPDATE* Got my new parts!!!.... Been waiting on the my new goodies to repair the drive shaft. Picked up a modern tapered roller bearing replacement spool kit and a new u-joint pin ...The kit... The Modern tapered roller bearing.. New U-joint pin ... More coming!
__________________
MrModelT 1926 Model T Roadster http://www.jalopyjournal.com/forum/s...d.php?t=308741 |
|
|
|
|
01-24-2012, 09:00 PM
|
#39 |
|
Senior Member

Join Date: May 2010
Location: SPEEDWAY INDIANA
Posts: 4,148
|
Great buildup. But now youve done it i gotta take my speedster apart and redo it after 7 years of drivin fun !!!!
Question ?? What distributor do you have on the engine ??? I know a guy with some new Mallory units curved for the Model T with auto advance etc that would donate one for the tour and your new engine. www.bubbashotrodshop.com Might even have to take the tour with you guys if i can figure out how to hook up from Indiana??? |
|
|
|
|
01-24-2012, 11:20 PM
|
#40 | |
|
Senior Member
Join Date: Jun 2010
Location: Portland, Oregon
Posts: 104
|
Quote:
The distributor I am currently running is a "Texas T Parts" accessory that uses an early to mid '60's VW head, cap and rotor. I would be most interested in the Mallory unit you mentioned and would be honored should your friend donate one to the cause Is it setup for a T mount? can I still run the manual hand advance/retard for starting? How hot a spark would it put out? (running two Stromberg 81's and want to make sure I burn it all ) We have not finalized the route yet, but would hope to meet up with you along the way or at least at Bonneville. Clayton
__________________
MrModelT 1926 Model T Roadster http://www.jalopyjournal.com/forum/s...d.php?t=308741 |
|
|
|
|
|
01-24-2012, 11:51 PM
|
#41 |
|
Senior Member

Join Date: Dec 2011
Location: Two Rivers, Wi.
Posts: 1,406
|
Hey Clayton... I am soon to be in the market for a FP spool kit...Even John the owner suggested I use the non adjustable kit. Thats what he runs in his car. I understand the set up on both, but why are the shims keyed? Is there a key in the kit that locks them together? What locks that down or does the whole shimpack spin and float in the housing?
On another note; did you alter the caster on yer front axle? Mines set at the OEM 5 degrees, and its been suggested I increase that to 7-1/2. Thoughts? See my post... Im making T bones that anchor to the frame instead of the oil pan. Whats an optimum length to consider? Bear in mind I am on a SEVERE budget! LOL... ws |
|
|
|
|
01-25-2012, 01:22 PM
|
#42 | |
|
Senior Member
Join Date: Jun 2010
Location: Portland, Oregon
Posts: 104
|
Quote:
The shims should not spin free, another reason I feel for keying the shims. I did alter my caster angle. The stock caster angle should be 5 1/2 degrees but mine is 6 1/2 or 7 degrees. I think the Ford "race cars" of the period would be set as much as 9 degrees or more.....but I would have to calculate it out. I think you are fine at 7 1/2 degrees. As for the wishbones, you really want the geometry to remain the same. My frame mounts are at the same distance from the front cross member as the original pan mount. Since I lowered my car quite a bit, I put the ball studs for the frame mounts 2" below the frame. The axle was push forward of the front cross member 2 3/4" ...so I think my 'bones are 47 1/2" if I remember right, but I will measure for sure. I don't have allot in that front end at all. I think I'm only into it $100 at most.
__________________
MrModelT 1926 Model T Roadster http://www.jalopyjournal.com/forum/s...d.php?t=308741 |
|
|
|
|
| Sponsored Links (Register now to hide all advertisements) |
|
|
|
01-25-2012, 03:01 PM
|
#43 |
|
Senior Member
Join Date: Dec 2011
Location: Two Rivers, Wi.
Posts: 1,406
|
Thanks Mr.T ! I looked at the install PDF and it shows that you need to cut that key down BELOW the end of the gear. Hmmm. Ive seen several bone jobs that ran way back as far as the U joint area. I do agree about dropping the mount level. I mounted my axle C/L almost 3 inches forward. At 1-1/2 the mounting hardware hit the radiator lower tank.
I like the idea that you only have $100 into the front... frugal is the key word for me these days too! More to follow! I included this too for some ideas I stole LOL.I like looking at home meade stuff! Strictly old school man!!http://www.scvmtfc.org/lghs_speedste...dster.html#top ws   First attempt caused intereference with the radiator  She's a gawner Last edited by yachtsmanbill; 01-25-2012 at 03:08 PM. |
|
|
|
|
01-25-2012, 10:35 PM
|
#44 |
|
Senior Member
Join Date: Jun 2010
Location: Evansville IN U.S.A.
Posts: 395
|
This front end had NO radiator interference! Tell me again why I sold it? I built the bracket for the most part out of the t speed secrets pattern.
How many things did I do wrong? http://s569.photobucket.com/albums/s...t=DSCF2565.jpg
__________________
1925 tudor (restoration) 1941 tudor"street rod" project1964 fairlane tube chassis "street car" 1996 f-350 crew cab 4x stroker! Na, I dont like working on cars...I exist for it! |
|
|
|
|
01-30-2012, 03:09 PM
|
#45 |
|
Senior Member
Join Date: Jun 2010
Location: Portland, Oregon
Posts: 104
|
*UPDATE*
Re-lowering the rear end: Chapter 1 Well, after a quick correction on the safety wire brought up thankfully by 64 DODGE 440...it was on to finally "mock-up" assembly of the rear axle (hubs, wheels, etc) and getting it mocked up under the chassis with the rest of the driveline, including the Chicago transmission case: Chris was kind enough to call into Pacific Machine Tool Steel and order us some good lengths of 4140 suspension grade 9/16th steel rod, the beginning of our lowering brackets: ...Then after getting the rear spring mounted up under the frame.. ..I spent the remainder of the evening working out the shape, dimensions and specifics of the shackle plates in the form of card board templates: More to come!
__________________
MrModelT 1926 Model T Roadster http://www.jalopyjournal.com/forum/s...d.php?t=308741 |
|
|
|
|
02-02-2012, 09:55 AM
|
#46 |
|
Senior Member
Join Date: Dec 2011
Location: Two Rivers, Wi.
Posts: 1,406
|
Sponsored Links (Register now to hide all advertisements)
Everything is new on the axle (bushing wise) and I find it very easy to barely lift the bones to decrease that angle. I know the book says 5.5. This isnt going to be built for speed so whats the general concensus on the angle of attack?? ws |
|
|
|
|
02-02-2012, 12:39 PM
|
#47 |
|
Senior Member
Join Date: Jun 2010
Location: Portland, Oregon
Posts: 104
|
*UPDATE*
Lowering the rear axle: Chapter 2 Last night I got some time to get some more progress made on the new rear shackles. I picked a nice heavy slab of 3/8th inch steel plate from the steel pile and went to work with the plasma cutter....my favorite tool After I got them cut out and some basic clean up work done I drilled the upper 9/16th holes so they could be test fit (these holes will need to be opened up bigger later on) so that I could find out how much clearance I had and or needed to add around the e-brake cam levers. The clearance was a little tight, so I stuck one of the plates in the vise, hit it with the torch and put a little "Z" bend in it so that it would clear: With a simple C-clamp installed to keep the spring attached to the spring, I pulled the blocks out on one side and gave it a quick and gentle test....of which it preformed exactly as I had hoped and planned! If all goes as planed....I hope to have the shackles complete and the rear end hung this weekend ..stay tuned!
__________________
MrModelT 1926 Model T Roadster http://www.jalopyjournal.com/forum/s...d.php?t=308741 |
|
|
|
|
02-02-2012, 12:45 PM
|
#48 | |
|
Senior Member
Join Date: Jun 2010
Location: Portland, Oregon
Posts: 104
|
Quote:
8.5 degrees wouldn't hurt it at all, but I would try to pull it back to 7 or 7.5 degrees if you can.
__________________
MrModelT 1926 Model T Roadster http://www.jalopyjournal.com/forum/s...d.php?t=308741 |
|
|
|
|
|
02-02-2012, 01:45 PM
|
#49 |
|
Senior Member
Join Date: Dec 2011
Location: Two Rivers, Wi.
Posts: 1,406
|
Thats where I was a bit concerned. The pic shows the new bones on the axle at a relaxed stage. I trimmed the pipe to a manageable length and now need to heat and bend them up to the mounting level without reducing the caster too much. It looks like the sleeves wont adjust the caster so much as it will to correct dogtracking.
Old railroad saying... "she needs no gauging... spike her where she lies..." kinda holds true here I guess... ws   trimmed to a manageable length. Notice white mark at the tie rod. Thats where I need to bend it up without losing too much caster angle.  You need a little practice with the grinding LOL... |
|
|
|
|
02-02-2012, 02:42 PM
|
#50 | |
|
Senior Member
Join Date: Jun 2010
Location: Portland, Oregon
Posts: 104
|
Quote:
Not a bad lookin' chassis at all! Those adjustable wishbone links I see should give you plenty of adjustment for Castor angle. As far as the grinding goes ...I'm not doing my finish grinding, cleaning and painting until ALL the fab work is done, tested and approved. Used to do that in the past: fab something up, finish it and paint it.....only to find out I had to do something else to it, or it would get shop worn and messed up and I went along.
__________________
MrModelT 1926 Model T Roadster http://www.jalopyjournal.com/forum/s...d.php?t=308741 |
|
|
|
|
|
02-08-2012, 02:25 PM
|
#51 |
|
Senior Member
Join Date: Jun 2010
Location: Portland, Oregon
Posts: 104
|
*UPDATE* The rear suspension is now....FREE STANDING!!!! Extra HD photos by Mrs. Model T  I had a great weekend. I had intended to get the rear suspension hung and free standing by the close of the weekend....and by Sunday night....I was successful! I started out the day finishing up the shackle plates, drilling the lower holes after the inner plates were heated and bent: With the drilling work complete, Chris and I moved on to machining out some steel tubes to weld between the two shackle plate that will except a stock Model T perch bushing...and this time, it was my turn to run the lathe: ..Our finished product... ...me assembling... Here is the completed shackle assembly all welded up and installed for testing. Still have some cleanup to do....but it works! More to come!
__________________
MrModelT 1926 Model T Roadster http://www.jalopyjournal.com/forum/s...d.php?t=308741 |
|
|
|
|
02-09-2012, 01:01 PM
|
#52 |
|
Senior Member
Join Date: Jun 2010
Location: Portland, Oregon
Posts: 104
|
*UPDATE*
Still "cranking" along on the rear shackles.. Didn't make any "earth shattering" progress, but a few more steps toward the finish line were made. Got the shackle support rods cut down and threaded as well as some preliminary cleanup work done on my shackle assemblies. All I have left is to finish making up the shackle rod-to-radius rod brackets and the appropriate spacer tubes to complete the rear shackle setups. I also messed around with the rear shock placement. I have been stewing over this problem for months and last night it finally hit me. The setup I have in mind will tie the axle mount side of the shocks into my new shackle support rods and should be plenty stout. I will have more on the shock mounts this weekend...along with the finished shackles. I also messed around with the new hand crank. I wanted something with a little more of a stouter, classier look. I found this early crank on Ebay last week. Sadly the crank radius was too big and it hit the frame, so I was forced to cut and shorten it.....but with my welding practice you can hardly tell More to come!
__________________
MrModelT 1926 Model T Roadster http://www.jalopyjournal.com/forum/s...d.php?t=308741 |
|
|
|
|
02-09-2012, 04:20 PM
|
#53 |
|
Senior Member
Join Date: Dec 2011
Location: Two Rivers, Wi.
Posts: 1,406
|
Ive been debating whether or not to mount an early motor mount upside down on the new crossmember so as not to bend the twister that I do need to lengthen... ws

|
|
|
|
|
02-16-2012, 12:19 AM
|
#54 |
|
Senior Member

Join Date: Jul 2011
Location: Arlington, TX
Posts: 121
|
Hey. Pretty good to see you on this side too! Hopefully I'll have something to contribute of my own on this site soon.
|
|
|
|
|
02-16-2012, 11:01 AM
|
#55 |
|
Senior Member
Join Date: May 2010
Location: SPEEDWAY INDIANA
Posts: 4,148
|
I figure the new engine is almost ready to run.
I built ya a new Mallory this morning , will go out ups today. This is a unit we build for the T engine with automatic advance...as a direct replacement for the Texas T drive set up with manual advance. 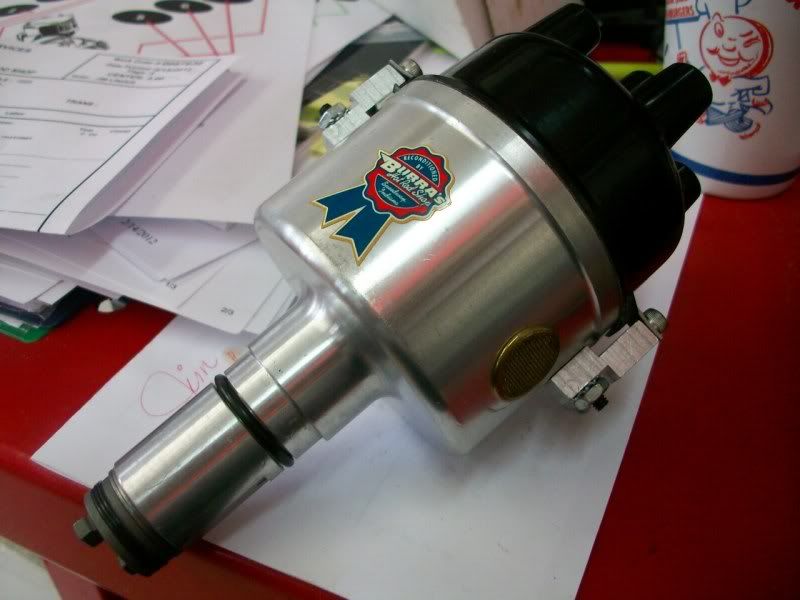
Last edited by BUBBAS IGNITION; 02-16-2012 at 11:14 AM. |
|
|
|
|
02-16-2012, 01:03 PM
|
#56 | |
|
Senior Member
Join Date: Jun 2010
Location: Portland, Oregon
Posts: 104
|
Quote:
That is about the coolest thing I have ever seen! ....you build a NICE looking "dizzy" I am so excited to play around with this on the new motor!
__________________
MrModelT 1926 Model T Roadster http://www.jalopyjournal.com/forum/s...d.php?t=308741 |
|
|
|
|
|
02-16-2012, 01:09 PM
|
#57 |
|
Senior Member
Join Date: Jun 2010
Location: Portland, Oregon
Posts: 104
|
*UPDATE* Work on the rear end draws closer to the finish line! Got some good progress made on one the last two phases of the rear suspension: the rear shock mounts. I've had this design rattling around in my noggin for a week or so now and finally got a chance to bring into a physical existence. I had originally intended to mount the rear shocks in much the same fashion as the front...but figuring how to attach them to the axle tubes without welding anything to the tubes or having them simple slide around them when in use (originally I was just going to use U-bolts and hope they didn't move) was proving to be a problem. Then....the other night (dreamland design work strikes again!) It hit me and I came up with this: These shock mounting "pads" tie into the new shackle setup via the 9/16th upper support rod and then tie down to the axle tube using my U-bolts (which will bolt through the shocks themselves) as seen here: Here are the shocks mocked up in position: I also picked up a cool old "dogbone" radiator cap for it too and spent some time early in the evening drilling the Moto-Meter stud hole larger to fit and getting it mounted: ..Looks good doesn't it? More to come!
__________________
MrModelT 1926 Model T Roadster http://www.jalopyjournal.com/forum/s...d.php?t=308741 |
|
|
|
|
02-23-2012, 02:50 PM
|
#58 |
|
Senior Member
Join Date: Jun 2010
Location: Portland, Oregon
Posts: 104
|
*UPDATE* Shock mounts: Part 1 Made some decent progress on the rear shock mounts and should have them, the front shock mounts and the steering box done tomorrow in my 3-day weekend roadster "progress spectacular" I have been trying to figure out the upper shock mounts for the rear shocks....but when I got to the shop, One of our shop buddies (who is working on a '48 Power Wagon) handed me these: Then I got the patterns made for the brackets that will hold them to the frame: ..and for some correctness.... More to come!
__________________
MrModelT 1926 Model T Roadster http://www.jalopyjournal.com/forum/s...d.php?t=308741 |
|
|
|
|
02-23-2012, 02:53 PM
|
#59 |
|
Senior Member
Join Date: Jun 2010
Location: Portland, Oregon
Posts: 104
|
*UPDATE* The rear shocks are DONE!!!!! Had the day off today, so I put in a decent days worth at the shop and got the rear shocks, shock mounts and rear suspension DONE! YAY! Here is how the upper rear shock brackets came out: ...and here is the finished product mounted up on the frame. I designed these brackets to use all preexisting bolt holes in the frame for mounting... Then after some drilling and tweaking....I got the shocks bolted up into place... Stay tuned for more!
__________________
MrModelT 1926 Model T Roadster http://www.jalopyjournal.com/forum/s...d.php?t=308741 |
|
|
|
|
02-23-2012, 02:56 PM
|
#60 |
|
Senior Member
Join Date: Jun 2010
Location: Portland, Oregon
Posts: 104
|
*UPDATE* Moving on the the front shock mounts Wednesday night was slow, so I plugged away on the new front axle clamp bolt assemblies for the front shocks to hold them to the front axle. I started with some big old leaf spring U-bolts from a '27 Dodge: They were a little too long stud wise and the two that would be used as the outboard clamps were too narrow...on account of the axle's taper. ...This meant surgery ..All welded up... Now just so you know.....I'm not done with them yet, this was just a test fit. I still have plenty of clean up work to do...so nobody get their undies in a twist lol!...I do know how to use a grinder  I also received a wonderful "care package" from Jim at Bubba's Ignition. He graciously offered to build up and donate one of their Mallory "Automatic Advance" T distributors (a direct replacement for my original) to the project. It was too kind of him and I can thank him enough Stay tuned for more!
__________________
MrModelT 1926 Model T Roadster http://www.jalopyjournal.com/forum/s...d.php?t=308741 |
|
|
|
|
02-23-2012, 10:42 PM
|
#61 |
|
Senior Member
Join Date: Aug 2010
Posts: 937
|
Heck of a donation. Congratulations. And to think of all the anguish I'm going through to rebuild my magneto.
__________________
It's 110 miles to Chicago We've got half a pack of cigarettes It's dark And we're wearing sunglasses Let's go. |
|
|
|
|
02-27-2012, 02:45 PM
|
#62 | |
|
Senior Member
Join Date: Jun 2010
Location: Portland, Oregon
Posts: 104
|
Quote:
It was exceedingly kind of him to volunteer his distributor to my project. I had originally planned to use a Bosch DU4...I wasn't looking forward to having that rebuilt..
__________________
MrModelT 1926 Model T Roadster http://www.jalopyjournal.com/forum/s...d.php?t=308741 |
|
|
|
|
| Sponsored Links (Register now to hide all advertisements) |
|
|
|
02-27-2012, 03:05 PM
|
#63 |
|
Senior Member
Join Date: Jun 2010
Location: Portland, Oregon
Posts: 104
|
*UPDATE* Rear Panhard Bar....DONE! Got up to the shop today rather then yesterday (had a few things going at home) and made some great progress! Started by cutting up the '27 Dodge Tie-Rod, the basis for my Panhard bar.. The old Dodge tie-rod pins had some damage to them from years of hard use on a trailer and neglect sitting buried in the brush and the elements, so I had to replace of the studs... ..Then I started 'fabbing up the lower Panhard mount on the axle.. The upper mount proved a bit a quandary as the first location I had chosen did not pan out, so after so trouble shooting...I came up with an alternate.. ..And here is the completed Panhard Bar... To finish off the old Tie-rod pins, I removed the old zurk-looking oil fittings.....then went digging through my vintage hardware "stash" and came up with these old grease cups to complete the look.. Stay tuned for more!
__________________
MrModelT 1926 Model T Roadster http://www.jalopyjournal.com/forum/s...d.php?t=308741 |
|
|
|
|
02-27-2012, 03:28 PM
|
#64 |
|
Senior Member
Join Date: Aug 2010
Posts: 937
|
The panhard bar looks good. At first I looked at the frame mount and thought it might be a little bit light. But then I figure if it's going to be used on a speedster it's not going to be subjected to a lot of torque because there's probably not a lot of weight being thrown against it. And after seeing how much it helped my '38's handling out on the highway I know it's definitely a good idea for a T speedster.
__________________
It's 110 miles to Chicago We've got half a pack of cigarettes It's dark And we're wearing sunglasses Let's go. |
|
|
|
|
02-27-2012, 04:05 PM
|
#65 | |
|
Senior Member
Join Date: Jun 2010
Location: Portland, Oregon
Posts: 104
|
Quote:
My original mounting position (mounted under the rear spring u-bolts) just didn't work for me either. The amount of steel rod extending out with no support made me nervous of bending under a load or a hard corner. It also required me to put a bend in the bar...that is why I opted to go to the shock mount instead which allowed for a better contact to the frame, lower the pivot point lower to keep the bar straight and allowed me to add a second support for the upper mount off of the RH shock frame mount stud for added support in the center of the upper bar mounting rod. I can see the difference here in the shop! before I put the Panhard bars on you could grab the car sway the car from right to left by hand....now, it does not move AT ALL. ..I can only imagine what it will handle like on the road!
__________________
MrModelT 1926 Model T Roadster http://www.jalopyjournal.com/forum/s...d.php?t=308741 |
|
|
|
|
|
04-01-2012, 11:48 PM
|
#66 |
|
Senior Member
Join Date: Jun 2010
Location: Portland, Oregon
Posts: 104
|
Sponsored Links (Register now to hide all advertisements)
*UPDATE*
Sorry...it's been a while.. I'm sorry it's been a while since my last update...been a little busy here. Anyway, here is the latest: After finishing the rear Panhard bar, I moved on the lower steering box mount: ..the setup of the steering bracket did require re-installation of the body to get the right angles.....and to see what the new higher stance would look like after our hard work This also gave me the time to repair the rear body sub-frame with the correct one.. Then it was time to get the rear Overdrive support cross member done... ...then strip it down... ...to get ready for paint.. Stay tuned for more...regular updates
__________________
MrModelT 1926 Model T Roadster http://www.jalopyjournal.com/forum/s...d.php?t=308741 |
|
|
|
|
04-02-2012, 12:15 AM
|
#67 |
|
Senior Member
Join Date: Aug 2010
Posts: 937
|
Wow! Nice work! Hey Will, are you looking at this. I want a speedster! OK, For Sale: 1926 beat-up Model T Sedan. No rust, but the fenders are beat up (one has the obligatory split in it), the tires look good for their age. The motor runs like crap but nothing leaks. The interior is springs and rags and old, old, dirty material. I believe everything is original to the car except the washers under the headbolts. The generator is there but doesn't work. One headlight and the taillight works. The radiator should be replaced. It starts with the starter if the ancient 6 volt battery has enough charge in it to turn it over. The back window looks like it was shot with a bb gun many years ago.
Will trade even up for a new built pristine speedster. Everything must be there and working perfectly. And I mean everything that it takes to make it look, run and drive safely and dependably. Must have a full tank of gas and meet with my approval before the trade. Spammers need not reply to ad.
__________________
It's 110 miles to Chicago We've got half a pack of cigarettes It's dark And we're wearing sunglasses Let's go. |
|
|
|
|
04-02-2012, 11:57 AM
|
#68 | |
|
Senior Member
Join Date: Jun 2010
Location: Portland, Oregon
Posts: 104
|
Quote:
...that "add" made me laugh
__________________
MrModelT 1926 Model T Roadster http://www.jalopyjournal.com/forum/s...d.php?t=308741 |
|
|
|
|
|
04-02-2012, 10:23 PM
|
#69 |
|
Senior Member
Join Date: Jun 2010
Location: Evansville IN U.S.A.
Posts: 395
|
Boy,between Mike and Bill it is certainly never dull round here! Keep up the good work.
That sweet T sure is looking nice too!
__________________
1925 tudor (restoration) 1941 tudor"street rod" project1964 fairlane tube chassis "street car" 1996 f-350 crew cab 4x stroker! Na, I dont like working on cars...I exist for it! |
|
|
|
|
04-02-2012, 10:38 PM
|
#70 | |
|
Senior Member
Join Date: Aug 2010
Posts: 937
|
Quote:
__________________
It's 110 miles to Chicago We've got half a pack of cigarettes It's dark And we're wearing sunglasses Let's go. |
|
|
|
|
|
04-24-2012, 11:34 AM
|
#71 |
|
Senior Member
Join Date: Jun 2010
Location: Portland, Oregon
Posts: 104
|
*UPDATE*
A little catch up.... Been a little while since I made an update, so it is time to play "catch up" Since the paint job, I got final assembly underway... ..and completed... Then I moved on to work in the machine shop with friend Troy, a retired U.S. Air Force aircraft machinist, on making a few important parts for the roadster on the the shop's Martin lathe. A few key parts for the Chicago overdrive and the ball bearing "4th Main" were found to be damaged upon disassembly. I am not experienced on the lathe at all Chris has always wanted to expand his self taught moderate machinist skills, so this was the perfect chance to learn from a master. We started with simpler of the two pieces to build, the "4th Main" bearing adapter sleeve (at left): First, we set up the the big 4-jaw chuck on the Martin and worked at getting the 2 1/4" piece of 4140 tool steel stock I acquired for the project perfectly centered with the dial indicator within .005" Then we moved on to step-drilling and boring the piece out with the large bits: ...then it was cutting time.. ...cutting the snap ring groove.. New on the left, old on the right... Stay tuned for more!
__________________
MrModelT 1926 Model T Roadster http://www.jalopyjournal.com/forum/s...d.php?t=308741 |
|
|
|
|
04-24-2012, 12:25 PM
|
#72 |
|
Senior Member

Join Date: May 2010
Location: Dallas
Posts: 1,053
|
man i love your car, it inspires me to look for a "T"
keep up the good work and more post please.. |
|
|
|
|
04-24-2012, 12:50 PM
|
#73 | |
|
Senior Member
Join Date: Jun 2010
Location: Portland, Oregon
Posts: 104
|
Quote:
Thank you kindly! I try to post regularly as I make new progress every week, but I have fallen behind a bit.
__________________
MrModelT 1926 Model T Roadster http://www.jalopyjournal.com/forum/s...d.php?t=308741 |
|
|
|
|
|
05-08-2012, 01:29 PM
|
#74 |
|
Senior Member
Join Date: Jun 2010
Location: Portland, Oregon
Posts: 104
|
*UPDATE* "Houston, the motor has landed...repeat, the motor has landed" Well, I guess this update doesn't need a whole lot of explanation...because "I got the motor in the car" is all I need to say to get the awesomeness across I spent the morning getting the little stuff ready and about 1:00 pm I lugged the short block and the transmission over to the new building to start assembly. First was getting the transmission bolted up to the crank: Originally (and on my old motor) The trans-to-flywheel bolts were just run in until snug (as per the service manual) and ran a single loop of safety wire through all for bolts with a single twist at the end. While this didn't fail, I added some hefty lock washers this time around and safety wired the 4 bolts together in pairs the correct way. After that, I gooped up the gasket surfaces and Chris and I lowered the assembled long block in to the pan, sitting in frame: ..Then curiosity got the better of me and I mocked it up with the manifolds... ..and if I have it that far...why not the carbs too.... Stay tuned for more!
__________________
MrModelT 1926 Model T Roadster http://www.jalopyjournal.com/forum/s...d.php?t=308741 |
|
|
|
|
05-08-2012, 08:56 PM
|
#75 |
|
Member
Join Date: Jun 2011
Location: hagerstown IN
Posts: 30
|
man that carb se t up is slick. it well be interesting to see what you have up your sleve for the carb linkage though.
|
|
|
|
|
05-09-2012, 10:51 AM
|
#76 | |
|
Senior Member
Join Date: Jun 2010
Location: Portland, Oregon
Posts: 104
|
Quote:
Thanks! I do have something up my sleeve, but it should be fairly simple and very functional.
__________________
MrModelT 1926 Model T Roadster http://www.jalopyjournal.com/forum/s...d.php?t=308741 |
|
|
|
|
|
05-11-2012, 03:21 PM
|
#77 |
|
Senior Member
Join Date: Aug 2010
Posts: 937
|
Clayton, years ago the big guns on the drag strips were utilizing magnetos on their cars. They claimed the hotter spark improved the power and speed of their machines. Are you planning on somehow utilizing your magneto with the rest of your ignition system?
__________________
It's 110 miles to Chicago We've got half a pack of cigarettes It's dark And we're wearing sunglasses Let's go. |
|
|
|
|
05-11-2012, 05:50 PM
|
#78 | |
|
Senior Member
Join Date: Jun 2010
Location: Portland, Oregon
Posts: 104
|
Quote:
I had no intention of using the Ford mag coil...just the magnets for weight and oiling purposes. My ignition system is a properly designed auto-advance Mallory unit and a good, hot coil...Should give me a hot spark. I know what you are saying is true, and if I had my way...I would have my Bosch DU-4 or my old Eismann mag setup with the side drive. ...and a Galivon DOHC head, 3 Winfield SRs and a Roots blower too
__________________
MrModelT 1926 Model T Roadster http://www.jalopyjournal.com/forum/s...d.php?t=308741 |
|
|
|
|
|
05-11-2012, 07:10 PM
|
#79 | |
|
Senior Member
Join Date: Aug 2010
Posts: 937
|
Quote:
__________________
It's 110 miles to Chicago We've got half a pack of cigarettes It's dark And we're wearing sunglasses Let's go. |
|
|
|
|
|
05-14-2012, 11:09 AM
|
#80 | |
|
Senior Member
Join Date: Jun 2010
Location: Portland, Oregon
Posts: 104
|
Quote:
...Not to mention, it will run a heck of a lot smoother. As Mr. Murry Fahnestock writes in his book "Model T Speed Secrets: The Fast Ford Handbook", "If smoother running is desired at low RPMs in high gear, then greater flywheel weight may be an advantage. Whether or not one really wants a heavier or lighter flywheel depends on the manner in which the speedster is to be driven. If the speedster is to be paraded through traffic and driven on rough roads, with only an occasional burst of speed...a heavier flywheel may be desired. For use on a half mile dirt track or where quick acceleration is needed, the Ford flywheel even without the magnets is sufficient. As a general rule, The Ford flywheel has ample weight for all occasions unless the magnets have been removed." As for the crank, I'm running a balanced '26-7 "EE" series crank.
__________________
MrModelT 1926 Model T Roadster http://www.jalopyjournal.com/forum/s...d.php?t=308741 |
|
|
|
|
|
07-31-2012, 02:07 PM
|
#81 |
|
Senior Member
Join Date: Jun 2010
Location: Portland, Oregon
Posts: 104
|
*UPDATE*
Sorry it has been a while... I know it has been a while, but here is some catch up: Finished engine assembly.. ..and the wire loom made.. before bolting the head down and wiring the engine.. Then we got to bolt the body down for the last time... ...and get the carbs on and the electrical done.. ...and working.. New battery box..
__________________
MrModelT 1926 Model T Roadster http://www.jalopyjournal.com/forum/s...d.php?t=308741 |
|
|
|
|
07-31-2012, 02:28 PM
|
#82 |
|
Senior Member
Join Date: Jun 2010
Location: Portland, Oregon
Posts: 104
|
...new turtle deck floors... ...Tires... ...and other carburetor goodies to round out the deal.. Then I got to assemble the Chicago overdrive unit after months of machine work... Then after plumbing carbs and getting the throttle linkage made up.. ...and the exhaust built...
__________________
MrModelT 1926 Model T Roadster http://www.jalopyjournal.com/forum/s...d.php?t=308741 |
|
|
|
| Sponsored Links (Register now to hide all advertisements) |
|
|
|
07-31-2012, 02:30 PM
|
#83 |
|
Senior Member
Join Date: Jun 2010
Location: Portland, Oregon
Posts: 104
|
__________________
MrModelT 1926 Model T Roadster http://www.jalopyjournal.com/forum/s...d.php?t=308741 |
|
|
|
|
08-13-2012, 07:49 PM
|
#84 |
|
Senior Member
Join Date: May 2010
Location: SPEEDWAY INDIANA
Posts: 4,148
|
For you guys dieing to know how the trip to Bonneville went , Clayton made it to the salt and the thread is over here on the hamb...
http://www.jalopyjournal.com/forum/s...d.php?t=711728 Bubba |
|
|
|
|
08-30-2013, 11:35 AM
|
#85 |
|
Junior Member

Join Date: May 2010
Location: So.Cal
Posts: 18
|
So cool bro...If only mine could be half as cool!!! =D Great job!
|
|
|
|
|
10-27-2017, 06:45 PM
|
#86 |
|
Senior Member
Join Date: May 2010
Location: NJ
Posts: 6,181
|
Sponsored Links (Register now to hide all advertisements)
|
|
|
|
|
10-29-2017, 09:24 PM
|
#87 |
|
Senior Member

Join Date: May 2010
Location: Auckland
Posts: 4,705
 |
Wow ,BG ,for big effort and TM for top marks ,
|
|
|
|
|
«
Previous Thread
|
Next Thread
»
 Linear Mode

|
|

| Sponsored Links (Register now to hide all advertisements) |
|
|
All times are GMT -5. The time now is 04:40 AM.