|
|||||||


| Sponsored Links (Register now to hide all advertisements) |
|
|
 |

|
Thread Tools | Display Modes |
 11-20-2012, 08:07 AM
|
#81 |
|
Senior Member

Join Date: May 2010
Location: Solihull, England.
Posts: 8,755
|
Don't sweat the copper pipes, guys, they ain't the same copper you get over there, it's a special alloy made to a british standard especially for brake pipe usage, thanks for your concern.
I had the car in the classic car show here in the UK last weekend, a lot of people passed comment along the lines of it being nice to see one that hasn't been restored. I'll cutnpaste an update I just made on a UK forum. *********************************** Ok, this must rank as the lamest update ever, but I now have some rudimentary instrumentation. I looked on ebay for some gauges and bought a water temp and oil pressure gauge from a marine place. I got em because they had old fashioned needles and curved glass. They were not too expensive and for a change were made in India, not China. Both are electric rather than mechanical so I had to get adaptors for the senders 5/8" UNF to 1/8" NPT for the temp and 1/4" NPT to 1/8" NPT for the oil. I picked up a two gauge bracket from the autojumble at the NEC, which is a bit unusual in it's shape, but had a warning light built in, as well as one of those old fashioned plugs that people used in the 50's. A session in the garage had it mounted and the gauges wired. 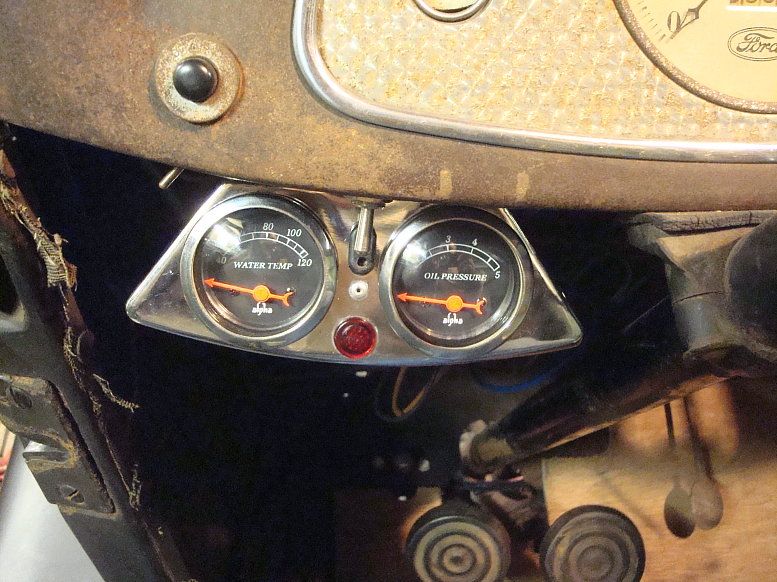 I fitted it without drilling any extra holes, the switch you can see is for the the indicators, the switch holds the bracket in place. I went the whole hog and even wired the illumination to the lights. I might drill the corners for a couple more tell tales for main beam and the indicators. Quite pleased with it, it fits in ok without looking too modern or over retro (like the magnolia Smiths stuff for instance). The other thing I did was order some silver on black plates, they should be here in a few days. Mart. |

|

|
|
12-17-2012, 12:22 PM
|
#82 |
|
Senior Member
Join Date: May 2010
Location: Solihull, England.
Posts: 8,755
|
7008
I have been bouncing the idea of improving the steering around for quite a while, It was the one big thing that was spoiling the enjoyment of driving for me. There have been many helpful discussions leading to lots of good info gathered from many sources. So thanks to those that took part in the discussions. I finally actually started cutting metal a couple of weeks ago and have been doing a bit as and when I can. I turned the place upside down trying to find an F100 box I'm sure I have somewhere. Anyway, can't find it so had to think of something else. I like the Hudson steering conversions for a few reasons.. Namely it's the improved type with the roller sector shaft, it's overslung like the original 33 box, and has the same spline for the pitman arm as the 33. Problem is, they are like rocking horse manure. So what's the next best thing? 37-48 passenger car. I had a couple of lhd boxes and a very crusty rhd box. To get the overslung arrangement, I needed a lhd box, turned 90 degrees and poked out through the rail. People have done this before, but it does have a drawback. It reverses the steering. You have to unreverse it by fitting the pitman arm sticking up instead of down. That's a bit rubbish in my view and a job stopper for me. I need the arm sticking down like stock. Triggered by a variety of conversations, it dawned on me that fitting the guts from the rhd box in the lhd casing would make a lhd box that steers correctly when fitted as push and pull rather than cross steer. Great, I have the lhd and rhd bits so the idea is a goer. So along with some sporadic photo's to help tell the story, follow along as I upgrade the steering on my 33 to the vastly improved 37 style. Here's a very grungy 37-48 style lhd box. 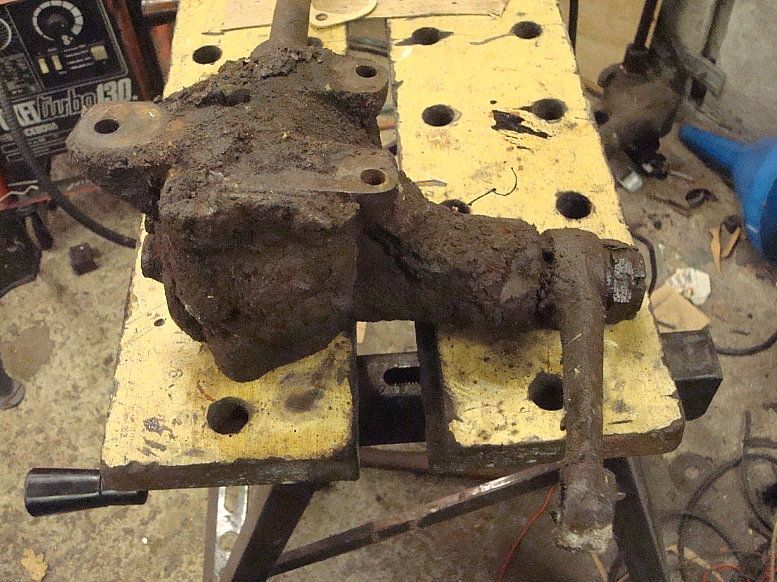 Note all the lugs that attach it to the steering bracket on the frame rail. These have to be cut off for this conversion. And here is the sad remnants of a rhd 37 box. The innards were still usable (just). 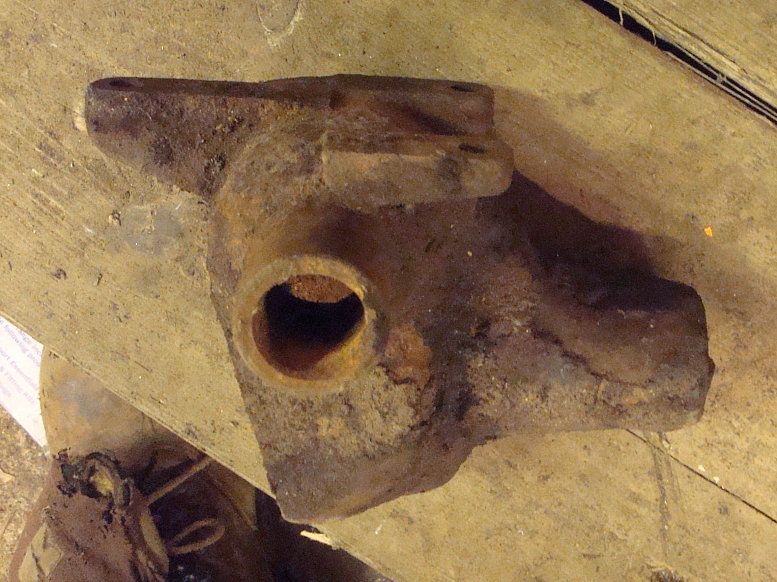 It is a direct mirror image of the lhd box. Heres the lhd box after cutting off the mounting lugs.. 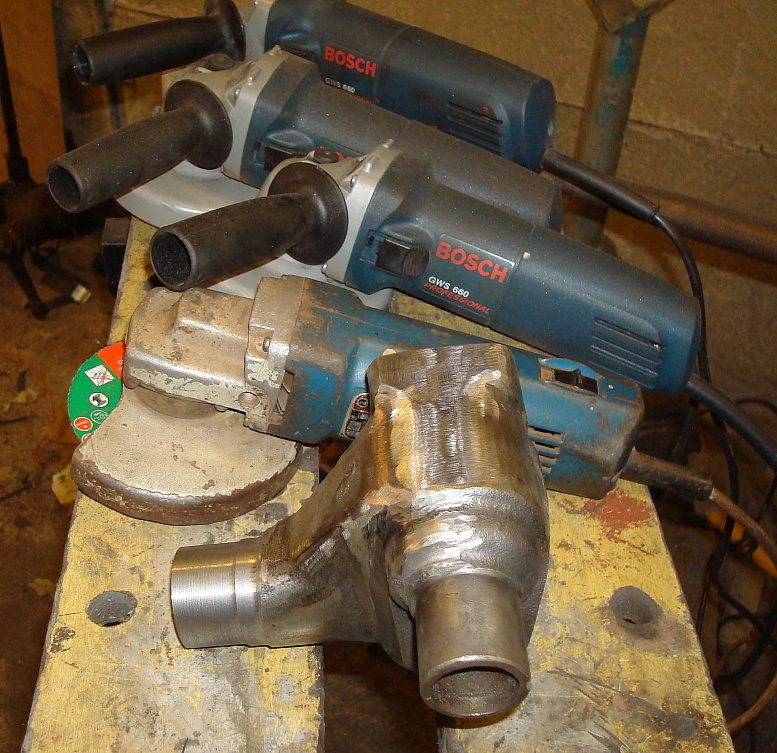 Note the selection of angle grinders - surely one of the most handy devices available to today's car nut. The box was chucked up in the hundred year old Hendey and the snout skimmed down to just big enough to keep the oil seal in place.  The sector shaft was kept in place so the end could be supported by the rotating centre. Having cut off the cross steer mounting lugs I needed a 33 style flange to bolt to the frame. This was cut from a piece of 10mm steel plate. I trimmed the end, cut the hole and then cut the flange from the plate. Easier to hold when still attached to the rest of the plate. 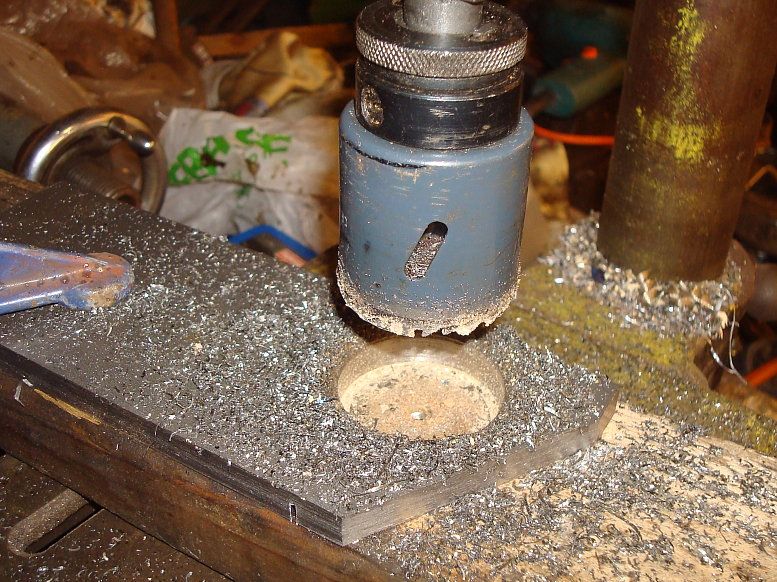 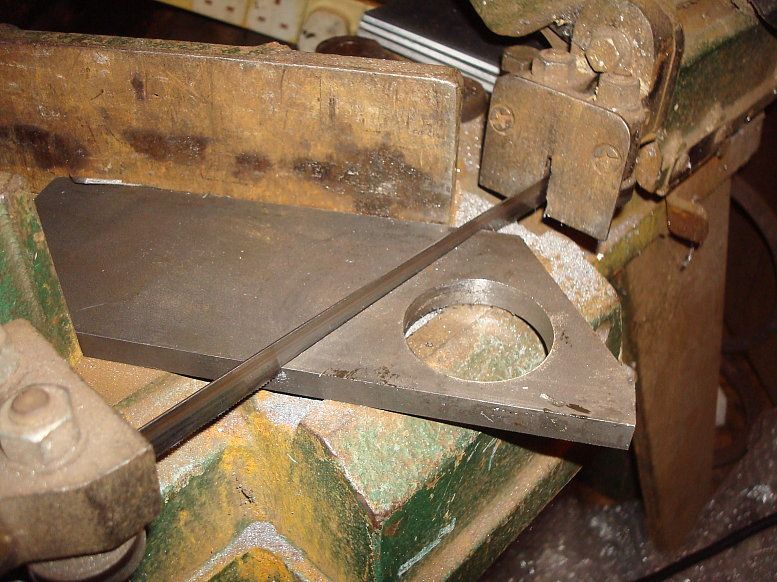 At this point I needed to trial fit the box in the car. The 33 steering was removed, I learned form the fordbarn that the engine did not need to be removed, as long as the exhaust manifold is removed, the steering will come out. I had to clean out the threads in the 40 wheel (5/16" UNF) and improvised a puller to get the wheel off. It was very tight. 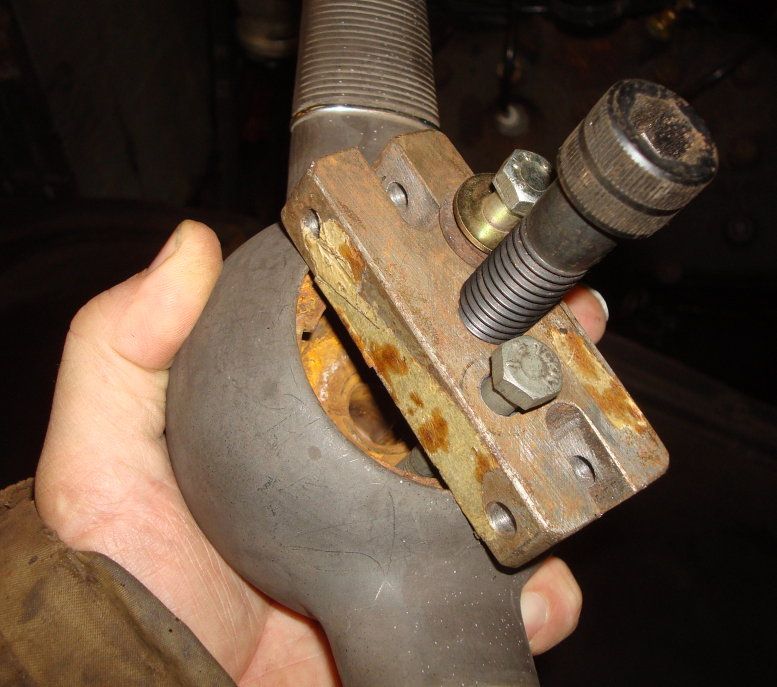 To even get the box in place you have to enlarge the hole in the frame. Only the 1-1/8" shaft sticks through on the 33, so to get the casing and oil seal through needs a bigger hole. Here's the original hole. 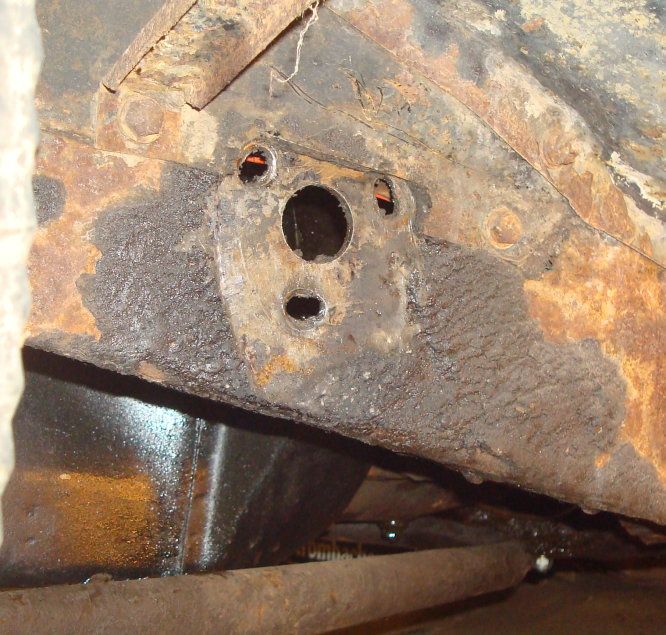 It's hard to enlarge the hole especially when the fenders are still in place so this is how I did it. This is the slug out of the flange when the hole saw was used to cut the hole. I skimmed it down so it was a light tap fit in the hole in the frame. 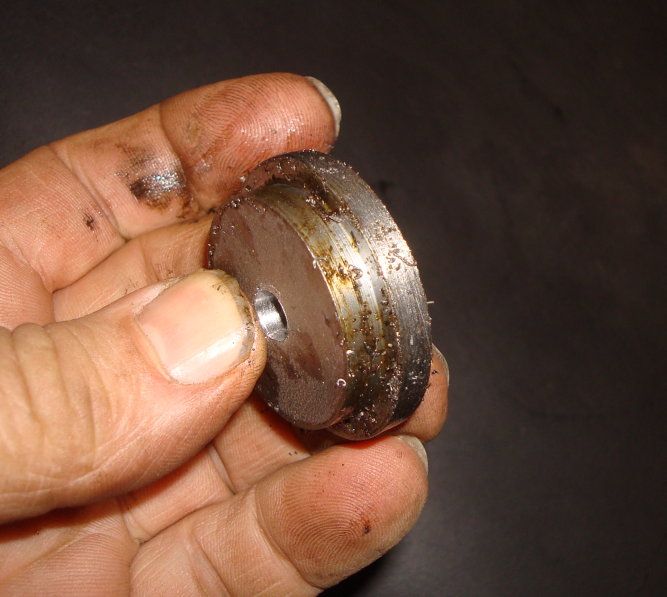 Here it is in place. 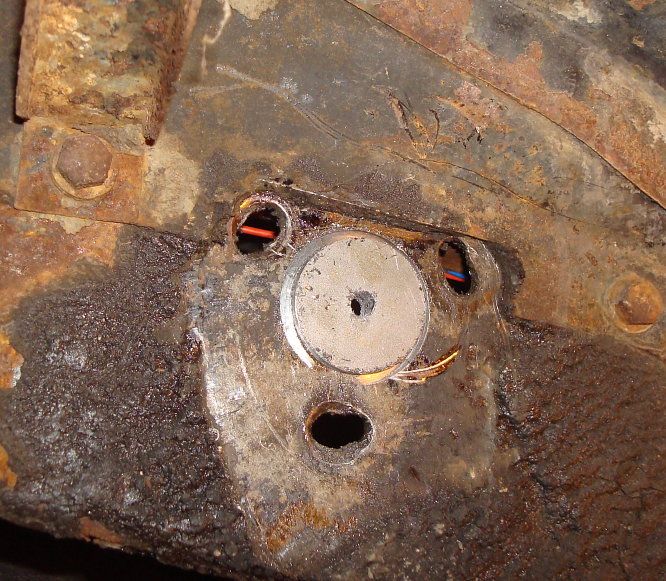 And here is the same hole saw being used to cut the hole in the frame. 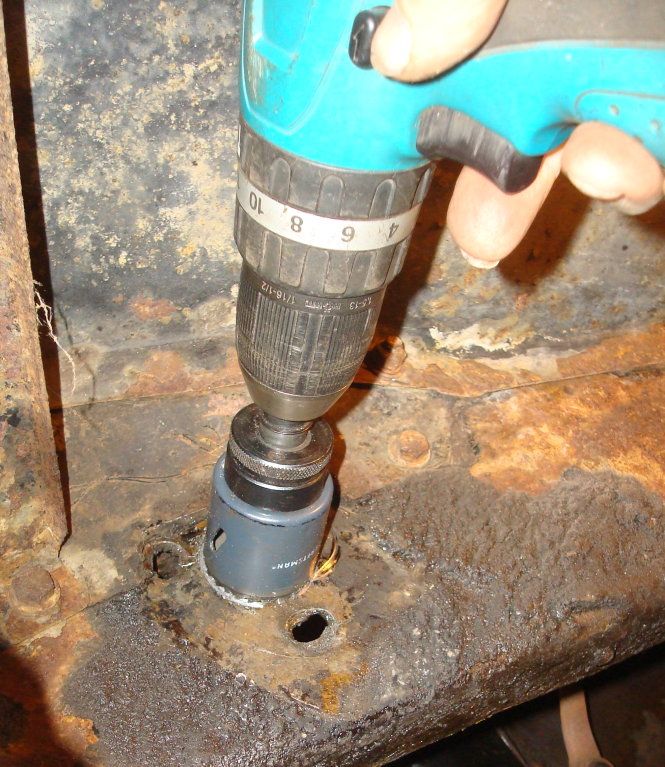 And the hole almost cut through. The frame is double thickness here, the x-member doubles the frame on a 33. 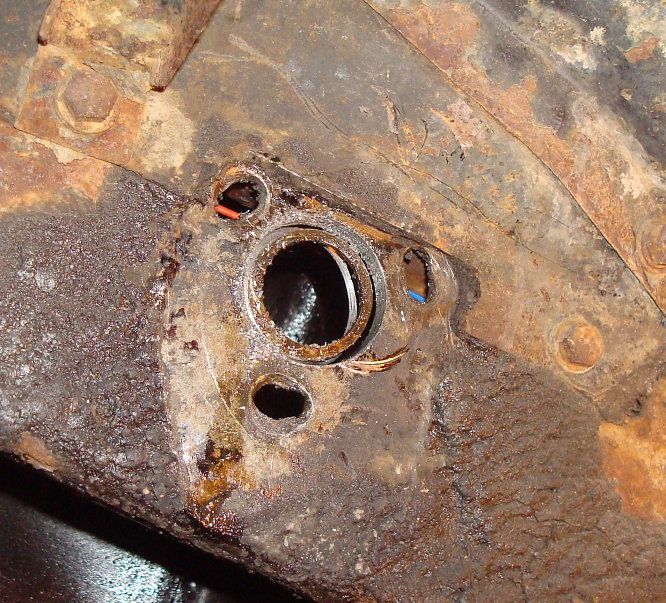 Once the hole was cut I could trial fit the box in the frame. 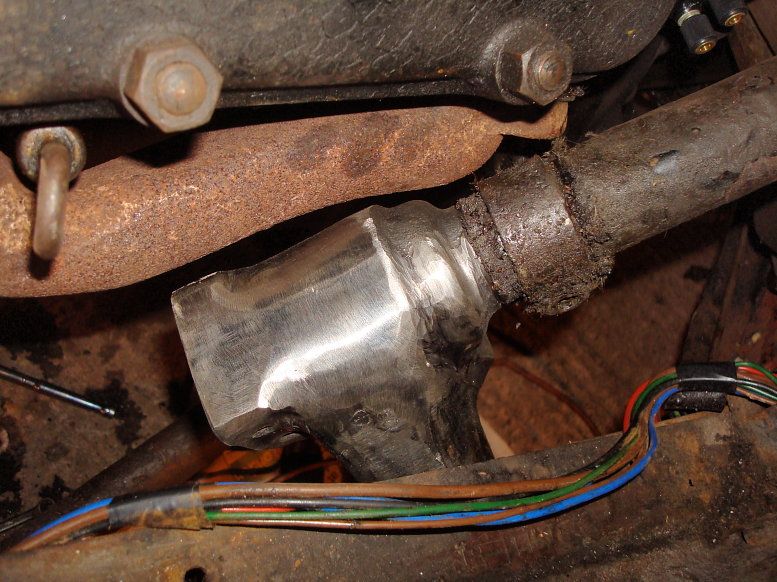 The column was attached and checked for alignment at top and bottom. 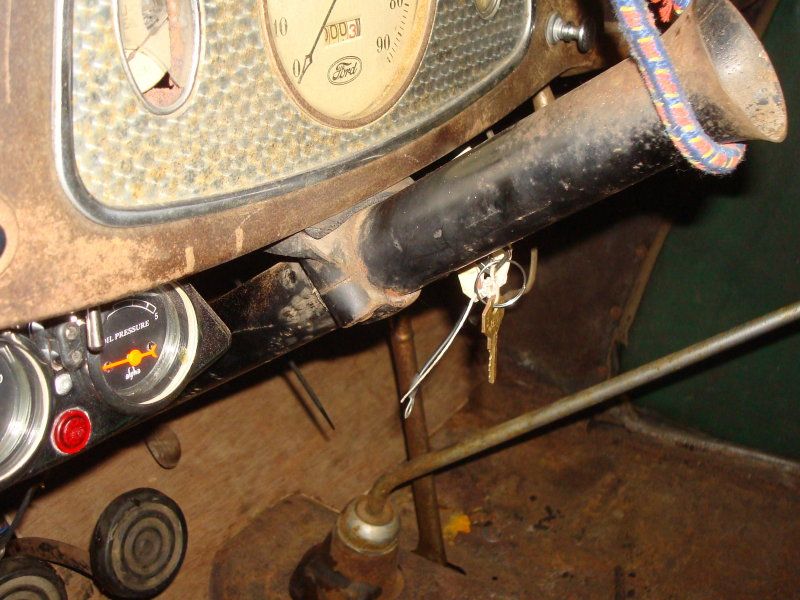  When all was looking good, it was assembled up with the flange in place (after lots of filing and grinding to take account of the angularity of the frame). The flange was tacked in place and then welded fully after pre heating with the gas axe. The 130 amp mig copes well as long as it's pre heated. Continued below. Mart. Last edited by Mart; 12-17-2012 at 01:01 PM. |
|
|
|
| Sponsored Links (Register now to hide all advertisements) |
|
|
|
12-17-2012, 12:23 PM
|
#83 |
|
Senior Member
Join Date: May 2010
Location: Solihull, England.
Posts: 8,755
|
The shaft was cut, bevelled, welded and ground down, but only to take off the high spots.
 (no pics bevelled, sorry) 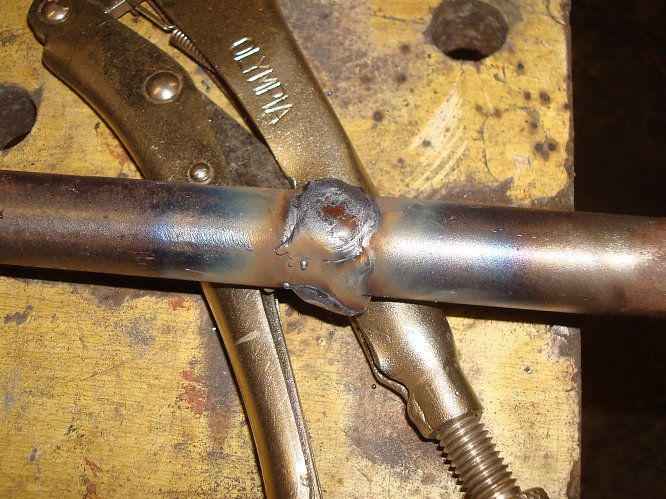  And the locking ring was refitted in the correct place. 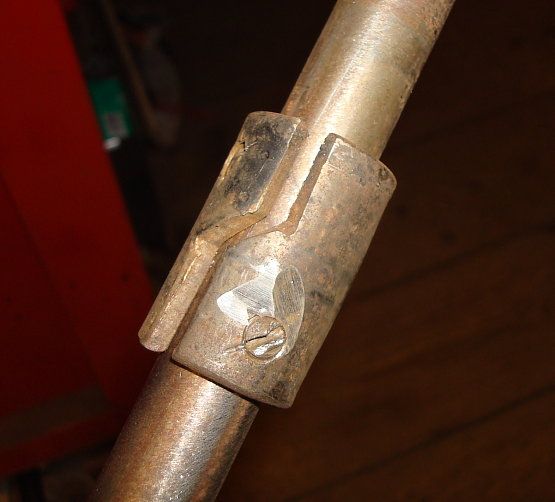 Make sure you have fitted the shaft to the box before fitting the lock ring. Ahem. Dont ask me how I know this. Here's the box assembled up ready for a quick coat of paint and refitting. In my experience it was easier to fit the mast after the box and shaft were fitted to the car. 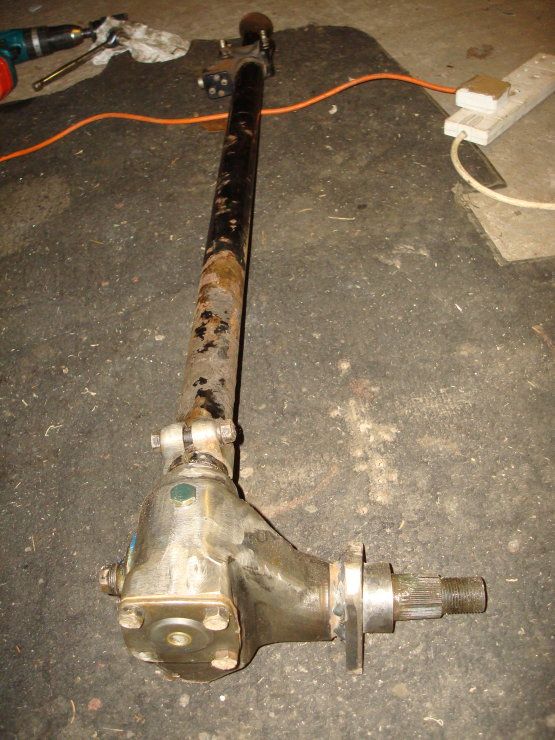 And the final trial fit. Note the filler plug. I drilled and tapped for a 1/4NPT taper plug. 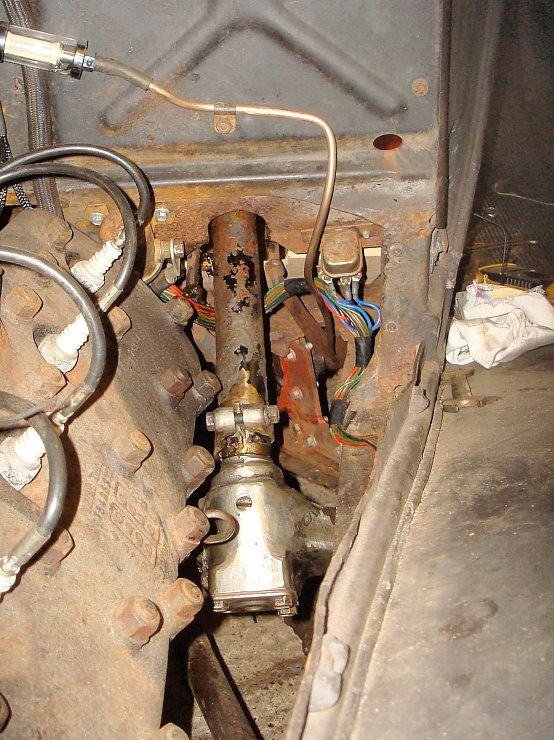 And the finished job in place. 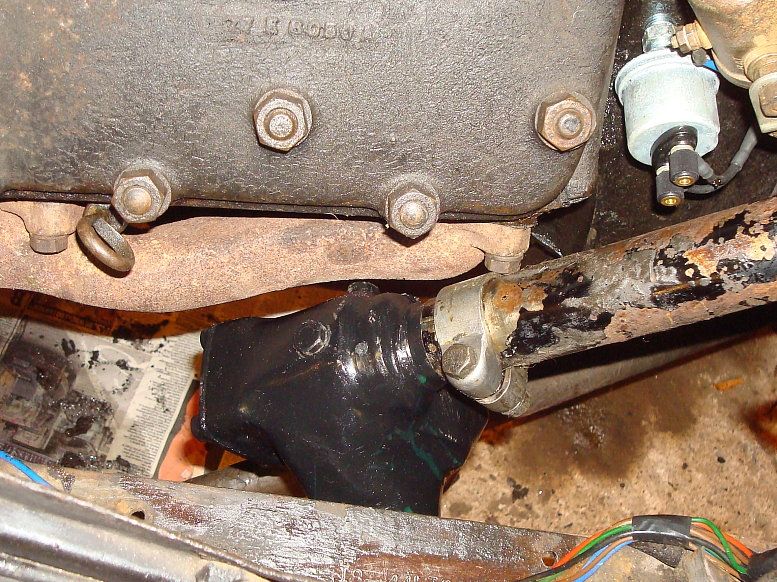 The sector shaft was fitted with a new seal. 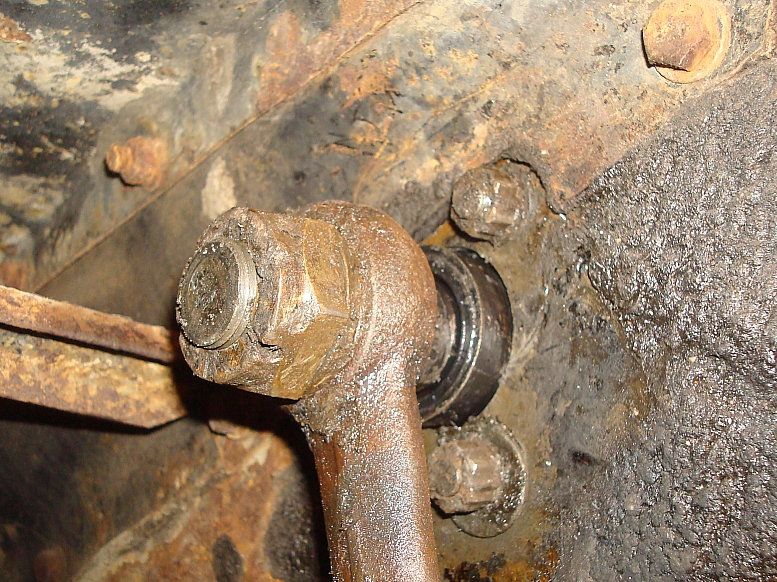 And a shot showing the flange from the inside. 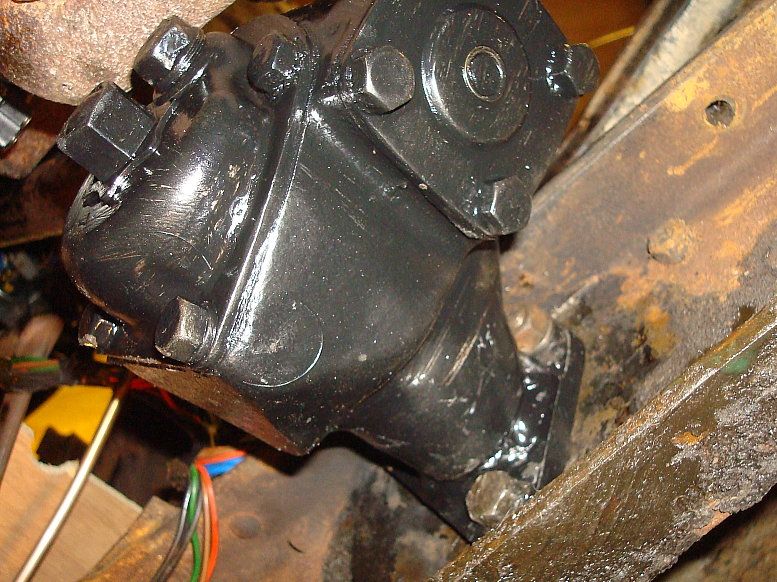 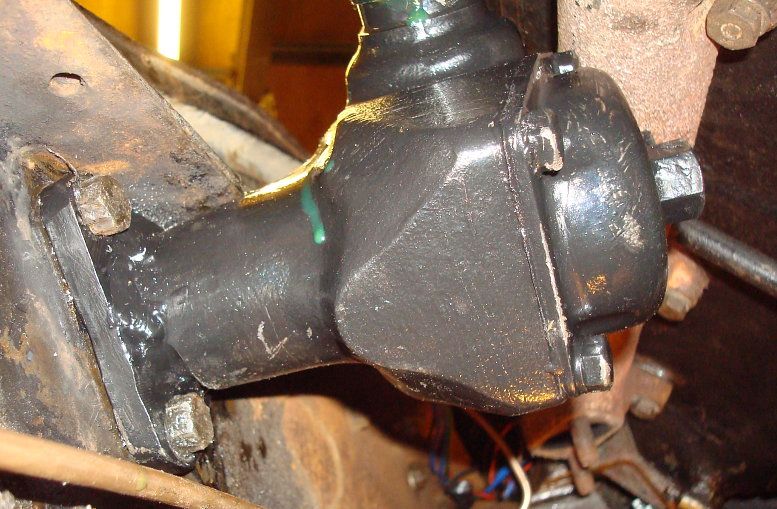 The box just fits and clears the exhaust. There was enough clearance to refit the manifold with the steering in place. 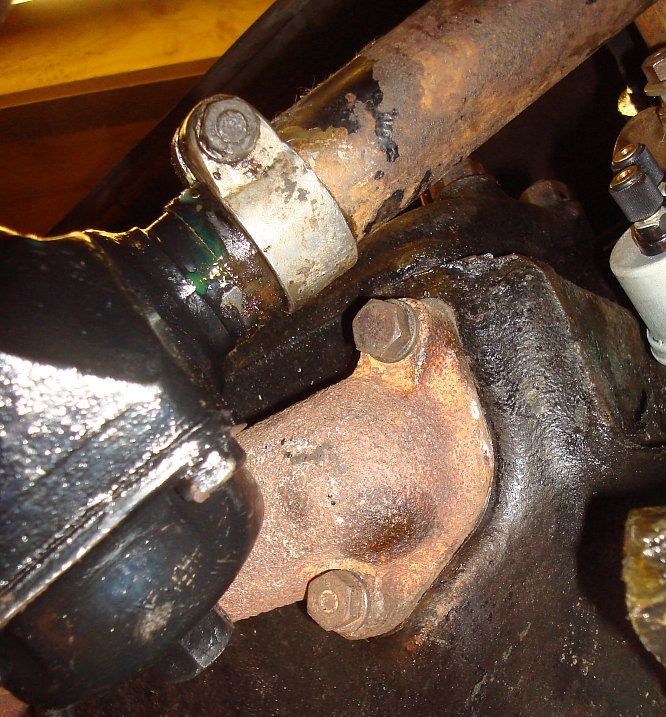 Last thing I did was fit a slightly smaller steering wheel. I think this was from a Ford Pop, not exactly sure, but it does have a nicely worn old cover on it. 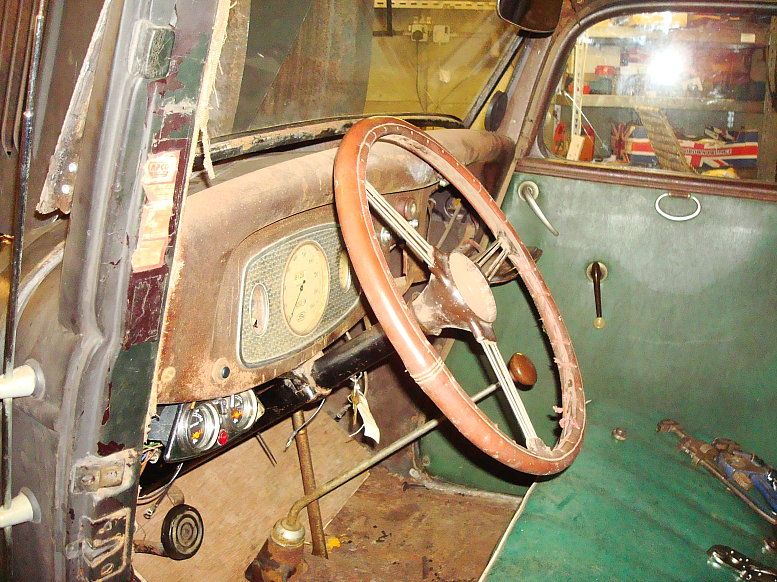 I Havn't done a proper road test, but I have reversed it up and down the drive and tried manouevring around a bit and I can tell straight away that it is much lighter and more direct, even with the borderline rhd parts I had to hand and the smaller steering wheel. Mart. |
|
|
|
|
12-17-2012, 03:00 PM
|
#84 |
|
Senior Member

Join Date: May 2010
Location: Auckland
Posts: 4,705
 |
Nicely done .
|
|
|
|
|
12-17-2012, 03:13 PM
|
#85 |
|
Senior Member

Join Date: Aug 2012
Location: Leicester. UK
Posts: 404
|
Great work Mart, a true fettler!
|
|
|
|
|
12-17-2012, 08:01 PM
|
#86 |
|
Senior Member

Join Date: May 2010
Location: Kokomo, Indiana
Posts: 1,731
|
Sponsored Links (Register now to hide all advertisements)
|
|
|
|
|
12-17-2012, 08:07 PM
|
#87 |
|
Member

Join Date: May 2010
Location: St. Louis, MO
Posts: 89
|
Mart, really nice work, thanks for taking the time. I did not see where you sorted out the pedal bushings...... check out Dick's thread. if you don't have this size over there, send me a PM and I'll send you a couple.
https://www.fordbarn.com/forum/showth...=pedal+bushing |
|
|
|
|
12-17-2012, 09:09 PM
|
#88 |
|
Senior Member

Join Date: May 2010
Location: FP, NJ
Posts: 2,770
|
Are the RHD steering guts readily available across the pond (in the UK?) Or, here in the states?? Possibly Job Lot?
(I've been working at copying all of the pictures and text from this thread and putting it all into a Word Document. It's too precious to risk losing it.)
__________________
Don't never get rid of nuthin! |
|
|
|
|
12-17-2012, 09:52 PM
|
#89 |
|
Senior Member

Join Date: May 2010
Location: ManchVegas, New Hampshah
Posts: 1,589
|
Excellent work on keeping a survivor a survivor. I really like what you have done to keep this one alive.
|
|
|
|
|
12-17-2012, 11:01 PM
|
#90 |
|
Senior Member

Join Date: May 2010
Location: Napier, New Zealand
Posts: 2,001
|
Brilliant!
|
|
|
|
|
12-17-2012, 11:05 PM
|
#91 | |
|
Senior Member
Join Date: May 2010
Location: Auckland
Posts: 4,705
|
I JUST CHECKED MACS CATALOGE PAGE 24 # 783524RH WORM matched with a new roller 7Rc-575-x ,Now all you need is the RH Sector.could be some used ones here .
Quote:
|
|
|
|
|

|
12-17-2012, 11:25 PM
|
#92 |
|
Senior Member

Join Date: May 2010
Location: Plano, Texas
Posts: 847
|
Now that’s what I call, really doing something on your lunch hour.
|
|
|
|
|
12-18-2012, 04:00 AM
|
#93 |
|
Senior Member
Join Date: May 2010
Location: Solihull, England.
Posts: 8,755
|
Thanks fellas.
Unfortunately the rhd parts are pretty scarce. I picked the rhd box up quite a few years ago and only just used it. It's good that the worms are available, I believe the roller is the same lhd/rhd, and as Ted says, that just leaves the sector shaft, which has the top angled opposite to lhd. If a good reliable source of rhd sectors could be found there are a few people that would be glad to have that available. Unfortunately shipping would be a killer, as the parts are normally on the wrong side of the world to the people that want them. Mart. |
|
|
|
|
12-18-2012, 08:48 PM
|
#94 |
|
Senior Member

Join Date: May 2010
Location: Suth'N Maine
Posts: 1,996
|
Been keeping an eye on this thread for the last few month's. Giving me a little boost of motivation for my "survivor".
Gonna hit it hard after the first of the year Mart 
|
|
|
|
|
12-18-2012, 10:17 PM
|
#95 |
|
Senior Member
Join Date: May 2010
Posts: 820
|
Thanks, Mart ,you are indeed talented .

|
|
|
|
|
12-19-2012, 07:21 AM
|
#96 |
|
Senior Member
Join Date: May 2010
Location: Solihull, England.
Posts: 8,755
|
Ok, an update on the steering conversion.
It's GREAT! I just took the car for a 10 mile drive on a mixture of roads and the improvement is fantastic! Well worth the effort an time taken to do the swap, and in reality it was fairly cheap. Shame there aint more rhd bits knocking about. Mart. |
|
|
|
|
12-19-2012, 05:02 PM
|
#97 |
|
Senior Member
Join Date: May 2010
Location: FP, NJ
Posts: 2,770
|
HELP!!!! All of the pictures from posts #6 and #7 (and more?) are missing!!!
OOOPSIES!! They're back! I kind of panicked when I saw all the little blue squares with question marks instead of pictures, but, a few minutes later, the pix are back.
__________________
Don't never get rid of nuthin! Last edited by PeteVS; 12-19-2012 at 05:17 PM. Reason: Pictures reappeared... |
|
|
|
|
12-23-2012, 05:35 PM
|
#98 |
|
Senior Member
Join Date: May 2010
Location: Auckland
Posts: 4,705
|
Heres a RH steering box,
http://www.trademe.co.nz/a.aspx?id=545991227 Last edited by FlatheadTed; 12-23-2012 at 07:39 PM. |
|
|
|
|
12-24-2012, 04:46 PM
|
#99 |
|
Senior Member
Join Date: May 2010
Location: Solihull, England.
Posts: 8,755
|
Thanks fellas.
I have been chipping away at some little jobs after doing the steering conversion. I removed the toeboard to do the steering and while it was out I wanted to tie up some loose ends in that area. Anyone that has sat in my car will remember the hole in the floor (actually the trans cover) where your heel goes. That was what I wanted to fix, so I removed the cover. I'd only put a couple of bolts in, so it came out easily. I had done the repair before taking any pics, but here's the repaired trans cover. 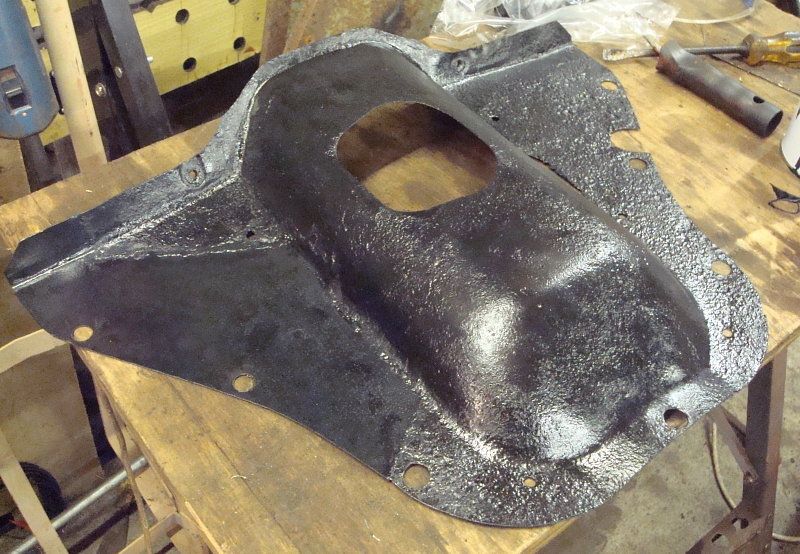 And here are the rusty parts cut out and replaced with sound metal. 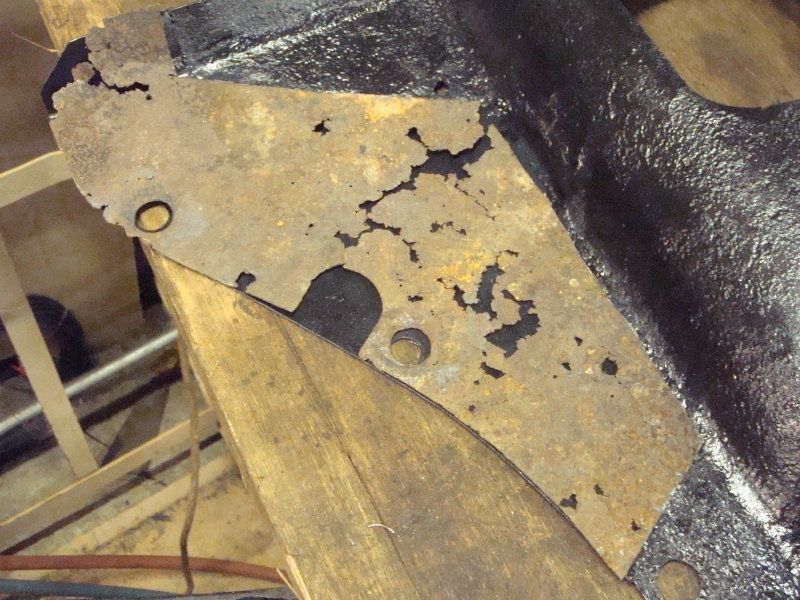 I didn't bother cutting out the steady rod bolt access notch, as I don't have one on the drivers side. I ran a tap through all the trans cover attachment holes and sorted out some original ford bolts and used washers to reattach it. But before that there was a couple of other little jobs. I removed the trans cover and drilled out the dowel hole to 7.5mm. I ground out the slot in the shifter until the shank of a 7.5mm drill just passed along the groove and made a new pin from a piece cut from the same drill, the part just above the flutes, which is harder than the end of the shank. Amazingly the cap unscrewed bu just grasping it with a cloth and turning it by hand. I was expecting all sorts of aggro getting it undone. 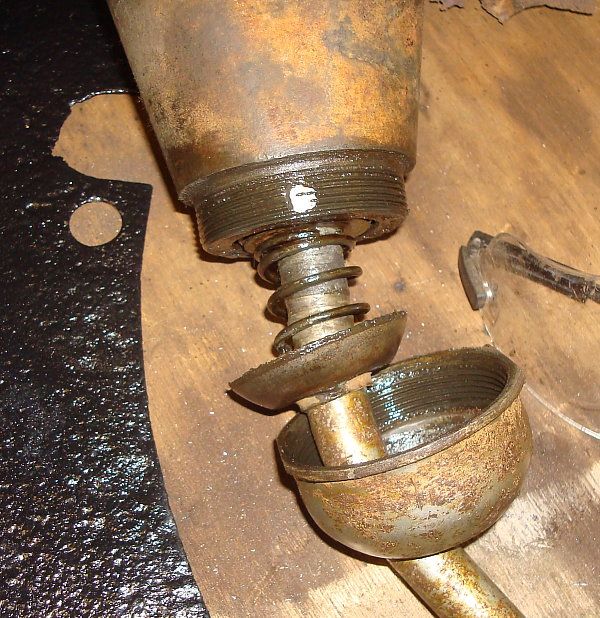 The reduction in side to side play of the gearstick was quite remarkable. It was pretty sloppy before. While the lid was off I drained the oil. The gears were quite rusty and a lot of the rust had come off and discoloured the oil. I refilled it through the open top which is by far the easiest way. I used sae 140 non ep. The gears looked pretty good, nice and shiny despite some slight pitting. 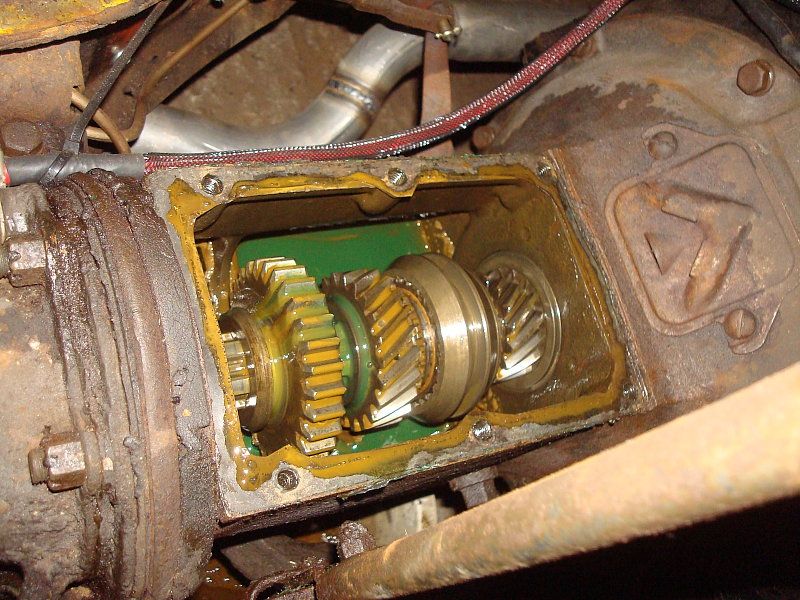 I'll probably give bit another flush through in the future. I put the lid back on and made a note of the trans number. Just because I could while the toe board was off and I wouldn't be able to do it after it was refitted. The case is later - 1941 - and I'm guessing it was from a pickup -(Passenger cars were side shift) so doesn't match the car. Why someone put early gears in a later case I do not know. 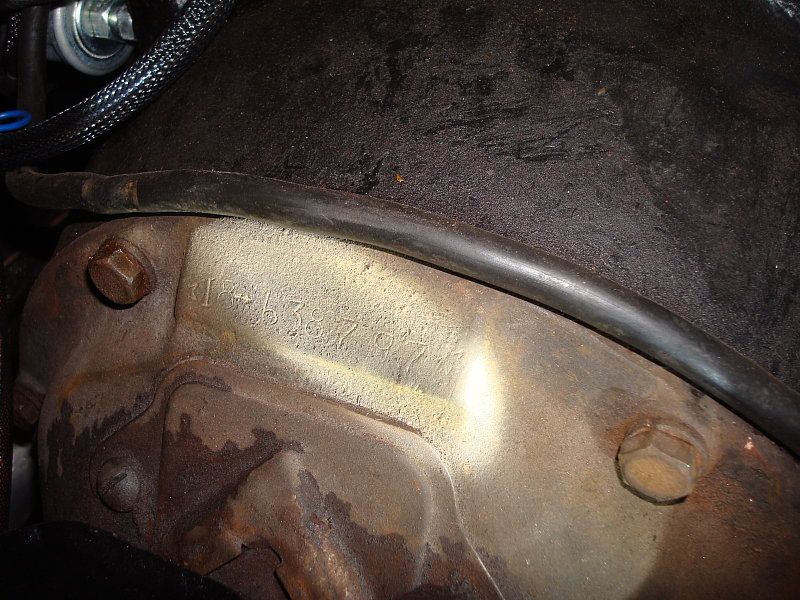 I then refitted the toeboard, temporarily for now. I got my son to sit in the car and press it down while I put some screws in from the engine bay side. Later I'll remove it, drill the holes out and screw it in from the inside. I had to do it this way round to locate the holes. You can see his footprints, because guess what? It was pouring with rain at the time. 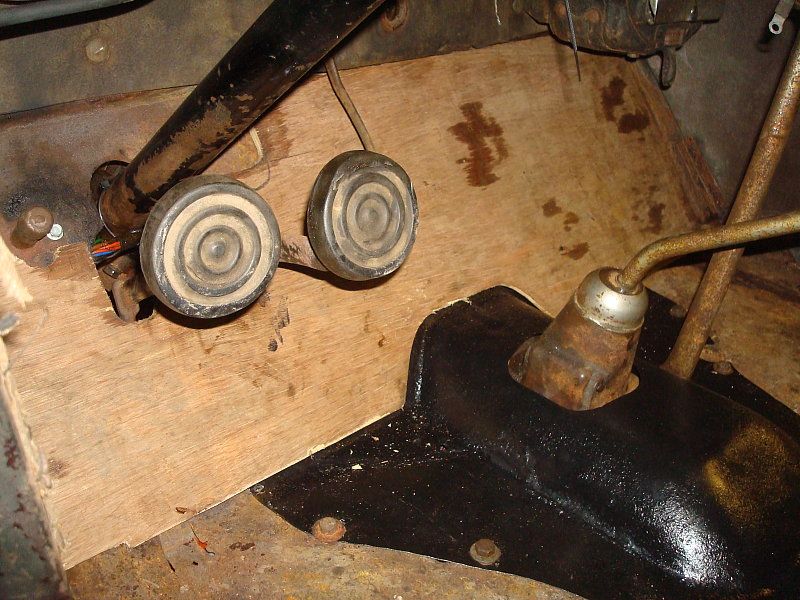 So little bit by bit, I'm fixing the little things that need doing. I'm enjoying myself. Mart. |
|
|
|
|
12-24-2012, 10:39 PM
|
#100 | |
|
Senior Member
Join Date: May 2010
Location: FP, NJ
Posts: 2,770
|
Quote:
__________________
Don't never get rid of nuthin! |
|
|
|
|
|
«
Previous Thread
|
Next Thread
»
 Linear Mode

|
|

| Sponsored Links (Register now to hide all advertisements) |
|
|
All times are GMT -5. The time now is 06:36 PM.