|
|||||||


| Sponsored Links (Register now to hide all advertisements) |
|
|
 |

|
Thread Tools | Display Modes |
 10-23-2018, 10:39 AM
|
#61 |
|
Senior Member

Join Date: Aug 2012
Location: Abq, NM
Posts: 3,607
|
Here's a link to a whole bunch of Y-block info you may eventually need...
http://www.ford-y-block.com/technical.htm |

|

|
|
10-23-2018, 10:45 AM
|
#62 | ||
|
Senior Member

Join Date: Aug 2012
Location: IN A 'GALAXIE' FAR FAR AWAY
Posts: 6,475
|
Quote:
Specifically- Quote:
__________________
***** - WHY IS IT ...  - -... that everything you buy in the grocery store is either wrapped in or contained in plastic but the government doesn't want you to carry it out in a plastic bag? WONDERING IN W(BY GOD)V ...
 DIAGNOSED CDO - (OCD In Correct Alphabetical Order) |
||
|
|
|

| Sponsored Links (Register now to hide all advertisements) |
|
|
|
10-26-2018, 07:24 AM
|
#63 |
|
Member
Join Date: Sep 2018
Location: Clayton, Michigan
Posts: 48
|
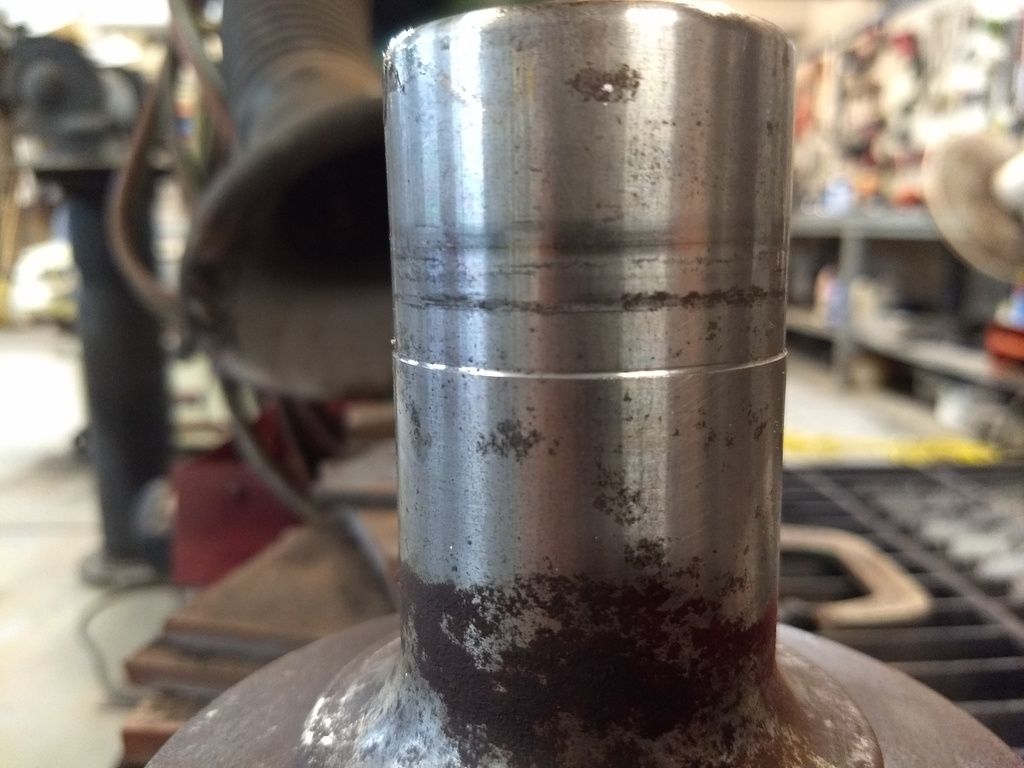
Cleaning up the balancer. There is some pitting but not a noticeable groove where the seal rides. I like how they designed the seal so it cannot be put in from the outside. Have to pull the whole cover off to do that. I installed a new chain and gear set and it was definitely tighter than the old one.
|
|
|
|
|
10-26-2018, 01:41 PM
|
#64 |
|
Senior Member
Join Date: Aug 2012
Location: IN A 'GALAXIE' FAR FAR AWAY
Posts: 6,475
|
You might want to lightly sand the snout (fine paper/crocus cloth using brake fluid as a lubricant) until fairly smooth.
When installing the cover, leave loose and install balancer so as to center the snout within the seal. Then position cover to center seal over snout and torque to specs. Use white grease or engine oil to lubricate seal /snout contact surface. There was a SPECIAL SERVICE TOOL for this years ago ... ")
__________________
***** - WHY IS IT ... -... that everything you buy in the grocery store is either wrapped in or contained in plastic but the government doesn't want you to carry it out in a plastic bag? WONDERING IN W(BY GOD)V ...
DIAGNOSED CDO - (OCD In Correct Alphabetical Order) |
|
|
|
|
10-28-2018, 11:02 AM
|
#65 |
|
Senior Member

Join Date: Jun 2010
Location: San Antonio, Texas
Posts: 16,436
|
The flatheads just had timing gears so the Y-block cam chain drive set up was kind of a new thing for FoMoCo. At the time, it must have made some sense to the engineers but over time with various new engine designs and new set ups, it no longer stood up to modern design standards. It looks confusing by todays standards but the relatively long distance between gears was the likely reason for the way they decided set it up.
|
|
|
|
|
03-30-2019, 04:57 PM
|
#66 |
|
Member
Join Date: Sep 2018
Location: Clayton, Michigan
Posts: 48
|
Sponsored Links (Register now to hide all advertisements)
|
|
|
|
|
03-30-2019, 06:00 PM
|
#67 |
|
Senior Member

Join Date: Jun 2010
Location: Detroit suburb, MI
Posts: 3,706
|
Your car will be very low on power and performance until the distributor is dialed in. With this style distributor, there is no spark advance beyond the base timing without
vacuum to both diaphragms (and good diaphragms). Sal |
|
|
|
|
03-30-2019, 07:35 PM
|
#68 |
|
Member
Join Date: Sep 2018
Location: Clayton, Michigan
Posts: 48
|
So you don't think the water drip is a problem?
|
|
|
|
|
03-30-2019, 08:49 PM
|
#69 | |
|
Senior Member
Join Date: Aug 2012
Location: Abq, NM
Posts: 3,607
|
Quote:
Last edited by dmsfrr; 03-31-2019 at 04:21 PM. |
|
|
|
|
|
03-31-2019, 06:39 AM
|
#70 |
|
Member
Join Date: Sep 2018
Location: Clayton, Michigan
Posts: 48
|
Not antifreeze. Clearly a drip of condensation from between the carb and the intake. Was worried about a possible vacuum leak there.
|
|
|
|
|
03-31-2019, 10:55 AM
|
#71 |
|
Member
Join Date: Sep 2018
Location: Clayton, Michigan
Posts: 48
|
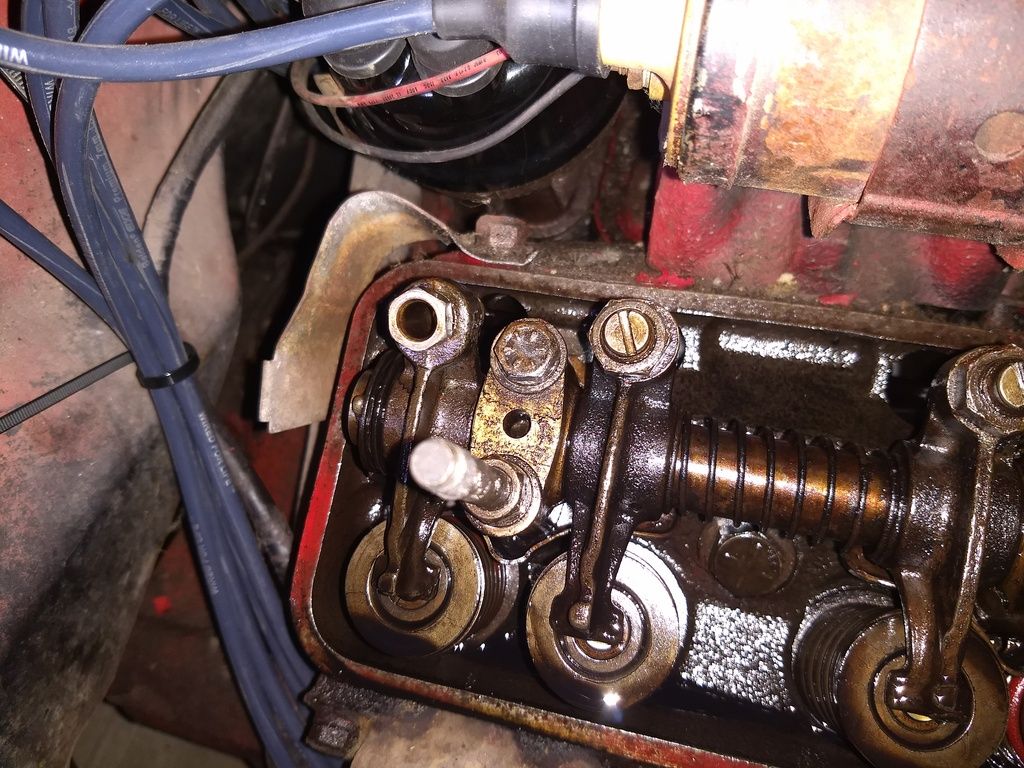 I know there were two style s of valve adjusters but when I opened it up this is what I found. Although it looks like the adjustment screw is missing from the exhaust on #4 it doesn't appear to have any threads inside it. It's also a different size. Also a little disappointed in my local parts stores. The y both sold me the wrong size cover gaskets. |
|
|
|
|
03-31-2019, 01:01 PM
|
#72 |
|
Senior Member
Join Date: Jun 2010
Location: San Antonio, Texas
Posts: 16,436
|
The adjuster is likely home brewed. The parts store catalogs might both have the same part number flaw. No one experienced in Y-blocks behind the counters now days.
|
|
|
|
|
03-31-2019, 03:03 PM
|
#73 |
|
Senior Member
Join Date: Jun 2010
Location: Detroit suburb, MI
Posts: 3,706
|
That adjuster is correct. In '57 they eliminated the one with the lock nut (two piece) and replaced it with one screw using interference threads instead of a lock nut. In '57 they also increased the rocker arm ratio to 1.54:1. Previous to '57 it was 1.44:1 I believe. Maybe 1.41 ? Looks like it's had some parts changed along the line.
Sal Last edited by scicala; 03-31-2019 at 05:01 PM. |
|
|
|
|
03-31-2019, 04:14 PM
|
#74 | |
|
Senior Member
Join Date: Aug 2012
Location: Abq, NM
Posts: 3,607
|
Quote:
I suspect the 1.54 rocker arms may(?) have been used only in the 'performance' engines, T-Bird, etc. They can often be mixed up by someone not watching the numbers. EAN-6564 rocker is 1954-1955 1.43:1 ratio 5751066 is 1958 - 1964 1.43:1 ratio 1.54:1 HIGH RATIO ROCKERS ARE ECG-6564 (from this link) http://www.ford-y-block.com/rockerarm.htm Last edited by dmsfrr; 03-31-2019 at 10:53 PM. |
|
|
|
|
|
03-31-2019, 07:37 PM
|
#75 |
|
Senior Member

Join Date: May 2010
Location: Midland Park, NJ
Posts: 3,982
|
The 1.54 rockers were used in all 57 engines, regardless of HP. They had the two kinds of adjusters, the changeover made mid year in 57.
__________________
48 Ford Conv 56 Tbird 54 Ford Victoria |
|
|
|
|
04-01-2019, 12:57 PM
|
#76 |
|
Senior Member
Join Date: Jun 2010
Location: San Antonio, Texas
Posts: 16,436
|
I wonder if they just replaced the adjuster and not the rocker arm. A person would have to confirm the part numbers unless the thread was different. Sort of a mix & match.
|
|
|
|
|
04-01-2019, 02:00 PM
|
#77 |
|
Member
Join Date: Sep 2018
Location: Clayton, Michigan
Posts: 48
|
The numbers are on the side of the rockers. I'll have to check it out. Just got done adjusting them. Waiting on the gaskets. Hopefully they're the right ones this time.
|
|
|
|
|
04-01-2019, 08:25 PM
|
#78 |
|
Senior Member
Join Date: May 2010
Location: Midland Park, NJ
Posts: 3,982
|
The rockers had two different suffixes denoting the ones with the nut and the ones with the interference thread -A for lock nut, B for interference.
Additionally, the rockers were slightly different in the adjuster end. The one that used the interference thread was slightly shorter The actual thread size and count were the same in both rockers. It was the adjuster that had the interference thread. You can use either adjuster in any rocker, but when using an interference adjuster in a lock nut rocker it is close to bottoming out when the factory clearance was set. I ran a interference adjuster in a lock nut rocker it it was very close but it worked.
__________________
48 Ford Conv 56 Tbird 54 Ford Victoria |
|
|
|
|
04-02-2019, 01:22 PM
|
#79 |
|
Senior Member
Join Date: Jun 2010
Location: San Antonio, Texas
Posts: 16,436
|
I noticed that the one in the photo looks pretty deep in the threaded bore. That's what made me think it was a home brewed repair.
|
|
|
|
|
04-03-2019, 07:39 PM
|
#80 |
|
Member
Join Date: Sep 2018
Location: Clayton, Michigan
Posts: 48
|
Got everything adjusted and the valve covers back. Suddenly I have no spark. Got six volts going through the primary coil windings. I haven't checked the secondary winding resistance yet. New coil wire so I think it's good. I hooked a jumper wire from the coil wire to a spare spark plug and grounded the plug and got no spark. What's the best way to test the electronic pick up?
|
|
|
|
|
«
Previous Thread
|
Next Thread
»
 Linear Mode

|
|

| Sponsored Links (Register now to hide all advertisements) |
|
|
All times are GMT -5. The time now is 10:09 PM.