|
|||||||


| Sponsored Links (Register now to hide all advertisements) |
|
|
 |

|
Thread Tools | Display Modes |
 11-29-2022, 12:12 PM
|
#1 |
|
Member

Join Date: Nov 2022
Location: Esparto, CA
Posts: 74
|
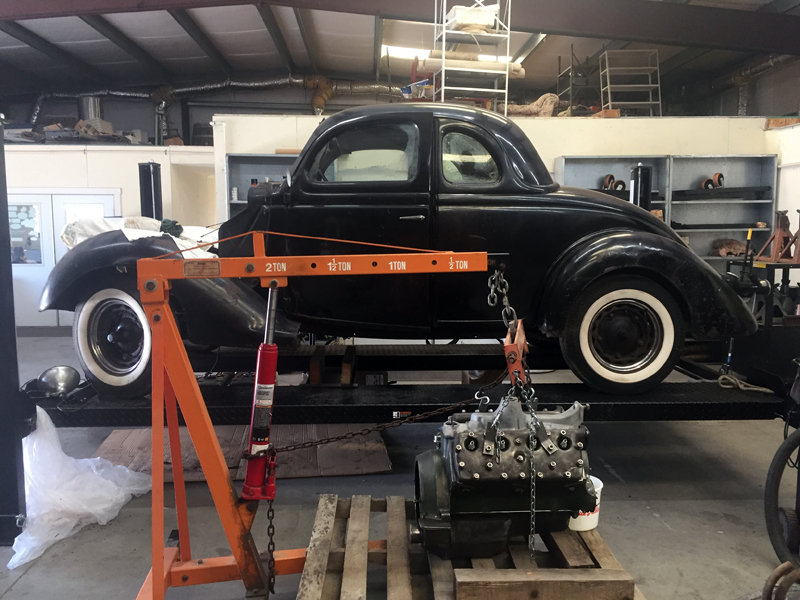
I am helping the owner of a 36 Ford get his grandfather's car back on the road. This won't be a restoration or a hot rodding project, but rather to simply get the car back on the road, as if it had never been parked. It has lots of authentic patina and we are keeping it. When he takes it to car shows he'll dress in period clothes and show up as if he had just come in out of the 1930's hills.
About the car: It's a 5-window couple. The V8 flathead was restored years ago but never run. It's in the car. The transmission has been overhauled and is still sitting in a box. The body looks great. There's a fair bit of rust but nothing that compromises the structural integrity. The running boards and part of the fenders have rusted through, but we have replacements. We even have extra grills and even an unused bug screen, with the price tag still on it. I'll be poking around here to learn what I can before we get deep into this. In general, the plan right now is to start by removing the interior and and getting new seat and door covers, replace the windows that have started to delaminate, and other things we can do before putting it on a lift or jack stands. Mechanically, I want to remove the front cross member and go through the suspension and steering, and the brakes. Next we'll do the same in the back. Along the way we'll get the radiator looked at, the gas tank cleaned out, and so on. Any advice you can give will be much appreciated. Thanks, Mike |

|

|
|
11-29-2022, 12:19 PM
|
#2 |
|
Senior Member

Join Date: Mar 2014
Location: Jacksonville FL
Posts: 3,963
|
First
PICTURES, it will help many knowledgeable here BETTER advise you on what you have and what you are trying to accomplish. A flathead and the "correct" flathead are two different animals!!!!! PICTURES.....Post PICTURES of what you are working on!!!! By the way, welcome to the FordBarns and look forward to seeing your "project"!! You will need 10 post before you can post pictures so you might want to knock that out now SO you will be able to do so!!!! |
|
|
|
| Sponsored Links (Register now to hide all advertisements) |
|
|
|
11-29-2022, 12:35 PM
|
#3 |
|
Senior Member

Join Date: May 2017
Posts: 566
|
Mike, where are you? There are probably several Barners close to you that would be willing to help.
__________________
Steve in Denver |
|
|
|
|
11-29-2022, 01:05 PM
|
#4 |
|
Senior Member

Join Date: May 2010
Location: southeastern Michigan
Posts: 10,102
|
Why do you want to remove the front cross member to access the front suspension, steering and brakes? All those those can be accessed readily and removed for restoration, etc. without disturbing the riveted-in front cross member. Is it rusted through or otherwise badly damaged that causes you to want to remove it?
Last edited by DavidG; 11-30-2022 at 12:51 PM. Reason: misspelling |
|
|
|
|
11-29-2022, 01:11 PM
|
#5 |
|
Senior Member

Join Date: May 2010
Location: Southern Illinois
Posts: 3,795
|
Also, be aware that there is no company suppling interior kits or fabrics. If you want to keep the original interior, if it is authentic, or want an authentic interior you might not remove what is currently in the car. Doing so could prove to be very costly and time consuming. Especially if you're just wanting to get the car down the road.
|
|
|
|
|
11-29-2022, 01:40 PM
|
#6 |
|
Senior Member
Join Date: May 2010
Location: Southern California
Posts: 7,033
|
Sponsored Links (Register now to hide all advertisements)
Charlie Stephens |
|
|
|
|
11-29-2022, 01:49 PM
|
#7 |
|
Senior Member
Join Date: Oct 2016
Location: harpursville ny
Posts: 1,040
|
Take on one task at a time so you don’t get overwhelmed. Don’t start taking everything apart for replacement,evaluate parts as you go and above everything remember just because a part is new doesn’t mean it’s good.
|
|
|
|
|
11-29-2022, 02:31 PM
|
#8 |
|
Senior Member

Join Date: Dec 2016
Location: Albion PA
Posts: 1,677
|
Mike,
Welcome to the Ford Barn. Me being a newbie not long ago here. I have really gained a lot of great information and advice as the above comments show. Your car is almost 90 years old. Have fun with it. Do a little, get that item figured out, then go to the next. A full restoration can take 7 years avg. Even getting them running and working can take some time too. Yes pictures would be great. Sounds like a dream come true. Regrads, Chris
__________________
1932 AAB Truck 1953 Ford Jubilee 2015 Ford F250 SuperCrew Lots of Allis tractors Some Cub Cadets |
|
|
|
|
11-30-2022, 10:29 AM
|
#9 |
|
Member
Join Date: Nov 2022
Location: Esparto, CA
Posts: 74
|
Thanks all for the friendly welcome and the advice.
We are located just west of Woodland, California. If you are reasonably local please do drop by for a visit. We got started on the car two days ago and it was slow going with all the rust to deal with. We rolled it outside and power washed the underside best we could. Much of what I thought was caked on dirt was undercoating. Boy, the sure put that stuff on thick. Yesterday I got the radiator out okay and it is now at a shop and will probably be re-cored. Next up was getting the door panels off to get at the windows. They have de-laminated so badly they need to be replaced. Does anyone have a source for replacement windows or is this something a regular auto glass shop can handle? Also, how do I free the glass from the channel it sits in? eat? Solvent? I work on Opel GTs a lot, almost exclusively, and found removing the suspension cross-member was the easier way to work on them. You just had to be really careful with that transverse leaf spring. It looks like I won't be doing that here. One rear fender is missing and the other damaged, but we have replacements. The car will probably go to a body shop soon to have rust in those areas repaired and the fenders installed. I took the running boards off and they revealed plenty of rust, but mostly at the ends where it attaches to the fenders. (The frame looked great.) We'll have the shop patch those areas, too. We have a good set of running boards to bolt on after we get the car back. Is there a source for the rubber that went between the running boards and frame? Also, the bottom of the doors? And while I am asking, all the rubber parts used on the body? My general approach is to start with the foundation then work my way to the more fun parts. That means wheels, brakes, and suspension first. We are installing a lift today and that will make that work easier. At this time the decision is to not do anything to the interior other than clean it up. It is in great shape in general, thought it is showing signs of wear, and there are a few holes in the headliner. The owner wants to drive the car his father, grandfather, and great grandfather drove. If we do replace anything we have someone available who can do the sewing. At present we are thinking of keeping the 6 volt system. What are people's thoughts on that? Is there a wiring harness out there that we can purchase? The wiring in this car looks okay in places and terrible in others. Photos will be coming soon. Thank you all for the warm welcome. Mike |
|
|
|
|
11-30-2022, 10:35 AM
|
#10 |
|
Member
Join Date: Nov 2022
Location: Esparto, CA
Posts: 74
|
I have that book. Thanks. I've been browsing it, to see what I am getting into, and I really like how succinct and direct it is. I also have a reprint of the original service manual. It reads more like a novel with promotional tendencies than a service manual. Very interesting.
Last edited by m610; 11-30-2022 at 10:55 AM. |
|
|
|
|
11-30-2022, 10:54 AM
|
#11 |
|
Member
Join Date: Nov 2022
Location: Esparto, CA
Posts: 74
|
One final note before I am off to begin day three on the car, is as I am working on the car I can't help but picture the scene in the Ford plant where guys are crawling in and around the car putting it together. As I was taking the door panels off, I pictured someone putting them on, and wondering if the door fully assembled before being hung on the hinges or hung then the window and other hardware added. As I am sizing up the job of pulling the motor I have visions of it being installed at the factory. A fun little bonus of working on these cars, I guess. I figure some of you may have had similar experiences.
|
|
|
|
|
11-30-2022, 11:24 AM
|
#12 |
|
Senior Member
Join Date: May 2010
Location: Southern Illinois
Posts: 3,795
|
Contact Michael Driskell at Third Gen Automotive for all your parts needs. He will have the rubber parts you are asking about as well. Including some NOS parts. Third Gen is the only source for all authentic, correct hardware and fasteners for your car. Michael and Jane are some of the best folks to do business with. He also does component services, distributors, fuel pumps, transmissions & rear ends.
I'll also say Fred at Southside Obsolete will have a lot of NOS parts as well. As for glass, Sanders Reproduction Glass is the best source for authentic glass. Or you can have a local shop cut new from your patterns. Engine removal is very simple and does not require the removal of any cross member, as others have said. Good luck with your project. Glad to have you here. |
|
|
|
|
11-30-2022, 12:42 PM
|
#13 |
|
Senior Member

Join Date: May 2010
Location: Chester Vt
Posts: 8,861
|
Welcome to the Barn, your in the right place for this project. Disassembly with nuts and bolts OK, rivets, not OK. If the area where the rivits is badly rusted, it needs to be replaced. The 36 frame is the approximate same thing as all the frames up to 1940. There is a web site here that has all the dimensions of all the frames. If the engine has been rebuilt, but never run, then the heads and pan should be removed, and the parts should be inspected befor you try to start it.. The 5Window coupe is one of my favorite cars, so be nice to it.
Gramps |
|
|
|
|
11-30-2022, 02:06 PM
|
#14 |
|
Senior Member

Join Date: Jun 2022
Posts: 281
|
Your appreciation of how that old rusty car was originally assembled is a wonderful gift to all of us.
Regarding that old gas tank. I have never had much luck trying to clean out a tank that has rusted on the inside. You can try, and then use one of the pour-in liners that are out there, but there is nothing worse than dealing with rust and crud in your fuel. Plus, if not done correctly, that liner can become a terrible problem in and of itself. I would suggest just going with a new one. Good luck. Phil |
|
|
|
|
11-30-2022, 02:58 PM
|
#15 |
|
Senior Member

Join Date: Oct 2011
Location: Shelton, WA
Posts: 3,800
|
Welcome, 36s are cool! If the pressure plate and clutch disk have been bolted to the flywheel and sitting for years, remove them now while the trans is out and clean up all the friction surfaces. I would bet that the disk is stuck to the flywheel and pressure plate after a long time of non use.
North of you is Bauer Engineering in Bend OR and Chris Olsen there makes very correct wiring for the entire car that lose no points on a concourse. Google his business and call and talk to him about what you want to do. He can install turn signal wiring etc in a very original looking cloth covered loom. When everything is the way it should be, 6 volts is just as good as 12. I have 5 old Fords running flatheads and only 1 has 12 volts (my avatar roadster) The rest are 6v, with mechanical fuel pumps. Be advised that any rubber product that comes in contact with what we call gas nowadays needs to be alcohol proof or it will turn to snot or swell up the inside of hoses. Besides the fuel pump diaphragm, any rubber fuel line no matter how short should be replaced. If in your parts there is a new line the grandpa bought that goes from the hard line to the fuel pump I would just assume it is too old and get a new one. If the tank isn't rusted out, maybe it can be boiled out by a radiator shop. You can get lots of good advice here, good luck with your project. |
|
|
|
|
11-30-2022, 03:20 PM
|
#16 |
|
Senior Member

Join Date: May 2010
Location: Napa,California
Posts: 6,037
|
Welcome to the Barn. For new reproduction wire harnesses you are not far from Sacramento Vintage Ford. I believe they still make the harnesses and I have used them with great success. They may have all the rubber gaskets, etc. that you will also need. As for glass there is a shop in Fairfield called R and R Glass (ph#707-429-3618) that can cut new glass for you. Leave the glass attached to the channels (from the doors and rear window) and let them remove the old glass from the channels and install the new glass.
|
|
|
|
|
12-01-2022, 01:14 PM
|
#17 |
|
Member
Join Date: Nov 2022
Location: Esparto, CA
Posts: 74
|
Thanks all for the excellent advice, and especially contact info for parts, etc.
I'm ready to pull the motor. It was overhauled years ago but not painted and we want to clean it up and paint it, and resurface the flywheel as suggested above. Funny how the original service manual says to just loop some rope around the engine and a 2x4 and get three guys to lift it out.  Anyway, the motor comes out today and gets some cleaning. We'll wait for the very welcome rain to pass before I paint it. Also today, we set up the four-post lift. I've never had the luxury of a lift before. Tomorrow is the start of race weekend, in the rain, at technical Sonoma Raceway, in an Opel wagon, so work will resume on Monday. Mike P.S. Deuce Roadster, I get up to Shelton now and then, usually to race but also to visit an Opel friend. |
|
|
|
|
12-01-2022, 07:21 PM
|
#18 |
|
Member
Join Date: Nov 2022
Location: Esparto, CA
Posts: 74
|
I can't reply to PM's or post photos until I have enough posts. This will count as a post, right?
I got the motor out today, it wasn't difficult, just a little different. The motor mounts are in front and there are none in the rear, just those rods. Anyway, I got it our without drawing blood. Once it was out I looked closely at the bolt-ons. The motor may have been rebuilt but I really wonder about the condition of the water pumps, generator, fuel pump, everything. The plan is to scrub up the motor on Monday and paint it the original green. Testing and validating, or replacing the bolt-ons will come next. There's no hurry getting the motor back in the car. We didn't get around to assembling the lift today. That might get taken care of while I am out this weekend. I can't wait to get at the wheels and suspension to inspect and repair as needed. Mike Last edited by m610; 12-01-2022 at 07:45 PM. |
|
|
|
|
12-01-2022, 07:45 PM
|
#19 |
|
Member
Join Date: Nov 2022
Location: Esparto, CA
Posts: 74
|
A few photos from the past few days. I have others on my DSLR that I'll post later.
     
|
|
|
|
|
12-01-2022, 07:55 PM
|
#20 |
|
Senior Member

Join Date: Jun 2014
Location: Williamsburg, VA
Posts: 1,627
|
I would suggest you rebuild the fuel pump because the diaphragm and check valves may have dried up and become subject to malfunction. Also replace the rubber fuel line from the firewall to the fuel pump.
If the water pumps turn freely, use them. If they leak, it is not very hard to change them with the motor in the car. Same thing on the generator. If it spins freely, try it. I would, however, pay close attention to all of the wiring around the engine room. If there are signs of cracking or frayed cloth insulation, you may want to replace that whole engine room wiring harness. That is a bit easier with the engine out of the car. |
|
|
|
|
12-01-2022, 08:07 PM
|
#21 |
|
Senior Member
Join Date: Feb 2021
Location: Perry Mo.
Posts: 486
|
Mike , Auto glassics just north of you in Eugene OR. has all your glass and has good $$$$. PLEASE don't take the car all apart at once. This has been the death of soooo many cool cars in the past as the person gets overwhelmed and never finishes it. Tim
|
|
|
|
|
12-01-2022, 09:51 PM
|
#22 |
|
Member
Join Date: Nov 2022
Location: Esparto, CA
Posts: 74
|
Thanks. I read that here about the fuel pump.
At present we are inclined to replace all of the wiring. The water pumps turn okay and the seals seem good, but they are pretty crusty inside. They shouldn't be difficult to clean. Mike |
|
|
|
| Sponsored Links (Register now to hide all advertisements) |
|
|
|
12-01-2022, 09:53 PM
|
#23 |
|
Member
Join Date: Nov 2022
Location: Esparto, CA
Posts: 74
|
Tim, I understand, and I've seen this too. I have torn cars down to nothing and managed to finish every one of them.
Thanks for the tip on Auto Glassics. |
|
|
|
|
12-01-2022, 09:59 PM
|
#24 |
|
Member
Join Date: Nov 2022
Location: Esparto, CA
Posts: 74
|
I don't think I mentioned this, but an interesting aspect of this project is the owner is one of the physicists credited with discovering the "God particle". He's here with me when I am working on the car, doing what he can to help, and loving it. This was his father's, grandfather's, and great grandfather's car, and he remembers riding on the shelf behind the seats when he was very young.
|
|
|
|
|
12-01-2022, 10:25 PM
|
#25 |
|
Senior Member

Join Date: Feb 2017
Location: Rochester Wa
Posts: 574
|
Great story. Can you post some pictures?
|
|
|
|
|
12-01-2022, 11:16 PM
|
#26 |
|
Senior Member
Join Date: May 2010
Posts: 426
|
Sponsored Links (Register now to hide all advertisements)
|
|
|
|
|
12-05-2022, 02:20 PM
|
#27 | |
|
Member
Join Date: Nov 2022
Location: Esparto, CA
Posts: 74
|
Quote:
I posted a couple of what I have. You can see them on page one of this thread. With all the rain and last weekend's race I am staying home today to sort and dry my tools. I'll be back at it tomorrow and will get more photos. |
|
|
|
|

|
12-05-2022, 02:46 PM
|
#28 |
|
Senior Member

Join Date: May 2010
Location: Mn
Posts: 2,411
|
Hey Mike, '35's and '36's are great looking cars, lots of style.
Sorry but I don't see any pictures show up on page one yet ? .
__________________
If mama ain't happy, ain't nobody happy. But if daddy ain't happy...RUN |
|
|
|
|
12-05-2022, 03:52 PM
|
#29 | |
|
Member
Join Date: Nov 2022
Location: Esparto, CA
Posts: 74
|
Quote:
Post #19. |
|
|
|
|
|
12-05-2022, 04:47 PM
|
#30 |
|
Senior Member

Join Date: Jan 2014
Location: Orcas Island Washington
Posts: 4,945
|
I don't see any pics on post 19 or anwhere elsi on your thread. Dying to see some though! Also, what's a god particle?
__________________
Owner/Operator of 'Jailbar Ranch' on the side of Mt. Pickett. Current stable consists of 1946 1/2 ton pickup turned woodie wagon with FH V8, 1947 Tonner Pickup (red) mostly stock with exception of a cummins 6at turbo diesel, 1946 Tonner Pickup (green) with 226 cu in 6 cyl flathead, 1979 Toyota landcruiser wagon, completely encased in 1947 Ford Jailbar sheet metal. Ok, cornbinder rear fenders..... 'Rusty ol' floorboards, hot on their feet' (Alan Jackson) |
|
|
|
|
12-05-2022, 05:33 PM
|
#31 |
|
Senior Member
Join Date: May 2010
Location: Mn
Posts: 2,411
|
Yep, I see the pics are posted now... Have fun with your build
.
__________________
If mama ain't happy, ain't nobody happy. But if daddy ain't happy...RUN |
|
|
|
|
12-05-2022, 05:38 PM
|
#32 |
|
Senior Member

Join Date: Apr 2014
Location: Minnesota
Posts: 1,166
|
Photos don't show for me????
|
|
|
|
|
12-05-2022, 05:55 PM
|
#33 |
|
Member
Join Date: Nov 2022
Location: Esparto, CA
Posts: 74
|
The see the photos people might need to reload the page. The old page without photos might be loading from memory, not the fresh one from the web site.
|
|
|
|
|
12-05-2022, 07:32 PM
|
#34 |
|
Senior Member
Join Date: May 2010
Location: Mn
Posts: 2,411
|
Your photo's are playing "hide and seek" as they are No longer listed on post 19
 .
__________________
If mama ain't happy, ain't nobody happy. But if daddy ain't happy...RUN |
|
|
|
|
12-05-2022, 07:35 PM
|
#35 |
|
Senior Member
Join Date: Jan 2011
Location: sw minnesota
Posts: 4,578
|
No pics here
|
|
|
|
|
12-05-2022, 08:48 PM
|
#36 |
|
Senior Member
Join Date: Oct 2011
Location: Shelton, WA
Posts: 3,800
|
Photos are probably too large (too many pixels)
|
|
|
|
|
12-05-2022, 10:23 PM
|
#37 |
|
Senior Member
Join Date: May 2010
Location: Mn
Posts: 2,411
|
OK, they came out of hiding and coming in BiG...
 .
__________________
If mama ain't happy, ain't nobody happy. But if daddy ain't happy...RUN |
|
|
|
|
12-06-2022, 12:25 AM
|
#38 |
|
Member
Join Date: Nov 2022
Location: Esparto, CA
Posts: 74
|
I thought I uploaded 1024 pixel wide photos. Is that too big?
|
|
|
|
|
12-06-2022, 12:27 AM
|
#39 |
|
Member
Join Date: Nov 2022
Location: Esparto, CA
Posts: 74
|
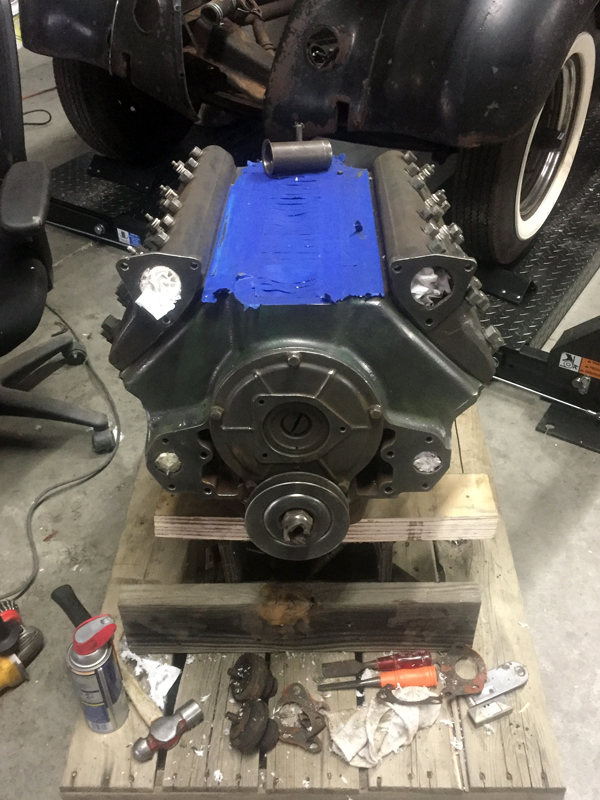
We plan to paint the engine the original green. I need to clean it first. It was rebuilt years ago but not painted and the bare metal needs cleaning.
In the original engines, was the aluminum intake manifold painted or left natural? |
|
|
|
|
12-06-2022, 05:39 AM
|
#40 |
|
Senior Member

Join Date: May 2010
Location: South Texas
Posts: 1,631
|
The aluminum intake was left natural.
If you are duplicating how Ford painted the engine then you have a bit of masking work to do. Ford painted the cast iron parts, then machined them, then assembled them. All machined surfaces on the block, heads, and timing cover should be bare metal. The head studs are bare metal. The head nuts are cadmium plated (I think) and are not painted. I clear coated the bare surfaces on the last one I painted like this. |
|
|
|
|
12-06-2022, 07:49 AM
|
#41 |
|
Senior Member
Join Date: May 2010
Location: southeastern Michigan
Posts: 10,102
|
Ford's archive photos of the Rouge Engine Plant paint line conveyors of the period suggest that it was the other way around and the painting of the engine blocks took place after machining and just before the engines were assembled. Masking fixtures were used to avoid paint being applied to areas such as the head and intake surfaces. While the intake surface was masked in its entirety after the '32 model year, those of '32 V8 blocks were masked following the outlines of an intake manifold gasket with the result that the surface between the intake manifold and the cylinder heads was painted green.
|
|
|
|
|
12-07-2022, 01:43 AM
|
#42 |
|
Member
Join Date: Nov 2022
Location: Esparto, CA
Posts: 74
|
This is what I plan to use to paint the engine - POR-15 Ford Green
I'll also use POR-15 Metal Prep. We are wire brushing the motor now to remove loose rust and old paint. While at it I wire brushed the flywheel to remove rust. This engine was rebuilt 30 years ago and never run, so I needs some cleaning. Was the oil pan also Ford green? Any comments? I've never used POR-15 before. |
|
|
|
| Sponsored Links (Register now to hide all advertisements) |
|
|
|
12-07-2022, 02:14 AM
|
#43 |
|
Member
Join Date: Nov 2022
Location: Esparto, CA
Posts: 74
|
More photos.
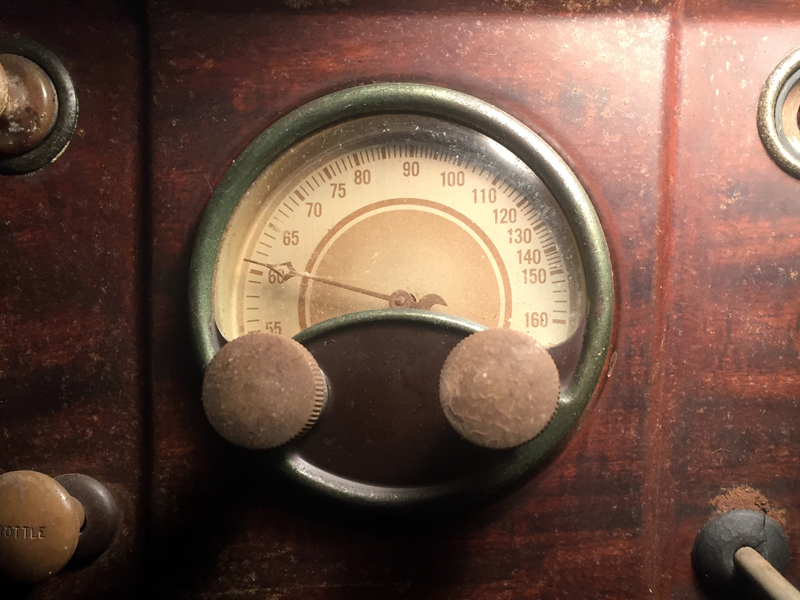
1. The dash. I love that rear-view mirror.  2. Seat back. It looks pretty good. We'll be keeping the original upholstery for now. It might give out after a little use, but for now we'll stay with the same seat Richard's grandfather sat on.  3. I love this fan. Was it meant to be used as a defroster? 4. Some floor panels have been removed and are getting cleaned up. Not as easy to see here is the battery tray, which is completely rusted out.  5. Both driver-side windows and the rear window have begun delaminating and will be replaced.  6. The door handle is pitted but otherwise is in great shape. Still, Richard has another set that are in much better shape.  Mike |
|
|
|
|
12-07-2022, 02:20 AM
|
#44 |
|
Member
Join Date: Nov 2022
Location: Esparto, CA
Posts: 74
|
More photos.
7. We'll need to repair this before the running boards go back on.  8. On the new lift with the motor in front of it. We were about to start cleaning the motor in preparation for paint.  9. A view of the rear. As you can see one fender is missing. Both rear fenders will be replaced. 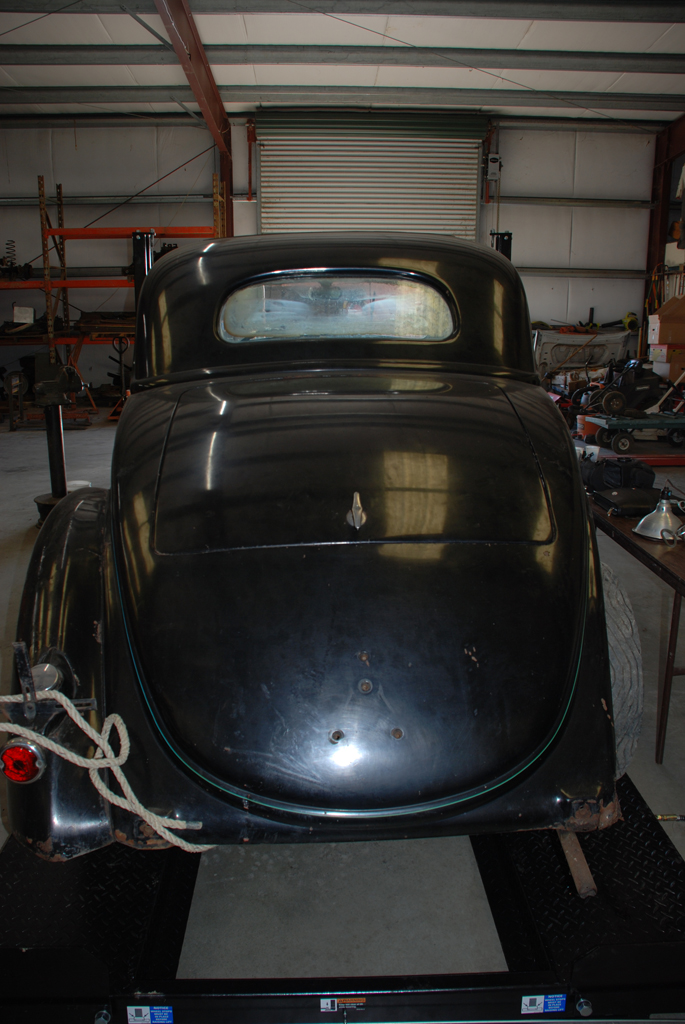 10. A look inside the trunk. Or, was it called a "boot" back then? 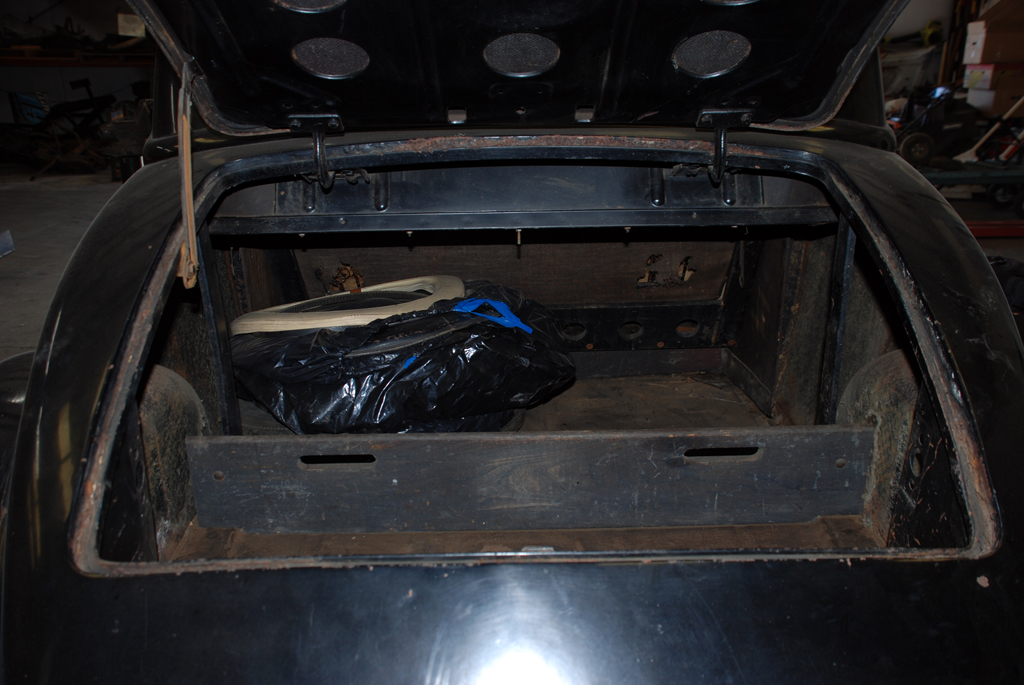 11. The car shown in profile. It looks rather sporty if you ask me.  12. The engine after some initial cleaning. Soon after this photo was taken we removed the distributor and exhaust manifolds and the intake manifold.  Mike |
|
|
|
|
12-07-2022, 10:58 AM
|
#45 |
|
Senior Member
Join Date: May 2010
Location: Napa,California
Posts: 6,037
|
Photos not showing.
|
|
|
|
|
12-07-2022, 12:15 PM
|
#46 |
|
Member
Join Date: Nov 2022
Location: Esparto, CA
Posts: 74
|
Sponsored Links (Register now to hide all advertisements)
The photos are on my web site here: http://www.kstreetstudio.com/files/36_Ford/ That's not a convenient way to view them so I will upload them to Facebook and will post the link here. Mike |
|
|
|
|
12-07-2022, 12:25 PM
|
#47 |
|
Member
Join Date: Nov 2022
Location: Esparto, CA
Posts: 74
|
Hopefully this link to the Facebook album works - https://www.facebook.com/media/set?v...30909997161300
|
|
|
|
|
12-07-2022, 01:16 PM
|
#48 |
|
Senior Member

Join Date: Dec 2013
Location: Minnesota, Florida Keys
Posts: 10,320
|
I was going to say "Boy, that looks good!" until I got to the picture of the front fender. It's still a lot better than most.
|
|
|
|
|
12-07-2022, 02:27 PM
|
#49 |
|
Senior Member

Join Date: May 2015
Posts: 8,166
|
OOPS! - Redundant...
__________________
The only thing nice about being imperfect is the joy it brings to others.... "Silver rings, your butt! Them's washers!" "We shot our way out of that town for a dollar's worth of steel holes!" - from 'The Wild Bunch' - 1969 https://www.youtube.com/watch?v=7NReUd2_0u0 |
|
|
|
|
12-07-2022, 03:27 PM
|
#50 |
|
Senior Member
Join Date: Jan 2011
Location: sw minnesota
Posts: 4,578
|
No pics, and no facebook either
|
|
|
|
|
12-07-2022, 03:52 PM
|
#51 |
|
Senior Member
Join Date: May 2010
Location: Napa,California
Posts: 6,037
|
I can see the photos from the link in post #46.Those front fenders can be saved. Looks like a pretty decent old Ford.
|
|
|
|
|
12-07-2022, 10:08 PM
|
#52 |
|
Member
Join Date: Nov 2022
Location: Esparto, CA
Posts: 74
|
The problem with the photos is odd. Maybe the admin can look into it.
If the Facebook link to the photo album does not work go to Facebook, find me, Mike Meier, then go to my photo albums. Sorry the regular way of posting photos does not work. Today we finished prep'ing the motor for paint. The plan at this time is to get some POR-15 Ford green paint and metal-prep from Amazon, unless we can find it locally, which is unlikely. I took the intake manifold off and cleaned it using Super Clean. It looks nice but not prefect, just natural. We're considering painting it with Krylon Cast Aluminum. It will look good and protect the aluminum. Until the engine paint arrives we'll start on the engine bay, cleaning and painting and probably pulling the wiring. Mike |
|
|
|
|
12-09-2022, 09:23 PM
|
#53 |
|
Member
Join Date: Nov 2022
Location: Esparto, CA
Posts: 74
|
I took yesterday off to let a cold have its way with me. I sound sick today but don't feel sick, much, so I got back to work.
Most of the day was spent cleaning and painting engine bolt-ons, including the starter, exhaust manifolds, and the tubes the spark plug wires run through. I also took the fuel pump apart and the diaphragm looks and feels good, but there is some rust under the cover that won't be easy to remove. I guess I need to get more naval jelly. There was a tan residue inside the fuel pump. It was easy to clean out. Still, I'm thinking the best thing to do is just get a new one. I would have cleaned and painted the generator but the two wires going into it look pretty bad. It may go to a shop for a rebuild. Tomorrow I'll finish the engine bolt-ons then move on to cleaning up the engine bay. Some questions, before we paint the engine, was the oil pan green or black? The motor mount arms/lower radiator connections are pretty rotted. There's not a lot left to connect the hoses to. Are replacements available? Thanks, Mike |
|
|
|
|
12-10-2022, 01:45 AM
|
#54 | |
|
Member
Join Date: Nov 2022
Location: Esparto, CA
Posts: 74
|
Quote:
We can fix it. |
|
|
|
|
|
12-14-2022, 10:56 PM
|
#55 |
|
Member
Join Date: Nov 2022
Location: Esparto, CA
Posts: 74
|
Slow going today cleaning up the engine bay, removing the old wiring, even removing the side panels to get them ready for paint.
We should have the engine painted soon, but we won't be putting it back in the car until most of the other work is done. I've been studying the article by Milton J. Webb on how to get a long-parked Ford back on the road. I'm recasting it as a checklist, and I'll probably change the order of a number of items because in the article he takes one part of the car at a time and describes what to do, where I want a checklist that goes step by step in order things should be done, which means starting the engine will be last. I also want to check things against the service manual and other references to verify certain details and to get more specific information, such as the idle speed setting. I'll share the document with you all here when done/nearly done, to get your comments and corrections. Mike |
|
|
|
|
12-18-2022, 02:37 AM
|
#56 |
|
Member
Join Date: Nov 2022
Location: Esparto, CA
Posts: 74
|
The engine bay has been cleaned up and parts were wire brushed down to the metal are in primer. Lots of other cleaning and inspection going on. On Tuesday we finish painting the engine bay and will start on the engine. In the mean time, a few photos.
|
|
|
|
|
12-18-2022, 05:07 AM
|
#57 | |
|
Senior Member

Join Date: May 2010
Location: East Shore of LAKE HOUSTON
Posts: 11,115
|
Quote:
There's no problem with this site's software. Are you sure that you didn't forget the very LAST step on the picture-posting process.... Clicking on the "SUBMIT REPLY" button at bottom? Coop |
|
|
|
|
|
12-20-2022, 02:40 AM
|
#58 |
|
Member
Join Date: Nov 2022
Location: Esparto, CA
Posts: 74
|
Photos disappeared when I clicked pre-view. Also, when I space between paragraphs, the forum software inserts a second black line.
Also, When posting this I got the message "Your submission could not be processed because you have logged in since the previous page was loaded." I reloaded the page and I got the same error. Mike |
|
|
|
|
12-22-2022, 03:21 PM
|
#59 |
|
Senior Member

Join Date: May 2010
Location: Fairfax Station, VA
Posts: 529
|
Just be patient and try again. You shouldn't have to reload the page.
Try typing a simple reply message like "This is a test." Then click on the "Go Advanced" button below the Quick Reply box and follow the prompts to add a picture (saved on your computer). Once it's loaded, then just hit the reply button and you can see if it works. I think you have to have the image saved somewhere so the program can copy it for posting. |
|
|
|
|
12-22-2022, 03:37 PM
|
#60 |
|
Senior Member
Join Date: May 2010
Location: southeastern Michigan
Posts: 10,102
|
Regarding your question about the oil pan paint color, it was originally gloss black.
|
|
|
|
|
12-23-2022, 09:14 AM
|
#61 |
|
Member

Join Date: Jul 2020
Location: La Puente, CA
Posts: 31
|
This whole thread is cracking me up.
|
|
|
|
|
12-24-2022, 02:25 AM
|
#62 | |
|
Member
Join Date: Nov 2022
Location: Esparto, CA
Posts: 74
|
Is that a Bamboo Bomber in the photo for your avatar?
Quote:
|
|
|
|
|
| Sponsored Links (Register now to hide all advertisements) |
|
|
|
12-24-2022, 02:37 AM
|
#63 |
|
Member
Join Date: Nov 2022
Location: Esparto, CA
Posts: 74
|
Modest progress lately. We spent several days scraping the undercoating tar off the front suspension and steering linkage. In some places it was over a half inch thick. Underneath we found long lost grease nipples.
We have an original set of front shocks we plan to install. Thanks for the tip on the color to paint the oil pan. We de-greased the engine again and washed it with the Por-15 prep. This prep is supposed to be water soluble but after several rinses it still left a white residue. Is that how it is supposed to be? We'll be back to work on the car on Monday and will probably work through the week on it. Most of the work will stop on Jan 3 when Richard leaves for extended travel. While he is gone we'll probably take the car to a body shop to have the rear fenders installed (we have like-new replacements) and other rust damage taken care of, especially around the running boards. Merry Christmas, all! Mike |
|
|
|
|
12-24-2022, 04:19 PM
|
#64 | |
|
Senior Member
Join Date: May 2010
Location: East Shore of LAKE HOUSTON
Posts: 11,115
|
Quote:
Coop https://www.fordbarn.com/forum/attac...6&d=1672625344 Last edited by V8COOPMAN; 01-01-2023 at 09:24 PM. |
|
|
|
|
|
12-24-2022, 06:06 PM
|
#65 | |
|
Member
Join Date: Nov 2022
Location: Esparto, CA
Posts: 74
|
Quote:
I'm finishing up a book about a friend's dad who had some adventures in these flying between Texas and Nicaragua back in the mid 1950s. Mike |
|
|
|
|
|
12-24-2022, 09:51 PM
|
#66 | |
|
Senior Member
Join Date: May 2010
Location: East Shore of LAKE HOUSTON
Posts: 11,115
|
Sponsored Links (Register now to hide all advertisements)
Quote:
That interests me! What is the name of that book, and is it available? Thanks... Coop . |
|
|
|
|
|
12-24-2022, 10:29 PM
|
#67 | |
|
Member
Join Date: Nov 2022
Location: Esparto, CA
Posts: 74
|
Quote:
I recently got the manuscript back from my copy editor. I figure a month to finish it and get prints in my hands. We'll sell it through Blurb.com and Amazon.com. Link on my web site: http://www.kstreetstudio.com/writing...resAtDawn.html Mike |
|
|
|
|
|
12-24-2022, 11:05 PM
|
#68 | |
|
Senior Member
Join Date: May 2010
Location: East Shore of LAKE HOUSTON
Posts: 11,115
|
Quote:
Yo, Mike.... That link won't open here. Do you have a title that I can watch for? Coop . |
|
|
|
|
|
12-24-2022, 11:32 PM
|
#69 |
|
Senior Member
Join Date: Jan 2011
Location: sw minnesota
Posts: 4,578
|
That sure is a nice looking aircraft, were they terrible to fly or what ?
|
|
|
|
|
12-25-2022, 12:06 AM
|
#70 |
|
Senior Member
Join Date: May 2010
Location: Eagle River,Alaska
Posts: 353
|
Coop, it won't open for me either, tells me that's an insecure website.
|
|
|
|
|
12-25-2022, 11:08 AM
|
#71 |
|
Member
Join Date: Nov 2022
Location: Esparto, CA
Posts: 74
|
It's an http site, not https. I guess I finally need to upgrade ($).
Try this one: https://www.kstreetstudio.com/writin...resAtDawn.html Title is "Blue Fires at Dawn". Mike |
|
|
|
|
12-30-2022, 02:30 PM
|
#72 |
|
Member
Join Date: Nov 2022
Location: Esparto, CA
Posts: 74
|
Not a whole lot of progress lately, but that's not for the lack of trying. I figure there are two phases to projects like this, the first being the breaking of rusty bolts phase, which is slow and lets blood now and then, and the second which is much more fun and involves putting parts back on the car. In VW circles there is a tradition of providing photo documentation of the first step in the second phase, and the part being installed is the ash tray.
Anyway, we are finally painting the engine and Richard seems to really be enjoying that job. Meanwhile I am breaking bolts and torching stuck suspension links. My current challenge is removing the gas tank, and with two of three bolts out it looks like I may need a coal chisel to get the third one out. (The captured nut on the other side has broken loose.) Once it is out I sure am hoping the tank can be slid out without removing the body from the frame. Also, the tank feels really heavy. Is it full of old gas/jelly?  (I hope the photo shows up this time.) Mike |
|
|
|
|
12-30-2022, 03:43 PM
|
#73 |
|
Senior Member

Join Date: Jan 2011
Location: Albion, PA
Posts: 715
|
My 42 coupe project has been marred by the frequent appearance of Vlad the Impaler. People think he died in the dark ages but he seems to be loose in Chris's (Sugarmaker) garage. Ripped about 3 layers of skin on my arm 3" by 3/4" awhile back. We wrapped it in a paper towel and secured it with painter's tape. I'm sure a couple of medical protocols were violated. Can't stop when you are working on an old Ford!
|
|
|
|
|
12-31-2022, 12:51 AM
|
#74 |
|
Member
Join Date: Nov 2022
Location: Esparto, CA
Posts: 74
|
I'm clearly still in the breaking-rusty-bolts phase of the project, although today I broke only one and drilled and chiseled out another.
I wanted to remove the gas tank. I'm sure it needs to be boiled out. It's really heavy, as if when parked in 1955 it had a full tank of gas in it. Three bolts hold it in and one bolt was stuck, so I drilled the head and chiseled off what remained. Then I took off the fender, which was a lot more work that it should have been, again, due to rust. One more bolt sacrificed. Where the filler neck comes out of the car, in the fender.  The reason for taking the fender off was I hoped I could slide the gas tank to the driver's side and the passenger side would drop down. Once that end was lowered I could twist the tank around and get the filler neck to come through. It was not to be. I need another half inch or so to be able to get the tank past the frame. I'll try again tomorrow. Maybe I was missing something, or maybe I can unbolt the body in that area and find a little more room to work. Anyway, skunky gas really stinks, and hours later the smell is still with me, and I hardly touched the stuff. Using a pair of vice grips I removed the drain plug and poked a punch up into the jelly and a dark red/brown liquid dribbled out. After several hours we had a quart of the stuff. Leaded, no doubt.  Richard finished painting the engine today. He really took his time, paying attention to the details. It looks great.  We'd like to be able to replace the motor mount arms, the one's that include the connection for the lower radiator hose. Does anyone know of a source for these?  Tomorrow a guy from a local body shop will come out to look at the car. He'll be making some basic sheet metal repairs, especially where the body under the rear fenders rusted and on the fenders where the running boards attach. We have a good set of spare running boards. Mike |
|
|
|
|
12-31-2022, 01:44 AM
|
#75 |
|
Senior Member
Join Date: Jan 2011
Location: sw minnesota
Posts: 4,578
|
Not trying to be the wise guy here, but it sounds to me that you need a different approach to stubborn rusty bolts. Hence, some things I've learned from decades of rusty Minnesota bolts. 1, for a blind hole, if you can get at it with a hammer, like an exhaust manifold bolt, shock the head with a good blow on the head with a hammer before you even start, to remind it that you are the supreme human being and will not be out smarted by an inanimate object.
2, I like to use a breaker bar so I can "feel" if its turning or breaking. Often, I try to tighten it first, then loosen, to see if it moves. if it moves, start with your favorite juice and keep working it back and forth while gaining ground each time you go backwards and forwards. 3 before you break it, you take an acetylene torch heat one side of the hex nut dull red and get it to break loose, then I sometimes let it cool, oil it, and see if it moves again after its cold. If not, heat it again. Propane or Map gas does not work. The whole point is, you want the nut to expand faster than the bolt and then it breaks loose. If you spend all day heating with a wimpy torch you end up expanding the bolt as much as the nut so its still stuck, and while its all red hot it might move, but you have effectively welded them together and wrecked the threads. The key is...heat one side of the hex nut quickly and try it before the bolt expands too. The cage nuts for the gas tank can be even more of a challenge. If you have any chance of pin holes in the tank, I would resort to some other kind of violence and leave the torch out of it. The cage nuts on fenders, I still like the torch. tricky to heat the nut without wrecking the cage, but again patience will prevail if you watch and pay attention to the color of the metal cage so as not to melt it and get the nut to a dull red. If you can get at it, I like to squish it hard with a vice grips while its hot, just before you try to move it, this will squeeze the cage on to the nut , which is good in the long run. good luck, Happy new year ! |
|
|
|
|
12-31-2022, 02:22 AM
|
#76 |
|
Member
Join Date: Nov 2022
Location: Esparto, CA
Posts: 74
|
Thanks for the tips. I do some of this. I usually soak with PB Blaster or something similar, whack it with a hammer, then come back later and wet it again then I use a breaker bar. It's much easier to control the force applied when using a breaker bar. If the bolt gets harder to turn after a few turns it's probably rust on the end of the bolt being dragged into the nut, so I tighten, then loosen again, and repeat until the bolt comes out.
I used propane on the dog bone suspension links and that worked okay, doing much what you said, trying to keep the heat on the collar rather than the stud/shaft/pin, whatever it is called. But, I'm only dealing with 50 years of Ohio rust, so probably not as bad as what you get. Mike |
|
|
|
|
01-01-2023, 07:30 PM
|
#77 |
|
Member
Join Date: Nov 2022
Location: Esparto, CA
Posts: 74
|
Earnest question, is it possible to get the gas tank out without removing the body?
|
|
|
|
|
01-01-2023, 09:23 PM
|
#78 | |
|
Senior Member
Join Date: May 2010
Location: East Shore of LAKE HOUSTON
Posts: 11,115
|
Quote:
Yup, on a '36.... it comes out the bottom after sliding the tank to one side. Lower OTHER side. On SOME cars, you MAY have to coax it by slightly forcing (twisting) the bottom of the two frame rails apart. Use a piece of 2 X 4 against the bottom lip of the opposite side frame rail. Coax (spread) the two bottom frame flanges apart with a pry bar. Coop . |
|
|
|
|
|
01-02-2023, 01:44 AM
|
#79 |
|
Member
Join Date: Nov 2022
Location: Esparto, CA
Posts: 74
|
Much thanks. That's what I figured but I was probably being a little shy with the coaxing.
And now that I think about it and see your advice about spreading the frame rails, this car once got hit in the right rear hard enough to destroy the fender, so the frame might have been pushed in a bit. As it sits now I need about another half inch to clear the frame. Mike |
|
|
|
|
01-02-2023, 10:26 AM
|
#80 |
|
Senior Member
Join Date: May 2010
Location: Napa,California
Posts: 6,037
|
The tank neck should be removed and the tank will come right out.You need a spanner wrench to remove the outer sleeve and then the neck will pull out.
|
|
|
|
|
01-04-2023, 11:32 AM
|
#81 |
|
Member
Join Date: Nov 2022
Location: Esparto, CA
Posts: 74
|
^ Thanks. I hope rust isn't too bad an issue.
Work has slowed. The owner has left for a 5 month trip to Asia. I'm working on a friend's Opel GT this week and hope to have it done by the weekend. After that work on the Ford will resume. The owner wants to be involved in all of the work but has given me the okay to deal with the brakes, suspension, and rewire. Mike |
|
|
|
|
01-05-2023, 12:15 PM
|
#82 |
|
Member
Join Date: Nov 2022
Location: Esparto, CA
Posts: 74
|
A little break in the action as I get the Opel sorted and back on the road.
 Mike |
|
|
|
| Sponsored Links (Register now to hide all advertisements) |
|
|
|
04-21-2023, 09:32 AM
|
#83 |
|
Member
Join Date: Nov 2022
Location: Esparto, CA
Posts: 74
|
Richard, the car's owner, will be back in the country soon and work on the Ford will resume shortly after. (The Opel GT is done and the Opel 1900 almost.)
The radiator needed rebuilding but our radiator shop guy, Juan, recommended replacing it, rather than re-coring it. Juan also took a look at the gas tank, which was nearly full of late-1950s gasoline-turned-jelly, and recommended the same. He could rebuild both, but the cost would be more than Richard would probably want to pay. Richard found a new replacement tank with all the accessories so we will probably go with that. I'm looking forward to working on the Ford again. Mike |
|
|
|
|
06-22-2023, 09:12 PM
|
#84 |
|
Member
Join Date: Nov 2022
Location: Esparto, CA
Posts: 74
|
I'm back at work on the Ford. The Opel GT is done and the Opel Ascona is getting its final touches.
I replaced the gas tank. It was not as easy as you'd expect. The bolt holes did not line up. Maybe the car is a little bent or there was a problem with the tank. After three tires and drilling out the mounting holes to enlarge them it went in.  I rehung the new wiring between the rear of the car and the engine bay. I think I'll remove, clean, and inspect the brake hardware and switch before I make that connection. I am also inclined to put the wiring in plastic wire mold. I hate the idea of the wiring being clamped to the chassis in places and free to more around, get wet, etc, along it's length. Richard and I cleaned up the differential. Besides the rust there was a lot of brushed-on tar, like what we saw in front. I figure this was 1930's undercoating. Anyway, I finished it up with a wire brush and a little paint.  The rear brakes were disconnected. I figure that means there had been a problem with them, so I have to get a look inside, which I would have done anyway. Problem is, I can't get the drums off. I see in the manuals that a castle nut pressed the drum onto a cone, and a snap ring in the drum sets how far onto the cone it can go. Anyway, as far as I can tell a little heat and a wheel puller should be enough to get the drums off, but that is not working. During heating some oil or grease does bubble out, so I know the drum is not on hard and fast. Does anyone have a suggestion on how to get this thing off?   By the way, most of the castle nuts in the rear were missing their cotter pins, including the big nuts that held the drums in place. I guess that is an good indicator of where work on the car has been done. Tomorrow I plan to work on the brake pedal and switch. Is there anything I should be on the lookout for? Also, hopefully I'll be able to get the rear drums off and see what is inside. Mike |
|
|
|
|
06-22-2023, 10:51 PM
|
#85 |
|
Senior Member

Join Date: Aug 2021
Location: Upstate N.Y.
Posts: 443
|
http://www.vintageprecision.com/prod...ers/index.html
This type proper tool was designed to use torque to remove Hub / Drum. Really tight , then a couple mild taps on stem of tool. It does not need to be “ Beat On “ When I do my taps on stem of tool . I hold a piece of Hardwood on stem of Tool , then hit. |
|
|
|
|
06-23-2023, 12:14 AM
|
#86 |
|
Senior Member
Join Date: Jan 2011
Location: sw minnesota
Posts: 4,578
|
Sponsored Links (Register now to hide all advertisements)
|
|
|
|
|
06-23-2023, 06:43 AM
|
#87 |
|
Senior Member

Join Date: May 2010
Posts: 4,751
|
Car appears to be later model year due to the flat top coil, wood grained dash. You can find the date the window glass mas manufactured on the window glass bug under the Ford script look in the lower corner of the glass for the bug. If there is no glass bug then the glass was replaced. The original glass has a black edge all the way around. Sanders glass can reproduce the same style of glass with the date code bug. The flat top coil can be rebuilt by Skip Haney in Fla. he can also rebuild and tune the distributor and supply a good condenser. Look on the brake pedal if there is the number 17 embossed in the casting then the brake wedges should also have the No. 17. Your rear brake drums use the smaller rear wheel bearing. Look for the letters LB to be stamped on the engine block next to the intake manifold. Third Gen Auto can supply the correct color, appearance and gauge wires for the generator as well as the rubber washer they pass through to go to the cutout. They are red and black cloth covered wires #12 AWG with high wire strand count for flexibility. The original wire terminals can be reused since they are unique also.
Very nice project. Last edited by Terry,OH; 06-23-2023 at 07:06 AM. |
|
|
|
|
06-23-2023, 11:20 AM
|
#88 |
|
Member
Join Date: Nov 2022
Location: Esparto, CA
Posts: 74
|
Thanks all for the comments.
I had seen that wheel puller in the only manual and it definitely looks like it can handle more torque, from my wrench, than the puller I am using. It looks like I'll have to get one, but it's pretty pricey, especially for a tool I'm unlikely to ever use again. M610 comes from M from my name and 610 which was the number on my car when I first started driving at race tracks, in my street car. Racing came much later. From what I have seen in the manuals and catalogs this is a later model, with the smaller wheel bearing, as noted here. One thing not of the photos in my sources show is the snap ring in the end of the snout of the drum. It appears to be there to prevent the drum from going too far onto the cone-shaped spindle. I'll check for the date codes. Thanks for the tip. Mike |
|
|
|
|
06-23-2023, 02:42 PM
|
#89 | |
|
Senior Member
Join Date: Mar 2014
Location: Jacksonville FL
Posts: 3,963
|
Quote:
|
|
|
|
|
|
06-23-2023, 11:54 PM
|
#90 |
|
Member
Join Date: Nov 2022
Location: Esparto, CA
Posts: 74
|
Thanks Rockfla. I think I can get the car's owner to buy it. There's a chance he might need it in the future. Seeing as I work mostly on Opels, I doubt I will be needing it.
Today was slow, but long, and productive, but not massively so. This kind of work takes a lot of extra effort and care. It would be one thing if this was a running car in good shape, but it is a car that has not run since the 50s. I peeled back to rubber covering in the rear of the trunk to expose the fuel level sender and hooked up that wire. Finally, I actually put something on the car! In past project that marked a turning point, but not so for this one. There is still a lot of digging and scraping to do.  Seeing as I can't get access to the rear brakes I switched to the brake pedal, parking brake, and the rest of the linkage. After removing several pounds of accumulated dirt, grit, and tar, I managed to get the parking brake lever out, inspect and clean it, and spray with primer. I ran out of black paint earlier in the day. Getting out the brake lever mechanism was quite a chore, and I still don't have it out. A bolt holding the rod that bolts to the back of the engine is in the way, and to get it our I need a square tool, like a hex wrench, but square. I may have to make one. BTW, the owner thinks I should be painting everything flat black. I've been using semi-gloss black and so far those parts are not easily seen by people, and he is okay with that. I want to finish painting the engine bay so I can install the rest of the wiring and I prefer semi-gloss. Which should it be? Mike Last edited by m610; 06-24-2023 at 12:08 AM. Reason: Typo |
|
|
|
|
06-24-2023, 04:31 AM
|
#91 |
|
Senior Member

Join Date: May 2010
Location: Yucaipa, CA
Posts: 1,095
|
It worries me a little when people that do not know old Fords decide to build a car. There is a learning curve with these old Fords. It's no big deal, but there are things that are constructed differently than most people have seen on other vehicles. That said, they are the perfect cars to learn how to work on, vehicles don't come any simpler than an old Ford, that was Mr. Ford's concept. That doesn't mean some of the stuff on them isn't a pain in the butt. It takes a lot of patience to work on old cars, Sometimes, just getting stuff a part that has been bolted together for 80-100 years is the worst part of it. And when it's all done it's not going to drive and stop like a new car and if you update it than its not old car anymore. Some people can't live with the brakes, hard steering and rough ride. Personally, I would rather experience an old car as it actually was. You should have somebody local take you for a ride in their old Ford and see what you think about how it drives. Moist people jump into these projects and have never even ridden in an old Ford or drove a Flathead V8. You really should know what it's like.
Do not let somebody tell you, " I wanted a car I could drive, that's why I put a Chevy in my Early Ford" or they installed independent front suspension... I guarantee you that when these cars were new people drove them all over the place, just like people do today with their modern cars. They went cross country, they went everywhere in them. These Ford flathead V8s were dependable, otherwise they would not have made them from 1932-1953. If they are having problems with them today it's not the vintage design, it's because they need to be brought back to new condition and then you can use them as your daily driver. You want to be careful with all the original bolts, they are special on old Fords. They have thick heads and no grade markings on the tops. Ford restorers look for that stuff and so do the people building period correct hot rods. Nothing is worse than seeing modern grade 5 shiny bolts on an old Ford. As you unbolt parts put the bolts back in the threads, so they don't get lost or mixed up. Take pictures of everything before you disassemble it so you will remember things like from what side the bolts went in, so they are like they were when they left the factory, stuff like that. Just tackle one system at a time, do not blow the car into a million pieces because then it becomes too overwhelming. Finish one section at a time like the brakes, then you will be motivated to move onto the next section. You need to be rewarded along the way on these projects by finishing small goals or you will burn out. Buy everything you need to do one section from one vender. Shipping has gotten really expensive, and you if you can order it all from one vender in one box you can cutdown on your restoration costs. Do not order online, talk to them in person and make sure they have the parts in stock before you pay for anything. A lot of these places will keep your money and have you waiting-and-waiting for backordered parts. If they are missing a part, try ordering it all from a different vender to keep the shipping costs down. Do your research on which venders are dependable and which reproduction parts are the best quality. There are all kinds of issues with reproduction parts not fitting or being faulty, its big problem. You will find you need some special tools to work on these old Fords like a rear brake drum puller. You need to decide if you are going to stay stock or a mild hot rod. You don't want to buy parts for an original car and then replace them when you change your mind and build a hot rod. You need to have a plan. The more original you can keep the car the more desirable it will be if you ever decide to sell it to a restorer. An untouched car with patina can be worth as much as a nice daily driver so you don't want to be too quick to change some of stuff and make one part of the car too nice. You want it looking like it just rolled out of a barn. If you build a hot rod, try to stay authentic to a certain time period, guys will appreciate the effort you made. Say you decide 1950 is the time frame you want; you do not use any modern speed equipment manufactured after 1950 on your hot rod. We can all tell a modern new casting reproduction flathead intake from an original 1950 one. You want real 1950 hot rod gauges. Old style wiring... It makes the build a little more challenging, but you are after authenticity. You need to learn about flatheads becuase not all flatheads are created equal. That one has a 21 stud engine, correct for the year but you maybe you want a later 24 stud with more cubic inches. |
|
|
|
|
06-24-2023, 07:02 AM
|
#92 |
|
Senior Member
Join Date: May 2010
Location: South Texas
Posts: 1,631
|
Ford used "chassis black" on the chassis parts, which is semi-gloss.
|
|
|
|
|
06-26-2023, 09:04 AM
|
#93 |
|
Senior Member

Join Date: May 2010
Location: At my kitchen table in Santa Rosa, Ca
Posts: 2,903
|
nice car , and it looks like a fun project
__________________
If it would have been a snake it would have bit ya! i can't spell my way out of a paper bag! |
|
|
|
|
06-28-2023, 01:34 AM
|
#94 |
|
Member
Join Date: Nov 2022
Location: Esparto, CA
Posts: 74
|
Thanks on the color question. My partner in this was sure I should be using flat black.
And, Brenden, it is a really fun project, even with all the accumulated dirt and painted on tar. The small differences from more modern cars, well, semi-modern, are fun to see. Such as actual carriage bolts, and all bolts being fine thread, and castle nuts everywhere. No top-loc nuts at all. And don't worry, we won't be taking liberties with this car that would horrify collectors. Our goal is to get it running reliably on all of the original gear, including the mechanical brakes, and preserving as much of the character of what was once Richard's great-grandfather's car as possible. Naturally, this creates problems making calls on what exactly to do. We can't leave everything as-is, dirty and rusty, and some some areas do need to be cleaned up in order to work on them. We've decided it won't violate the project's goals if we cleaned up the engine bay, for example, but other crusty parts will stay as they are.  I wanted to go ahead and paint the engine bay so I could start installing the wiring. Today I spent cleaning and painting parts we've taken off the car. The pedals and e-brake handle are ready to go back in, but I'll hold off until I get the floor repaired.  I did replace the steel screws for the electrical connections with brass. I'm wondering if replacements for these are available. If not, can they be repaired? I'd think welding cast iron could be a challenge.  I finally got around to painting the frame in the engine bay. We've decided we want to engine bay to look nice, seeing as a fresh motor is going in there. Here's some patina we'd like to preserve.  Tomorrow I'll take on the inner fender. 
|
|
|
|
|
07-05-2023, 10:37 PM
|
#95 |
|
Member
Join Date: Nov 2022
Location: Esparto, CA
Posts: 74
|
Work continues in the front section, until we can figure out if the recommended brake drum puller will work for our car. I really prefer to get the wheels and brakes, and suspension taken care of before moving on to other parts of the car.
It was dirty work but the inner fender liners cleaned up okay.  They look good installed. The installation is temporary. I have to get the sealing strips first.  With the engine area clean and painted I can start installing the wiring. I had no problem connecting the fancy plug to the steering column, but I'll need to get the pigtails to complete the connections to the lights and horn.  I'll be moving on to the interior next. I need Richard's (car owner) approval to remove the seat. He's rightfully concerned about the fabric and how it seems to be integral to the rear deck. I need to find a clean way to separate it. Richard want's to stay with the original interior fabrics. They will get patched but not replaced. The driver-side floor is damaged and rotted out, and there's not much left of the battery tray. The catalog I have shows wooden floor panels. From what I see in the car at the moment is metal panels were installed over the wood panels. Is that correct? While I am working inside I'll remove the heater and check it out. The radio will stay in for now, but if we can find a shop to work on it that would be great. In more modern electronics capacitors, mostly electrolytics and tantalums, go bad when not used. I figure neither of these were used in 1930s radios, but we will see. The filler neck came out of its vinegar soak yesterday. It looks great after a little wire brushing. A lot of scale came out of the inside but that looks good, too. I still want to see if I can run a brush around in it.  It's been a fun project so far. |
|
|
|
|
07-07-2023, 08:12 AM
|
#96 |
|
Senior Member
Join Date: May 2010
Location: Fairfax Station, VA
Posts: 529
|
The answer to your question on floorboards is on pages 11 and 12 of the 1935-36 Ford book published by the Early Ford V8 Club. I think in a prior post you mentioned you purchased a copy. If not, it's an invaluable source of all kinds of correct information for your project.
__________________
1935 157" 1 1/2 ton stake truck undergoing full original restoration 1936 131 1/2" panel truck rescue preservation Author of the 1935-1936 Ford Model 51 V8 Truck book published by the Early Ford V8 Club of America |
|
|
|
|
07-11-2023, 12:19 AM
|
#97 |
|
Member
Join Date: Nov 2022
Location: Esparto, CA
Posts: 74
|
Model51, thanks for the tip. I just read it. Very helpful, but now I have to look more closely at the car and see how to proceed.
Sometimes this job seems about as sexy as washing dishes at a restaurant. I do a lot of cleaning, wire brushing, using taps and dies to clean up nuts and bolts, and so on. It's not boring, but I'd think anyone could do it. But would they? I'm taking a lot of pride in this project, even if it isn't a restoration. I'd love to see this car on the streets again. Today's fun, other that what I just listed, was putting a part back on the car, which always makes the day feel special. In this case it was the rear/spare tire holder. Unfortunately I don't have a spare tire so I couldn't put the tire cover on, but I had a rim and that provided some satisfaction. See below.   The plan for tomorrow is to finish getting the rear bumper mounts finished and installed, then take a hard look at the floor on the driver's side. I also want to get the heater out and give it a good going over. That should be enough for one day. Mike P.S. It looks like we are going to need a rear bumper. Last edited by m610; 07-11-2023 at 12:34 AM. Reason: typo |
|
|
|
|
07-11-2023, 08:18 PM
|
#98 |
|
Member
Join Date: Nov 2022
Location: Esparto, CA
Posts: 74
|
I found interesting things in our parts stash. For example, the wheel looks like it has never been used.
 The label seems to confirm this.  Also, this is interesting.  And I found our spare tire, so I just had to do this:  I still think I'm missing a part, but it looks great so far. Other parts of the car I worked on do not look so great. |
|
|
|
|
07-11-2023, 08:25 PM
|
#99 |
|
Member
Join Date: Nov 2022
Location: Esparto, CA
Posts: 74
|
I pulled the heater. It looks like it has been out before. The grommets are missing and anti-seize was used on the mounting threads, the firewall was also a little bent. But the heater core itself looks great and I see no signs of previous leaks. Still, I will test it before putting it back in the car.
 I'm not sure if the fan motor works. The external wiring is shot and I don't have a 6-volt battery or power supply. If it doesn't work there are probably shops in Sacramento that can rebuild it. |
|
|
|
|
07-11-2023, 08:35 PM
|
#100 |
|
Member
Join Date: Nov 2022
Location: Esparto, CA
Posts: 74
|
The floor and battery tray will be some work. I cut out the rotted floor and cleaned the area. I think we can get by with splicing in a replacement. Otherwise it looks like we would have to lift the body off the frame.
 Here's were the battery tray used to be.  And this is what was being used as a battery tray.  Somehow that does not look OEM to me. Mike |
|
|
|
|
07-11-2023, 08:39 PM
|
#101 |
|
Member
Join Date: Nov 2022
Location: Esparto, CA
Posts: 74
|
Final work-bit for the day. I love this little fan. I hope the motor works. The external wiring will have to be replaced, obviously, but insulation on armature windings is different so maybe new hook-up wire and a little cleaning is all it needs.

|
|
|
|
|
07-12-2023, 01:00 AM
|
#102 |
|
Member
Join Date: Nov 2022
Location: Esparto, CA
Posts: 74
|
I am starting to look for a rear bumper. An older one with patina will be fine. New ones are available, but...
Also, it would be nice of the original radio worked. I might take it out to see what we've got. Older radios did not use electrolytic or tantalum capacitors, so that will help. Most likely we'll find a shop that can repair/rebuild it. Unless you guys know of a better solution. |
|
|
|
| Sponsored Links (Register now to hide all advertisements) |
|
|
|
07-14-2023, 01:56 PM
|
#103 |
|
Member
Join Date: Nov 2022
Location: Esparto, CA
Posts: 74
|
I've been told we already have the rear bumper.
The two electric motors (heater and fan) look fine on the inside. I just need to replace their power cords.  Two days ago I picked up a few parts from Sacramento Vintage Ford, fuel line and some wiring pigtails. Really nice folks, and this was on their counter.  I unrolled and fed the fuel line under the car and hooked it up at the tank. I was not happy seeing how the original fuel line just sat loose under the car and will do something different this time. I attempted to connect the pigtails to the headlight but could not get them through the hole. I'll remove the connector/ends today and will try again. I don't really like how the wiring looks where the pigtails connect to the main harness. What do you guys do here? See the photos below.  
|
|
|
|
|
07-15-2023, 02:25 PM
|
#104 |
|
Member
Join Date: Nov 2022
Location: Esparto, CA
Posts: 74
|
It took a lot longer to get that fan motor back together than expected. It was tricky getting all of the parts in the right place at the same time, but I prevailed.
 Next up was the wiring. I had to remove the connector tips to get the pigtail down the hole for the headlight wiring, and even then it was a tight fit. Any time the wires in the bundle crossed over each other it made a thick part and that was the hangup. I'm reusing the headlight connectors, and two of three connections went well. The red wire would not go through the hole, and the day ended before I could finish.  The scene when I left for the day. 
|
|
|
|
|
07-20-2023, 11:57 AM
|
#105 |
|
Senior Member

Join Date: May 2010
Location: Minnesota
Posts: 1,138
|
The headlight sockets appear to be new or are they original? Please use only the original Ford sockets, since the nice shiny reproductions are just that, but they do not have spring steel and when you try to install in the reflector and bulb, they will NOT WORK properly. Ask me how I know?
|
|
|
|
|
07-31-2023, 01:19 PM
|
#106 | |
|
Member
Join Date: Nov 2022
Location: Esparto, CA
Posts: 74
|
Sponsored Links (Register now to hide all advertisements)
Quote:
Thanks for the tip. We are reusing the original sockets. |
|
|
|
|
|
07-31-2023, 01:22 PM
|
#107 |
|
Member
Join Date: Nov 2022
Location: Esparto, CA
Posts: 74
|
Battery question - The space available in front of the driver is about 7.5" tall, and we can't find a battery under 8.5" tall. Are suitable batteries, ones that fit, available, and if not, what do people do, relocate the battery to the trunk?
|
|
|
|
|
08-04-2023, 12:59 AM
|
#108 |
|
Senior Member
Join Date: May 2010
Location: Minnesota
Posts: 1,138
|
There was a woven asbestos cloth cover for the wiring coming out of the headlight switch. Since asbestos is difficult to find, I used the silver colored woven cloth cover used for modern spark plug covers that are rated for high temperature. They typically are used with headers on modern cars.
|
|
|
|
|
08-04-2023, 10:47 AM
|
#109 | |
|
Senior Member
Join Date: May 2015
Posts: 8,166
|
Quote:
__________________
The only thing nice about being imperfect is the joy it brings to others.... "Silver rings, your butt! Them's washers!" "We shot our way out of that town for a dollar's worth of steel holes!" - from 'The Wild Bunch' - 1969 https://www.youtube.com/watch?v=7NReUd2_0u0 |
|
|
|
|
|
08-06-2023, 01:53 PM
|
#110 | |
|
Senior Member

Join Date: Dec 2014
Location: California
Posts: 802
|
Quote:
ph: 800-722-0854 They are very well known, been in business for decades. THEY QUOTE YOU A PRICE BEFORE YOU SEND YOUR RADIO! My radio was completely rebuilt including the fm yellow light!, returned in two weeks. Upon using the radio in the car, I noticed a problem; phoned them. They said ship it to us COD. = within days they found a bad capacitor, and shipped it immediately. I am amazed by these very professional folks. This took place half-dozen years ago. My radio is brand new to this day! Very highly I recommend. Patrick 'Pat' Malone Last edited by highbeams; 08-06-2023 at 02:03 PM. |
|
|
|
|
|
08-06-2023, 08:31 PM
|
#111 |
|
Member
Join Date: Nov 2022
Location: Esparto, CA
Posts: 74
|
Thanks for the recommendation. I found them on the Internet so it looks like they are still in business. I'll give them a call tomorrow.
|
|
|
|
|
08-06-2023, 10:05 PM
|
#112 |
|
Senior Member
Join Date: May 2010
Location: Minnesota
Posts: 1,138
|
You show the filler neck and there should have been a lead washer between the neck and the tank. I hope you found the old one and can replace it with a new lead washer to seal the neck to the tank. I would not recommend any other type of seal for this part.
|
|
|
|
|
08-13-2023, 10:52 PM
|
#113 |
|
Member
Join Date: Nov 2022
Location: Esparto, CA
Posts: 74
|
Thanks. We have the lead washer. We're holding on installing the filler neck until the sheet metal back there has been repaired.
|
|
|
|
|
08-13-2023, 11:12 PM
|
#114 |
|
Member
Join Date: Nov 2022
Location: Esparto, CA
Posts: 74
|
A quick update.
The headlights are all back together. We haven't tested them yet, but what could possibly go wrong? 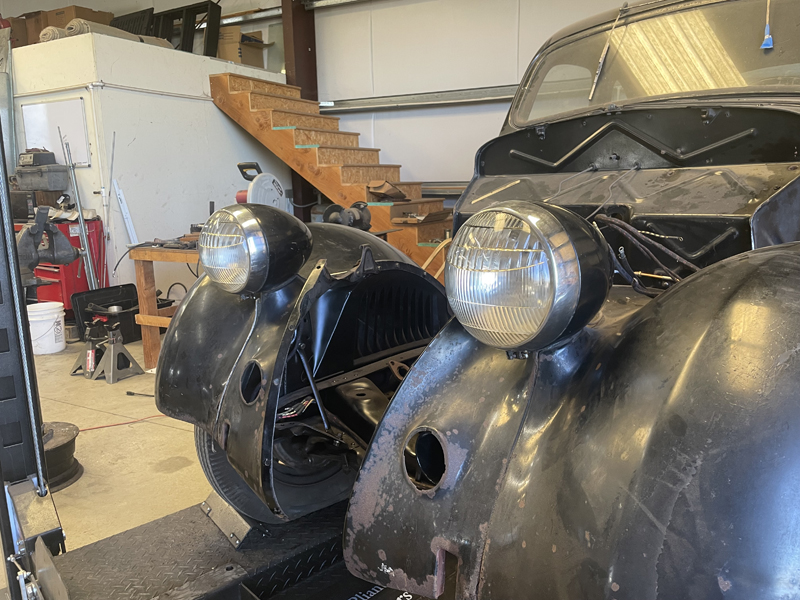 We took the radio out just to make room. We'll see about sending it to the shop recommended above.  I'm still unable to get the defroster fan to work. I guess I'll take it apart again and check for breaks in the wiring. The heater is back together and is working. I flushed the little radiator and replaced the power cord for the fan. We won't put it back in the car until we've taken care of the floor. (Love the patina!) 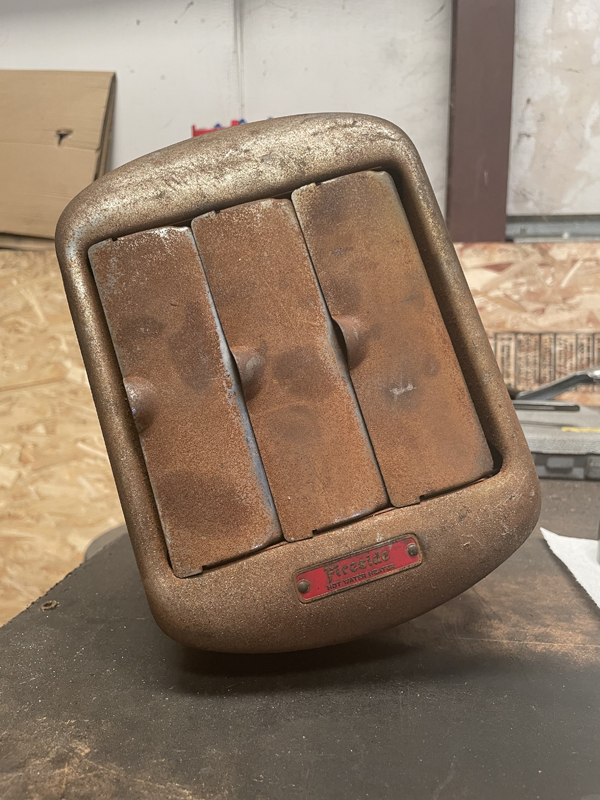 Part of the section of sheet metal on the driver-side floor has rotted away. We're thinking of making a replacement, or if we can find one pre-made, we'll go for that. Richard does not want me to remove the seat so I'll be splicing it in. The wooden sections toward the front are in bad shape but making replacements will be easy. It's just 3/4" plywood. With some of the plywood scraps I can fix the pieces between the frame and floor on the driver-side. The battery tray came out nice. I had some sheet metal bent, then I painted and installed it. The battery sits 3/4" lower than originally but I think that is okay. There's still space between the top of the battery and floor.    Mike |
|
|
|
|
09-18-2023, 08:30 PM
|
#115 |
|
Member
Join Date: Nov 2022
Location: Esparto, CA
Posts: 74
|
Sorry for the lack of updates. We've been making slow progress on uninteresting parts of the car, such as the floor panels. I made new wood panels and cleaned and painted the metal panels. The driver-side metal floor panel has most rotted away so I made a replacement, which will take some doing installing it.
But today, success! I got the rear drums off. It still wasn't easy, and when the drums broke free they sounded like I broke them, but instead they both came off. The puller tool fit and worked well.  As I was trying to get the drum off I needed to used a cheater bar, and even then it required some effort, too much, I feared. I stopped and took it off again to make sure everything was okay. It all looked okay. I tired again and it would not budge. I was about to leave to get my propane torch but decided to try one more time, and this time no additional effort was required to turn the tool. I figured either the threads were traveling or the drum was finally moving. Worrying that the threads were starting to go I removed the puller again to look, and the threads were okay. Once I had it back together again I continued soon I heard a loud bang, and the wrench was suddenly loose. I figured either I had broken something or the drum was free. Fortunately the drum was free. The story for the driver-side brake was about the same. It took some effort but it came off, again, with a bang. The drums themselves look great, very few signs of wear, in fact, very few signs of use. I think a brake job must have been done soon before they disconnected the rear brakes. The problem with the brake was super obvious. The oil seals had failed. Maybe when that brake job was done they left the old ones in. Anyway, the right-rear was well-oiled and oil was everywhere, coating everything. The left rear had some leakage but was mostly dry. 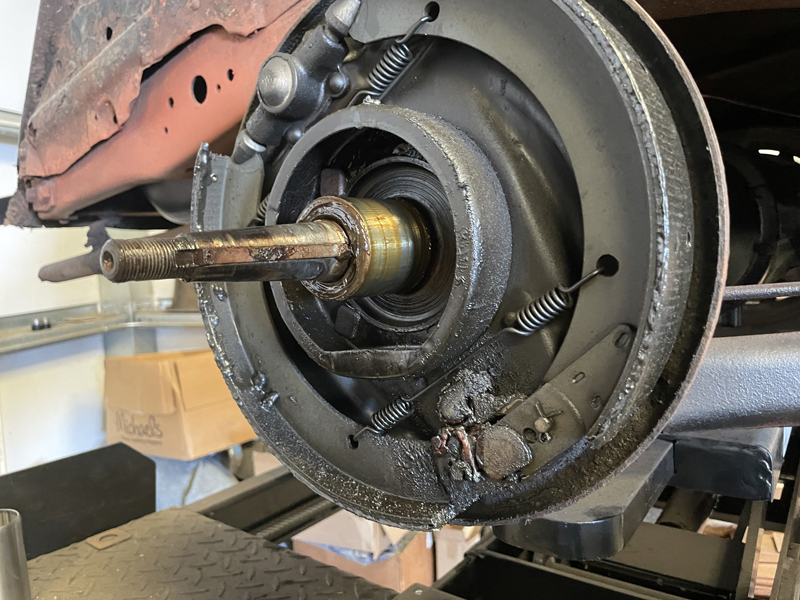   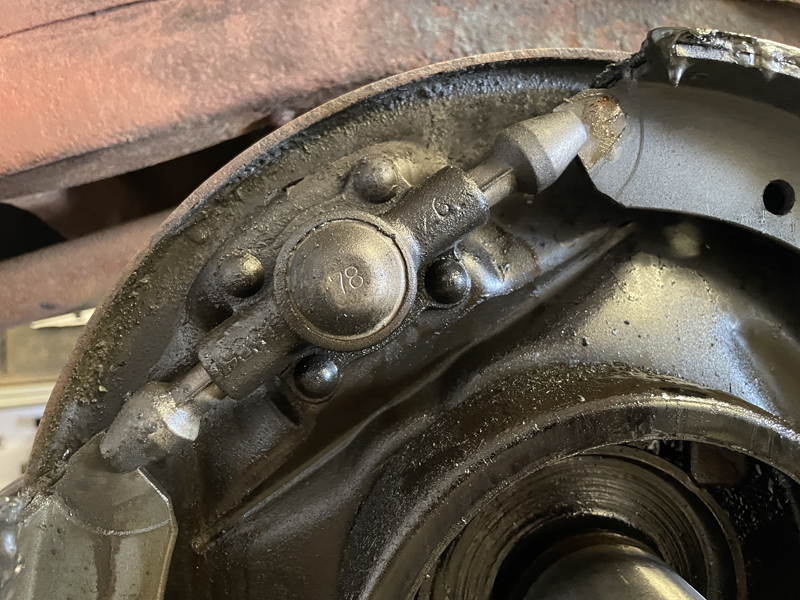  I've got the parts on the bench, soaked with PB-Blaster to loosen everything. Tomorrow I will clean them up and maybe I'll take the drums in to get resurfaced. Meanwhile, I'll locate new brake shoes and seals. Once I have parts it will be easy to finish the rears then I'll start on the fronts. Any recommendations on what other work needs to be done in the rear? I'd like to get the bearing out to clean, inspect, and re-grease. Anything else? Mike |
|
|
|
|
09-18-2023, 11:12 PM
|
#116 |
|
Senior Member

Join Date: May 2010
Posts: 2,488
|
The axle key inner upper edge, can cut into the drum, so try to have a rounded key edge inside/ upward toward drum slot. Club member had this problem. Newc
|
|
|
|
|
09-19-2023, 02:13 AM
|
#117 |
|
Member
Join Date: Nov 2022
Location: Esparto, CA
Posts: 74
|
Thanks for the tip. It's probably come out as I clean things, so I'll make sure it goes back in right.
Also, I'll be using a dab of anti-seize when I put this back together. It'll save someone some trouble 40-some years from now.
|
|
|
|
|
09-19-2023, 06:37 AM
|
#118 | |
|
Senior Member
Join Date: Oct 2016
Location: harpursville ny
Posts: 1,040
|
Quote:
|
|
|
|
|
|
09-19-2023, 11:21 AM
|
#119 |
|
Member
Join Date: Nov 2022
Location: Esparto, CA
Posts: 74
|
Interesting. Why?
Edit - I googled and found nothing to help answer this question. Several people point out that the friction of an un-lubricated taper joint is why everything should be assembled dry. None of the cases I read about ever mentioned a key-way, which these axles have. I'd think the key-way takes care of the friction part of the equation, and the taper is mostly there to ensure alignment. Thoughts? Last edited by m610; 09-19-2023 at 11:36 AM. |
|
|
|
|
09-19-2023, 12:39 PM
|
#120 |
|
Senior Member
Join Date: Oct 2016
Location: harpursville ny
Posts: 1,040
|
The torque should not be on the key as it will wear the key way and can cause the axle to crack. I have seen pics. of this posted here maybe do a search.
|
|
|
|
|
09-20-2023, 12:18 AM
|
#121 |
|
Member
Join Date: Nov 2022
Location: Esparto, CA
Posts: 74
|
I'm not trying to be argumentative, but I ask genuine question on the matter and a "here's what I do" answer won't do. I've googled this question and that's pretty much all I am hearing. Some people use a copper-based anti-seize, others say you should not use anything. In the latter case, if a reason is given, it is that the friction between the two parts is necessary. In all of these cases they were talking about situations that did not involve a keyway, or at least none was mentioned.
My Opel engines have a keyway on the nose of the crank. It turns a gear which operates the oil pump, fuel pump, and distributor. It also sets the timing, to an extent, for everything it turns. This is not on a tapered shaft so the keyway is necessary, and I've never heard anyone express a concern about the load on the keyway fracturing the crank. Granted, the loads are lower, but still. The issue has never even been broached. In our case we have a keyway that is nearly 4" long, possibly longer. (I have not measured it.) If loading it could lead to axle failure, why is it even there? I don't think there is any issue concerning timing. And given it's length, I'd say it was meant to carry a load and that is is capable of carrying a considerable load. My reason for wanting to use anti-seize is to prevent the axle and drum from essentially welding themselves together. If you take two clean pieces of metal and rub them together hard enough, the oxide keeping them from bonding when simply touching each other, is rubbed away and you have actual bare metal in contact with actual bare metal, and when that happens they will bond, aka, weld. I think this is why it is so difficult to get these parts apart, not because they are wedged tightly together, or that they have rusted, but because they have welded themselves together, partially. In industry they do this for certain metals. As things are now, I am going to clean everything up and apply a thin layer of anti-seize, unless someone can give me a good reason not to. And I welcome hearing a good reason not to. In other news, I cleaned up the drums today and they are in great shape. There are hardly any signs of wear in them. Tomorrow I'll paint them and set them aside while I clean up the backing plates. Today's photo:  The bearing and race look great. All I am going to need to finish this is the seal, shoes, and some axle grease. Mike |
|
|
|
|
09-20-2023, 02:39 AM
|
#122 |
|
Senior Member

Join Date: May 2010
Location: Masterton, New Zealand
Posts: 3,835
|
The advice you have been given is correct; you assemble tapers dry. This is a standard engineering principle. And is why you had so much trouble removing the drums. That's how it's supposed to be. And yes, that is the way I do it!! I have been following your rebuild, good work. Good that you are enjoying the process and learning about this era of automobile. Keep up the good work, which includes assembling the hubs onto the axles dry and torquing, subsequently retorquing and retorquing after a few miles. These things MUST be tight [and dry]
__________________
Unfortunately, two half wits don't make a whole wit! |
|
|
|
| Sponsored Links (Register now to hide all advertisements) |
|
|
|
09-20-2023, 03:31 AM
|
#123 | |
|
Senior Member
Join Date: May 2010
Location: East Shore of LAKE HOUSTON
Posts: 11,115
|
Quote:
Mike ..... Rest assured that nobody is going to accuse you of being "argumentative". Everyone here in America has the God-given right to IGNORE any answer that comes from an internet-based advice forum, and a bunch of dummies trying to save your butt. I am not a credentialed or degreed mechanical engineer, so I really don't have a means of putting the science involved here into lay terms so that you can understand how two precisely-tapered surfaces are designed to 'lock-up' ..... precisely the situation that you will be attempting to prevent with your application of anti-seize. You don't seriously think that that little piece of 1/4" key stock is what allows you to spin your tires as you 'peel-out' (if you're so inclined)? Have ya ever heard of a "MORSE TAPER"? An entire industry has been based on this theory for at least the past hundred plus years. Look into it! If you'll give any of this TAPERED AXLE crapola a few moments of reasonable consideration, you would eventually realize why every Ford dealer in America had more than one tool in their SERVICE Department made specifically to separate the tapered drums from the tapered axles. ALL of us serious old Ford geezers of any worth own one of these not-inexpensive tools designed exactly for that purpose. And this is exactly the reason for that single axle nut being required to be torqued to 205 foot pounds (PLUS). It's the guys that DON'T torque those nuts nearly that tight ('cuz they know better and that will make the drum easier to remove the next time) that cause most of the cracked axles and axle failures that we occasionally hear about. Those tapered surfaces NEED to be tightened to the extreme for the surfaces to take advantage of the surface friction produced. It's that drum moving around on that axle KEY that causes the inner end of that key stock to cause a crack to form. Every time that wheel/axle goes around, the crack propagates through the axle until it meets its yield point and fails. That's when the owner finally realizes (hopefully) what a dumb idea it was not to follow this ages-old advice .... dry, clean and tight! AND, it really ain't no fun replacing an axle after it breaks, not to mention the damage that tire and wheel is going to cause on your rear fender and possibly more parts as the wheel/tire departs the rear end. And heaven forbid that wheel/tire causes an accident with another/more vehicle(s)! Coopman |
|
|
|
|
|
09-20-2023, 07:15 AM
|
#124 |
|
Senior Member

Join Date: Jan 2011
Location: Central Ohio
Posts: 5,070
|
Another thing to consider is "lapping" the rear hubs onto the axle stubs. You can use a fine lapping compound as well as blue die-chem to see how well the tapers fit together.
This can help ensure that the morse taper is doing the best job that it can (due to a consistent contact surface between the axle the hub). As others have noted, you want them to go together DRY upon final assembly! |
|
|
|
|
09-20-2023, 10:49 PM
|
#125 |
|
Member
Join Date: Nov 2022
Location: Esparto, CA
Posts: 74
|
I do plan to clean everything thoroughly before it goes back together, lightly sanded and wire-brushed to remove any rust and rough spots.
I totally get it that you want the drum on tight, but the question remains, why is there a keyway in this setup? It is not needed to set the position (rotational) of the drum and wheel, so I figure it is there to keep the drum from rotating. Or maybe it is there just in case the drum gets loose on the axle. I do have degrees and credentials in a related area, metallurgy, not that that means much here other than how it warps my thinking. I figure a 1/8" deep 4" long keyway can carry a lot of load. Figure 1/8 x times 4 and you have 1/2 square inches of steel working for you. Mild steel is good for around 40,000 psi, hardened steels more than double that, so at minimum that means we're looking at 20,000 lbs of force it can handle. These are rough numbers. I would need to look at shear strength instead of tensile strength, plus the loads the keyway can expect to see given wheel diameter, axle diameter, etc. I'm not up to that at the moment. But again, why is the keyway even there? I have an old copy of Machinery's Handbook. I'll see what I can find in it. Mike |
|
|
|
|
09-21-2023, 03:00 AM
|
#126 |
|
Senior Member

Join Date: May 2010
Location: Solihull, England.
Posts: 8,755
|
Sponsored Links (Register now to hide all advertisements)
But they did use the keyway and people familiar with early Fords just accept it and carry on using it. Collectively the contributors to this forum probably have many hundreds of years of early Ford experience. So why dismiss "here's what I do" replies? The accepted good practice is to have everything clean as a whistle and have the nut very tight and regularly checked. If you have been here for a while you will know which contributors advice can be relied upon. Mart. Edit: Re the keyway: It isn't a pure shear strength consideration but a fatigue failure situation when people do not have the nuts tight enough. |

|
|
|
09-24-2023, 02:20 PM
|
#127 |
|
Member
Join Date: Nov 2022
Location: Esparto, CA
Posts: 74
|
Seems odd that Ford would spend time and money on something not needed.
I'm not totally dismissing the "here's what I do" reasons, as it seems to be working, but that doesn't mean it's the best way, and I'm not one to just stick with tradition if I think there might be a better way. Does anyone remove the keyway when they work on this part of the car? Eliminating it would seem to remove the fatigue problem. Moving on, our local parts place, Sacramento Vintage Ford, has the oil seals we need, but not the brake shoes. Does anyone know of a source for these? Or, do people buy the kits and reline them themselves? Next up, while waiting for brake parts to show up, are three windows that have been de-laminating for a while. I think there might be a local (to Sacramento) source for replacement glass. I should also look into replacing the seals or gaskets while I am at it. Mike |
|
|
|
|
09-24-2023, 02:50 PM
|
#128 |
|
Senior Member
Join Date: May 2010
Location: South Texas
Posts: 1,631
|
You can probably clean the shoes up. The lining material looked thick. Use brake cleaner or starting fluid without upper cylinder lubricant and spray away. You will be surprised and how much gunge comes out of the woven lining before it cleans up, but it will. Make sure the lining is on tight with no looseness or loose rivets.
|
|
|
|
|
09-24-2023, 09:27 PM
|
#129 |
|
Senior Member
Join Date: Aug 2010
Location: East Boothbay, Maine
Posts: 279
|
Ok, I'm going to jump into the fray on this taper thing. It's interesting to note that Morse taper drills have a parallel sided tang at the end of the shank. Some would argue that its purpose is for removal with a drift key. Others would say the tang is to prevent the drill from slipping. I tend to agree with the latter opinion. Otherwise, why would the tang be parallel sided and fit into a milled slot? That slot could have easily been a far less expensive drilled hole to accommodate a round tapered drift pin. But that's not the case.
As for Ford and the key and machined keyway, it was not just Ford. General Motor did it as well. My 37 LaSalle has the same setup and most likely do similar years Cadillac. Frankly all it would take is one slight slip between the axle and the hub to create a galling situation and now you have a real mess. |
|
|
|
|
09-24-2023, 09:38 PM
|
#130 | |
|
Member
Join Date: Nov 2022
Location: Esparto, CA
Posts: 74
|
Quote:
|
|
|
|
|
|
09-26-2023, 08:00 PM
|
#131 | |
|
Member
Join Date: Nov 2022
Location: Esparto, CA
Posts: 74
|
I found something in Wikipedia that shed some light on the tapered joint question.
Link: https://en.wikipedia.org/wiki/Machine_taper The interesting part, to me is this: Quote:
|
|
|
|
|
|
09-26-2023, 08:15 PM
|
#132 |
|
Member
Join Date: Nov 2022
Location: Esparto, CA
Posts: 74
|
Today I started removing windows that had de-laminated. The driver-side rear came out okay, and the rear window too, although that one too more effort. I didn't want to break it. Once out, it was interesting. It came out as two pieces of glass and between them a thin sheet of plastic. I'm sure that at one point these were bonded together, like the rear quarter is. I can see the plastic layer from the edge.
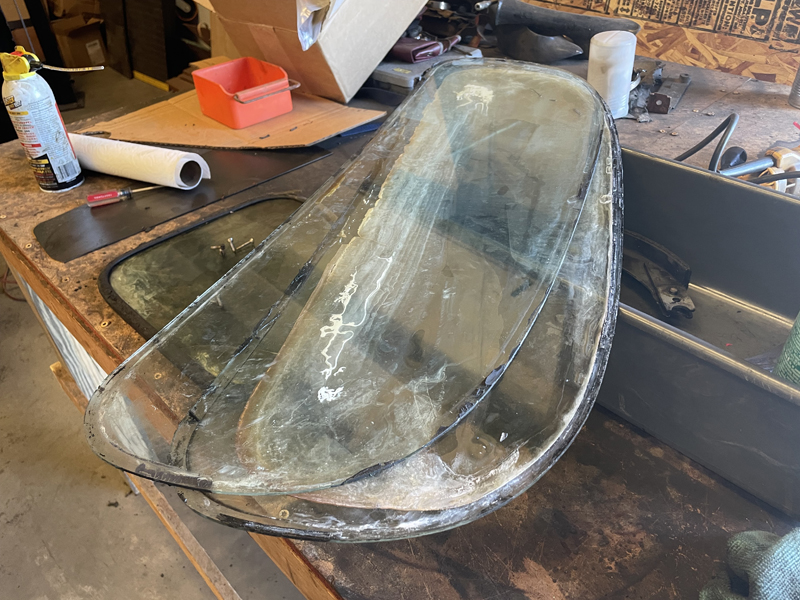 I'm having trouble getting the driver-side door window out. It looked like it may have been installed in the channel along with some heated tar to hold it in place. With some PB Blaster and a screw drive I can easily dig some of it out, but that won't get me far. I can't see an easy way to disconnect the channel it is mounted in, so it is looking like I have to deal with that tar somehow. Any suggestions? Mike |
|
|
|
|
02-19-2024, 09:12 PM
|
#133 |
|
Member
Join Date: Nov 2022
Location: Esparto, CA
Posts: 74
|
I'm still here, and the project has not been abandoned.
Richard, the owner, has been out of the country for a bit and I was sidelined by a medical, but I'm back now. I have a short list of things to do before Richard gets back in April.
Today it was brakes. Three are done, only the driver-side front remained. I opened it up and other than being really greasy it looked okay. I'm wondering if the drums hadn't been resurfaced and shoes replaced before the car got parked, back in 1957. Here's what I saw after getting the drum off.  Now in primer.  All cleaned up. It will get some paint. 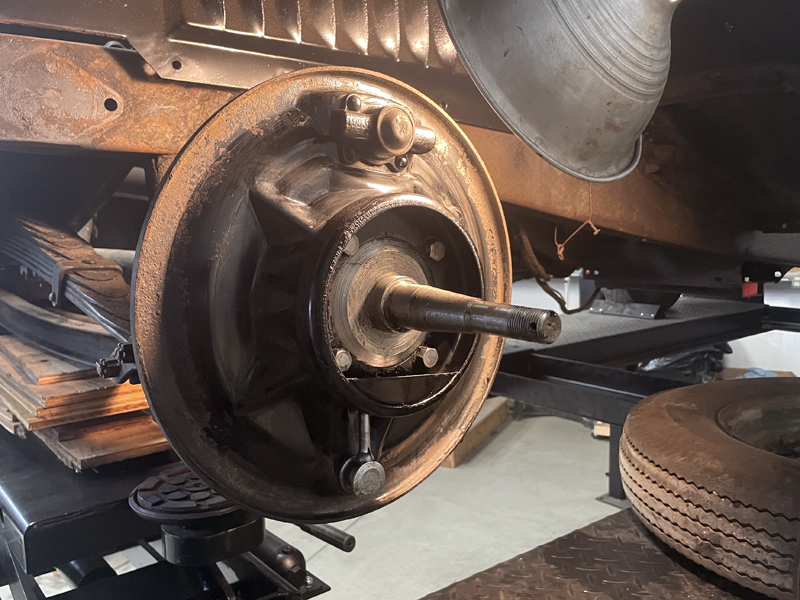 The small parts. 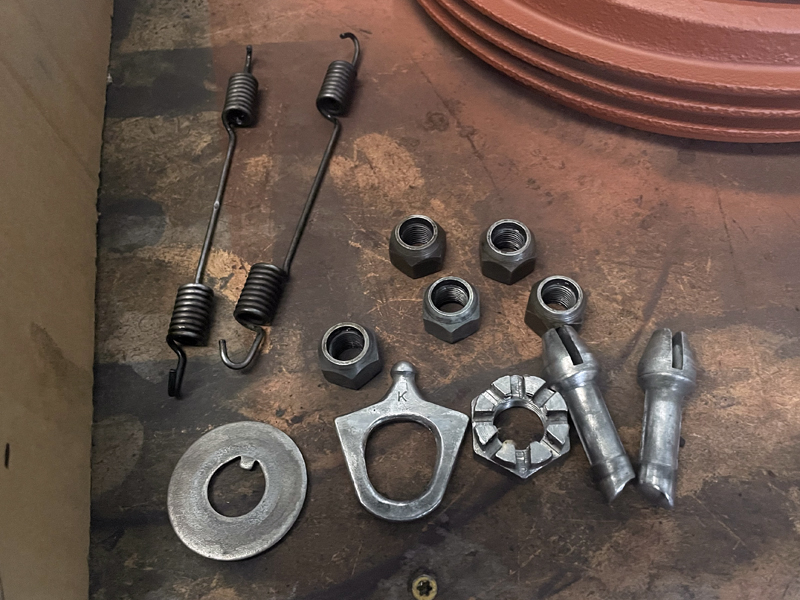 Fresh paint, still shiny because it is wet.  Oh, and I am determined to get this fan working again.  Mike |
|
|
|
|
02-19-2024, 09:14 PM
|
#134 |
|
Member
Join Date: Nov 2022
Location: Esparto, CA
Posts: 74
|
After everything I listed above is done we will take the motor to a shop that will do the run-in, attach the clutch and transmission (overhauled years ago), and repair the fenders. While they are at it they might as well install the motor, too.
It's looking like this car will be on the road come summer. Mike |
|
|
|
|
02-20-2024, 11:10 PM
|
#135 |
|
Member
Join Date: Nov 2022
Location: Esparto, CA
Posts: 74
|
Modest progress today. I took care of a little painting, mostly for rust protection, but it looks better, too. I had to cut a few bolts to get the passenger side fender off. Now that I've figured out how that goes I'll get the other one tomorrow.
I spent most of the day on the road to see the nice folks at Vintage Ford in Rancho Cordova, CA. I picked up a few small parts, talked about getting window glass, and my friend talked about his coming '32 Ford project where the power plant will be from a Tesla. No photos worth posting today. Quick question, regarding shocks, are the really for the left and right, or can they go on either side as long as the arms are on correctly? Mike |
|
|
|
|
02-21-2024, 06:10 AM
|
#136 |
|
Senior Member
Join Date: May 2010
Location: Saratoga Springs, NY
Posts: 1,111
|
Welcome aboard, best of luck with the 36
|
|
|
|
|
02-21-2024, 08:48 AM
|
#137 |
|
Senior Member

Join Date: Jul 2010
Location: 36 miles north of Albany NY
Posts: 2,954
|
I think the shocks are the same without the arms. If you need them rebuilt or have any question here is the go to guy for lever shocks. I had him rebuild all 4 of mine.
|
|
|
|
|
02-21-2024, 12:12 PM
|
#138 | |
|
Senior Member
Join Date: May 2015
Posts: 8,166
|
Quote:
__________________
The only thing nice about being imperfect is the joy it brings to others.... "Silver rings, your butt! Them's washers!" "We shot our way out of that town for a dollar's worth of steel holes!" - from 'The Wild Bunch' - 1969 https://www.youtube.com/watch?v=7NReUd2_0u0 |
|
|
|
|
|
02-21-2024, 10:43 PM
|
#139 |
|
Member
Join Date: Nov 2022
Location: Esparto, CA
Posts: 74
|
Thanks, all.
After looking at the shocks carefully I noticed a single left/right difference, the location of a filler hole/plug. I installed the shocks with this feature pointing up, in case future topping off is needed, which I sort of doubt. But no matter because this port is not accessible with the shock on the car, but they are easy to remove. I finished up the last brake today. When I took it apart it was loaded with grease. When I installed everything I used much less. It should be fine. Same with the wheel hub. It was packed with grease, over a cup in total. I went with much less, but still plenty. Both front fenders are now off. They will be repaired and reinstalled with the nicer set of running boards. With the fenders off I was able to clear away a lot more of that tar that I figures was undercoating. Was also able to remove a rat's nest. Rat's nest removed. 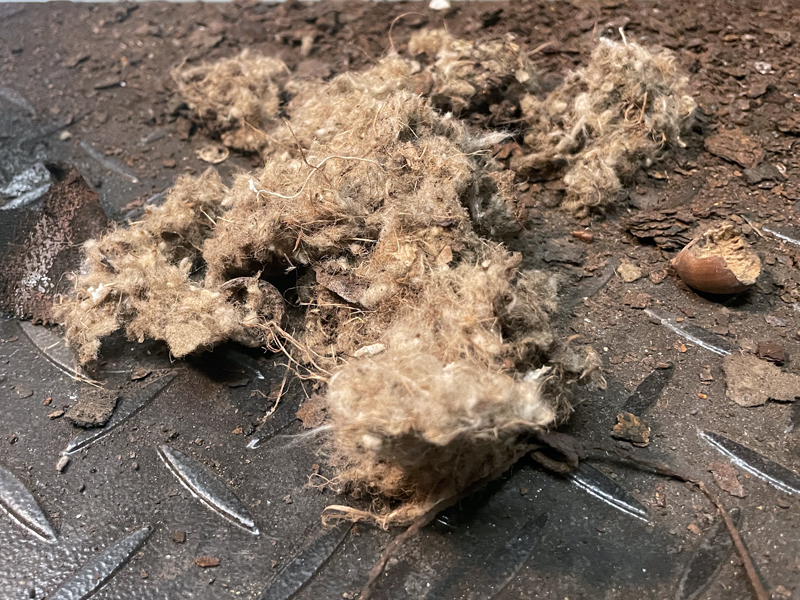 Front brake going back together.  Front brake done.  Fenders off.  Mother Nature's approval of my work.  Mike |
|
|
|
|
02-22-2024, 10:58 PM
|
#140 |
|
Member
Join Date: Nov 2022
Location: Esparto, CA
Posts: 74
|
I didn't expect today to go pretty much the whole day, roughly 11 AM - 5 PM. It was just small stuff, but you know how small stuff goes.
I finished up on installing the shocks, by installing the links and the last shock. (I had to wait for yesterday's paint to dry.) After the shocks (Aftershocks?) came the brake rod hardware that reduces vibration. The fronts were a bit of a chore but they got done. In the rear there was more rust but I managed to get things apart without breaking anything. I would have finished them up except the parts we have are wrong. The label says they are for the rear, and they look very different from the fronts, but the ones on the rear of the car look like the fronts. I'll see about getting replacements. Question, the car has springs pulling each rod towards the frame. Were those stock/original? I installed the brake and clutch pedals and hooked the brakes up. I still need to install the parking brake lever but I can't figure out where it goes. Maybe someone here can help, or maybe all I need is a good night's sleep and a fresh look in the morning. With a little help I got the last of the front fender sheet metal off. Looking around at other parts we had one hand, I found the battery cables and installed them. I hooked up the ground (+) but not the power side (-). I'll get a plastic boot to cover the hot (-) terminal so that it would be very difficult to short the battery. I installed the foot-press starter switch and connected the battery cable, but did not connect the other end to the battery. It's too early for that and we don't want to have a live circuit while we are working on the car. The fact that the outer insulation for the wiring is fabric still bothers me. There are a few places where chaffing can lead to problems. In those areas I'll cover them with a harder plastic wire covering. I'll also paint the exposed terminals for the brake light switch with liquid electrical tape, to keep things there clean and dry. As for the windows, the rear and rear-quarter are clearly bad, as is the driver-side window. We'll be replacing them. It looks like tomorrow will be a short day for me on the car, and after that, there's next to nothing to do until the owner returns from Asia. No photos today. Mike |
|
|
|
|
02-28-2024, 03:27 PM
|
#141 |
|
Member
Join Date: Nov 2022
Location: Esparto, CA
Posts: 74
|
That short day turned out to be not so short. It turned out I needed to remove the clevis and jam nut for the brake rods back at the rear brakes so I could get the anti-rattler on. That took some effort, and time, but I managed to get them off without breaking anything.
The car is off the lift now so that the upholstery can be patched. After that it does to a shop that will take care of rust damage that prevents us from mounting the running boards.   The rear anti-rattlers in the catalogs did not match what was on the car. 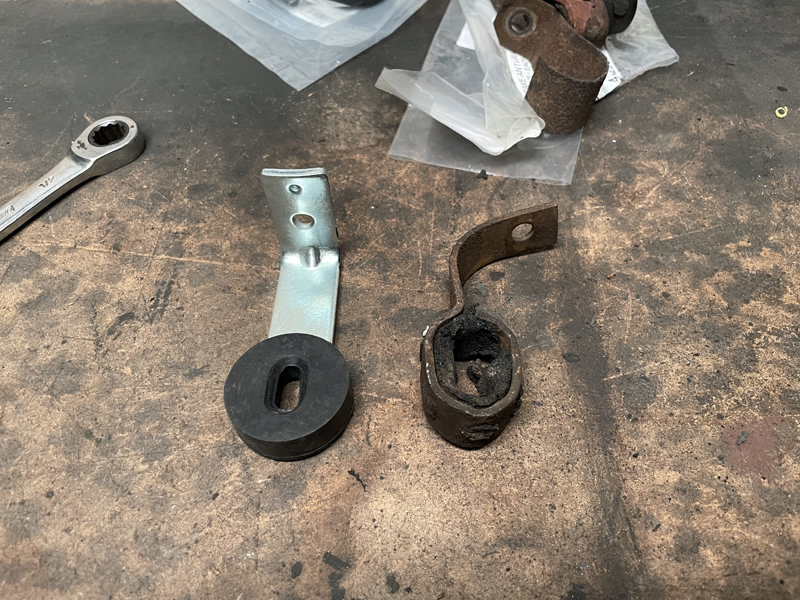 I am done for now, until the owner returns. No I can work on my friend's first-gen Miata. How's that for a contrast in car projects? 
|
|
|
|
|
02-28-2024, 06:55 PM
|
#142 |
|
Senior Member
Join Date: May 2017
Posts: 566
|
When you talk to the radiator shop, be sure to tell them that the EXACT height of the core is important as the hood fastens to the top of the radiator. Speaking from experience, an extra quarter inch and the hood will not close properly and you will not be happy.
Water pumps should just go to Skip in Florida for a proper rebuild!!!
__________________
Steve in Denver |
|
|
|
| Sponsored Links (Register now to hide all advertisements) |
|
|
|
«
Previous Thread
|
Next Thread
»
 Linear Mode

|
|

| Sponsored Links (Register now to hide all advertisements) |
|
|
All times are GMT -5. The time now is 02:23 AM.