|
|||||||


| Sponsored Links (Register now to hide all advertisements) |
|
|
 |

|
Thread Tools | Display Modes |
 06-27-2012, 06:19 PM
|
#1 |
|
Senior Member

Join Date: May 2010
Location: Richmond, VA
Posts: 882
|
I need to replace the light socket assembly in my drum taillight (have acquired a correct early style original). I realize that I will need to rotate the strap-like connector between the socket and the upper bulb in order to remove/install sockets. It seems apparent that any movement will likely cause the insulators to break.
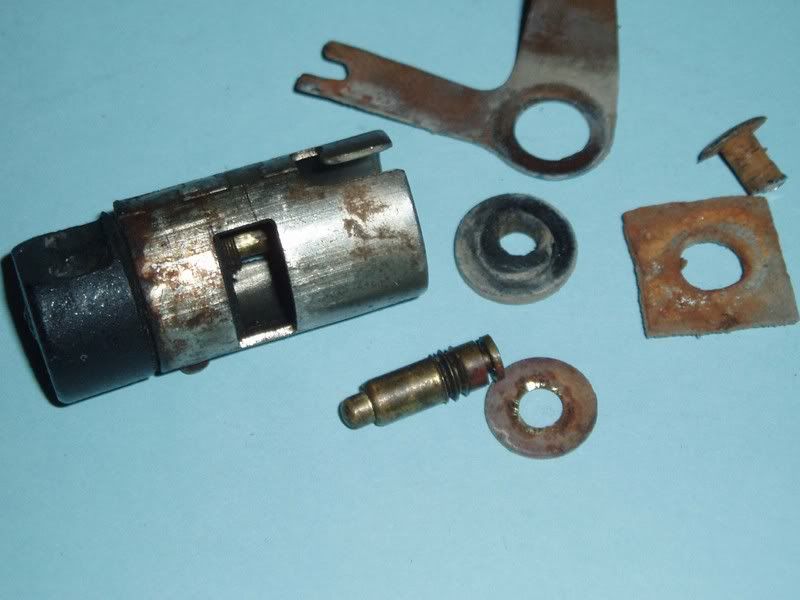
1. Seems it would be easy enough to drill out the rivet but where would one find a replacement rivet for this? 2. can make insulating material from thick paper but is there a diagram of the order of assembly (i.e. where the insulators are located) 3. I recall seeing a photo where someone had soldered an accessory wire between the bulb sockets (I assume for better grounding). Unfortunately, did not keep a copy of that photo. |

|

|
|
06-27-2012, 09:02 PM
|
#2 |
|
Senior Member

Join Date: May 2010
Location: Mpls, MN
Posts: 27,582
|
I have some pictures from when I worked on three of them. I soaked the socket to metal body with Kroil for a day or two, then you have to push in on the spring loaded pin so you can rotate the bakelite socket and pull it out of the metal frame. (use care as replacement sockets are spendy)
|
|
|
|
| Sponsored Links (Register now to hide all advertisements) |
|
|
|
06-27-2012, 09:39 PM
|
#3 |
|
Senior Member
Join Date: May 2010
Location: Richmond, VA
Posts: 882
|
My socket is already loose ... is it simply a matter of turning the socket or will i have to 'move' the "L" shaped connector strip? if i have to move the strip, i am certain i will have to drill out the rivet and replace the insulators.
when/if i get it reassembled, where are the 'contact' points i should use with my ohmmeter to ensure i am not improperly grounded. do you have a pix of the extra wire (ground) some have suggested? |
|
|
|
|
06-27-2012, 10:08 PM
|
#4 | |
|
Senior Member

Join Date: May 2010
Location: Daytona Beach, Fl & Spencer, W. Va,
Posts: 4,442
|
Quote:
Do you have a photo of the Bakelite socket ? I might have a jar of NOS ones. Mine would not be too "spendy". MIKE 
|
|
|
|
|

|
06-27-2012, 10:35 PM
|
#5 |
|
Senior Member
Join Date: May 2010
Location: Mpls, MN
Posts: 27,582
|
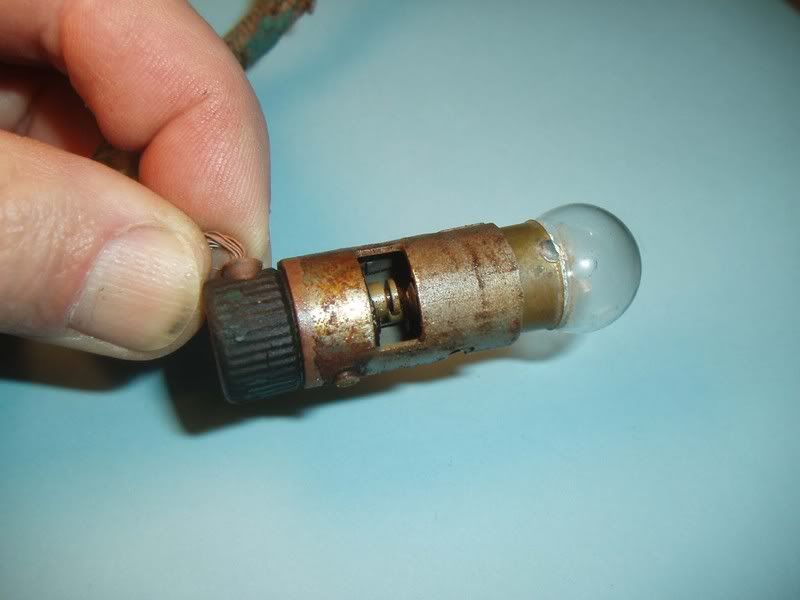    When you push the locking pin in on the socket, you should be able to twist the socket around enough to release the contact strap, since it also should move to the side a bit, without having to drill out the rivet. Notice the bulb lead contact in the last picture, which shows one of the socket spring loaded pins has pushed up until it hit the bulb contact, thus making the brake light stay on any time the lights were on. |
|
|
|
|
06-27-2012, 10:50 PM
|
#6 |
|
Senior Member
Join Date: May 2010
Location: Mpls, MN
Posts: 27,582
|
Sponsored Links (Register now to hide all advertisements)
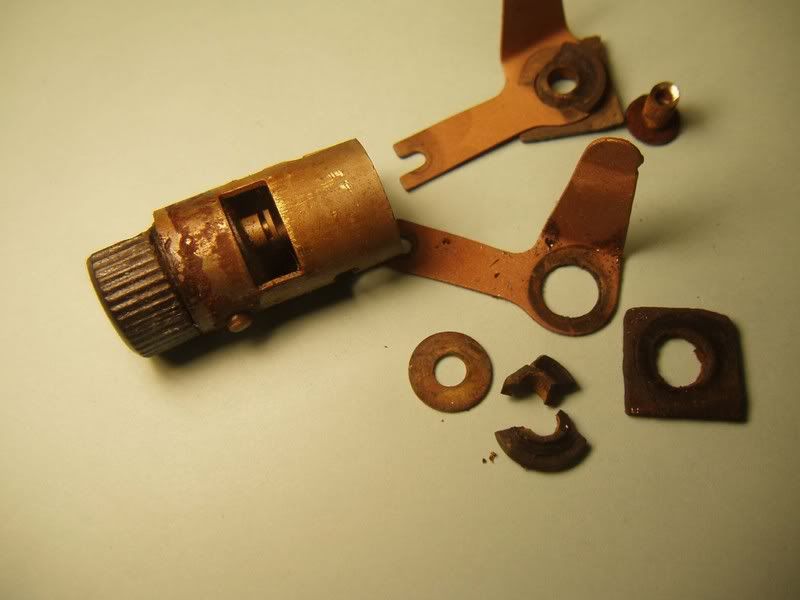
 Here is a temporary bad ground fix for the stop light socket. The divider plate needs to be removed and sandblasted for a better ground, or I could scrape a small area clean and solder the divider plate to the main frame. |
|
|
|
|
06-27-2012, 11:03 PM
|
#7 |
|
Senior Member
Join Date: May 2010
Location: Richmond, VA
Posts: 882
|
It is my understanding that the earliest socket had a full round Bakelite ribbed cylinder while the later socket was ribbed but had a flat area at the wire attachment. The smooth (un-ribbed) cylinder was a service item
Mr. W. thanks for the pix. the last one is the one i recall ... will give it a try tomorrow. |
|
|
|
|
06-28-2012, 09:33 AM
|
#8 |
|
Senior Member

Join Date: May 2010
Location: Fresno, Ca.
Posts: 3,636
|
That is my understanding, I don't remember the dates of change...
|
|
|
|
|
06-28-2012, 01:21 PM
|
#9 |
|
Senior Member
Join Date: May 2010
Location: Daytona Beach, Fl & Spencer, W. Va,
Posts: 4,442
|
CHARLES REESE ................
My sockets seem to be, maybe, "T" Model. I do have one, which seems to be very close. I've provided a photo. MIKE
|
|
|
|
|
06-28-2012, 02:08 PM
|
#10 | |
|
Senior Member
Join Date: May 2010
Location: Mpls, MN
Posts: 27,582
|
Quote:
 Nothing A in there |
|
|
|
|
|
08-10-2015, 06:39 PM
|
#11 |
|
BANNED
Join Date: May 2010
Location: Walla Walla, Washington USA
Posts: 6,066
|
Tom,
Nice show here...very helpful and interesting. Thanks. Pluck |
|
|
|
|
08-10-2015, 07:05 PM
|
#12 | |
|
Senior Member

Join Date: May 2010
Location: Central, IL
Posts: 3,968
|
Quote:
__________________
1929 Model AA - Need long splash aprons! |
|
|
|
|
|
08-10-2015, 07:07 PM
|
#13 |
|
Senior Member

Join Date: May 2010
Location: Young Harris, GA
Posts: 1,821
|
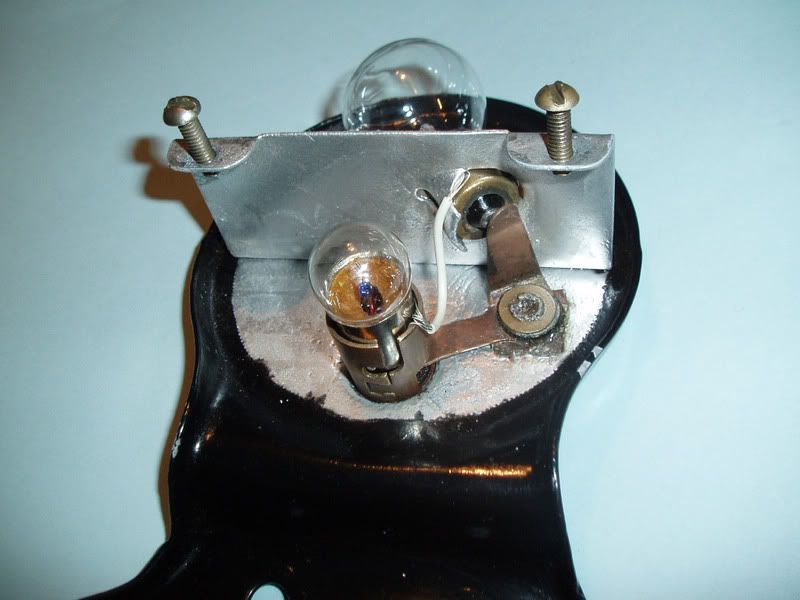
From Tom's image below I can see why Steve thought this light used a 2-contact bulb.
There are 2 contacts in there, but only one is for the tail light bulb. The other connects to the strap that runs up to the stop light bulb.
__________________
Jim Cannon Former MAFCA Technical Director "Have a Model A day!" |
|
|
|
|
08-11-2015, 12:41 AM
|
#14 |
|
Senior Member

Join Date: Jun 2010
Location: San Diego, CA
Posts: 1,486
|
I have never had to drill out the rivet to remove the "L" connector strip to remove the socket. You should be able to carefully push the socket from the bakelite side into the housing and the connector strip should bend enough to get the socket out. Then simply reinsert the socket the same way and the connector should go into the opening on the side and connect with the contact inside the socket.
|
|
|
|
|
08-11-2015, 06:16 AM
|
#15 |
|
Senior Member
Join Date: May 2010
Location: Mpls, MN
Posts: 27,582
|
As Gary mentioned, the rivet doesn't need to be removed, unless repairs are needed, like my broken insulator. You can push the locking pin in on the socket, and then rotate the socket so the strap turns out of the notch. You may need to soak the metal with Kroil to get the socket to move.
|
|
|
|
|
01-26-2016, 07:56 PM
|
#16 |
|
Senior Member
Join Date: May 2010
Posts: 337
|
thank you all for the pictures and detailed information about the 28 tail light..now I understand..Charles..
 ).. )..
|
|
|
|
|
01-26-2016, 08:23 PM
|
#17 |
|
Senior Member
Join Date: May 2010
Location: Mpls, MN
Posts: 27,582
|
BTW, that was the original FORD script wrinkle bulb from 1928 and it burned out about 4 years ago.
|
|
|
|
|
10-06-2016, 10:41 AM
|
#18 | |
|
Senior Member
Join Date: May 2010
Location: Fresno, Ca.
Posts: 3,636
|
Quote:
In the top photo, with the "bullet connector" (the 2 tail light wires), do they just pop out of the holder because of the the springs ? Thanks |
|
|
|
|
|
10-10-2016, 11:07 AM
|
#19 |
|
Senior Member
Join Date: May 2010
Location: Mpls, MN
Posts: 27,582
|
Yes, the two wire terminals should pop out of the socket when you pull hard enough to overcome the spring loaded bullet shape. The barbs (shown in the 2nd picture) are to lock the plunger/socket assemblies in place in the bakelite, but one of mine came out.
|
|
|
|
|
10-10-2016, 11:11 AM
|
#20 |
|
Senior Member
Join Date: May 2010
Location: Fresno, Ca.
Posts: 3,636
|
Thanks Tom,.... I have it !
|
|
|
|
|
«
Previous Thread
|
Next Thread
»
 Linear Mode

|
|

| Sponsored Links (Register now to hide all advertisements) |
|
|
All times are GMT -5. The time now is 11:37 AM.