|
|||||||


| Sponsored Links (Register now to hide all advertisements) |
|
|
 |

|
Thread Tools | Display Modes |
 04-20-2012, 06:26 AM
|
#1 |
|
Senior Member

Join Date: May 2010
Location: Florida
Posts: 186
|
I have a nice freshly cleaned original aluminum intake manifold I am going to put on my 36 motor. Has anyone clearcoated their manifold and did it hold up well. I hate to see it get all dirty and oily looking.
Thanks |

|

|
|
04-20-2012, 07:41 AM
|
#2 |
|
Senior Member
Join Date: May 2010
Location: jackson,nj
Posts: 513
|
i have clearcoated some sbc and a slant six four years ago and it is still holding up well.
|
|
|
|
| Sponsored Links (Register now to hide all advertisements) |
|
|
|
04-20-2012, 08:04 AM
|
#3 |
|
Member
Join Date: Jul 2010
Location: Sugar Land, TX
Posts: 80
|
I powercoated clear a 4BBL 49-53 flathead intake and it still is very shiney. Some discoloration near center heat riser area. Carb stains came off fairly easily too.

|
|
|
|
|
04-20-2012, 08:19 AM
|
#4 |
|
Senior Member

Join Date: May 2010
Location: Wheaton, IL (west chicago)
Posts: 558
|
I've been doing intakes like this for years....glass bead blast, blow out with air gun, rinse with aerosol brake cleaner, blow out again, then clearcoat with Krylon 1313 satin clear. Doesn't look phoney-shiney, protects against stains, and holds up well.
__________________
36 1/2 ton pickup on 38 car frame with 1940 v8 24 stud |
|
|
|
|
04-20-2012, 08:56 AM
|
#5 |
|
Senior Member
Join Date: May 2010
Location: Florida
Posts: 186
|
Thanks everybody for the input. Cearcoat it is.l
|
|
|
|
|
04-20-2012, 09:08 AM
|
#6 | |
|
BANNED
Join Date: May 2010
Location: stratford,ct
Posts: 5,971
|
Sponsored Links (Register now to hide all advertisements)
Quote:
|
|
|
|
|

|
04-20-2012, 01:00 PM
|
#7 |
|
Senior Member

Join Date: May 2010
Location: Near Rising Sun, Maryland
Posts: 10,859
|
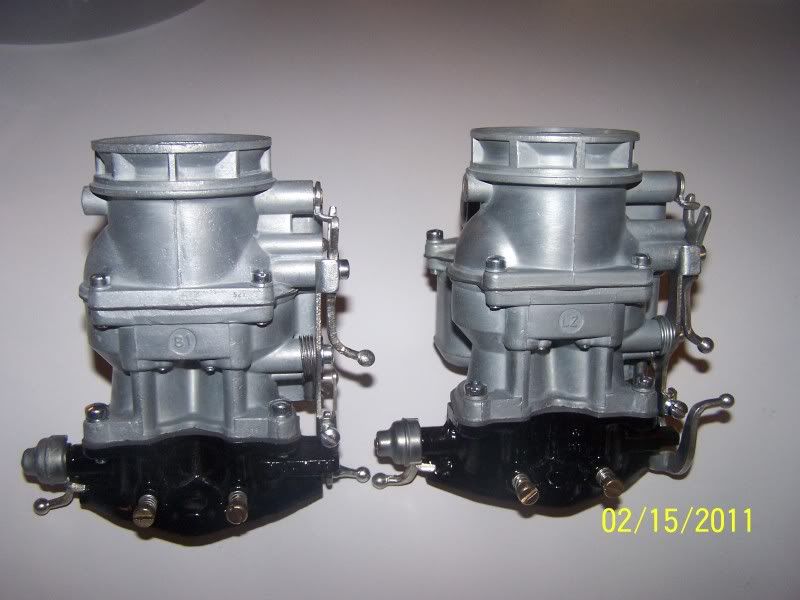
I've previously used clear coat spay on aluminum intake manifolds and on carburetors that I have rebuilt and personally I would never use it on either again. I'm getting ready to put two Stromberg 81's on my '35 5w coupe (pictures attached). One carb was rebuilt by me and the other was purchased already rebuilt. Both of these carburetors had the center and top housings glass beaded and sprayed with a clear coat paint. The resulting outer finish is a dull gray, and also two completely different shades of dull gray. I'm planning to tear both of these carburetors down and send the housings out for a chemically applied zinc chromate finish that will look much better (in my opinion) than the existing clear coat finish and will also look the same when they are put back together and mounted side by side as 2x2's. I have had a similar experience with aluminum intake manifolds and aluminum heads. They look great when they come out of a glass bead cabinet but turn a dull gray after spraying with a clear coat paint. I have tried many different brands and types of clear coat and so far they have all turned these different glass beaded parts a dull looking gray. I will never use that type of finish again. This is my personal preference and I'm sure others here will have their own preferences. You have to decide what looks right, good or correct on your own project.
Here are pictures of my 2x2 set up as it exists now. Both carburetors have been sprayed with a clear coat spray paint. The intake and the Y adaptor have been left as they came out of a glass bead cabinet over a year ago. Once these carburetors have there outer castings (center and upper) chemically coated with zinc chromate I will repost both pictures side by side so you can be the judge of how each process looks and decide for yourself which method you would prefer to use. Additional pictures added 1/14/16 that show how these 81 Stromberg carburetor zinc castings look after removing the old spray on clear coat, and reapplying the original type zinc chromate finish.
__________________
John "Never give up on what you really want to do. The person with big dreams is more powerful than one with all the facts". Albert Einstein Last edited by JM 35 Sedan; 01-14-2016 at 12:07 PM. |
|
|
|
|
04-20-2012, 01:16 PM
|
#8 |
|
Senior Member
Join Date: May 2010
Location: Wheaton, IL (west chicago)
Posts: 558
|
John,
Good post, well explained. You seem to be looking for a factory-fresh as-cast look. Personally I like the color of your carbs...I just wonder what made them come out as different colors. Maybe two different clearcoats, maybe a different degreaser, or perhaps the carbs are of different ages and their aluminum weathered differently. I like the satin clearcoating to help seal the porous aluminum and make it easier to keep clean. I'm also not going for restoration points, so my method may be incorrect for someone who needs 100% originality.
__________________
36 1/2 ton pickup on 38 car frame with 1940 v8 24 stud |
|
|
|
|
04-20-2012, 01:23 PM
|
#9 |
|
Senior Member

Join Date: May 2010
Location: Wichita, KS
Posts: 210
|
Here's another way to keep an aluminum manifold looking like new...at least it implies that. I copied this off of a post from over a year ago here on Fordbarn (I think). I haven't personally verified this but I'm inclined to give it a try.
"I just sent a 34 aluminum intake manifold to www.jandpdeburring.com they use a vibratory process for cleaning then a media that contains aluminum to refinish and the results were outstanding it looks just like it came off the assembly line. This puts a skin on the surface of the part and it looks just like the original factory finish. It also seems to seal the part so that gas, oil and grease doesn't penetrate the aluminum. If I remember correctly the cost was around $25. J & P Deburring Inc. 9135 Alabama Ave. Unit D Chatsworth, Ca. 91311 (818) 998-6079 Last edited by Steve Staysko; 01-08-2011 at 11:54 AM." |
|
|
|
|
04-20-2012, 01:29 PM
|
#10 | |
|
Senior Member

Join Date: May 2010
Location: North Dakota
Posts: 1,621
|
Quote:
__________________
I dig coal, which provides motivation for EVs. |
|
|
|
|
|
04-20-2012, 01:36 PM
|
#11 | |
|
Senior Member
Join Date: May 2010
Location: North Dakota
Posts: 1,621
|
Quote:
__________________
I dig coal, which provides motivation for EVs. |
|
|
|
|
|
04-20-2012, 02:45 PM
|
#12 | |
|
Senior Member

Join Date: May 2010
Location: South California
Posts: 6,188
|
Quote:
Thanks much for this post/info. This business is about 2 mi away from me. I think that if this info is accurate..they are going to get my work  ! !
|
|
|
|
|
|
04-20-2012, 03:21 PM
|
#13 |
|
Senior Member
Join Date: May 2010
Location: Florida and Penna.
Posts: 4,471
|
The grain structure of the metal is what makes the differance in color if everything else is equal. Courser grain structure allows a deeper penitration of the "color". At least this is the effect on aluminum, welded then anodized TIG welding which is a more fluid weld cools slower and is a finer grain structure. MIG welding solidifies faster and is more like a casting with course a grain structure. the MIG weld shows a dark band where the weld is. TIG weld is less visiable. The die castings could be a differant alloy or the cooling method could effect them. G.M.
__________________
www.fordcollector.com |
|
|
|
|
«
Previous Thread
|
Next Thread
»
 Linear Mode

|
|

| Sponsored Links (Register now to hide all advertisements) |
|
|
All times are GMT -5. The time now is 05:58 PM.