|
|||||||


| Sponsored Links (Register now to hide all advertisements) |
|
|
 |

|
Thread Tools | Display Modes |
 04-19-2012, 11:02 PM
|
#1 |
|
Senior Member

Join Date: May 2010
Location: Northern Mi.
Posts: 295
|
I posted this on the HAMB before,.... But thought you guys might also enjoy this..........
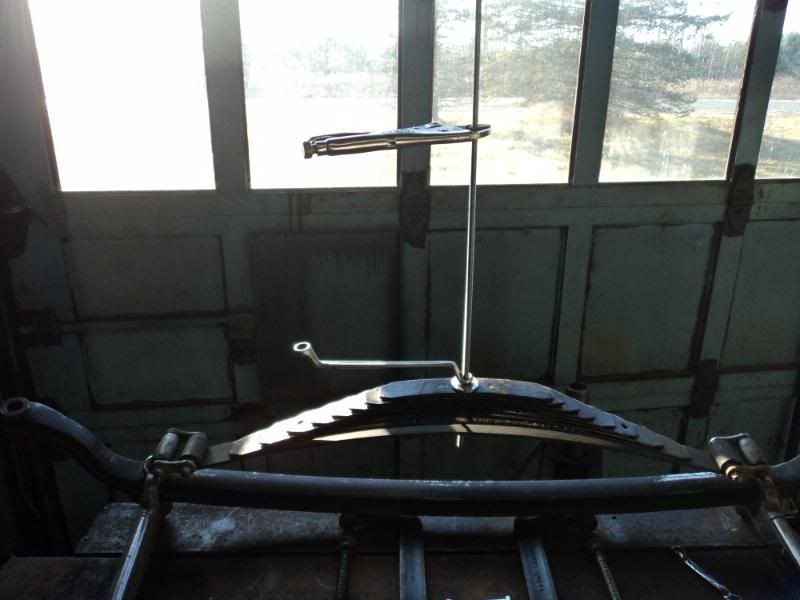
Now I know for most of you guys this is just a rehash,.. and you all know this,... but for some this might help. Back in the 70's I built a spring spreader from plans in Rod Action magazine, hooked it up to a partial unpacked 40 rear spring and started cranking away, well when the spring was spread almost far enough to get the shackles lined up, the stupid thing folded up like a cheap lawn chair, the spring went flying and just about took my head off. A old friend of mine had been using a variation of this method for a very long time, this isn't new to a lot of you, but I have found this to be the safest easiest way to mount and dismount a transverse spring especially if you are working alone,............. I just happened to have a camera handy when I put a front spring on a dropped front end, for a friends chassis. So for those of you who are interested in this simple process, here is the step by step process. ------------------------------------------------------------------------- First you take 2 large beefy "C" clamps and put them on either side of the Pack center bolt and reef them puppys down,.. then get a "All Thread" rod, 4 large flat washers, and a couple nuts for it, unbolt the center bolt ( or cut the head of it off ) remove the old bolt and replace it with the All Thread, 2 washers on top and two washers on the bottom and tighten up the nuts. 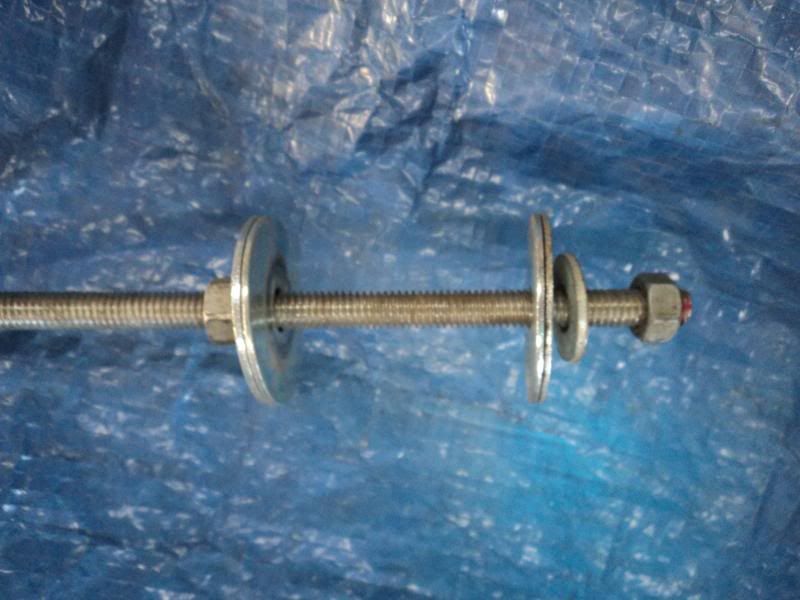  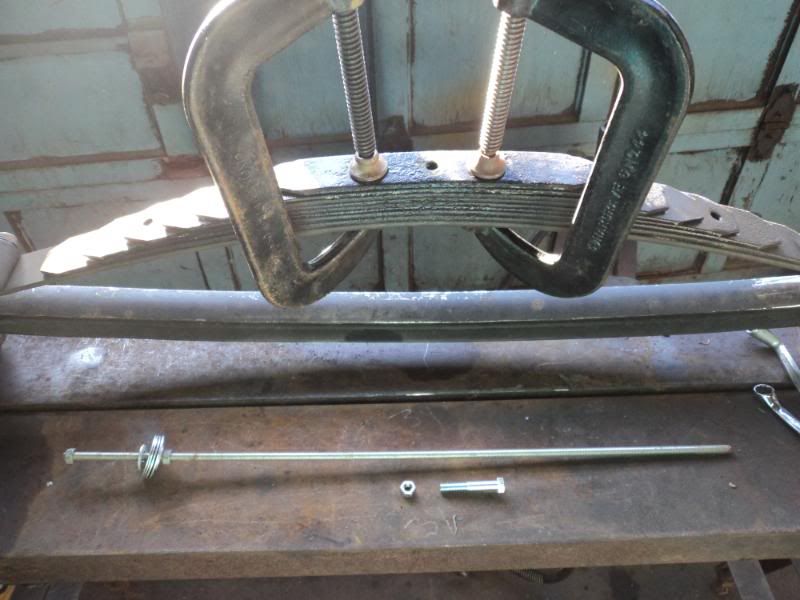 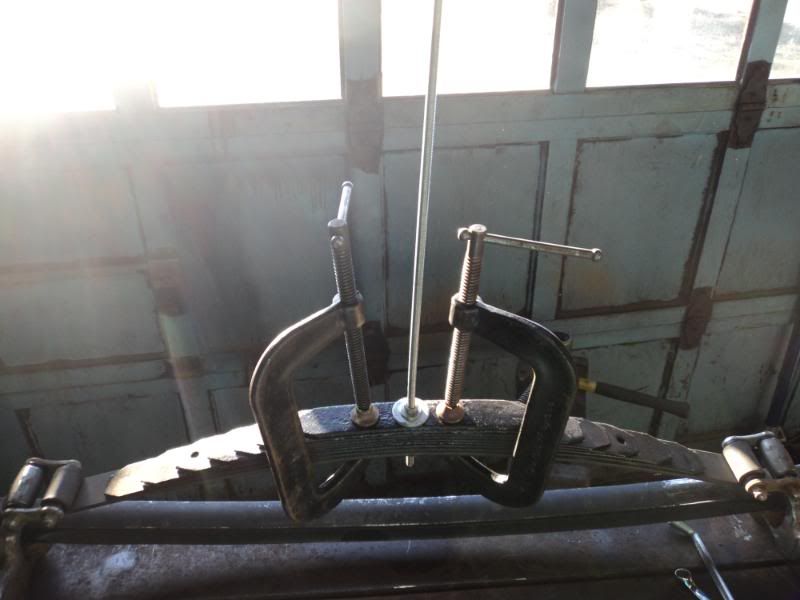
__________________
A sinner saved by Grace,......... Eph. 2:8-9 |

|

|
|
04-19-2012, 11:03 PM
|
#2 |
|
Senior Member
Join Date: May 2010
Location: Northern Mi.
Posts: 295
|
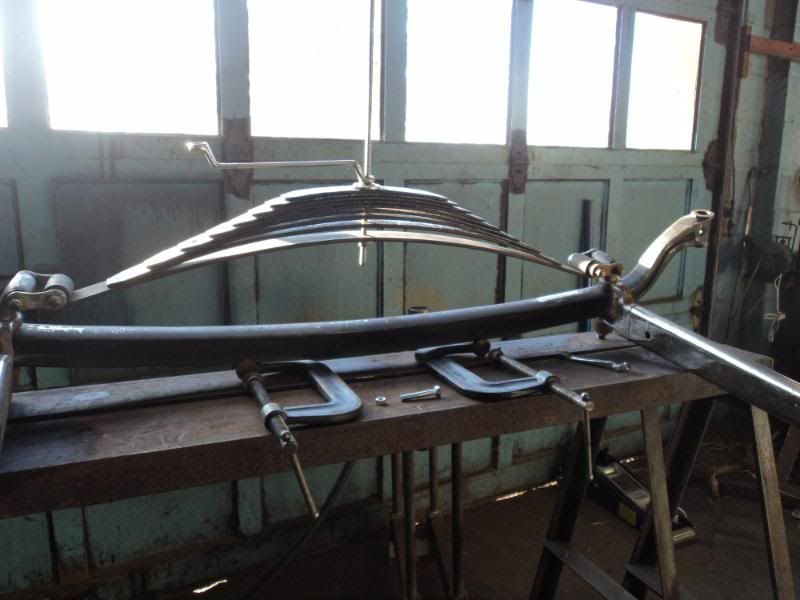
Next you remove the pack clips ( If there still on the spring), there in about 6" from the spring eye on either side, slowly remove the 2 big clamps, then you just start backing off the top nut on the All Thread slowly, keep a eye on the spring to make sure none of the leaves are trying to walk out (this has never happened to me "yet" ).
__________________
A sinner saved by Grace,......... Eph. 2:8-9 |
|
|
|
| Sponsored Links (Register now to hide all advertisements) |
|
|
|
04-19-2012, 11:03 PM
|
#3 |
|
Senior Member
Join Date: May 2010
Location: Northern Mi.
Posts: 295
|
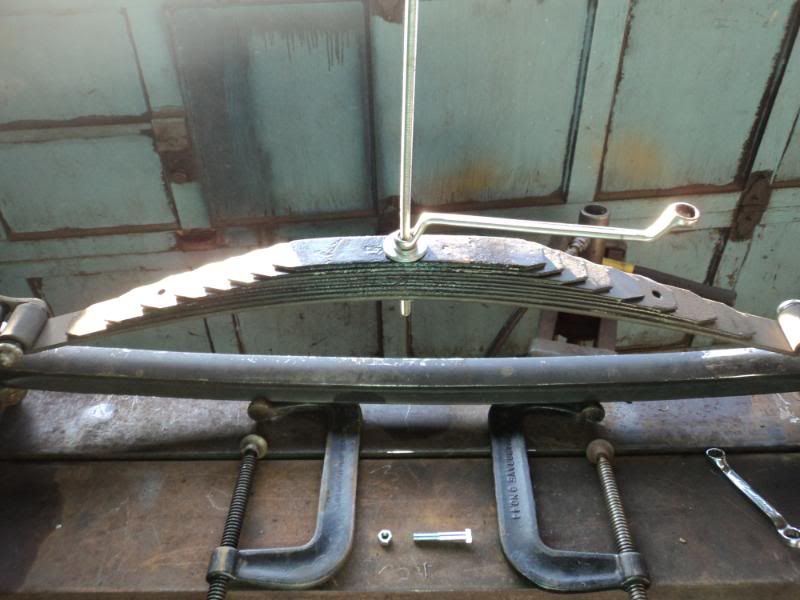
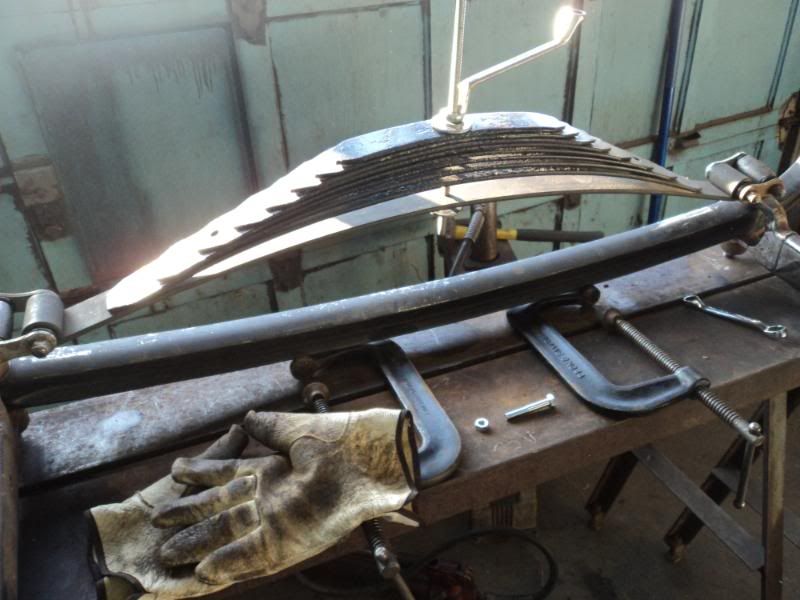
When all the tension is off,... just loosen the nut from the bottom and lift the spring pack off.
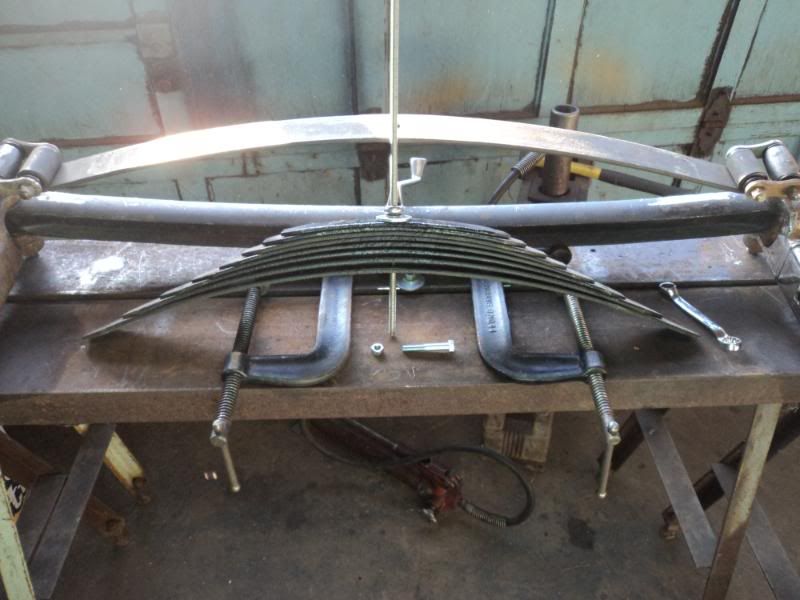 At this point, just unbolt your shackles, and you can easily take the main leaf on and off at will with very light hand pressure. Now all you have to do is reverse the procedure,... After the spring is apart, you can just mount the main leaf (this is really easy to do), tighten up your shackles, take your All Thread rod with with the nut and 2 washers on the top and replace the leafs you want to use on it, than just set it on the main leaf, put the 2 washers and nut on the bottom and start to tighten it back up ( again making sure none of the leafs are trying to walk out on you ) it draws the spring pack back together and keeps the center hole lined up,......... When the spring pack draws back tight, put your 2 big beefy C clamps back on either side of the center hole like in the first picture, remove the All Thread, replace the center bolt and pack clips,...... remove the C clamps and,............ Ta Da ! it's ready to go back in the car. And your head is still firmly attached to your shoulders ! 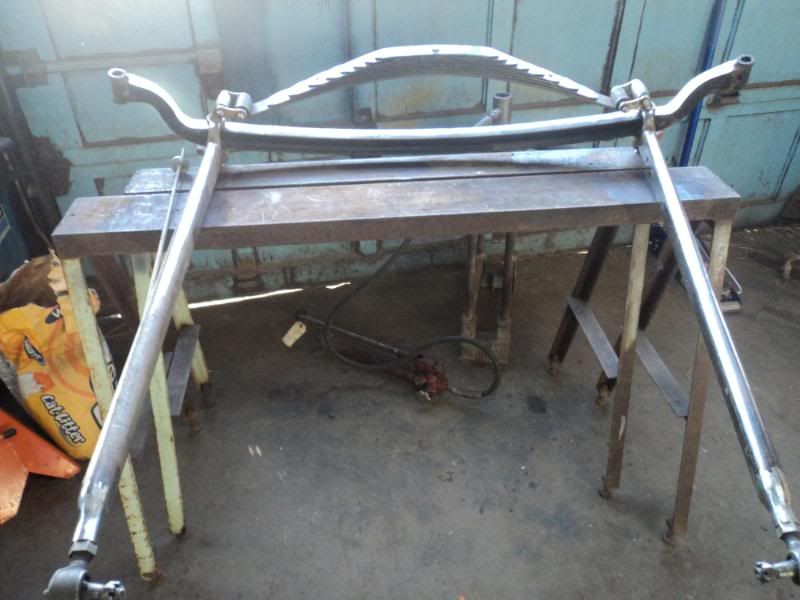
__________________
A sinner saved by Grace,......... Eph. 2:8-9 Last edited by Harms Way; 04-19-2012 at 11:11 PM. |
|
|
|
|
04-20-2012, 05:39 AM
|
#4 |
|
Senior Member

Join Date: May 2010
Location: FP, NJ
Posts: 2,770
|
A couple of years ago, on the old FordBarn, Miss Shelly posted a photo of a C clamp that had been used as you show in your second and third photos. It came undone with results similar to your description of your original spreader. If you look at your photo number 3, do you see that long portion of the threaded rod in the clamp? If you somehow get a little bit of horizontal force on the swivel pad at the end of it, that long length puts a very large twist on the top end of the "C" frame. It twists and then, the frame twists some more and very quickly, the clamp comes undone, the spring leaves take off and it would be best if your body were armor plated. I use the threaded rod deal, but I use a stout 3/4" Pony Clamp because it doesn't have that long threaded portion. I also don't just get the threaded rod hooked up and then totally remove the clamp. I work them down in alternating short steps. (What would happen if the thread in the nut wore out shortly after I started backing it off?) IMHO!
__________________
Don't never get rid of nuthin! |
|
|
|
|
04-20-2012, 06:58 AM
|
#5 |
|
Senior Member
Join Date: May 2010
Location: Powell, TN
Posts: 2,509
|
I see a prota power under the table. My porta power set has two wedge ends that bolt to the cyl and pipe that work perfect for a spring spreader on v8 springs.
|
|
|
|
|
04-20-2012, 07:41 AM
|
#6 |
|
Senior Member

Join Date: May 2010
Location: Solihull, England.
Posts: 8,756
|
Sponsored Links (Register now to hide all advertisements)
Mart. |
|
|
|
|
04-20-2012, 08:54 AM
|
#7 |
|
Senior Member

Join Date: May 2010
Location: Freehold, NJ
Posts: 113
|
Great Tip!
I used this method last weekend. I used threaded rod "couplers" instead of just plain old nuts to engage extra thread. I used two BIG C clamps, knocked out the old center bolt, installed the "tool" and then alternated lossening the threaded rod and c clamps untill the pressure was off. Just take your time, pay attention and sends the kids out of the garage while doing this. |
|
|
|
|
04-20-2012, 09:45 AM
|
#8 | |||
|
Senior Member
Join Date: May 2010
Location: Northern Mi.
Posts: 295
|
Quote:
If your using the All Thread in conjunction with the pony clamps, and you are loosening them all in steps,.. how do you do that if you dont have clamps with enough thread to let the spring totally decompress ???? ( like the really good quality clamps I used in the pictures) Do you readjust the position of the clamp end every so often ? It would seem to me that the horizontal force on the swivel pad of this type of clamp would be much greater, As the entire theory of these clamps work while binding on a piece of tubing,.... and the anvil or clamp portion of this type of clamp can turn on the pipe (spine) with little effort. Pony Clamp  Quote:
The original spring pack bolt that good ol' Henry used was the same diameter as the "all thread",.. yes it was a fine thread, but the minimum and maximum on the threads were much less.... I have taken spring packs apart (using the method described above) where the original spring pack bolt was corroded to half its original diameter, and it was holding just fine until I went to unpack the spring. I should have known the "keyboard engineers" would see through my evil plan to try to hurt and mam the guys on this board,.. So I could snatch up all your old Fords and Ford parts ! Well, The gig is up !,... ya caught me. Kindly disregard this thread.
__________________
A sinner saved by Grace,......... Eph. 2:8-9 |
|||
|
|
|

|
04-20-2012, 09:48 AM
|
#9 | |
|
Senior Member
Join Date: May 2010
Location: Northern Mi.
Posts: 295
|
Quote:
Yes, I have used Barrel nuts as well,.. And usually use them on unpacking stock rear leaf springs. Coupler or Barrel Nut. 
__________________
A sinner saved by Grace,......... Eph. 2:8-9 Last edited by Harms Way; 04-20-2012 at 09:59 AM. |
|
|
|
|
|
04-20-2012, 09:52 AM
|
#10 |
|
Senior Member
Join Date: May 2010
Location: NJ
Posts: 6,182
|
I've used this same method. It's been a while but I think I've place a piece of a 2X4 either on top or bottom of the spring pack. I use crank down the C clamps on to it and it helped to act like another leverage point in flatening out the spring.
Also agree, quality clamps and grade 8 stuff, you should be good to go. Thanks for posting this. |
|
|
|
|
04-20-2012, 10:18 AM
|
#11 |
|
Senior Member

Join Date: May 2010
Location: Coral Springs FL
Posts: 10,951
|
Here is a little info on how to install a reversed eye spring.
Last edited by 19Fordy; 04-20-2012 at 10:24 AM. |
|
|
|
|
04-20-2012, 12:00 PM
|
#12 |
|
Senior Member

Join Date: May 2010
Location: Near Rising Sun, Maryland
Posts: 10,859
|
All good information here....my key learning from messing with these old Ford springs over the years is BE SAFE. If one of those springs pops appart and you are in its path it could really hurt you very bad or even worse. So think twice...do once...with the correct tools/equipment.
__________________
John "Never give up on what you really want to do. The person with big dreams is more powerful than one with all the facts". Albert Einstein |
|
|
|
|
04-20-2012, 02:08 PM
|
#13 |
|
Senior Member

Join Date: May 2010
Location: southeastern Michigan
Posts: 10,103
|
I may have missed it in the other posts, but the clamps should not both be on the same side; one on one side and the other on the other side of the spring.
|
|
|
|
|
04-20-2012, 02:19 PM
|
#14 |
|
Senior Member

Join Date: May 2010
Location: MN
Posts: 7,053
|
Good post. Great info and step by step pictures.
|
|
|
|
|
04-20-2012, 08:01 PM
|
#15 | |
|
Senior Member
Join Date: May 2010
Location: FP, NJ
Posts: 2,770
|
Quote:
__________________
Don't never get rid of nuthin! |
|
|
|
|
|
04-20-2012, 08:15 PM
|
#16 |
|
Senior Member

Join Date: May 2010
Location: Wheaton, IL (west chicago)
Posts: 558
|
Another vote to keep the C-clamps on there, plus I rotate the clamp housing so it rests against the leafs.
__________________
36 1/2 ton pickup on 38 car frame with 1940 v8 24 stud |
|
|
|
|
«
Previous Thread
|
Next Thread
»
 Linear Mode

|
|

| Sponsored Links (Register now to hide all advertisements) |
|
|
All times are GMT -5. The time now is 09:22 PM.