


 02-09-2013, 03:38 PM
|
#1 |
|
Senior Member

Join Date: May 2010
Location: Richmond, VA
Posts: 882
|
Ok, admittedly at my advancing age, my eyesight is not what it used to be (and my patience is running a bit thin as well!)
 Regarding the ammeter
it is my understanding that the driver side post would be considered the negative (discharge) post; the passenger side post the positive (charge) side. Regarding the ammeter
it is my understanding that the driver side post would be considered the negative (discharge) post; the passenger side post the positive (charge) side.My first illustration posted below represents, what I believe is the correct wiring diagram the yellow wire to the driver (-) post; the yellow/black wire to the passenger (+) post. Somewhere I have scanned/downloaded two other diagrams, which are the genesis of my frustration. I hope they are simply mislabeled and I can delete them into cyberspace. In both of these illustrations the * yellow wire is shown running to the passenger (+) post * yellow/black is shown running to the driver (-) post Since I consider flipping the switch when I enter a room to be an act of personal electrical accomplishment and amazement, and that I dont want to fry my original early ammeter during that virginal moment when I connect my battery can someone kindly clarify the ammeter wiring in simple terms (plz dont just post another diagram!!!) maybe something insightful like put the yellow wire on the driver/passenger side post" ...(dont be cute, plz indicate one or the other!!!) 
|

|

|
|
02-09-2013, 03:54 PM
|
#2 |
|
Senior Member

Join Date: May 2010
Location: Pace, FL near Pensacola
Posts: 374
|
Les Andrew's book shows the yellow wire to the discharge or driver side and the yellow/black to the charge or passenger side.
|
|
|
|
| Sponsored Links (Register now to hide all advertisements) |
|
|
|
02-09-2013, 04:29 PM
|
#3 |
|
Senior Member

Join Date: May 2010
Location: Portland, Oregon
Posts: 5,906
|
Getting the wires backwards on the ammeter won't fry your ammeter. It will simply cause a charge to read as a discharge and vice-versa.
__________________
Ray Horton, Portland, OR As you go through life, keep your eye on the donut, not the hole. 
Last edited by 700rpm; 02-09-2013 at 07:10 PM. |
|
|
|
|
02-09-2013, 05:26 PM
|
#4 |
|
Senior Member

Join Date: May 2010
Location: Fresno, Ca.
Posts: 3,636
|
Charles,
1. Look in the Service Bullitions Book...there was a change in the wiring...you should have the earlier style...I thought it had too do with the coil.? 2. Buy a repop Ammeter for the "test". Ya...I killed my original 45 years ago! 3. Hope your feeling better ! |
|
|
|
|
02-09-2013, 07:41 PM
|
#5 |
|
Senior Member

Join Date: May 2010
Posts: 3,099
|
All three are wired for a straight pole coil which shows the ignition discharge through the ammeter. The first one has the ammeter backwards.
__________________
http://www.abarnyard.com/ |
|
|
|
|
02-09-2013, 08:21 PM
|
#6 | |
|
Senior Member
Join Date: May 2010
Location: Richmond, VA
Posts: 882
|
Sponsored Links (Register now to hide all advertisements)
Quote:
I am aware of the Nov29 switch in the red (ignition) & black (coil) wires. My apologies for my density . what I am trying to determine is which ammeter posts the yellow and yellow/black wires attach to. If I understand your post correctly (i.e. #1 illustration is wrong), it appears the yellow goes to the passenger side post (+); the yellow/black wire goes to the driver side post (-) Compounding my confusion is Brattons (catalog) text describing their dash loom. attach yellow to ammeter discharge and yellow/black to charge post of ammeter Another diagram I found in an earlier FB post also shows the yellow to the driver (discharge) side. ??? thanks for everyone's patience with me ... |
|
|
|
|

|
02-09-2013, 10:29 PM
|
#7 |
|
Senior Member

Join Date: May 2010
Location: Kalamazoo
Posts: 1,656
|
Relax, sir.
Like 700rpm said, you're not going to hurt anything if you hook it up backwards. Turn the lights on, or blow the horn, or tap the brakes--if ammeter shows discharge, you're good; if not, reverse your connections to it. NO ONE would trust a repro ammeter's innards to be put together the same as stock. |
|
|
|
|
02-09-2013, 10:33 PM
|
#8 |
|
Senior Member

Join Date: May 2010
Location: Mpls, MN
Posts: 27,582
|
Bill, wire it as shown on page 215 in the SERVICE BULLETINS. The yellow wire from the starter terminal goes to the passenger side, as does the yellow wire fron the ammeter. The black coil power wire also goes to the passenger side, but if you want the coil draw to read on the ammeter, just shift the black coil feed wire to the driver's side.
Late in 1929 Ford did move the black wire to the driver's side, and at or about the same time Ford switched the primary coil posts polarity. I do have one original coil that is opposite of all the others, and If I remember right, it was a slant pole with the new primary terminal polarity. |
|
|
|
|
02-09-2013, 10:36 PM
|
#9 |
|
Senior Member
Join Date: May 2010
Location: Mpls, MN
Posts: 27,582
|
Steve, I'm pretty sure Charles has a good original ammeter, but as you say some ammeters being sold have the terminals reversed, so some people using a repro ammeter may have to switch the wires on the rear of the ammeter to make it show charge when it should.
|
|
|
|
|
02-09-2013, 10:50 PM
|
#10 | |
|
Senior Member
Join Date: May 2010
Location: Richmond, VA
Posts: 882
|
Thanks! this is the simple info i need!!!
 Yep, original ammeter with early flat bezel ... so dont want to do anything bad to it Yep, original ammeter with early flat bezel ... so dont want to do anything bad to itQuote:
 i have the slant pole with the script at top (no oval around it)/AL at bottom. i have the slant pole with the script at top (no oval around it)/AL at bottom.
|
|
|
|
|
|
02-09-2013, 11:29 PM
|
#11 |
|
Senior Member
Join Date: May 2010
Location: Mpls, MN
Posts: 27,582
|
The passenger side of the mounted slant pole coil is POSITIVE and gets the red wire, which leads to the ignition switch.
|
|
|
|
|
02-09-2013, 11:52 PM
|
#12 | |
|
Senior Member
Join Date: May 2010
Posts: 3,099
|
Quote:
On a positive note you have the correct coil! If what I've read is correct the Model T ammeter has reversed polarity from ours.
__________________
http://www.abarnyard.com/ Last edited by Marco Tahtaras; 02-09-2013 at 11:58 PM. |
|
|
|
|
|
02-10-2013, 12:58 AM
|
#13 | |
|
Senior Member
Join Date: May 2010
Location: Richmond, VA
Posts: 882
|
Quote:
At least Im batting 500 with the coil!) Pg 6-2 (2011 rev) of the JS does state all ammeters had raised bead next to the glass face. Guess the search is now on for a proper ammeter, ugh. ") Didnt record the source (probably a club mag article), but my notes have ve28 with 3/16" wide flat bezel with an open-ended ring shaped permanent magnet fitted to the inner wall of the case (like mine) sharp edges next to face added Jan28. How does one go about identifying the polarity of an ammeter?
|
|
|
|
|
|
02-10-2013, 01:40 AM
|
#14 |
|
Senior Member
Join Date: May 2010
Location: Mpls, MN
Posts: 27,582
|
The yellow ammeter wire goes to the passenger side, which leads to the battery negative post. Also I can see brass through your ammeter glass, which is common on every repro ammeter I've seen. Ford painted the brass buss bar a flat black so it wouldn't be so visible through the slot in the guage face.
|
|
|
|
|
02-10-2013, 08:53 AM
|
#15 |
|
Senior Member
Join Date: May 2010
Location: Richmond, VA
Posts: 882
|
Yipes ... i better quit this thread before i step into anything deeper than my knee
simple guy with (what i had hoped) simple questions .... thanks for your patience!!
|
|
|
|
|
02-10-2013, 09:26 AM
|
#16 |
|
Senior Member
Join Date: May 2010
Location: Mpls, MN
Posts: 27,582
|
Charles, I just noticed that you also have the red wire on the driver's side, which is correct until the change in late 29.
Last edited by Tom Wesenberg; 02-10-2013 at 12:15 PM. Reason: corrected information |
|
|
|
|
02-10-2013, 10:32 AM
|
#17 | |
|
Senior Member
Join Date: May 2010
Posts: 3,099
|
Quote:
He has it correct. The coil should not read through the ammeter.
__________________
http://www.abarnyard.com/ |
|
|
|
|
|
02-10-2013, 11:34 AM
|
#18 | |
|
Senior Member
Join Date: May 2010
Location: Richmond, VA
Posts: 882
|
Quote:
i did the red wire based on pg 390 Service bulletins i.e., 'old hookup' before the Nov 29 change since I'm working on a '28 ... assumed judging would want date appropriate ... |
|
|
|
|
|
02-10-2013, 11:44 AM
|
#19 |
|
Senior Member
Join Date: May 2010
Location: Mpls, MN
Posts: 27,582
|
Yep, you're right Charles. I just looked at page 390 again. I've got to stop posting when I'm tired!
 Here is the best thread I've seen on checking coil polarity. Lots of good information and it only takes a few minutes to read it all. http://www.chicagolandmgclub.com/tec...neral/574.html |
|
|
|
|
02-10-2013, 11:52 AM
|
#20 | |
|
Senior Member
Join Date: May 2010
Posts: 3,099
|
Quote:
__________________
http://www.abarnyard.com/ |
|
|
|
|
|
02-10-2013, 01:17 PM
|
#21 | |
|
Senior Member

Join Date: May 2010
Location: Cape Cod
Posts: 1,128
|
Quote:
I thought that a change was introducted to have the coil current show on the ammeter? Marc |
|
|
|
|
|
02-10-2013, 01:17 PM
|
#22 | |
|
Senior Member

Join Date: May 2010
Location: Alabama
Posts: 8,099
|
Quote:
Steve S gave the correct and simple answer to your question of how to find the correct polarity of YOUR ammeter on post number 7 . I really don't know what the original ammeter bezel looks like . I do know that many of the repro ammeters are actually 26-27 model T and the model T was negative ground and will require the wires to be reversed to register correctly if used on the model A . This same subject came up just the other day . Too much info complicates and confuses matters. If it cranks and runs good, the coil is probably hooked up correct. There is a tool sold my many venders for checking coil polarity. |
|
|
|
|
| Sponsored Links (Register now to hide all advertisements) |
|
|
|
02-10-2013, 03:08 PM
|
#23 |
|
Senior Member
Join Date: May 2010
Location: Mpls, MN
Posts: 27,582
|
On the Chicagoland MG club's drawing they show both the correct and incorrect coil polarity checked bu using a pencil. Unfortunately they didn't label the pictures "CORRECT" and "INCORRECT". The middle picture is correct. The flare is between the pencil and spark plug when the coil polarity is correct.
What might get confusing is the point of the flare is towards the coil, so when they say the flare is "away from" one might think this means away from. Never mind the point of the flare, just be sure the flare is between the pencil and plug. Below is a bit from the MG club: "If you are still skeptical about all this, there is a quick way to check directly which way the current is flowing in the high tension circuit. Disconnect a spark wire from a spark plug (or the coil wire from the distributor cap). Hold this HT wire near a grounding point (or near the connector end of a spark plug), and position the tip of a graphite pencil in between. When you crank the engine (no need to start or run) you can observe the resulting spark jump between wire and pencil, and between pencil and ground (or spark plug). A flare (hard to see) toward the plug (or ground) shows correct polarity while a flare toward the coil shows reversed polarity. If the flare goes toward the coil, just switch the primary wires on the coil and make note of the connections for future reference. 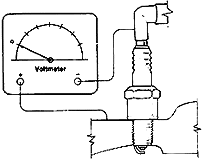  Can't see the flare? Not sure yet? You can also check spark polarity using an analog (moving needle) volt meter. Hook up a voltmeter with the negative lead to the plug terminal and the positive lead to the block. Set the meter on the highest volt range. Crank the engine over (no need to start it), and you should see an upward swing of the voltmeter needle (don't be concerned with taking a reading). If the needle swings down off the scale, your coil is hooked up wrong. To correct it reverse coil primary leads. Do not worry about the coil markings, but make note of them for future reference." Can't see the flare? Not sure yet? You can also check spark polarity using an analog (moving needle) volt meter. Hook up a voltmeter with the negative lead to the plug terminal and the positive lead to the block. Set the meter on the highest volt range. Crank the engine over (no need to start it), and you should see an upward swing of the voltmeter needle (don't be concerned with taking a reading). If the needle swings down off the scale, your coil is hooked up wrong. To correct it reverse coil primary leads. Do not worry about the coil markings, but make note of them for future reference."
|
|
|
|
|
02-10-2013, 03:30 PM
|
#24 | |
|
Senior Member
Join Date: May 2010
Posts: 3,099
|
Quote:
This happened to coincide with the transition to the straight poll coil and introduction of the new 1930 passenger models. The new coils had the internals rotated 180 degrees thereby reversing the polarity. This allowed Ford to continue routing the wires straight up from the terminal box to the coil instead of crossing the wires. A number of the final slant pole coils were produced with the revised polarity.
__________________
http://www.abarnyard.com/ Last edited by Marco Tahtaras; 02-10-2013 at 10:05 PM. |
|
|
|
|
|
02-10-2013, 09:27 PM
|
#25 |
|
Senior Member
Join Date: May 2010
Location: Cape Cod
Posts: 1,128
|
Marco,
Thanks for the additional information. Marc |
|
|
|
 |
«
Previous Thread
|
Next Thread
»
 Linear Mode

|
|

| Sponsored Links (Register now to hide all advertisements) |
|
|
All times are GMT -5. The time now is 02:54 AM.