|
|||||||


| Sponsored Links (Register now to hide all advertisements) |
|
|
 |

|
Thread Tools | Display Modes |
 05-12-2025, 01:16 PM
|
#1 |
|
Senior Member

Join Date: May 2021
Location: NH/ VT
Posts: 460
|
I just had the drive shaft shortened for my T5 conversion, and have needed to install and remove it with pinion attached a couple times. In the course of this exercise the big adjusting nut with punch location has been moved to the point that I don't dare install it again for fear of damaging the differential gear mesh. I am using a Mitchell pinion remove/ install tool. I think the bearing preload needs to be checked, but I have never done it. The red book describes the process, but presumes that the reader has a pile of loose parts. My pinion and bearings are all together in a big cluster with the two big nuts loose. Sorry, but operator deficiencies prevent photo attachment. How do I check the preload in this situation?
|

|

|
|
05-12-2025, 02:05 PM
|
#2 |
|
Senior Member

Join Date: Jul 2010
Location: Cow Hampshire
Posts: 4,610
|
I have done this as a teen by measuring the diameter of the double sided bearing. Then wrapping a string several turns around the bearing.
You know the "radius" in inches, you can stack up nuts or other weight on the end of the string to give the desired 20 in-lbs. (Les Andrews says for used bearings go 12-15 in-lbs. which makes sense if you consider the bearing races/rollers are "surface conditioned" in their previous service.) IIRC, my bearing/race was new and I used 10 lbs of weight. (2 inch radius) You start with the nuts "loose" and incrementally rewind the string/weight tightening each time until the spin just about stops. Approach it on the "increase" in tightness and not the "let it go" looseness. Others have done it by using an inch-lb torque wrench on the shaft. You may want to mount the bearing/shaft in the punkin housing before - and NOT hold the double sided bearing in a vise. (lest you drive it "out of round.") https://www.santaanitaas.org/wp-cont...wH7_cfm8_rXk08 p.47 Tom Endy comes to mind. Joe K
__________________
Shudda kept the horse. Last edited by Joe K; 05-12-2025 at 02:11 PM. |
|
|
|
| Sponsored Links (Register now to hide all advertisements) |
|
|
|
05-12-2025, 08:09 PM
|
#3 |
|
Senior Member
Join Date: May 2021
Location: NH/ VT
Posts: 460
|
I read Tom Endy's article, but he also presumes all loose parts. As shown on attached pics, I have a complete pinion and bearing assembly ready to slide onto drive shaft. Still unsure how to check preload short of disassembling everything and starting from scratch.
|
|
|
|
|
05-13-2025, 12:08 AM
|
#4 |
|
Senior Member
Join Date: Jan 2020
Location: SF Bay Area
Posts: 2,109
|
You should fully assemble the pinion bearing carrier onto the driveshaft before thinking about adjusting preload. The driveshaft is a taper fit into the bearing carrier, and the torque of the shaft into that taper will slightly expand the carrier and affect the bearings. Best way to actually check the preload is to install the pinion assembly into the banjo without the ring gear or axle housings, and then use a beam-type torque wrench to turn the nut on the end of the driveshaft and adjust the two big nuts accordingly. Small beam-type torque wrenches are surprisingly inexpensive at the river store.
The string method outlined by Joe K will work if you really dont want to disassemble your banjo. But mount the pinion bearing carrier assembly onto the driveshaft first!
__________________
JayJay San Francisco Bay Area ------------------------ 1930 Murray Town Sedan 1931 Briggs S/W Town Sedan It isn't a defect, it's a feature! |
|
|
|
|
05-13-2025, 07:16 AM
|
#5 |
|
Senior Member
Join Date: Jun 2014
Location: Land of Lincoln
Posts: 3,430
|
Install the driveshaft into the pinion assembly, hold the driveshaft in a vise, turn the pinion assembly by hand, adjust by feel just like you adjust the front wheel bearings on your A . May I suggest that you use a new locking washer, if you use the old one you stand a chance of it breaking off and causing issues !
__________________
Don't force it with a little hammer tap, tap, tap get a bigger hammer tap done Last edited by Big hammer; 05-13-2025 at 07:31 AM. |
|
|
|
|
05-13-2025, 07:38 AM
|
#6 | |
|
Senior Member
Join Date: Jul 2010
Location: Cow Hampshire
Posts: 4,610
|
Sponsored Links (Register now to hide all advertisements)
Quote:
You can stand the driveshaft "vertical", put the bearing/gear assembly on the taper, and then "tap" the shaft/gear/bearing to bring the two parts together on the taper. Then, put the nut on. Do the string version test/adjustment NOW. THEN - press fit the assembly into the front opening of the banjo. I've done this by having the shaft/bearing assembly vertical, putting the banjo casting over the top, and doing a similar "tapping" of the assembly to walk the shaft/bearing into the punkin hole. It's a little heavy so don't get hurt. Do the torque wrench test/adjustment NOW. At that time I didn't have the "handi-dandy" tool that bolts to the punkin and clamps and will pull the shaft assembly into place. Imagine my pleasure on buying a "box of rear end parts" and finding the tool still in place clamped around one of the shafts. Mine not precisely this one, but someone's equivalent (its not marked.) 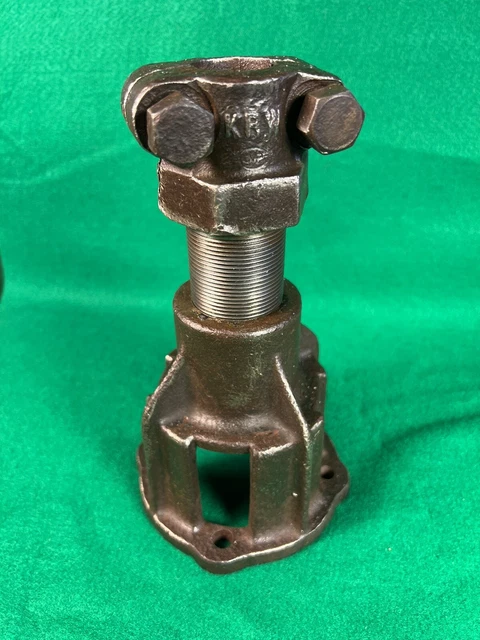 Heh. I now have the "right tool" but I haven't used it yet. There are other ways to bring the pinion bearing/shaft/gear into the banjo. Use of two carpenter pipe type clamps and a couple of strongbacks come to mind for you. Think LARGE. Maybe even a lead hammer on the spline end? The fit of the pinion bearing into the banjo housing is not exactly interference. I've had shafts FALL out of the hole. Joe K
__________________
Shudda kept the horse. Last edited by Joe K; 05-13-2025 at 07:56 AM. |
|
|
|
|

|
05-15-2025, 01:19 AM
|
#7 |
|
Senior Member
Join Date: May 2010
Location: St Charles , Missouri
Posts: 2,032
|
Russell,
The pinion preload for used bearings is 12-15 INCH pounds…. For new bearings 18-20 INCH pounds .. you really need to assemble it into rhe banjo with the stub and if the open driveline is bolted on you can leave it off till you preload rhe bearings . I have done over 350 rear axles and give the Marc national seminars on rear axles and more … . It’s nearly impossible and I would not attempt to assemble it as a preloaded setup in a bench Vice and then press it into the banjo housing. You really need to won’t know your true torque. As bug hammer said I’d install it and use a new tab washer but you don’t lock it down till you have it set. There’s a number of process for this . I’d be happy to email my rear axle seminar handout if you drop me a line at [email protected]. The kr Wilson tool shown A329 was used to pull rhe driveshaft together and pinion race and bearings out but was really one of the few substandard KR Wilson tools that was made. In fact in the 1931-32 catalog they habe a disclaimer to the fact that if it fails send pp paid for a replacement . The threads are soft and absolutely must be at minimum lubricated on trying to pull it out . I install the double race tapping it in with a brass hammer once frozen in a freezer for a while. Install bearings ( heated on a light bulb to go on pinion easier ) and set torque accordingly with lube. Like I said this is not brain surgery but is proper process, proper tools, and some experience . I have sold a spare A329 to a fellow one time because he borrowed another guys and destroyed it. So it can happen. The Mitchell one works better to remove and install but I believe tequirws removing the outer nut which can affect the setting. Not a favorable method in my opinion. I’ve done about 40 Mitchell’s and do not typically use that method for removal or install. Make sure your rear axle overall is properly restored before thinking about more speed and stress from an open driveline setup. A note about open driveline fans… rhe Model A was a torque tube drive where it did more than simply house the driveshaft. As thw name implies it absorbed and kept the rear axle torque and axle located for and aft. Without it you shackles and radius rods take all of that. I’ve been in tours where open driveline guys tore their radius rods take all and rhe axle flopped around , even with reinforced units. The shackles Cant take it. Imagine if they break? Just my 45 years of experience on this. If you want my seminar handout drop me a line at my email address I stayed above. It would be helpful. Larry Shepard Model A Restorers club tech advisor St Charles , Mo |
|
|
|
|
05-15-2025, 07:37 AM
|
#8 |
|
Senior Member

Join Date: May 2010
Location: Long Island, NY
Posts: 4,113
|
This is from Dyke's Automotive Encyclopedia, "Adjustment of the double taper roller bearing on the drive pinion shaft can be made by taking up on the driving pinion adjusting nut. This adjustment should be made by taking out all the play, but caution however must be used to not adjust the bearing too tight, but leaving the bearing to revolve freely."
No preload is mentioned. My practice is to snug the bearing hand tight to seat to the parts, then back-off the nut until the bearing spins freely without any axial play.
__________________
Bob Bidonde |
|
|
|
|
05-15-2025, 08:38 AM
|
#9 |
|
Senior Member
Join Date: May 2021
Location: NH/ VT
Posts: 460
|
I appreciate all these helpful posts--Bob B and Big Hammer techniques are the least precise and easiest to 'feel'. In the absence of a video showing the actual process I must confess to not understanding how a torque wrench can be used for this. It is easy to torque the drive shaft nut to 80# in a vise, but how do you use a torque wrench on the 2 3/16" nuts after the bearing is installed to the DS? Since everyone of you has done this multiple times, please tell me what I am missing
|
|
|
|
|
05-15-2025, 08:59 AM
|
#10 | |
|
Senior Member
Join Date: Jan 2020
Location: SF Bay Area
Posts: 2,109
|
Quote:
__________________
JayJay San Francisco Bay Area ------------------------ 1930 Murray Town Sedan 1931 Briggs S/W Town Sedan It isn't a defect, it's a feature! |
|
|
|
|
|
05-15-2025, 09:01 AM
|
#11 | |
|
Senior Member

Join Date: Jun 2015
Location: Red Deer, Alberta
Posts: 5,715
|
Quote:
I would use a 2-3/16" socket, adaptors down to 1/4"drive, 1/4" drive torque wrench in inch pounds.
__________________
If you don't hear a rumor by 10 AM, start one!. Got my education out behind the barn! Last edited by katy; 05-15-2025 at 09:02 AM. Reason: Correction |
|
|
|
|
|
05-15-2025, 09:12 AM
|
#12 |
|
Senior Member
Join Date: Jul 2010
Location: Cow Hampshire
Posts: 4,610
|
And, not to dispute those who "snug it up." MANY Model A have successfully been disassembled and reassembled by exactly these methods.
My father's comment: "The only car you can disassemble with a pair of vice-grips and a flat blade screwdriver." An obvious overstatement but showed his level of admiration of a car which DID have the capability for self-service. The purpose of pre-load is to compensate for heating up of the assembly in operation. You "snug it up" (i.e. undefined torque) and your hand calibration MAY result when at operating temperature in either excessively loose resulting in ring/pinion mis-match and ultimate failure, or "ouch too tight" as the bearing assembly heats, seizes, and fails. I have spoken of the driveshaft/pinion/bearing that just "fell out" of the banjo hole. I suspect this axle had "spun" the failed bearing resulting in wear to the hole. A defined torque here is the Goldilocks "just right" assembly tension between the parts to avoid either of these failures. Joe K
__________________
Shudda kept the horse. Last edited by Joe K; 05-15-2025 at 09:20 AM. |
|
|
|
|
05-15-2025, 09:29 AM
|
#13 |
|
Senior Member
Join Date: May 2010
Location: So Cal
Posts: 9,360
|
Here is a picture from the Tom Endy article on setting the preload with a torque wrench.
|
|
|
|
|
05-15-2025, 09:38 AM
|
#14 |
|
Senior Member

Join Date: May 2010
Location: Epping N.H.
Posts: 3,423
|
You would need a 5 foot deep 2-3/16 socket to get onto that nut after it is installed on the driveshaft.To get that rolling torque value you just need to turn either end of the driveshaft ..I think this is being overthought.Look up how Ford did it,and their service instructions on it.That should get you another 90 years or so out of it.
|
|
|
|
|
05-15-2025, 10:25 AM
|
#15 | |
|
Senior Member
Join Date: May 2021
Location: NH/ VT
Posts: 460
|
Quote:
|
|
|
|
|
|
05-15-2025, 10:47 AM
|
#16 |
|
Senior Member
Join Date: Jun 2014
Location: Land of Lincoln
Posts: 3,430
|
Russell, when you install your new locking washer and then tighten the second nut test the preload again ! You may find that the preload has changed, test again and readjust before you bend the locking tabs. I found that when you tighten the two nuts together the preload changes on matter how careful you are, you’ll need to play with this to finally set the preload.
__________________
Don't force it with a little hammer tap, tap, tap get a bigger hammer tap done |
|
|
|
|
05-15-2025, 03:16 PM
|
#17 | |
|
Senior Member
Join Date: Jan 2020
Location: SF Bay Area
Posts: 2,109
|
Quote:
__________________
JayJay San Francisco Bay Area ------------------------ 1930 Murray Town Sedan 1931 Briggs S/W Town Sedan It isn't a defect, it's a feature! |
|
|
|
|
|
«
Previous Thread
|
Next Thread
»
 Linear Mode

|
|

| Sponsored Links (Register now to hide all advertisements) |
|
|
All times are GMT -5. The time now is 05:14 AM.