|
|||||||


| Sponsored Links (Register now to hide all advertisements) |
|
|
 |

|
Thread Tools | Display Modes |
 05-11-2012, 08:06 AM
|
#1 |
|
Senior Member

Join Date: May 2010
Location: Mpls, MN
Posts: 27,582
|
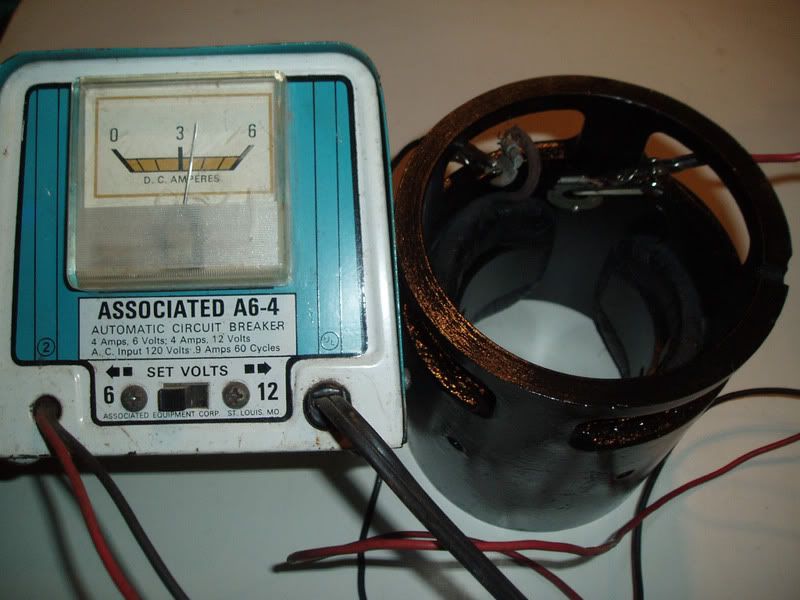 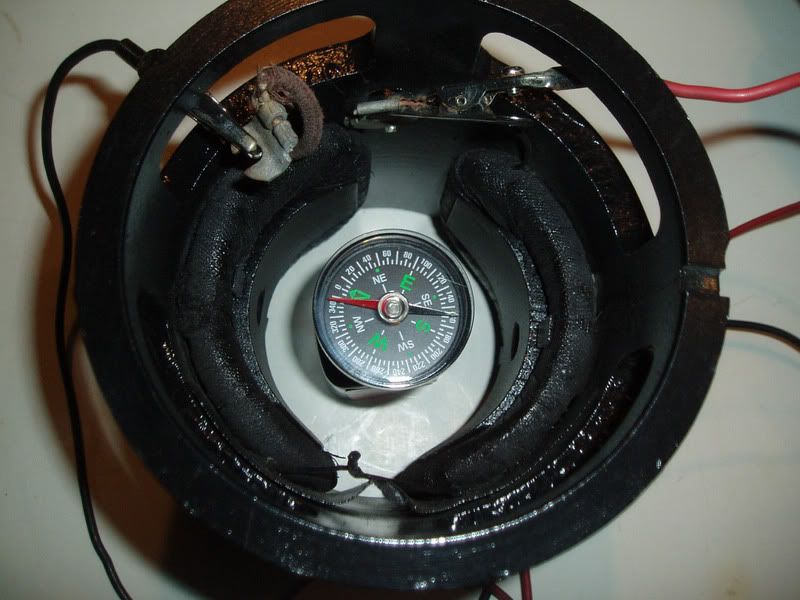 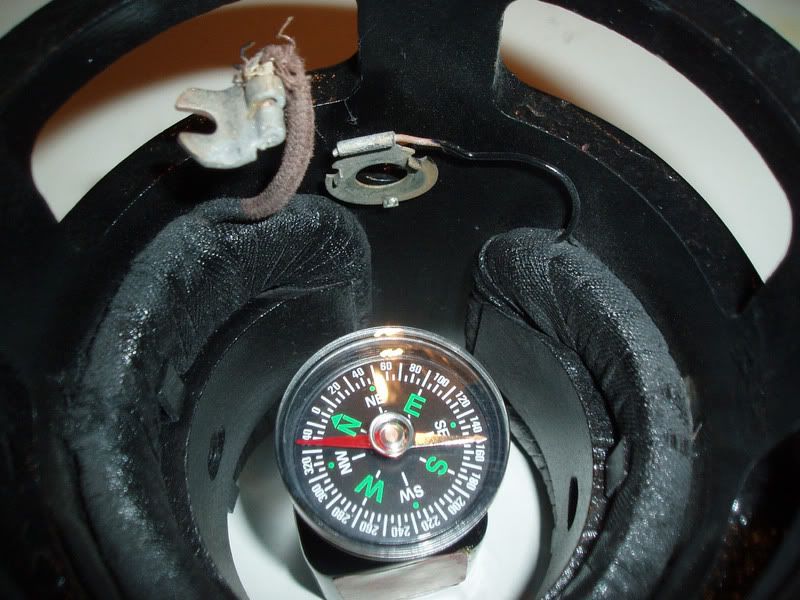 Last weekend I found out that the replacement field coils come with wires long enough to install the coils on the wrong side of the case. I tested a friend's newly rebuilt generator last Saturday and when I polarized it, it spun backwards. Good fields should draw about 3 1/2 to 4 1/2 amps. You can check the field windings while the generator is on the car by lifting the adjustable brush off the commutator, or placing a piece of paper or cardboard between the brush and commutator. Test with at least a 4 amp charger as pictured and set to 6 volts and the POSITIVE cable on the field ground. With the output stud facing away from you, as in the picture, the compass needle (NORTH) should face left. It will face left whether you place the compass on the left side of the case, in the center, or on the right side of the case. Notice that this is the later gnerator with the output stud near the rear, and the field ground is clamped to the case by the insulating washer on the output stud. Last edited by Tom Wesenberg; 05-11-2012 at 08:21 AM. |

|

|
|
05-11-2012, 02:00 PM
|
#2 |
|
Junior Member
Join Date: Jan 2012
Posts: 27
|
Thanks for another informative post with clear supporting images.
Jason |
|
|
|
| Sponsored Links (Register now to hide all advertisements) |
|
|
|
05-11-2012, 07:38 PM
|
#3 |
|
Senior Member

Join Date: Jun 2011
Location: Oakton, VA
Posts: 437
|
Tom,
Someday I hope to see your comments, instructions and observations along with your photographs gathered into a manual. I, and undoubtedly many others, have acquired an understanding of automotive electronics that we never had! Bud |
|
|
|
|
05-11-2012, 07:48 PM
|
#4 |
|
Senior Member

Join Date: May 2010
Location: Fresno, Ca.
Posts: 3,636
|
............................." Tom's Tutorials ".........................................
Put all your electric stuff on the "sticky" at the top of the page, so we can find in one spot...................Pluck? |
|
|
|
|
05-11-2012, 08:01 PM
|
#5 |
|
Senior Member

Join Date: Feb 2011
Location: Cocoa, Florida
Posts: 1,609
|
D.J. Moorrdigian that is a great idea, probably allot of work but I'd like to see it!
__________________
Wanted: Simmons Super Power Head  Craig Likon 1931 150B |
|
|
|
|
05-12-2012, 05:56 AM
|
#6 |
|
Senior Member
Join Date: May 2010
Location: Portland, ON, Canada
Posts: 315
|
Sponsored Links (Register now to hide all advertisements)
__________________
Dave A Jamieson Portland, ON Canada 1928 Tudor |
|
|
|
|
05-12-2012, 06:23 AM
|
#7 | |
|
Senior Member
Join Date: May 2010
Location: Mpls, MN
Posts: 27,582
|
Quote:
|
|
|
|
|

|
05-12-2012, 10:26 AM
|
#8 |
|
Senior Member

Join Date: May 2010
Location: Lynden, Wa
Posts: 3,550
|
Tom,
Is there a left and right field coild? I just bought new coils and installed them in my gen. I installed them with the wires facing the rear. I am not at home now and trying to remember how I Installed them and panicking since I have had them tightened down already. Mike
__________________
1930 TownSedan (Briggs) 1957 Country Sedan |
|
|
|
|
05-12-2012, 11:18 PM
|
#9 | |
|
Senior Member
Join Date: May 2010
Location: Mpls, MN
Posts: 27,582
|
Quote:
|
|
|
|
|
|
06-05-2012, 09:47 AM
|
#10 |
|
Senior Member
Join Date: May 2010
Location: Mpls, MN
Posts: 27,582
|
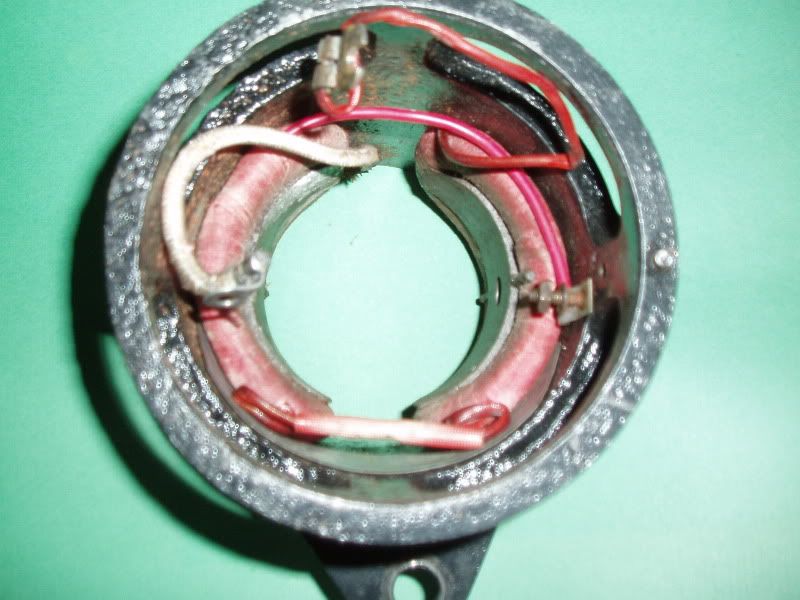 The mystery has been solved. My friend gave me the generator that mtors backwards and I took it apart the other day. He replaced the field coils to the correct side as I suggested, but the wrong field wire was being grounded, thus reversing the field polarity. This picture shows the RED wire going to ground, but it should lead to the adjustable brush. Since this generator case is badly rust pitted this will be used for good parts to fix other generators. |
|
|
|
|
«
Previous Thread
|
Next Thread
»
 Linear Mode

|
|

| Sponsored Links (Register now to hide all advertisements) |
|
|
All times are GMT -5. The time now is 02:34 PM.