|
|||||||


| Sponsored Links (Register now to hide all advertisements) |
|
|
 |

|
Thread Tools | Display Modes |
 02-14-2011, 01:30 AM
|
#1 |
|
Senior Member

Join Date: May 2010
Location: Mpls, MN
Posts: 27,582
|
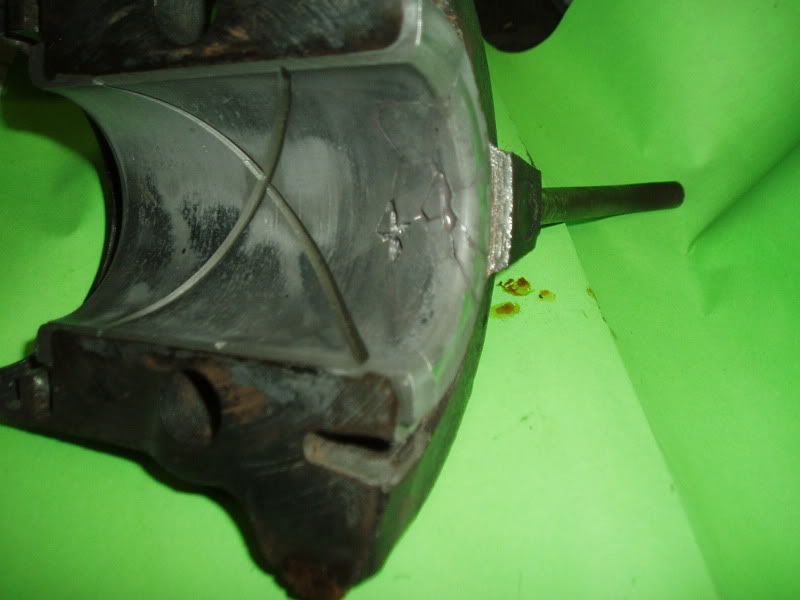
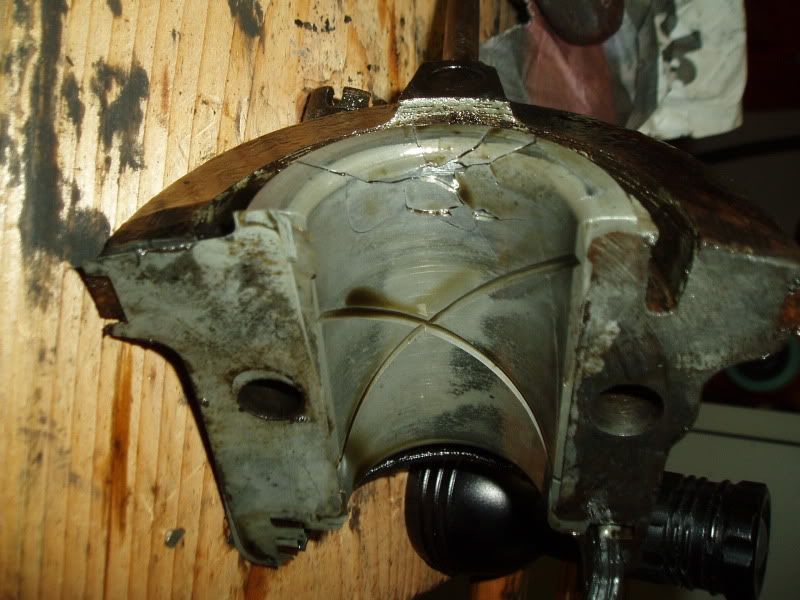  I'm doing a light overhaul on Mark's engine. I took it apart today and found all the babbit to be in great shape, except for this front of the rear main bearing cap. The engine has Silvolite STD. pistons with a little extra slop in the ring grooves, so it'll get new pistons and rings. The valves are all OK, so they won't be ground (or removed, as of now). Since this is the front of the rear main, and has very little thrust applied to it, I told Mark if it was my engine, since the rest of the babbit is so good, I'd JB weld in the pieces and drive it until it needs a new babbit job. The cap looks like it was well tinned, but the cap must have been too cool when the babbit was poured, so it didn't stick. Also notice the oil pockets where the block meets the cap. The pocket on the driver's side ends about 5/8" from the rear and the pocket on the right side ends just 1 3/8" from the front. The valve clearance ranges from .016 to .019", so we are thinking of installing adjustable lifters. There was some mention of some adjustables having too small of a base diameter. Is that still true today, or are both the single and double nut adjustables OK to use? Thanks Last edited by Tom Wesenberg; 02-14-2011 at 01:47 AM. |

|

|
|
02-14-2011, 06:10 AM
|
#2 |
|
Senior Member

Join Date: May 2010
Location: Eastern Tennessee
Posts: 11,508
|
What would I do, ....or what will YOU do??
 The JB Weld will likely work well in this instance for an engine that is not gonna get "hammered on", and as long as the driver does not 'ride the clutch pedal'. Another option is to get a rebuilder to pour just another cap and then you can scrape & fit it to the crank journal. Then the engine will be good to go for a long time. |
|
|
|
 )
)| Sponsored Links (Register now to hide all advertisements) |
|
|
|
02-14-2011, 06:30 AM
|
#3 |
|
Senior Member

Join Date: May 2010
Location: Asheville,NC
Posts: 3,104
|
Tom, I am going to guess, the engine is a Model B with the x groove for oil, right? After I know that is the case or not I can try to help. Probably won't matter in the long run but there are differences from 28 to 31 Model A and the later B engines. In any case the babbitt is toast and nothing will "fix" it except a repour. I don't say this because I want the job, it just is the truth. Just because there is no pressure from the driver pressing the clutch does not mean there is no pressure on that surface. If that were the case there would be no use for a thrust surface on the front of the bearing except, for a thin layer just in case it contacted the rear surface of the crank. I hate to bear bad news but it will leak out the rear main till it is repaired correctly.
|
|
|
|
|
02-14-2011, 07:02 AM
|
#4 |
|
Senior Member
Join Date: May 2010
Location: Asheville,NC
Posts: 3,104
|
Sorry Tom, my computer didn't load the first picture and I now see it is an early 28 cap. I should have noticed, there are no pinning holes drilled in the front thrust area, a dead give away. Looks like the babbitt was too cool when poured and the cap probably was too cool also since you are correct that the bond was compromised. The early caps are forged not cast and must be tinned before pouring and must be heated to 350-400 degrees to pour and the babbitt from 700 to 800 degrees in my opinion. This will create a good bond and make for a good bearing. The rebuilder probably didn't have a reliable way of checking the heat at different points of the cap. That is why the bearing broke where it did, the bottom of the cap is the hardest to heat if you don't check it reliably. If you don't think there are tremendous forces at work on the front of the thrust, why is it the most damage to rear mains is to the front of the bearing? 75% or more of the caps I remove with damage is to the front of the cap. Generally, the early caps are the best to run if, the babbitt is done correctly. The tinning creates a bond that will help to lessen damage from these forces. I believe Ford discontinued the use of these caps because of the time it takes to pour them with the tinning. Why he kept using the forged center and fronts I don't know but he had a reason since he used these till he went to inserts and beyond.
Last edited by James Rogers; 02-14-2011 at 07:11 AM. |
|
|
|
|
02-14-2011, 07:05 AM
|
#5 |
|
Senior Member

Join Date: May 2010
Location: Gwynn's Island Va
Posts: 1,386
|
I agree with Brent and James ,repour the cap and scrape it to fit.
Now because your gonna replace the pistons...go ahead and have it bored out and repour all the mains. Wick |
|
|
|
|
02-14-2011, 08:02 AM
|
#6 | |
|
Senior Member

Join Date: May 2010
Location: NC
Posts: 2,975
|
Sponsored Links (Register now to hide all advertisements)
Quote:
|
|
|
|
|

|
02-14-2011, 09:54 AM
|
#7 |
|
Senior Member

Join Date: May 2010
Location: on the Littlefield
Posts: 6,156
|
I would hope the crank was larger than one of the used intact caps in the core box and either bore or scrape it to fit ---upon seeing the ring groove wear and seeing the std pistons i would check the bore for taper ---then I would decide depending on the results --and perhaps cut the groove for a spacer, or if the bores are still good and the rods still had the grooves for the centerlocks I would use the std nos pistons with the thick dust on them.
It looks like (from the pic) that the bearing contact was less that perfect to begin with ---how round is the crank? --and with the oil well treatment how much did it leak? I had the same kind of crummy surprise when I went to adjust the bearings after 3000 miles ---the shop that did mine went downhill fast, an engine done 2 years later didn't even have oil grooves or the oil holes drilled |
|
|
|
|
02-14-2011, 10:14 AM
|
#8 |
|
Senior Member
Join Date: May 2010
Location: Woodstock, Illinois
Posts: 597
|
I would take it to Rich Fallucca and have it rebuilt completely, Oh where have I heard that before......... is there an echo on this site........LOL
Ken 
|
|
|
|
|
02-14-2011, 10:17 AM
|
#9 |
|
Senior Member

Join Date: May 2010
Location: Didsbury Alberta
Posts: 838
|
IMO, I would give Bill Barlow in Bend Oregon a call, without a doubt. If you provide him with accurate dimensions, of distance between the thrust faces, and the throw diameters, he can provide you with any of the caps you need, and they will fit perfectly. The caps that I received from Bill for an engine, were just like a piece of fine jewlery, as I was told by another FordBarner they would be. Shims come with the caps, at the right thickness, and marked for relative positioning. Usually no scraping required.
|
|
|
|
|
02-14-2011, 11:39 AM
|
#10 |
|
Senior Member
Join Date: Jun 2010
Location: Temecula, CA
Posts: 4,085
|
My first choice would be to install a new or rebabbitted cap, and machine to fit, difficult but not impossible. If I were to run that cap without new babbitt, I would not JB weld, just put it in without the pieces.
|
|
|
|
|
02-14-2011, 12:49 PM
|
#11 |
|
Senior Member
Join Date: May 2010
Location: 60615,330th Ave.,Clare, Iowa, 50524
Posts: 1,457
|
Have you got pictures of the block, and other caps, Tom.
|
|
|
|
|
02-14-2011, 01:35 PM
|
#12 |
|
Senior Member

Join Date: Nov 2010
Location: Raynham, Mass.
Posts: 583
|
Tom,
Did you hear the engine run prior to tear down, if so any knocking with that kind of underlying condition?
__________________
"no one knows more than everyone" |
|
|
|
|
02-14-2011, 01:48 PM
|
#13 |
|
Senior Member

Join Date: May 2010
Location: Jordan, MN
Posts: 1,411
|
Tom,
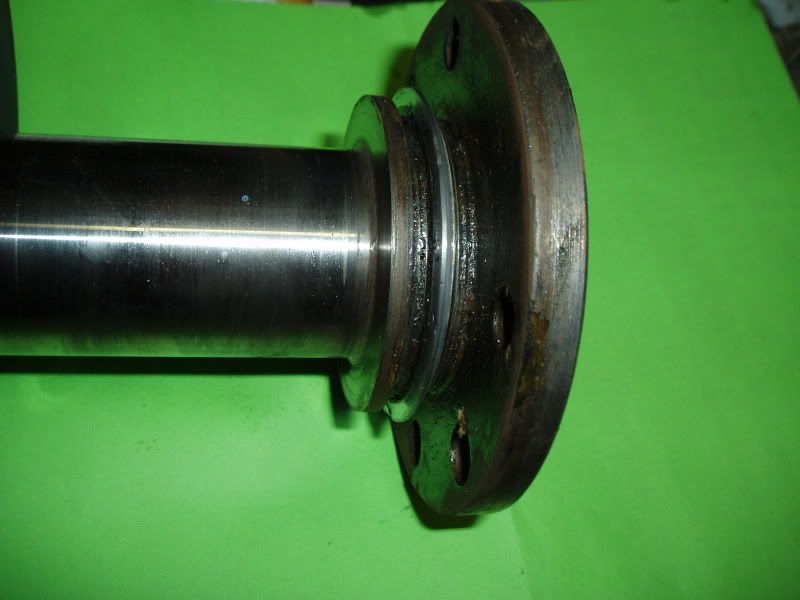
If it were mine, I would carefully remove the remaining thrust material on the front of the cap and then I would clamp it to a rotary table on a Bridgeport. I would machine it for the thrust washer shown below. I have a dedicated jig on my rotary table for the Bridgeport...so that would be my first choice. You could also machine the receiving area with a lathe. Turn a stub shaft the diameter of the babbit of the cap and use an old center or front cap to clamp the cap to the shaft for the machining. Feed slowly so as to not create any further damage to the remaining babbitt.  I do this all the time at the rear of the cap. The typical machining will need to be .125" deep and 2.25" in diameter. Before you complete this fix, check the area the thrust washer will be machined into to see if there is enough shoulder left after the machining to capture the thrust washer. If the shoulder is to thin, the outside diameter of the thrust can be reduced to leave a bit more shoulder. I do not have a cap available at the moment as I am away from my shop so I am winging it here. Final fit is accomplished by decreasing the thickness of the thrust washer until it flushes out with the thrust surface on the block. If you need to reduce the end-play of the crank, you could leave a bit of the thrust washer beyond the thrust surface of the block. Bevel the leading edge of the washer 45 degrees to keep oil between the surfaces. If you leave the leading edge sharp, it may actually wipe the oil from the surface of the crankshaft's thrust surface. See photo of a thrust edge @ 45 degree below. (The last pic below shows the thrust with the beveled edge located in the block but the principle is the same. The thrust is normally installed in the block when installing insert bearings because it is the quickest and most accurate to cut the pocket while the block is secured in the line boring machine. But...the thrust will work just as well in the cap.) File or sand the back side of the thrust washer to complete the final crankshaft endplay adjustment. Keep checking the overall thickness across the washer with a mic. as you remove material to keep it equal in thickness. I often use a belt sander with a fine belt to reduce the thickness quickly. The thrust washer is available at Snyder's under their Crankshaft section. Other Model A parts suppliers carry this part also. Note: When rebuilding with insert bearings, it is common to only provide a 1/2 thrust at the front of the rear main bearing. This single thrust is within the crankcase area and receives a good amount of oil from the dipper splash. I have an inserted engine with over 50,000 miles running on a 1/2 front thrust in the car shown on my avitar to the left of this text. The thrust should not be pinned...it should float. The block will keep the thrust washer from spinning and the thrust surface of the crank will keep it captured in the machined space. The thrust surface will most likely last longer than the remaining babbitt. When the engine is rebuilt, an unaltered cap should be substituted for the modified one. Replacement caps are readily available. The machining is about 10 minutes of work on a milling machine. I've attached some photos of the machining at the other end of the cap...try to picture the same process on the front of the cap to fix your problem. Updated: Tom, Just caught your later post about the cracked thrust on the block. The single thrust washer installed in the cap will still fix the problem. Just bevel the leading edge so it won't wipe the oil from the crank. Beveling it actually sets up a little pressure at the spot and forces oil between the two surfaces. Good Day! Dave in MN www.durableperformance.net Tom: Call me if you need help a better explanation or help. Last edited by Dave in MN; 03-04-2011 at 09:04 AM. |
|
|
|
|
02-14-2011, 03:30 PM
|
#14 | |
|
Senior Member
Join Date: May 2010
Location: Asheville,NC
Posts: 3,104
|
Quote:
|
|
|
|
|
|
02-14-2011, 03:43 PM
|
#15 |
|
Senior Member
Join Date: May 2010
Location: Mpls, MN
Posts: 27,582
|
As Paul Harvey would say, here's the rest of the story.
I just came in from scraping on the block and discovered there are similar cracks and loose pieces on the front end of the rear main in the block. Now, I think I know what happened here. When I was pulling the engine I noticed a hole in the bottom of the flywheel cover at the radius, so I assumed someone had hit a rock to break it like that. When I got the engine out I discovered a broken pressure plate bolt in the flywheel. A couple ring gear teeth also got whacked, so I knew the broken bolt got jammed between the flywheel ring gear and flywheel housing to knock the hole in it. I'd also bet the big jarring action on the flywheel made the crank flex enough to break the babbit. BTW the left hand drill bit set Mark bought yesterday worked great to remove two broken bolts. Someone had also broken a pan bolt. I slowly drilled into the center of the broken bolt and when the bit grabbed, it spun out the broken part. One bolt grabbed on the first 1/8" hole I drilled. The other one I had to drill all the way through with the 1/8" bit, then I used the 3/16" left handed bit and it grabbed right away. Of course it wouldn't work that well on broken head studs, but was well worth the $8 for the set of bits. I did drive the car for 1 mile before tearing into it because I wanted to see if there was anything unusual as far as power or noises. I also wanted to do a compression check. The compression ranged from 72 to 75, so the valves were OK, except for clearance, which ranged from .016" to .019". There was a very slight ticking noise, but it was too slight to tell where it might be comming from. Now that I know about the flywheel hitting a bolt and breaking a hole in the housing, that may have put just the slightest bend in a rod, or???? The wrist pins all feel good. There were some rust stain marks in the cylinders caused by years of non use and not oiling down the cylinders. Mark put over 5,000 miles on the car since he got it less than a year ago. Last edited by Tom Wesenberg; 02-14-2011 at 11:21 PM. |
|
|
|
|
02-14-2011, 10:17 PM
|
#16 |
|
Senior Member
Join Date: May 2010
Location: Vici,Okla.
Posts: 256
|
Tom, just a thought, could the slight ticking have possibbly came from the cracked pressure plate flexing? It happens some times on a cracked flywheel on automatics. Monte
|
|
|
|
|
02-14-2011, 11:00 PM
|
#17 |
|
Senior Member
Join Date: May 2010
Location: Mpls, MN
Posts: 27,582
|
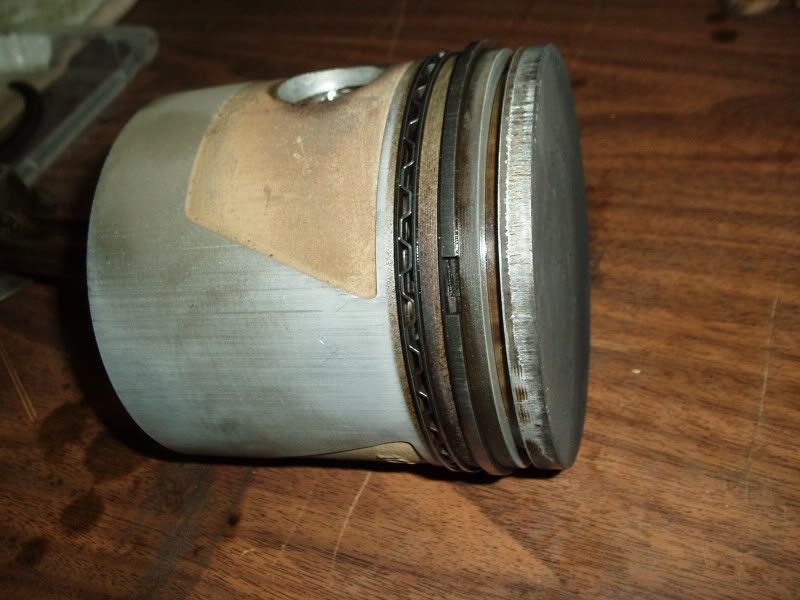 I'm pretty sure I found what was making the slight ticking noise when I test drove Mark's car. Someone had installed new pistons and rings at one time, but didn't remove the ridge from the tops of the cylinders. That ridge has sheared the top edge of #3 piston, as shown in the picture. If it shows up, you can actually see a slight bit of aluminum curled at the bottom of the shear. The pistons show no signs of bent rods. Also, if someone used a hammer to force the new pulley onto the crankshaft, that's probably what cracked the front of the rear main babbit. |
|
|
|
|
02-15-2011, 03:08 AM
|
#18 |
|
Senior Member
Join Date: May 2010
Location: now Kuna, Idaho
Posts: 3,778
|
That top ring groove wear is likely the result of covering many miles on gravel roads, with the carb living in a constant cloud of dust kicked up by the front wheels. You should have a number of old-time machine shops/garages in your area that would still have ring groove lathes and spacers tucked away in a corner. It's a simple hand-held tool.
|
|
|
|
|
02-15-2011, 08:46 AM
|
#19 |
|
Senior Member

Join Date: May 2010
Location: Spruce Pine, NC
Posts: 1,458
|
so far the most interesting part of the whole story is that Mark successfully drove 5000 miles with all this damage and poor workmanship in the engine.
I have found some similarly ugly sights inside engines that I drove a lot. it seems they usually either run well or not at all..... |
|
|
|
|
02-15-2011, 08:53 AM
|
#20 | |
|
Senior Member

Join Date: May 2010
Location: Reseda, Calif.
Posts: 2,188
|
Quote:
|
|
|
|
|
|
02-16-2011, 12:34 PM
|
#21 |
|
Senior Member
Join Date: Jun 2010
Location: Temecula, CA
Posts: 4,085
|
Tom, Let us know what you did and how it turned out, thanks.
|
|
|
|
|
02-16-2011, 10:38 PM
|
#22 | |
|
Senior Member
Join Date: May 2010
Location: Mpls, MN
Posts: 27,582
|
Quote:
|
|
|
|
|
| Sponsored Links (Register now to hide all advertisements) |
|
|
|
02-16-2011, 11:16 PM
|
#23 |
|
Senior Member
Join Date: May 2010
Location: on the Littlefield
Posts: 6,156
|
I have 1 .005 nos centerlock piston --maybe there are other single pistons looking to get together.
|
|
|
|
|
02-18-2011, 04:02 PM
|
#24 |
|
Senior Member
Join Date: May 2010
Location: Mpls, MN
Posts: 27,582
|
  I secured the broken babbit with JB Weld and Rich Fallucca replaced the cut down oil slinger by building up the cut off part of the slinger with solder, then turning it to shape on his lathe. When I removed the rings from the pistons I found most all the wear was in the thickness of the ring, rather than worn ring lands, so we'll reuse these pistons. The engine is a 1929 block, so Mark will look for a late 31 block and I'll put adjustable lifters and new rings in this engine, and Mark will run it for 2 or 3 years, when he will have a 31 touring engine installed. |
|
|
|
|
02-18-2011, 04:16 PM
|
#25 |
|
Senior Member

Join Date: May 2010
Location: Southbridge, Ma.
Posts: 1,614
|
Tom, is there any reason you couldn't fill the voids in the babbit with ol JB? Just wondering, I would be tempted to get it smooth and encapsulate the babbit.
|
|
|
|
|
02-18-2011, 08:32 PM
|
#26 | |
|
Senior Member
Join Date: May 2010
Location: Mpls, MN
Posts: 27,582
|
Sponsored Links (Register now to hide all advertisements)
Quote:
|
|
|
|
|
|
02-19-2011, 10:03 PM
|
#27 |
|
Senior Member

Join Date: May 2010
Posts: 361
|
Well, knowing in advance someone will try to publicly discredit me for making a contribution on this forum, I will nevertheless comment because I think this is interesting. I have seen this exact type of thrust face, and worse, damage "soldered" with salvaged babbitt material. The donor babbitt is melted out of old rods and mains. It is melted into a simple sheet metal trough and ends up stick-, or rod-shaped, and after thorough cleaning and preparation, is joined to the broken or voided babbitt with a huge soldering iron. If done with extreme prep and control, it "wets" well or "homogenizes" with the old babbitt and bonds to the old tinning, if there is any left. Then it is hand dressed and scraped to fit. I have seen this done on "T" and A main caps to repair broken babbitt and to build up thrust faces. I do not know how durable this "fix" is, just thought it may be interesting to you. Yes, Dearies, I know many reasons this could be a poor repair, I'm just reporting that I've seen it done.
|
|
|
|
|
06-19-2011, 12:01 PM
|
#28 | |
|
Member
Join Date: Jun 2010
Location: nanaimo b.c.
Posts: 35
 |
Quote:
|
|
|
|
|
|
06-19-2011, 04:18 PM
|
#29 |
|
Senior Member
Join Date: May 2010
Location: now Kuna, Idaho
Posts: 3,778
|
I'll bet a lot of these patch jobs were the work of used car dealers back in the day-"patch and peddle"! I grew up in southern Minnesota and my dad said many used car dealers bought cheap cars from Chicago, in the '30's and '40's especially. These cars were really beat and either patched by the Chicago dealer or the local guy. Dad said buying one of these cars was an adventure! You could tell a Chicago car by all the soot embedded in the paint from all the coal smokestacks.
|
|
|
|
|
06-20-2011, 08:59 AM
|
#30 |
|
Senior Member
Join Date: May 2010
Location: Santa Rosa, CA
Posts: 1,278
|
I have heard that back in the day plain old lead-tin solder was used to repair babbitt. Those old boys would just melt it in and file and scrape to shape.
|
|
|
|
|
06-20-2011, 09:17 AM
|
#31 | |
|
Senior Member

Join Date: Nov 2010
Location: Anchorage, Alaska
Posts: 9,115
|
Quote:
|
|
|
|
|
|
09-04-2011, 10:09 AM
|
#32 |
|
Senior Member

Join Date: May 2010
Location: Cincinnati, OH
Posts: 209
|
This post has taken on great interest to me because of similar damage I uncovered a couple of days ago (see the picture in my recent post). There were several approaches to the repair presented; Tom, how did your approach hold up?
Giles in Cincinnati |
|
|
|
|
09-04-2011, 06:31 PM
|
#33 |
|
Senior Member
Join Date: May 2010
Location: Mpls, MN
Posts: 27,582
|
Giles, I've run the engine for 3 or 4 hours in the garage, but the car is still getting painted, so we'll have to wait to see how it holds up on the long haul.
|
|
|
|
|
11-04-2016, 06:14 PM
|
#34 | |
|
Junior Member
Join Date: Oct 2010
Location: Canada
Posts: 9
|
Quote:
|
|
|
|
|
|
«
Previous Thread
|
Next Thread
»
| Thread Tools | |
| Display Modes | |


 Linear Mode

|
|

| Sponsored Links (Register now to hide all advertisements) |
|
|
All times are GMT -5. The time now is 03:32 PM.