|
|||||||


| Sponsored Links (Register now to hide all advertisements) |
|
|
 |

|
Thread Tools | Display Modes |
 11-06-2010, 01:39 PM
|
#1 |
|
Junior Member
Join Date: May 2010
Posts: 2
|
Hi,
I am preparing to install a Model B counter weighted crankshaft in my Model A engine. I am wondering if anyone would know where/and how much material I should machine off the flywheel to end up with a flywheel weighing 40 lbs. My lathe is not large enough to hold the flywheel from the outside and once I've machined off the original clutch mount so I can no longer hold it from that side. I have one shot at getting it right. Any help would be appreciated. Don |

|

|
|
11-06-2010, 02:20 PM
|
#2 |
|
Senior Member

Join Date: May 2010
Location: santa cruz, calif
Posts: 2,011
|
Last edited by pat in Santa Cruz; 11-27-2010 at 02:50 PM. Reason: change to new website URL |
|
|
|
| Sponsored Links (Register now to hide all advertisements) |
|
|
|
11-06-2010, 02:25 PM
|
#3 |
|
Senior Member

Join Date: May 2010
Location: on the Littlefield
Posts: 6,159
|
I took a chunk of old crankshaft, milled 4 flats on it so it wouldn't shift in the chuck, dialed it in to match the crankshaft the flywheel is going on (so there would be less than .0005 difference in runout at the pilot bearing hole)
The first flywheel I did had deep balancing holes, opposite those holes I found a large void in the casting. I don't have the prins I was working off home, I am going out to play now, they were found online but I don't remember where (2 different versions, I was using a combination)I will try to take a pic of them, but they are dirty and old. I am using a 15" Sidney that is much older than the A. |
|
|
|
|
11-06-2010, 06:29 PM
|
#4 |
|
Senior Member

Join Date: May 2010
Location: Asheville,NC
Posts: 3,104
|
I have one for sale that is 42#. I did 4 at 53# (just the ring off) today while doing other things. I have probably sold 30 complete setups this year. The key to excessive lightening is to take the weight off the inside rear or crank flange side before removing the pressure plate mount. Then you turn the FW around and remove what you want from the front after removing the ring.
|
|
|
|
|
11-08-2010, 06:39 PM
|
#5 | |
|
Senior Member

Join Date: May 2010
Location: Bucks Co, Pa
Posts: 3,740
|
Quote:
How much stock gets removed? If I take it from the clutch side. do I have to redrill/tap the clutch retaining bolts? What about rebalancing? Would it be easier to take it to a shop with a Blanchard (Rotary Surface Grinder)? Possible Pitfalls! What should I look out for? Where shouldn't I remove stock from? Dimensionaly, How much gets removed to make 53# No jokes Please! I'm fully aware that 65# Minus 53# is 13#. But whats that in 1.000 ndths"? (Terry, mentally trying envision thirteen lbs of cast iron) TIA Terry |
|
|
|
|

|
11-08-2010, 06:42 PM
|
#6 |
|
Member
Join Date: May 2010
Location: macclenny, florida
Posts: 71
|
Sponsored Links (Register now to hide all advertisements)
|
|
|
|
|
11-08-2010, 08:56 PM
|
#7 | |
|
Senior Member

Join Date: May 2010
Location: Quincy CA
Posts: 752
|
Quote:
I start with the clutch ring clamped from the inside in my 12" 3-jaw set-true chuck, then I cut the inside until the ring gear flange measures a bit over 1/2". After it's roughed out I dial in the pilot bearing hole to as close to zero as I can get--usually well under 0.0005"--and the wobble as measured at the ring gear flange down to a couple thou or better if possible--it isn't always. Then finish the inside to a flange measurement of 1/2". Be sure to leave a radius in the corner. I like to take a minimum clean-up cut across to the boss around the crank flange. Then I take an ABSOLUTE minimum clean-up cut across the bottom of the crank pocket (being VERY careful not to touch the ID of the pocket) and a minimum cut off the face of the ring gear flange. I'm happiest when my cut on the bottom of the crank flange pocket just barely scrapes off the rust and leaves the original machining marks. Then I flip the flywheel, grab it from the engine side, and cut off the ring down to just shy of the friction surface. This assumes you are converting to a V-8 clutch--if not, leave the ring. Then dial in the pilot bore, and the fresh cut on the ring gear flange to take the wobble out. Finish cutting the ring down to the friction surface if converting. Then I like to take a clean-up cut on all other accessible surfaces. Don't apply too much clamping pressure or the bell of the flywheel will start going triangular, or square if you're using a four-jaw. I bring in the big bull-nose center in the tailstock so I don't have to clamp so hard. I've not done one as heavy as 53 lbs. You might want to stop on the first setup when the flange thickness is maybe 3/4" and weigh it,then go from there. If you're taking off the ring for a V-8 clutch, maybe stop at 1" and shoot for about 59 lbs. The ring seems to be about 5-6 lbs. You can always get some more off the OD after you take the ring off. I prefer to take most of the weight off the ID. I'm not sure why, except that my gut tells me it makes for a better flywheel than taking it all off the OD. Joe
__________________
1929 Tudor since 1962 Feather River A's |
|
|
|
|
|
11-08-2010, 09:07 PM
|
#8 |
|
Senior Member
Join Date: May 2010
Posts: 447
|
I am not a machinist, but the instructor at an evening class that I took said to cut cast iron slowly with a fairly deep cut. Some people with professional experience should comment on this.
|
|
|
|
|
11-08-2010, 10:07 PM
|
#9 | |
|
Senior Member
Join Date: May 2010
Location: Asheville,NC
Posts: 3,104
|
Quote:
|
|
|
|
|
|
11-09-2010, 09:00 AM
|
#10 | |
|
Senior Member
Join Date: May 2010
Location: Bucks Co, Pa
Posts: 3,740
|
Thanks Joe! This what I wanted, Specifics! By 3 jaw set true, you mean a 3jaw universal? I would probably use a 4 jaw independent and a lead "Wonker"(1lb of lead , cast in an old soda can) and a indicator. So you're not doing just one side, you're machining almost all surfaces, Some more than others! Do you have the FW rebalanced? Or does removing an equal amount of stock leave it a balanced condition? I'm new to this!
Terry Quote:
|
|
|
|
|
|
11-09-2010, 10:05 AM
|
#11 |
|
Senior Member

Join Date: May 2010
Location: 60046
Posts: 888
|
isnt there a blue print in the sos magazine for stock removal
tk
__________________
anyone need some Model A restoration work done in Illinois? shoot me an email for pics and information [email protected] |
|
|
|
|
11-09-2010, 11:45 AM
|
#12 | |
|
Senior Member
Join Date: May 2010
Location: Quincy CA
Posts: 752
|
Quote:
A set-true chuck is a 3-jaw universal with a mounting arrangement that allows the body of the chuck to be shifted on the backplate with four adjuster screws. You grab the workpiece with the regular 3-jaw setup, which as we know puts the work close to centered but not exact. Then you work the four adjustments on the backplate just like a four-jaw universal, until the work is centered to your spec for the particular job. It's more of a production tool in that once the chuck is set for work of a certain diameter, it repeats nicely--not good enough for flywheel work, but good enough for most other purposes. I have all my flywheels balanced after installing new ring gears. Machining all surfaces brings them close to balanced, but they always need a little more attention. Joe
__________________
1929 Tudor since 1962 Feather River A's |
|
|
|
|
|
11-09-2010, 01:19 PM
|
#13 |
|
Junior Member

Join Date: May 2010
Location: Mortsel, Belgium
Posts: 10
|
Hi guys, I posted this on the HAMB earlier this year.
Hope this is of some help. Eddy Quote: Originally Posted by Fro  I followed the SOSS print with the exception of adding the model B undercut on the backside which isnt quite as deep as the model B, I thought this would help with the outer mass a little, I'd be glad to draw it up if you'd like. Hi Fro, I don't want to alarm you but did you use the dimensions stated in the January 2006 S0SS magazine? Or did you use the corrected dimensions? In the Jan. issue it stated that you had to cut the inside of the flywheel to 5.735R but this is to much!!!  You can only machine it to 5.3125R as stated in the note he put in the following magazine!!!! Here are pics of the mag and the note (I don't have a scanner so I took pictures of them). You can only machine it to 5.3125R as stated in the note he put in the following magazine!!!! Here are pics of the mag and the note (I don't have a scanner so I took pictures of them).I hope you cut it to the correct dimensions. I used the correct dimensions exept I did not machine it to use a V8 clutch, I still use the stock one.  Good luck, Eddy  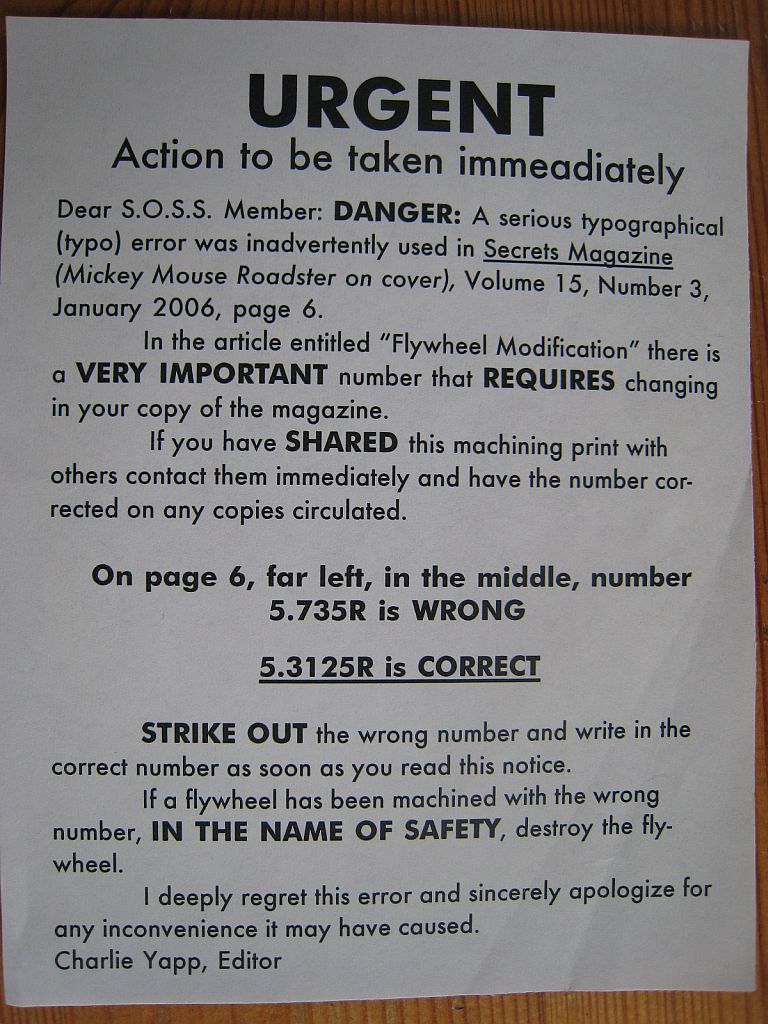
|
|
|
|
|
11-09-2010, 05:11 PM
|
#14 |
|
Senior Member
Join Date: May 2010
Posts: 120
|
Thanks Eddy,
I hadn't seen that correction .... guess I need to join SOSS to get the rundown |
|
|
|
|
11-09-2010, 06:53 PM
|
#15 |
|
Junior Member
Join Date: May 2010
Posts: 2
|
Thank you for all the great information. It was exactly what I needed.
|
|
|
|
|
03-06-2016, 01:45 PM
|
#16 | |
|
Senior Member

Join Date: Apr 2014
Location: Connecticut
Posts: 130
|
Quote:
|
|
|
|
|
|
03-06-2016, 02:09 PM
|
#17 |
|
Senior Member

Join Date: May 2010
Location: Eastern CT
Posts: 2,732
|
Is this what you are looking for? Notice the correction in red.
|
|
|
|
|
«
Previous Thread
|
Next Thread
»
 Linear Mode

|
|

| Sponsored Links (Register now to hide all advertisements) |
|
|
All times are GMT -5. The time now is 02:38 AM.