|
|||||||


| Sponsored Links (Register now to hide all advertisements) |
|
|
 |

|
Thread Tools | Display Modes |
 12-25-2012, 05:38 AM
|
#101 |
|
Senior Member

Join Date: May 2010
Location: Solihull, England.
Posts: 8,747
|
Yeah, probably, but that assembly was "new" in the 50's. There is hardly any clutch chatter so it's working well enough with just the one.
Mart. Last edited by Mart; 12-25-2012 at 06:34 AM. |

|

|
|
08-06-2013, 03:36 PM
|
#102 |
|
Senior Member
Join Date: May 2010
Location: Solihull, England.
Posts: 8,747
|
One thing that had been bugging me on my coupe was a slight tendency to bump steer, or even worse, "roll" steer. There are traffic calming measures on my road in the shape of raised junctions. The car would give a little kick to one side as it went up the bump and a slightly bigger kick the other way as it dropped off the other side of the bump. Also when trying to drive fast down a country lane as I wind some steering on and start to turn right, lets say, as the body rolls to the left, the steering pulls harder to the right. Not good. It was a bit of a handful on the twisty stuff, requiring constant attention and correction.
I had an idea what was causing the problem. Hers's a pic to illustrate. 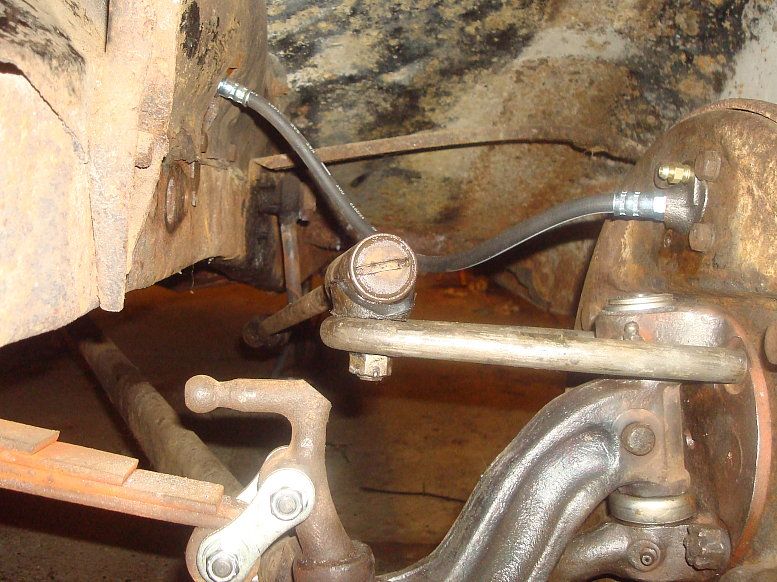 Ok, it would have been better taken from the side, but you can see that the drag link runs uphill from the pitman arm end to the steering arm ball. The steering arm is straight, and the ball is fitted sticking up, so the drag link attachment is quite high. All this is made worse, of course by the dropped axle. Fitting a dropped axle does cause a big list of knock-on effects. I decided to invert and drop the steering arm. That meant that the drag link would no longer fit, as the end would be the wrong way up. As I needed to modify the drag link I decided to make it adjustable using the end of a track rod. A drag link has two different ends, one the same as a track rod end, and the other one is the opposite way around. This means one end has the shock absorbing spring for compressive loads, the other end has a spring for tensile loads. So I used the otherwise scrap drag link that was on the coupe when I got it, and cut the end off that was the opposite of a track rod end, and took a bent track rod and straightened enough of it to give me enough to make a drag link. I drilled out the track rod tubing to about 12mm and turned down the drag link shaft so it pressed into the drilled out end of the track rod tube. I cleaned it thoroughly and welded it on full power with the mig. I then drilled and made a couple of rosette welds through the tube into the shaft of the drag link end. This is a highly critical weld so don't try this at home unless you are either confident of your own abilities or have a certified welder prepared to do it for you. Aussies would not be allowed to do this. So the steering arm was heated and bent to give a drop, a new ball was fitted and the drag link built up and fitted. Here's a shot from the front: 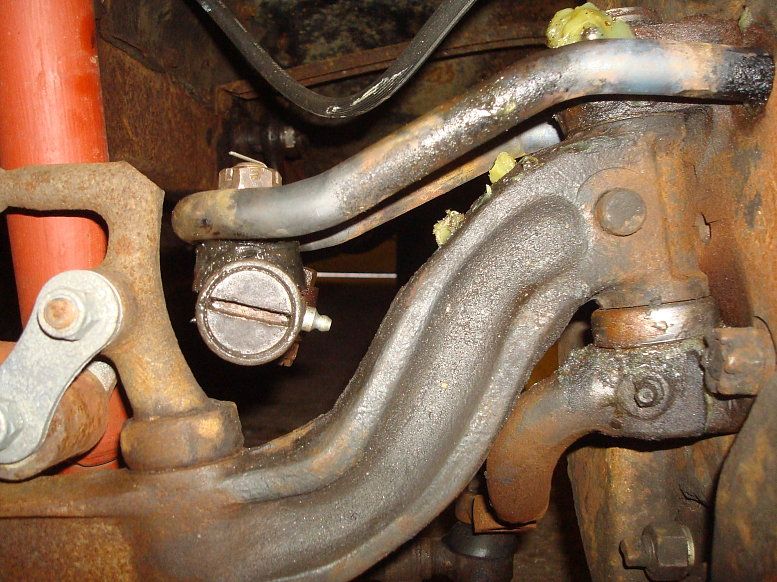 You can see the drag link end is about 4 inches (or more) lower than it was. What you can't see so easily is that the alignment is better, the drag link sits on the ball more readily, without binding. Everything travels through the full range from lock to lock without fouling or binding. And here's a shot from the side: 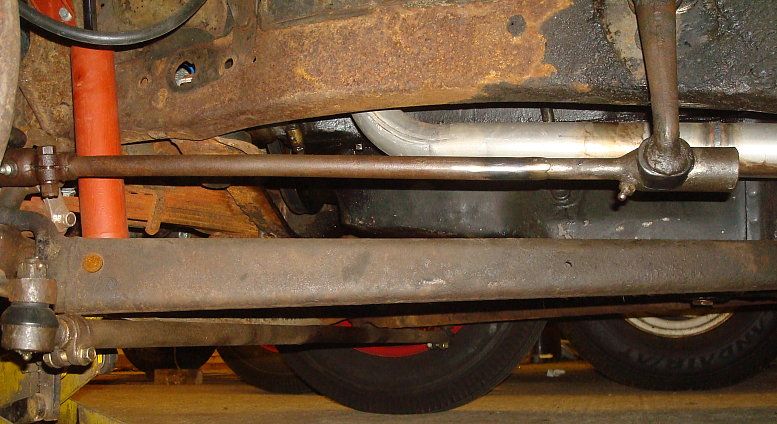 Although I do not have a "before" shot for comparison, you can see this angle is perfectly reasonable. I took it for a road test and I could feel straight away that the "edginess" had gone, and the tendency to dart to the side over the raised sections was gone too, I could ride the bumps hands off and it just goes straight. The first road test showed me that the drag link length needed adjusting as the steering wheel was not centred. A couple of iterations of adjustment followed by a quick run around the block got that dialed in. Having the sweet spot on the box properly aligned to straight ahead driving seems to make it that little bit better. So a good improvement for what amounted to a couple of afternoons worth of work. Now it's dialed in I can go around and fit the splitpins and regrease and go out and enjoy the improved driving experience. Mart. |
|
|
|
| Sponsored Links (Register now to hide all advertisements) |
|
|
|
08-06-2013, 05:51 PM
|
#103 |
|
Senior Member
Join Date: May 2010
Location: san antonio, texas
Posts: 461
|
you are a true caftsman.......
|
|
|
|
|
12-12-2013, 01:36 PM
|
#104 |
|
Senior Member
Join Date: May 2010
Location: Solihull, England.
Posts: 8,747
|
I left out the part where I got the roof insert a bit more finished:
Ok, time to add a little bit to the thread. I have been away working in the states for nearly 3 weeks so that halted progress for a while but did allow me to pick up a few little nik naks like wiper arm and blade, radiator to grille brackets, window channels and other sundry bits. I fitted the radiator brackets and that allowed me to refit the hood. It doesn't really align very well, but it'll do for now. I like a 33/34 with a hood. It looks classy. I had had some glass cut for the side windows. One was broken and one was really obscured in the plastic interlayer. Got the new glass fitted using the new lower channels and rubber I had bought. Didn't take any pics. Finally got around to doing a proper job and decided to tackle the roof insert. I had the section of Mondeo bonnet and had slowly contrived a plan on how to fit it. Neals hammer formed panels had stuck in my mind and with 3 weeks thinking time, an idea formed in my mind. Heres an overall pic of the task at hand. 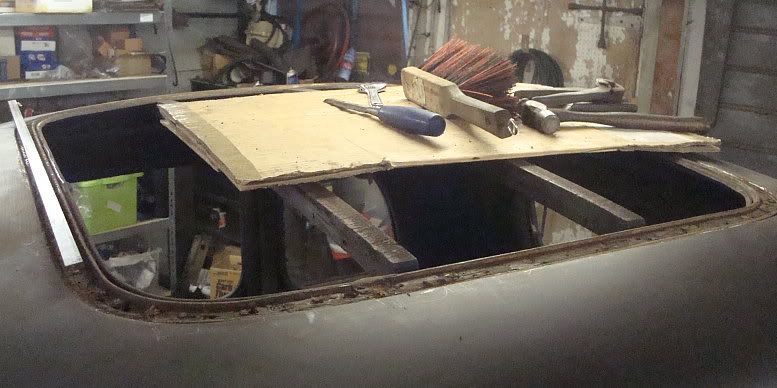 Firstly I removed all the remnants of cloth and tacks from the roof surround tack strip. The strip was in quite good condition, pretty sure it had only had one insert ever fitted.  Here's a strip of b&q's finest 15mm by 5mm steel bar, chosen as the best size to go around the opening. 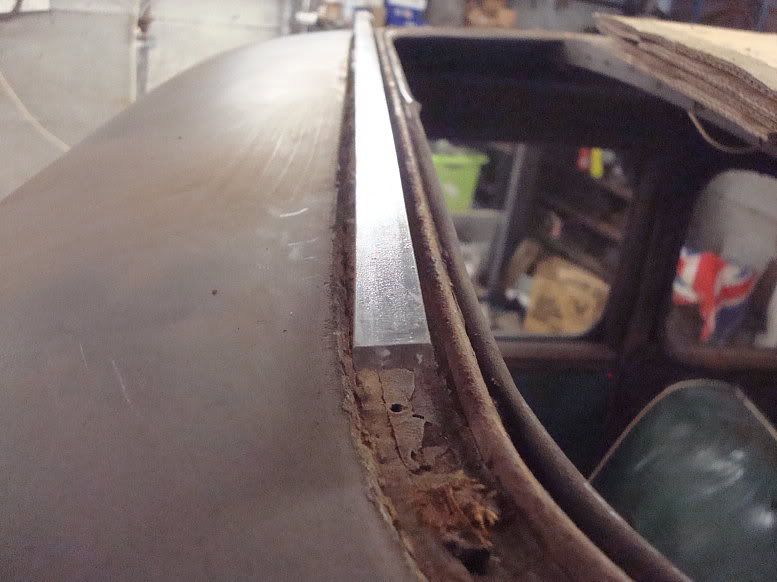 And using a Y-block pulley in the vice I proceeded to bend it to suit the shape of the roof opening. 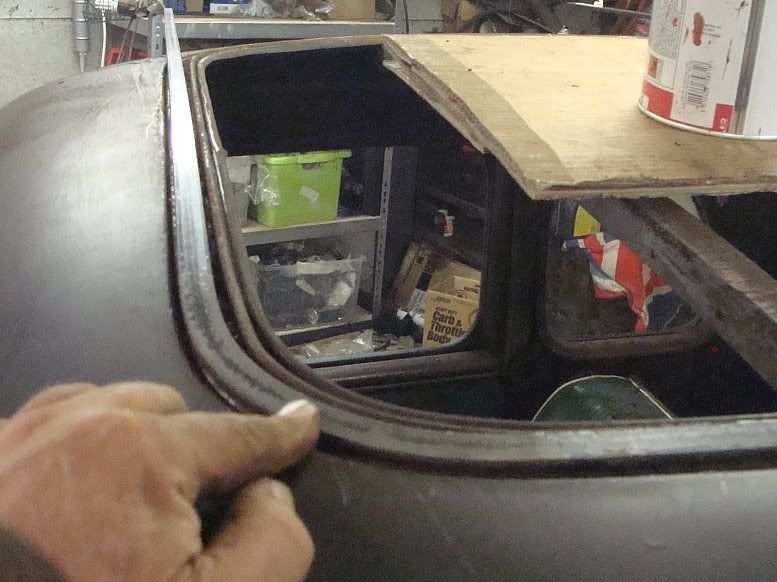 Keep going, all the way around. It'n not as easy as the pics suggest, lots of tweaking and rebending. 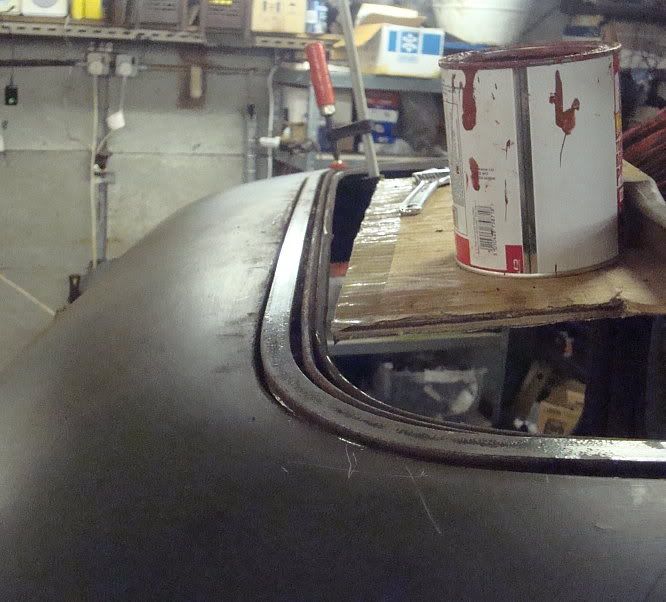 I had to weld three pieces together. The outer frame was then drilled in 20 places and the holes transferred to the tack strip and drilled through. 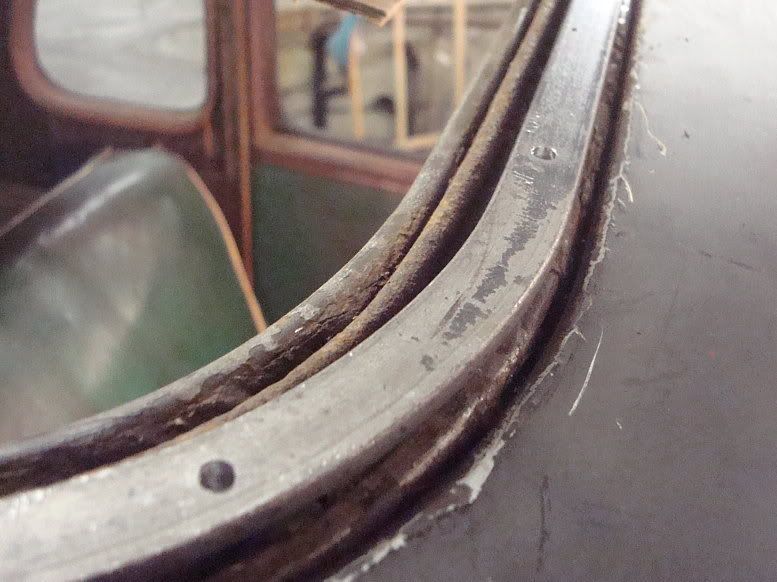 I then countersunk the holes, tapped them and after turning the heads down a bit, inserted 20 10-32 UNF screws into the holes. 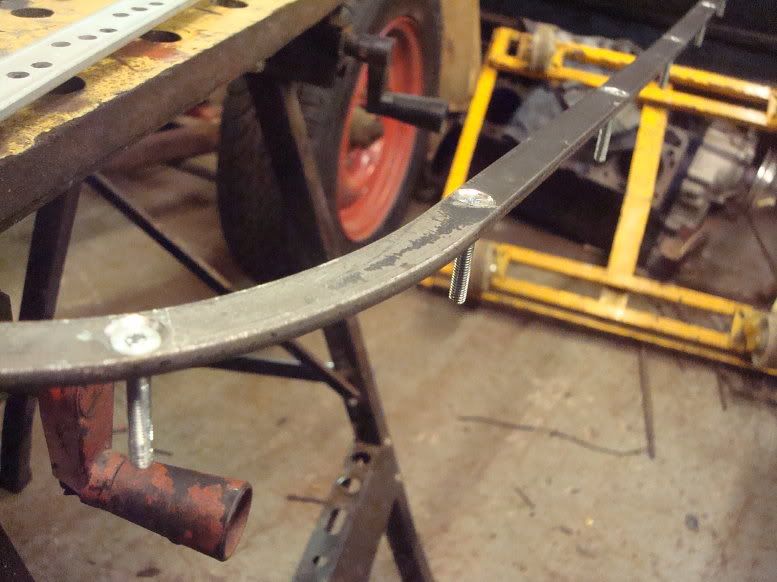 I secured each one in place with weld and then ground the welds flat. I was then able to lay the frame onto the upturned filler panel.  I then scribed a good clear line around it, and (after this pic) trimmed the panel to approx 6-7mm outside the line. 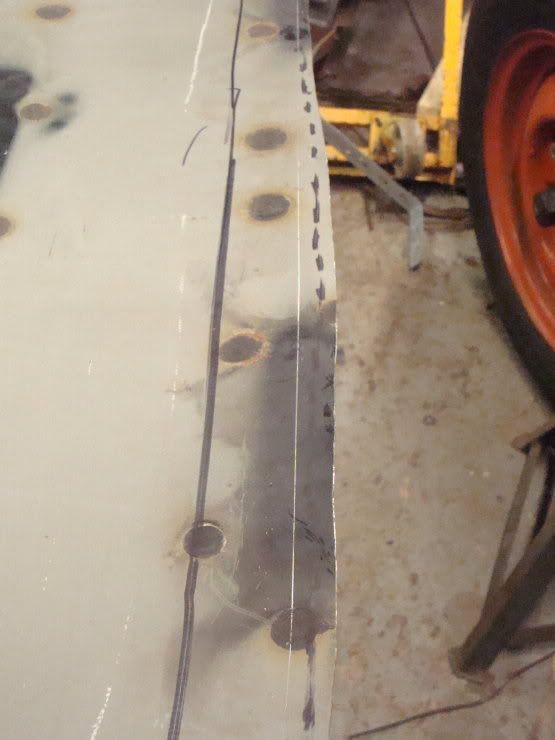 Then using a mallet and a lump hammer as a dolley I knocked the overlapping piece up around the edge of the frame, the frame acting as a hammer form. (no pic sorry) Once the outer lip was formed, I trimmed off any excess and welded the skin to the frame in a 3 stage process. 1, grind a little notch. 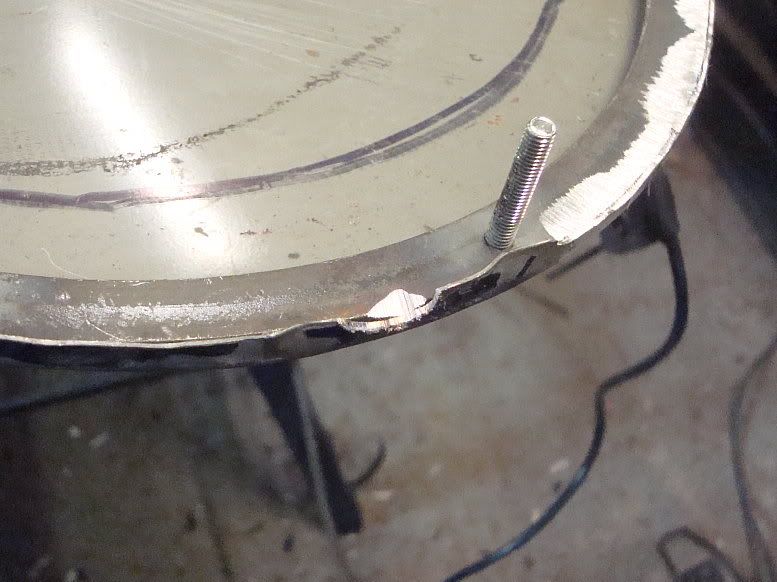 2, Run a little bead of weld into the notch. 3, Grind the weld down flush with the surrounding metal, taking the outer skin down flush at the same time. 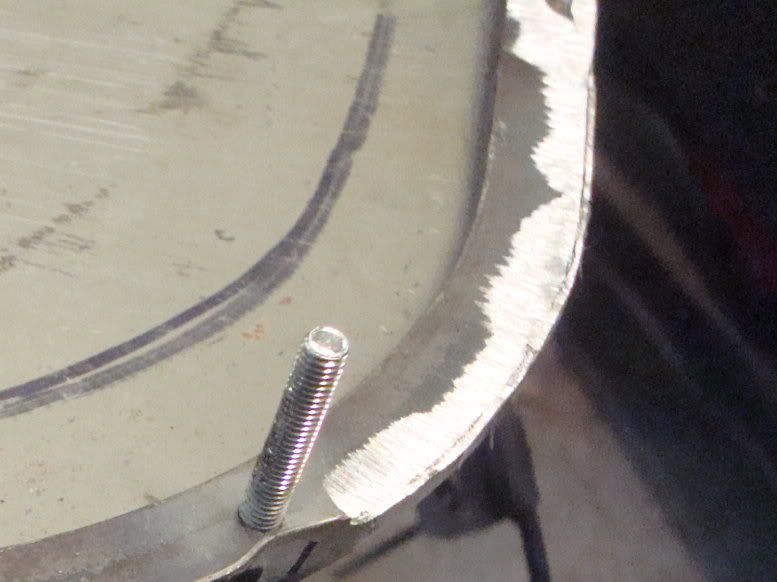 I trialled the frame in the roof and had to drill the holes along the side rails a little oversize, (7mm) as the frame had shrunk a bit with the hammering. I got it in place with just a little bumping with the palm of my hand, and put the nuts on below. The screws need trimming down, but will do for now. 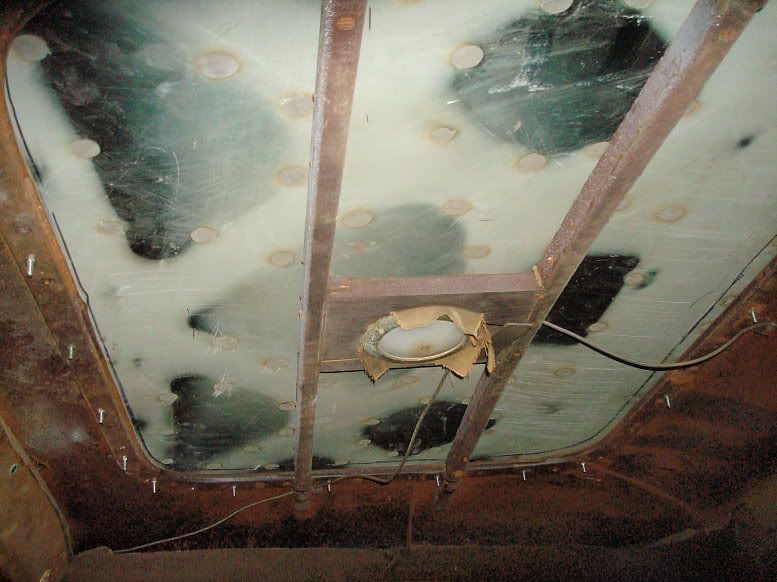 And here is a quick look at how it sits. Right side: 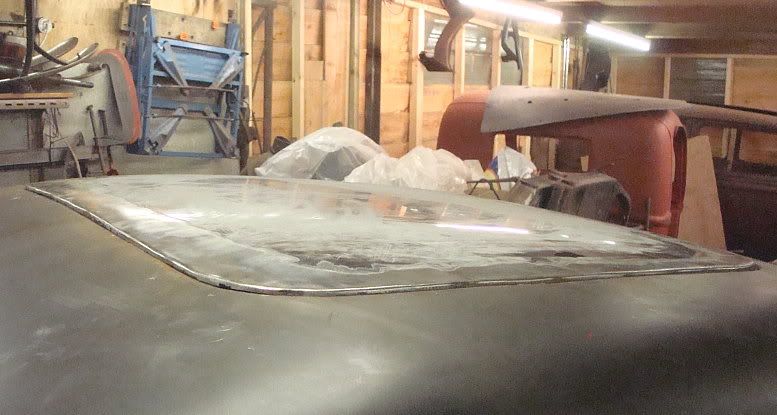 Rear: 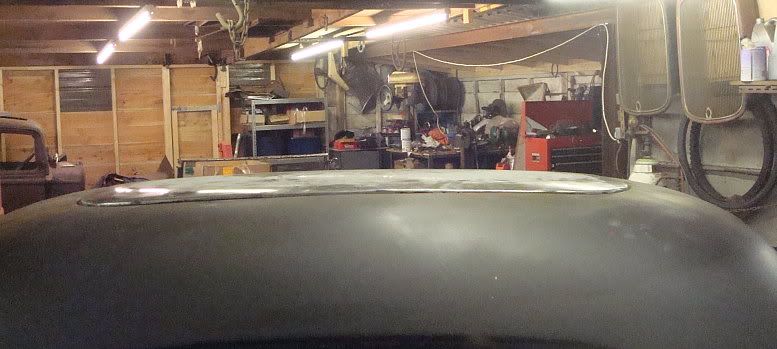 And left side: 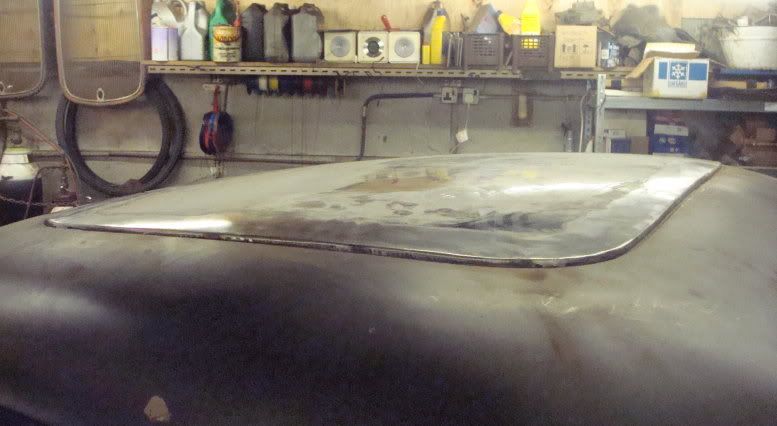 Obviously it will need to come off again for painting and to paint the tack strip area and apply some sealant, but I'm pretty pleased with it as it stands. Mart. |
|
|
|
|
12-12-2013, 01:38 PM
|
#105 |
|
Senior Member
Join Date: May 2010
Location: Solihull, England.
Posts: 8,747
|
Here's a bit more:
********** Did a bit more on the roof insert. Took it off and ran a wire brush around the roof aperture.  Stripped all the old paint off. 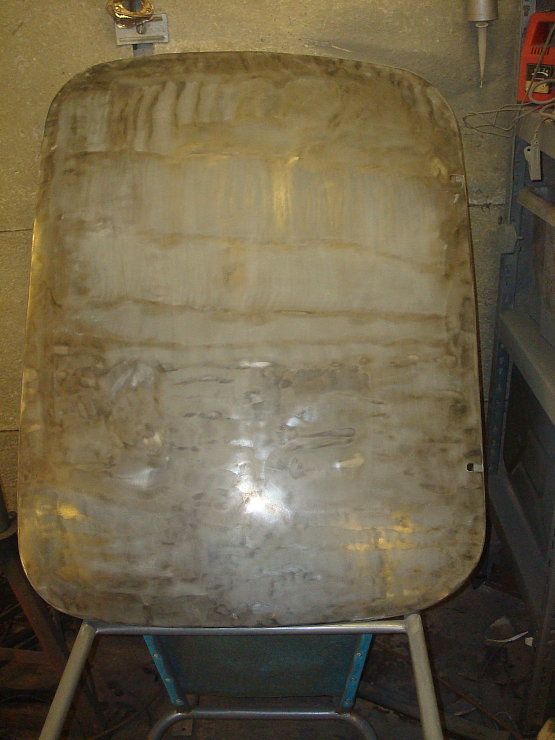 Remember this was a Mondeo bonnet? Those two holes on the right of the pic are the windscreen washer jet holes, they are at the back of the bonnet but on the front of my insert. Welded them up and just licked the welds down with the grinder. Didn't bother with any filler. 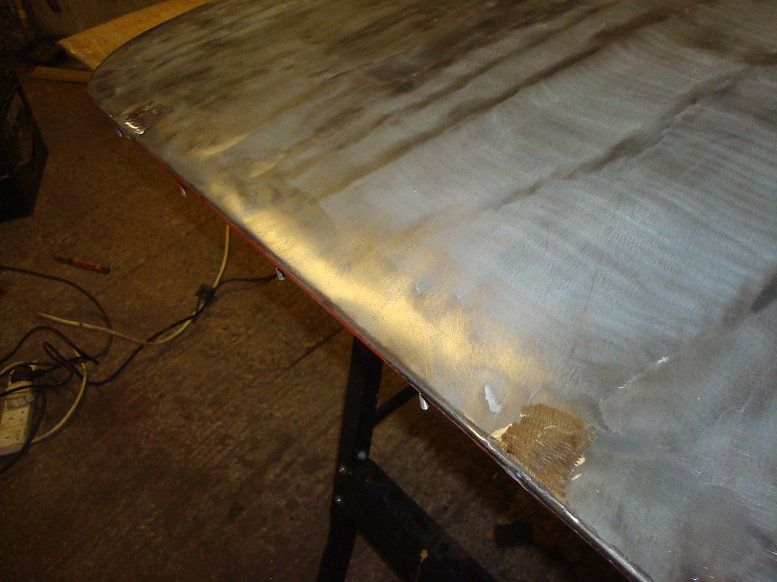 Two coats of screwfix red primer and one of hammerite satin black. Love the red primer, don't like the hammerite stuff. 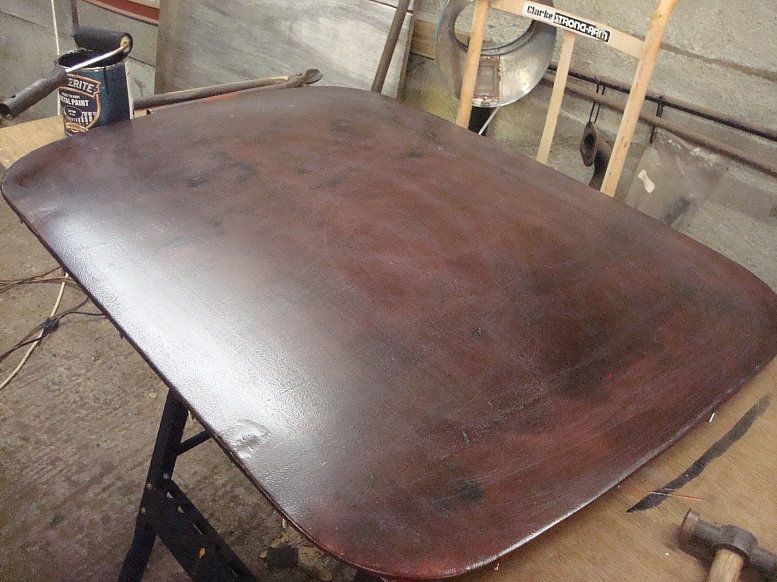 Didn't take pics at this stage, but put another coat of black on the top and the next day flipped it over and after cleaning the remnants of the glue nobules off with the wire brush, put a coat of red oxide on the underside. Cut a bicycle inner tube into long strips and made a rubber gasket to go around the perimeter. punched holes in it to fit over the studs and put little bits of tape on the corners to hold the gasket in position. I plonked the roof insert back in place and tightened it down. 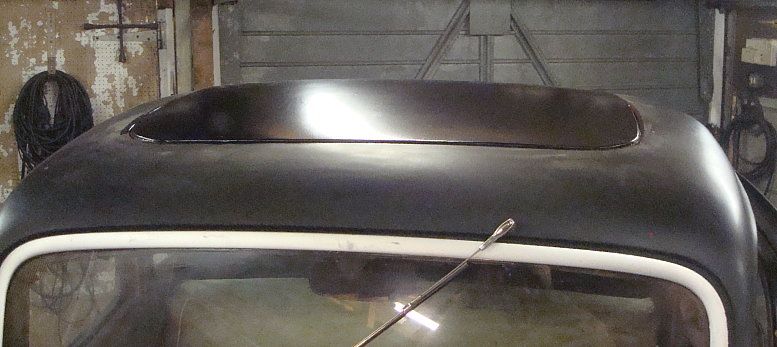 The rollered paint has a sort of mottled effect, and looks a little like stretched fabric. I'm quite pleased with it. It looks well made in a rough and ready way, (if you know what I mean). 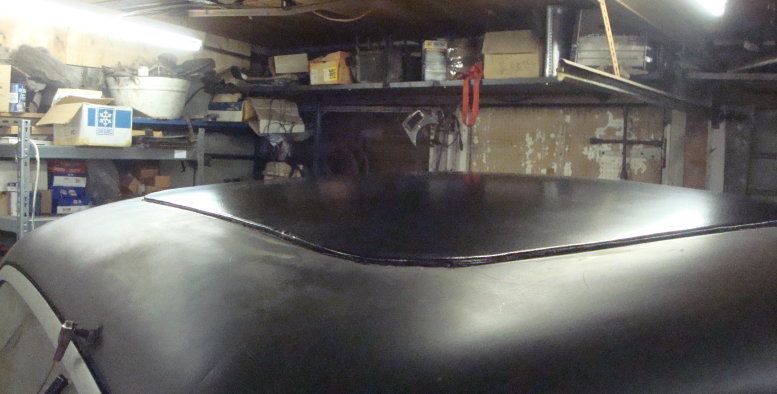 It looks ok from the inside too, with the coat of red paint. 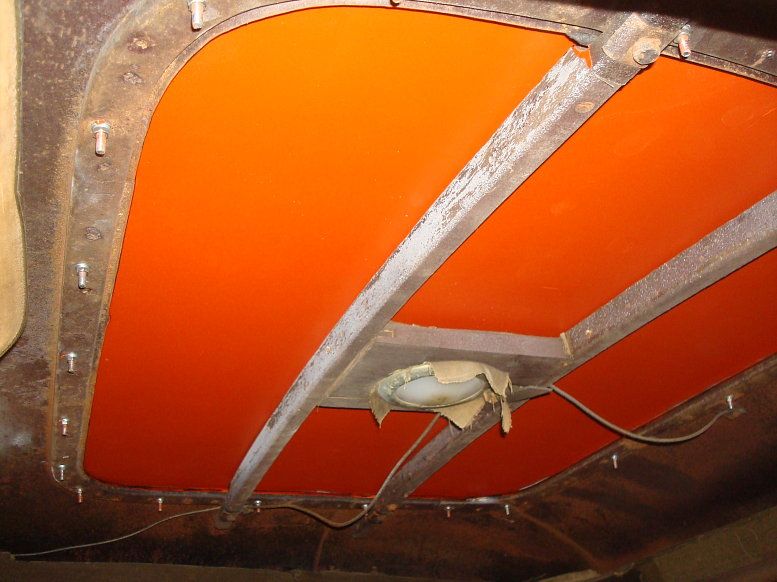 I may still trim a little off the length of the screws. I intend to just put a bit of matt black paint on the screws, because when driving, I find the bright screws in my peripheral vision distracting. Overall I'm pretty pleased with the way it turned out. Mart. |
|
|
|
|
12-12-2013, 02:45 PM
|
#106 |
|
Senior Member

Join Date: May 2010
Posts: 875
|
Sponsored Links (Register now to hide all advertisements)
|
|
|
|
|
12-12-2013, 03:07 PM
|
#107 |
|
Senior Member

Join Date: Feb 2013
Location: Eureka Calif.
Posts: 968
|
To say I'm impressed would be an understatement.Amazed is a better choice of words.I can only wish that I had your talents.Do you need an apprentice?
|

|
|
|
12-12-2013, 05:26 PM
|
#108 |
|
Senior Member

Join Date: Nov 2010
Location: NM
Posts: 2,438
|
Great job on all accounts, Mart!
Curious why, if you had a RHD gearbox, you didn't convert the car to RHD?
__________________
'52 F-1, EAB flathead |
|
|
|
|
12-13-2013, 11:02 AM
|
#109 |
|
Senior Member

Join Date: May 2013
Location: Coos Bay, OR
Posts: 640
|
Wow! I hadn't seen this thread before today, but very impressed with your back-yard garage skills. I'm inspired to do more to my own car, and don't throw away any part that doesn't crumble in my hand!
|
|
|
|
|
12-14-2013, 08:17 AM
|
#110 |
|
Senior Member

Join Date: Sep 2010
Location: Merrimac Mass
Posts: 161
|
That looks great! I like it better than a filled roof. No leaking canvas and no wind noises.
|
|
|
|
|
12-14-2013, 08:26 AM
|
#111 | |
|
Senior Member

Join Date: May 2010
Location: FP, NJ
Posts: 2,770
|
Quote:
__________________
Don't never get rid of nuthin! |
|
|
|
|

|
12-15-2013, 01:17 PM
|
#112 |
|
Senior Member
Join Date: May 2010
Location: FP, NJ
Posts: 2,770
|
I'm working on a '32 Tudor that needs a roof and this looks like just the ticket. I've tried bending some flat stock on edge like that and I figure that it would take either an elaborate bending set up or a lot of heat at hammering. Maybe I could cut the corners from plate and weld them to bar for the sides and ends?
__________________
Don't never get rid of nuthin! |
|
|
|
|
12-15-2013, 07:03 PM
|
#113 |
|
Junior Member

Join Date: Apr 2013
Location: California
Posts: 17
|
I have enjoyed reading this thread this weekend. The detailed descriptions and the pictures are excellent. Thanks Mart for your dedication in documenting all you are doing. Looking forward to your future posts.
|
|
|
|
|
02-19-2014, 11:17 PM
|
#114 |
|
Senior Member

Join Date: Jan 2014
Location: Atlanta, GA
Posts: 482
|
Just read this thread to the end. What? It's over? Need more posts. Great work on a great car and a driver to boot. Thanks for your effort with your documentation.
|
|
|
|
|
02-20-2014, 01:01 PM
|
#115 |
|
Senior Member

Join Date: Aug 2012
Location: Nebraska
Posts: 603
|
A friend redid his kids first car,, a 70's Buick vinyl top with rattle can bed liner.. looked pretty good and took a couple of years daily abuse.
|
|
|
|
|
02-20-2014, 01:39 PM
|
#116 | |
|
Member

Join Date: Jan 2014
Location: West of Rochester, NY
Posts: 83
|
Quote:
__________________
Josh Quick Quick Speed Shop "6.50 rubber really gives you the old dig when you need it!" |
|
|
|
|
|
02-20-2014, 02:03 PM
|
#117 |
|
Senior Member

Join Date: May 2013
Location: kent , u.k
Posts: 519
|
well done indeed mart, yours and paul,s 37 zephyr coupe threads are the most interesting for me on the barn I,v seen , like me you seem to have some serious projects on the go, i,v got a 37 zephyr coupe I tore apart 26 years ago ( very rare right hand drive) and I,m hoping to make a start on it when the truck and 39 are finished this year (I hope) some classic bikes to finish also but compared they are easy peasy, nice to see your "stuff" and like me its all done with minimum garage space,a master craftsman ...well done , cheers jim.
|
|
|
|
|
01-11-2015, 05:49 AM
|
#118 |
|
Senior Member

Join Date: Sep 2010
Location: South of I-40
Posts: 379
|
Fantastic thread!!!!!
|
|
|
|
|
01-11-2015, 09:32 AM
|
#119 |
|
Senior Member

Join Date: Sep 2013
Posts: 3,005
|
Fantastic! The man's a genius! Like watching a great artist work!
|
|
|
|
|
01-11-2015, 11:53 AM
|
#120 |
|
Member

Join Date: Sep 2012
Location: Boulder, Colorado
Posts: 96
|
Man! Slickest steering upgrade ever! And that roof insert looks really stylish compared to a smoothed over fill-in. The amount it sticks up, while still matching the roof contour perfectly, adds a lot of character. Looks like a period aftermarket accessory for bad weather areas. Incredible, as always! Thanks Mart.
|
|
|
|
|
«
Previous Thread
|
Next Thread
»
 Linear Mode

|
|

| Sponsored Links (Register now to hide all advertisements) |
|
|
All times are GMT -5. The time now is 09:16 AM.