|
|||||||


| Sponsored Links (Register now to hide all advertisements) |
|
|
 |

|
Thread Tools | Display Modes |
 04-26-2013, 01:35 PM
|
#101 |
|
Member

Join Date: Oct 2012
Location: Ohio
Posts: 61
|
Thanks 37 Fordman for the amazing frame!

|

|

|
|
04-26-2013, 07:16 PM
|
#102 |
|
Junior Member
Join Date: Apr 2013
Posts: 9
|
your welcome enjoy keep in touch still need windshield frame ir you know of one
|
|
|
|
| Sponsored Links (Register now to hide all advertisements) |
|
|
|
05-07-2013, 05:33 PM
|
#103 |
|
Member
Join Date: Oct 2012
Location: Ohio
Posts: 61
|
I gotta say I'm really starting to get very angry. After ruining the brass thrust bushing trying to weld on it I tried to replace the broken cam gear. The nut tool and cam tool thing I ordered are useless, don't work or fit. Edit: after looking online it appears the cam nut tool is for a T. I always however review my purchase and specifically go over the dates to make sure I'm getting A stuff. I found a way to loosen and tighten the cam nut so I jump into putting it on. I didn't get to an easy 30 foot pounds before the way I was holding the spinning cam broke the brand new gear.

Last edited by hotrod937; 05-08-2013 at 05:04 AM. Reason: Shouldn't post when mad. Won't happen again |
|
|
|
|
05-07-2013, 07:04 PM
|
#104 |
|
Member
Join Date: Oct 2012
Location: Ohio
Posts: 61
|
Okay, my anger has calmed down. I've just been building so much stuff for other people and when I go to work on my own junk I hit brick walls. After destroying the new cam gear, I had one good gear left over from the other A motor. I didn't want to touch it as to break a 3rd one and be waiting days for more parts spending more wasted money. I called my buddy over to handle it. He got the gear off the other cam and installed it on my cam. Now I can put the motor back together. Then in a day or so put the old engine in the car with new thrust and cam gear and hopefully it doesn't pour oil out and only leaks enough that I can drive it around town for a couple months til the other A motor gets fully built from scratch.
|
|
|
|
|
05-07-2013, 07:36 PM
|
#105 |
|
Senior Member
Join Date: Aug 2010
Location: Walkerton, Ont. Canada
Posts: 623
|
What did you use to get the nut off?
__________________
_________________________________________ 1931 Ford Model A Tudor 1930 Ford Model A Deluxe Roadster 1930 Ford Original Rolling Chassis- Restoring |
|
|
|
|
05-08-2013, 04:59 AM
|
#106 |
|
Member
Join Date: Oct 2012
Location: Ohio
Posts: 61
|
Sponsored Links (Register now to hide all advertisements)
|
|
|
|
|
05-10-2013, 01:07 PM
|
#107 |
|
Senior Member

Join Date: Jan 2011
Location: Near Salinas,CA
Posts: 271
|
I like that fact you come across as humble but not timid. I've had all kinds of cars. I'll share this with you. My chip free - every nut and bolt painted, polished, or coated cars are beautiful, but they are not nearly as much fun as the beater's I can take anywhere anytime in any weather and park right next to a new car in a parking lot. Get it reliable, and DRIVE IT! I'll enjoy watching and reading all about your adventures. Need anything? Shoot me a email and I will see if I can't scrounge it up to help out. -Dennis
|
|
|
|
|
05-10-2013, 09:03 PM
|
#108 |
|
Member
Join Date: Oct 2012
Location: Ohio
Posts: 61
|
Thanks a lot IP. Update. I've got the engine bottom end all buttoned up cotter pins and all. I'm putting on the oil pan now. It appears that the 2nd bronze thrust main gives me roughly 15 thou end play. I've cleaned everything out and hopefully she doesn't leak too much oil. Still have to post the pic of how I got the timing gear off and on.
I'd ask how to do the oil pain and main gaskets but I'm about to read up and get it done. Hopefully sunday I'll have the motor in. I'm assuming that if I put the motor on tdc via the hole in the front cover pining the divit in the timing gear and then orientate the dist drive so that it points the rotor at the #1 cyl, that should be sufficient enough to have the dist in visual time. |
|
|
|
|
05-10-2013, 11:01 PM
|
#109 |
|
Senior Member

Join Date: May 2010
Location: Mpls, MN
Posts: 27,582
|
"I'm assuming that if I put the motor on tdc via the hole in the front cover pining the divit in the timing gear and then orientate the dist drive so that it points the rotor at the #1 cyl, that should be sufficient enough to have the dist in visual time. "
The rotor should be point towards the right headlight when the timing pin is in the dimple. |
|
|
|
|
05-11-2013, 07:55 PM
|
#110 |
|
Member
Join Date: Oct 2012
Location: Ohio
Posts: 61
|
Couple things. First here's how I got the cam gear nut off
Take a sturdy set of vise grips and get them on there..  Next put a pry bar in there and turn. Hopefully it comes off. I also put some vise grips on the base circle of the cam to hold it. Didn't know the torque spec but lock tited it on there.. 
|
|
|
|
|
05-11-2013, 08:00 PM
|
#111 |
|
Member
Join Date: Oct 2012
Location: Ohio
Posts: 61
|
Now I've got the pan on and have this spring that I think cam out of the rear area of the motor where the bell housing is but am not sure. I put the smaller spring in the front cover where the cam is. Then there's the dist drive spring which is large and there was a spring bolted to the bottom of the oil pump. The tension on the mystery spring is very high.. Where does this thing go?
  
|
|
|
|
|
05-11-2013, 09:22 PM
|
#112 |
|
Senior Member

Join Date: Aug 2011
Location: Illinois
Posts: 730
|
http://www.snydersantiqueauto.com/485
Sure looks like one of the springs that are part of the tie rods. |
|
|
|
|
05-11-2013, 09:26 PM
|
#113 |
|
Senior Member

Join Date: May 2010
Location: Asheville,NC
Posts: 3,104
|
That spring goes in the steering, not the motor.
__________________
http://www.model-a-ford-4bangers.com/ |
|
|
|
|
05-12-2013, 02:59 PM
|
#114 |
|
Member
Join Date: Oct 2012
Location: Ohio
Posts: 61
|
I thought it came from the bell housing area. Might be a clutch spring?
|
|
|
|
|
05-12-2013, 06:43 PM
|
#115 | |
|
Senior Member
Join Date: May 2010
Location: Mpls, MN
Posts: 27,582
|
Quote:

|
|
|
|
|

|
05-14-2013, 11:56 PM
|
#116 |
|
Member
Join Date: Oct 2012
Location: Ohio
Posts: 61
|
Well the mystery spring is not part of the clutch. Where does it go?
#2 Which way does the clutch pressure plate go in and how do I keep it centered when installing the engine? Do I need to pull the trans? Do I put them on the input shaft and then work the bolts from the crack? Not sure what to do here, thanks... |
|
|
|
|
05-15-2013, 02:26 AM
|
#117 | |
|
Senior Member
Join Date: May 2010
Location: Mpls, MN
Posts: 27,582
|
Quote:
The thick offset part in the clutch disc center MUST face the rear of the car, or it would mess up the flywheel mounting bolts. I've used my fingers and eyes to center the disc and had good luck, but the best way is to use a pilot shaft. They are cheap from one of the Model A partshouses. |
|
|
|
|
|
05-22-2013, 12:52 AM
|
#118 |
|
Member
Join Date: Oct 2012
Location: Ohio
Posts: 61
|
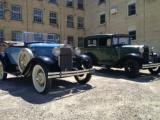
Did some work today on the car.

|
|
|
|
|
«
Previous Thread
|
Next Thread
»
 Linear Mode

|
|

| Sponsored Links (Register now to hide all advertisements) |
|
|
All times are GMT -5. The time now is 02:45 AM.