|
|||||||


| Sponsored Links (Register now to hide all advertisements) |
|
|
 |

|
Thread Tools | Display Modes |
 04-02-2013, 02:29 PM
|
#1 |
|
Senior Member
Join Date: May 2010
Location: Lakeville, MN
Posts: 5,159
|
I have two or three front fenders that look like the leading edge was pushed in by something (see picture below). I checked it with some other fenders that are better looking and they have a little more elliptical shape in the front, not somewhat flattened like the fender in the picture. The front part of the outer edge of the fender (bead) in the picture also has is pushed out a little. I have tried to squeeze the sides together with my hands to reform the fender in the picture, but had no luck. Does anyone know a way to reshape the front of a fender?
Rusty Nelson 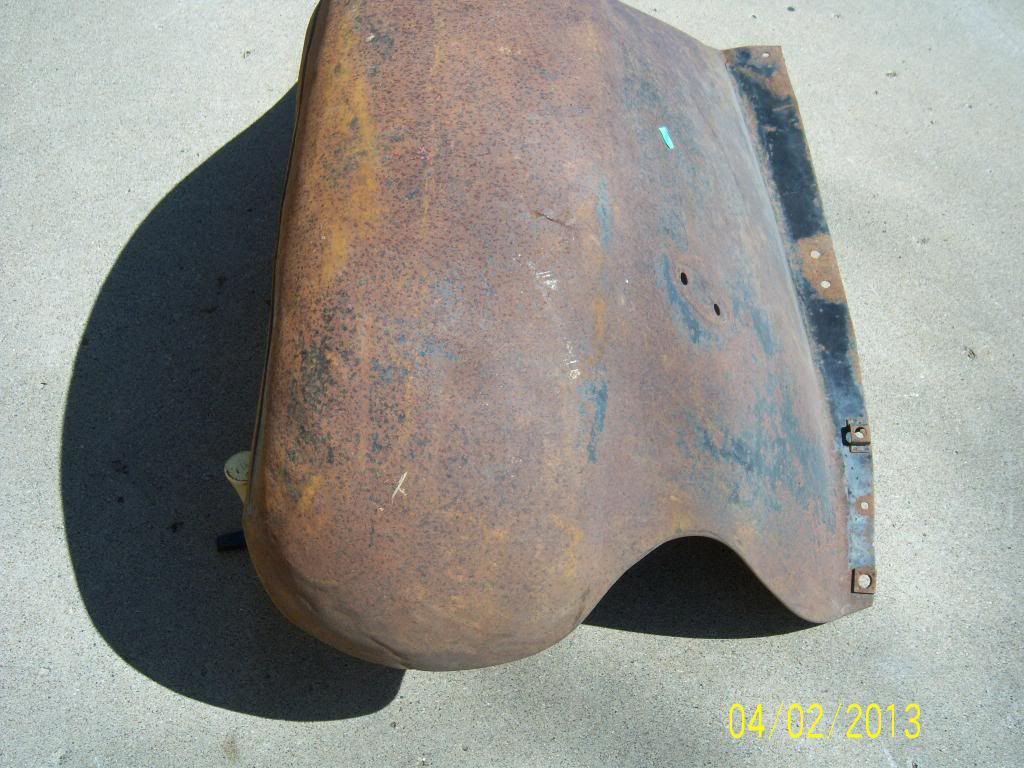
|

|

|
|
04-02-2013, 02:36 PM
|
#2 |
|
Senior Member

Join Date: May 2010
Location: Wauconda, IL
Posts: 3,600
 |
Looks like there was a previous repair in this pic or the left side (pic side) and have you tried heat to bring it back?
__________________
Mark Maron Ill., Region MARC & MAFCA MARC JSC Member MAFFI Trustee National Facebook Admin. https://www.facebook.com/groups/MARC.group/ A7191-Sport Coupe 29 Roadster 29-Town Sedan 29-Original Special Coupe |
|
|
|
| Sponsored Links (Register now to hide all advertisements) |
|
|
|
04-02-2013, 02:38 PM
|
#3 |
|
Senior Member
Join Date: May 2010
Location: South East NJ
Posts: 3,398
|
First put it on a frame with a corrected pair of fender brackets and correct lamp bar. You also need a correctly placed running board.
The number one way to make a fender worse is to 'fix' it off the frame. You can impart none repairable damage when you attempt to repair a fender in the wrong order. Heat can be your biggest enemy, do not attempt use heat to move the metal until you know it is ready for it!!!!!!!!!!!!!!!! Sound complex, well it is complex. The nose of the fender will affect the bead line and that then affects where the rear of the fender ends up. It is a complex relationship. You then have to figure out what stretching and shrinking needs to be done at the nose to get the correct shape. The correct shape as being defined as two fenders on the same car looking balanced. Fenders are likely to be the most complex metal work you will need to caress into shape. It is very interconnected and as you experiment with moving the metal you find out with every bend that it is more complex then you thought. See my hints for fender working on my website. |
|
|
|
|
04-04-2013, 10:21 AM
|
#4 |
|
Senior Member

Join Date: May 2010
Location: Fresno, Ca.
Posts: 3,636
|
I also agree with Kevin. The body shop teacher here in Fresno, back when I was a kid
was legendary(Mr. Carl Rustigian), all the old, retired, and long gone were taught by him. If, only one thing sank in my brain during his tutorials, this one stayed, and has served me well. " Before picking up the hammer,...study first how the damage happened, direction(s), and force. Now with that information, work backwards too correct the damage." I would study Carl, studying a problem with his hand on his chin,...then, with little effort, fix the problem! Dudley |
|
|
|
|
04-04-2013, 11:43 AM
|
#5 | |
|
Senior Member

Join Date: May 2010
Location: Eastern Tennessee
Posts: 11,508
|
Quote:
|
|
|
|
|

 )
)|
04-05-2013, 06:29 AM
|
#6 |
|
Senior Member

Join Date: May 2010
Location: Rock Hill, S.C.
Posts: 985
|
Sponsored Links (Register now to hide all advertisements)
In fact, in my own humble opinion, I do not think that I have actually seen any damage from a crash or hammer work that resulted in any form of shrinking that occured. Can anyone suggest a possibility of how shrinking might occur in an 'accident'? As I have begun to try to understand metal shaping the most glaring thing that has occurred is that everyone that tries to 'explain' something to me, in some form of stretching. Of course, shrinking can be done in many ways, but most that I have been exposed to are a hand method, or something like the 1" deep Lancaster type shrinkers with little throat depth. When looking around for ways to actually shrink with a machine, you end up with the $60,000 and up Eckold style machine with 'nomar' dies for directional internal panel shrinking, or the 'thumbnail' shrinking dies for edge shrinking that originally required an expensive machine like a Pullmax. The marchant style shrinkers are heavy duty, but have less than a 3" throat on them. Recent developments in less expensive machines left a lot to be desired in my still humble opinion, so I designed and built some more suitable, less costly machines tailored to use the shrinking die assortments. Here is a link to a Yoder or Pettingale type power hammer fitted to a set of Fay Butler edge shrinking dies. These thumbnail dies are unbelievebly docile to use as opposed to the larger dies that require large amounts of effort when going either in or out in the shrinking process. http://www.mantiquesresto.com/aboutu...erbuild01.html Here is a link to a power shrinker that I made in an effort to have rapid repeating shrinking strokes in a machine with a suitabe 'leg' contour and a much deeper throat for getting into a panel. http://www.mantiquesresto.com/aboutu...rShrink01.html Here is a link to a larger Planishing Hammer that I made by converting an old mill drill press to hold a larger hand held motor in place, so I could have a deeper throat as well. http://www.mantiquesresto.com/aboutu...planish01.html I made this English Wheel to be strong enough to be able to get back into a large panel without much frame deflection, while smoothing out panels made from the above machines. http://www.mantiquesresto.com/aboutu...shwheel01.html
__________________
Uncle Bud says "too soon old, too late smart!" |
|
|
|
|
«
Previous Thread
|
Next Thread
»
 Linear Mode

|
|

| Sponsored Links (Register now to hide all advertisements) |
|
|
All times are GMT -5. The time now is 09:02 PM.