|
|||||||


| Sponsored Links (Register now to hide all advertisements) |
|
|
 |

|
Thread Tools | Display Modes |
 07-16-2012, 04:01 PM
|
#1 |
|
Senior Member

Join Date: May 2010
Location: Solihull, England.
Posts: 8,747
|
Just spent the last 3 months working on a survivor 33 5W coupe. This post will cover the first month, roughly mid April to Mid May.
The car had been laid up in a barn in 59. It used to run around Kansas City Missouri in the mid to late 50's. It passed through a few hands recently and was blown over in black primer and the chromework painted silver, but what attracted me to it was that it was almost complete, had some mild mods from back in the day, and best of all it had never been stripped to a bare shell, as so many have. Most of the posts will be pasted in from another forum so will be written as they were happening, rather than in recap form now. I tried to lump a load of posts together, but can't do that as there are too many images. I'll have to keep replying with the next installment. Mart. =============================================== Collection: Got up at 5:15 this morning, on the road at 5:45. Nice easy ride down. In the '58 GMC towing a very nice hired trailer. Bit of traffic, not too bad, got to Chatham at about 9:30. Russ from R and R turned up and we got the coupe pushed outside. 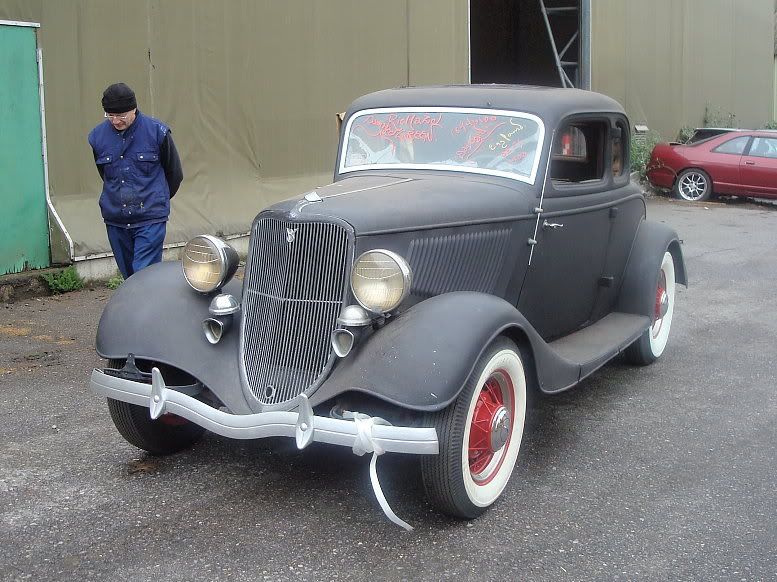 After making a right arse of myself reversing the trailer, I managed to get it loaded up. 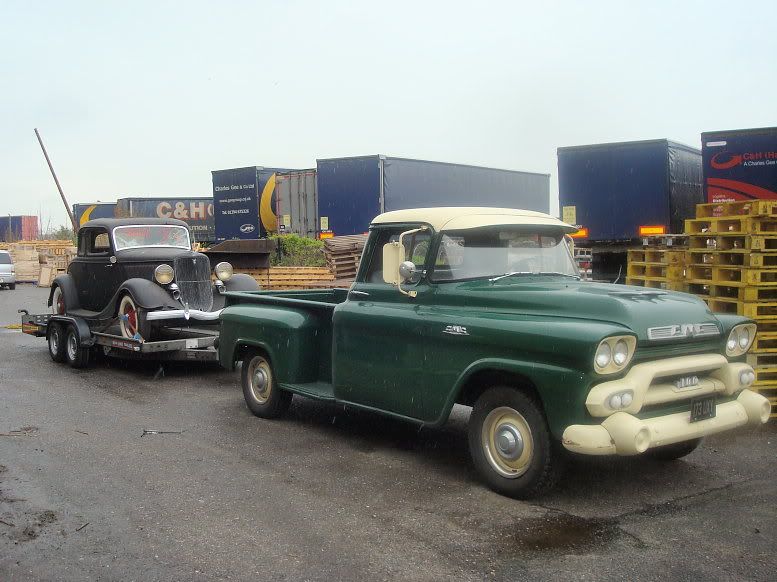 And on the way out took a shot by the cranes: 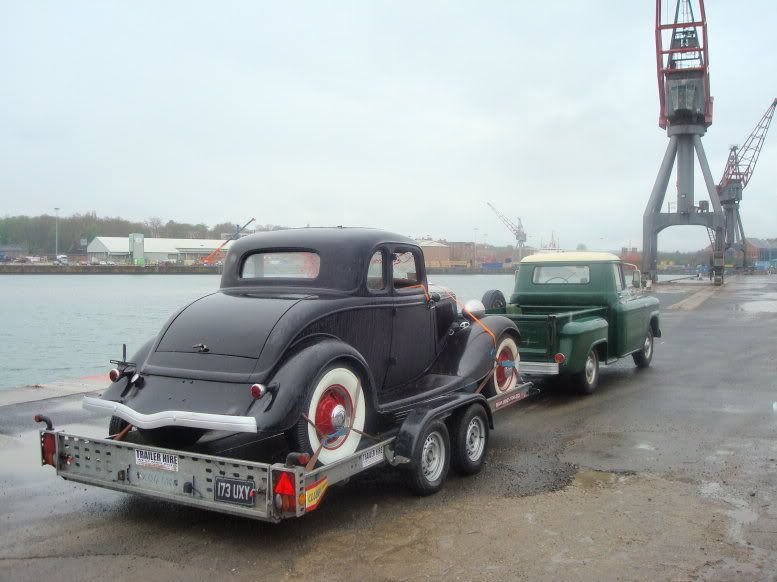 It was raining by now, thje paint is much more matt than it looks in this shot. A couple of the obligatory "tailgater" pics: 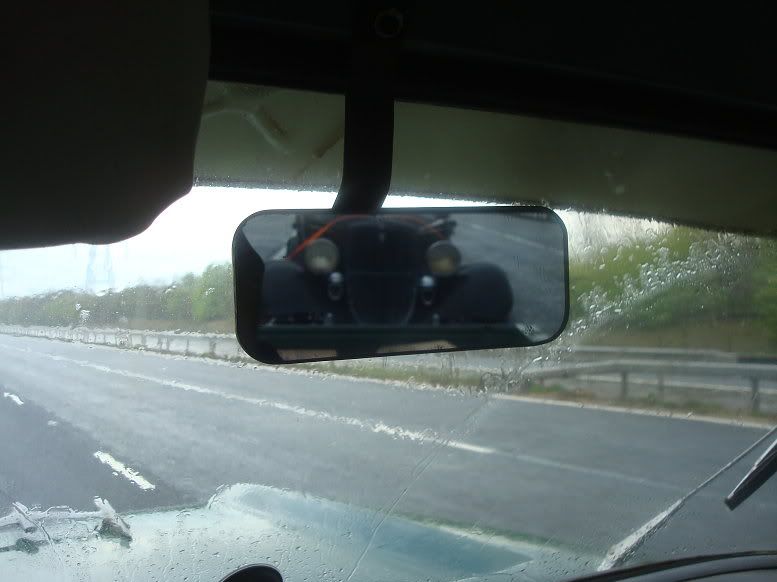 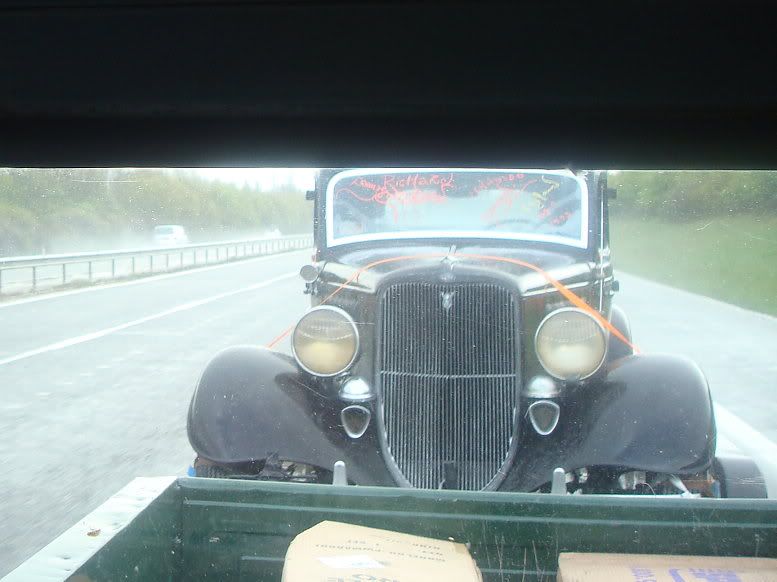 Home by 2:30, and managed to reverse alongside the house. GMC is now known as "The CHAMP". 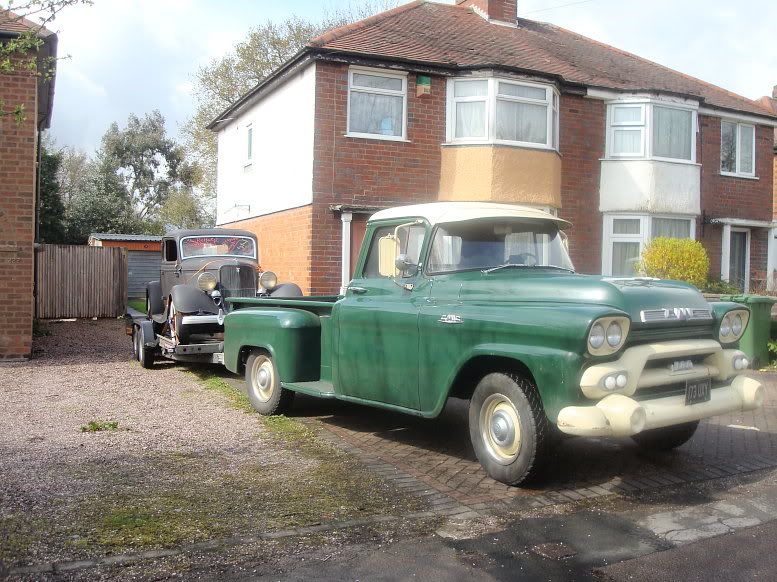 And as luck would have it, a mate just happened to be passing so we were able to offload the 33. (I offloaded it and he helped me push it into the garage). 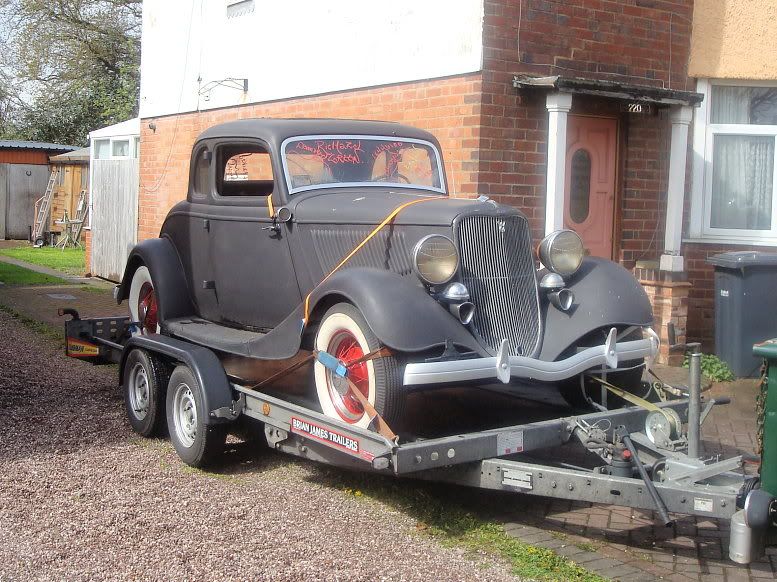 So now it's safely tucked up in my recently tidied garage while I make my mind what to do. I can guarantee though, that much tinkerage will ensue. Will start a proper build thread when appropriate. Mart. |

|

|
|
07-16-2012, 04:02 PM
|
#2 |
|
Senior Member
Join Date: May 2010
Location: Solihull, England.
Posts: 8,747
|
===============================================
4/22/12 Getting started: This thread is to document the work done on my 33. It will show everything - warts and all and will also be a record of the as found condition. I don't have a real clear cut plan, just a few ideas. I just looked and realised it was 3 months since contacting the seller about the coupe, and picking it up. The deal was delayed when the seller changed his mind about selling it, but at least I was first in the queue when he did then re-decide to sell it. I'll take some detail pictures when I start doing something, but the plan of attack is loosely based around: First problem is now lack of space in the garage due to the truck being dismantled. (41 pickup). There were parts in with the coupe that I ordered for the truck, so first I want to use those parts to enable me to get the truck at least loosely assembled so it takes up less space. First firm point of the plan is that the truck will go on the backburner so I can concentrate on the coupe. With the truck put away as much as possible, I will tackle the coupe in a 3 part plan. 1, running 2, driving 3, legally on the road. 1. Running. First off, this will not be a restoration. It will simply be a repair what is necessary job. The whole underside of the car is surface rust. To clean it up would require complete stripdown and that is not going to happen. I will remove the rad and grille, and remove the engine and box. The engine is a rebuild core at best, scrap at worst. I have the running 21stud out of Old Rusty, complete with all ancillaries. So having a running engine will be no problem. I can't bolt it to an unknown box though, so I will inspect the box and either use it with new parts as necessary or replace it with either the one that was in Old Rusty (the one with welded teeth) or fit another one I have. The box has a 1941 serial number, so it is not critical that it stays in the car, but I would like to use it as it has been in there a long time and to me is part of the car. It has an early shift tower so I suspect it has early gears in a later case. So Engine and box out, replacement engine and box in. New engine and trans mounts will go in. The rad can be cleaned out and the tank cleaned out and there is no reason why the engine could not be hot wired to run at this stage. Driving: With a good engine and box fitted, all it needs is a working set of brakes to drive. But some of the shackle bushes are badly worn, and I have bought replacements, so I will pull the axles. Front will get new brake shoes, cylinders and hoses. Wheel bearings will be inspected and reused if possible. New kingpins will go in, new track rod ends and shackle bushes too. Hopefully the drums will be serviceable. A new rubber ball on the wishbone and the front will be good to go. Rear will get new shackle bushes and brakes, including all the handbrake stuff. The car does have a handbrake, so it should be a case of cleaning and reusing what is already there. I won't strip the axle unless something 'orrible comes out with the oil, or it makes nasty noises when turning over. The rear has already had leaves removed from above, and fitted below. I need to remove a leaf or two to get the nuts further onto the u bolts. Steering box will not be touched using the same logic as the axle. Drag link will be replaced as it looks cobbled up. Brake Master cylinder will be replaced with a new unit of the same type. Will use new pipes, re-run in a proper manner. The old pipes seem to have been done well, so may just copy that and add a few clips as necessary. Once all is back in and hooked up with appropriate linkages etc. then it should drive. Legally on the road: Not so much detail here as this will be further down the road (pun intended!). Glass: New windshield and side glass required. Shockers: It has none on the front, so will have to find some or convert to tube shocks. Not out of place as it was mildly rodded years ago. It has some on the back but no arms or links. Chances are they are siezed, so maybe a tubular conversion would be in order. Exhaust: The remnants of an exhaust system are in place but require complete replacement. May fit headers if enough room. Floorboards: A new toeboard is required. Seat: Seat needs bolting down properly. And that should be it.  The car has some rust in the rockers and the quarter panels appear to have some filler but none of this should stop it getting an MOT. And unless I find major chassis rot the body will stay on the chassis. Lights and other wiring: The car will be rewired and lighting set up to legal requirements. So that's the plan. I guess I did have a plan all along, I just needed to get it all down in a logical sequence. It will be nice to do all the fixing up and get it on the road and be able to drive an UNRESTORED mildly rodded 1933 Ford." So lets pick it up from there. Here's the coupe straight after unloading and being pushed back into the garage. 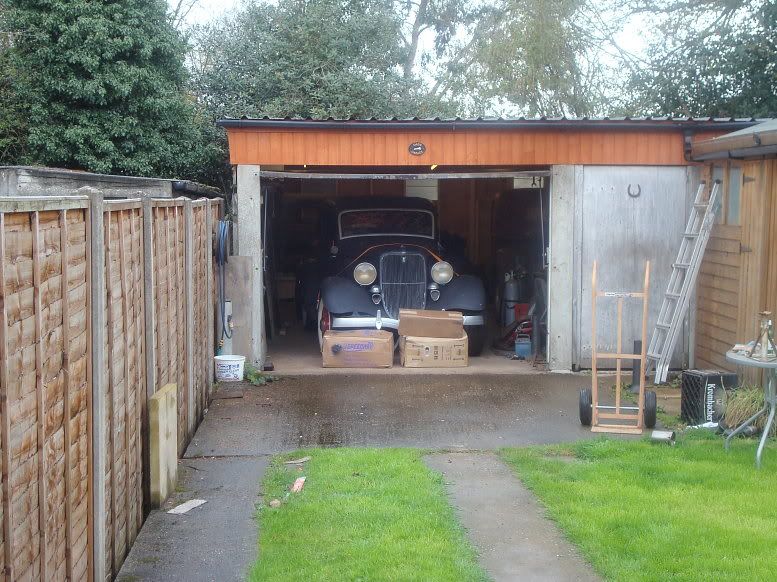 A massive clearup ensued and I roped my kids in to help me push the cars around, and managed to get the coupe properly situated so I could work on it.  The hood was the first thing to come off.  Now, buying a car is a voyage of discovery. Some things are better than hoped for, but most things are worse. But that's the fun of the game. I was told the engine was stuck, but being the optimist I sort of hoped that rocking it in gear might free it up. The heads were only loosely fitted, so it took no time at all to find out my hopes were misfounded.  Lots of rust and water damage. But hey ho. Keep looking around and taking stock. Crab dizzy and what I presume is a cut down pulley.  39 pedals fitted to the x-member, stepped off at an angle on spacers. Still not square to the car but it must have worked. 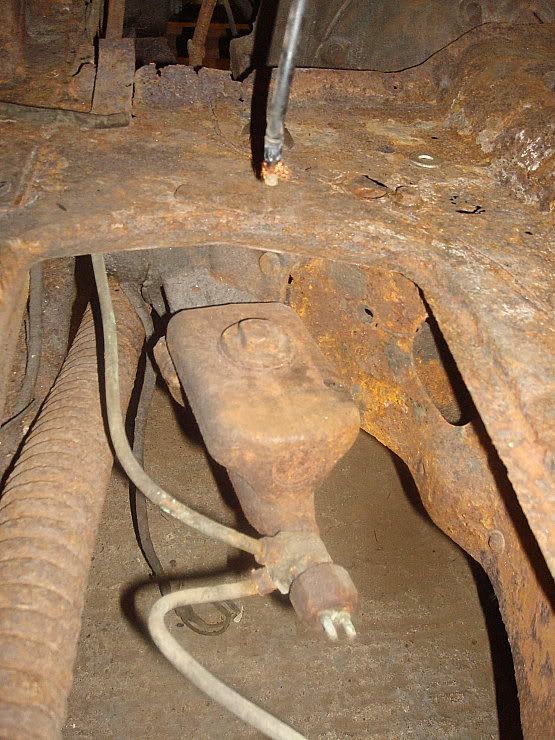 The floor cut a bit to allow the pedal to come up. 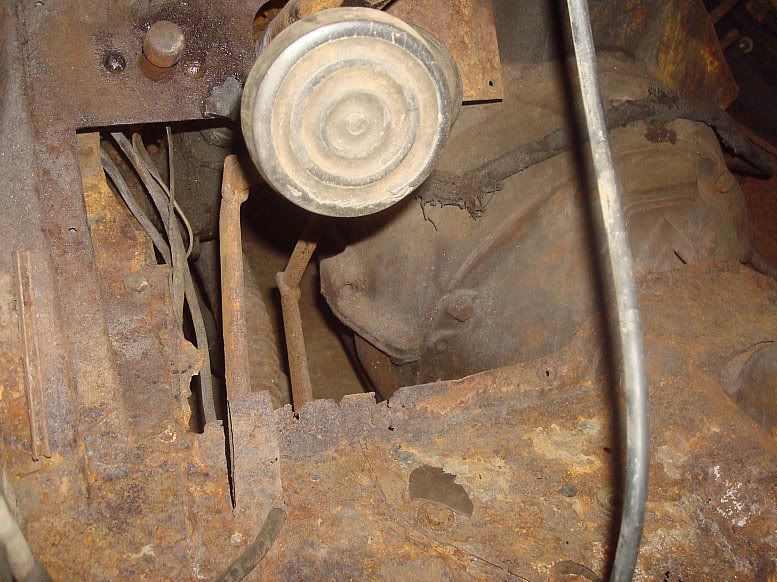 Pedal linkage, while not following btextbook geometry, does still work. 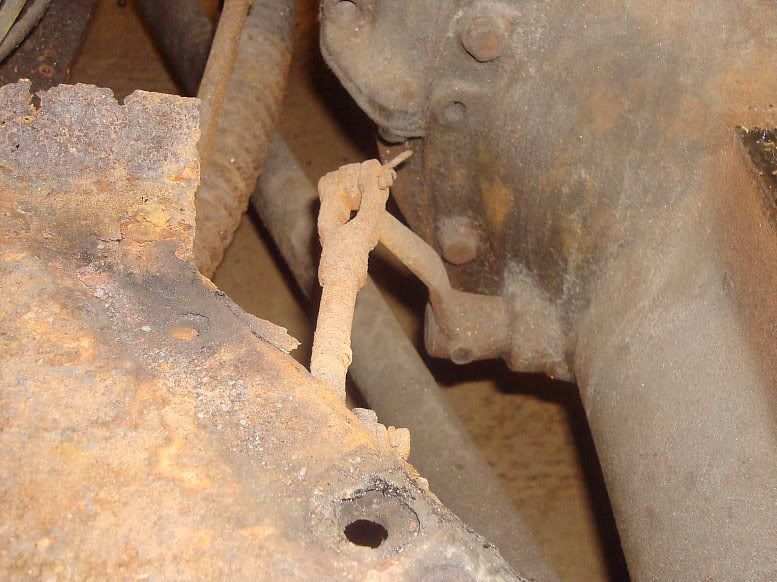 For some wierd reason a couple of relays are screwed to the floor under the seat.  I've seen engine mount spacers used in 33's before but but not a stack of 4 engine mounts per side! 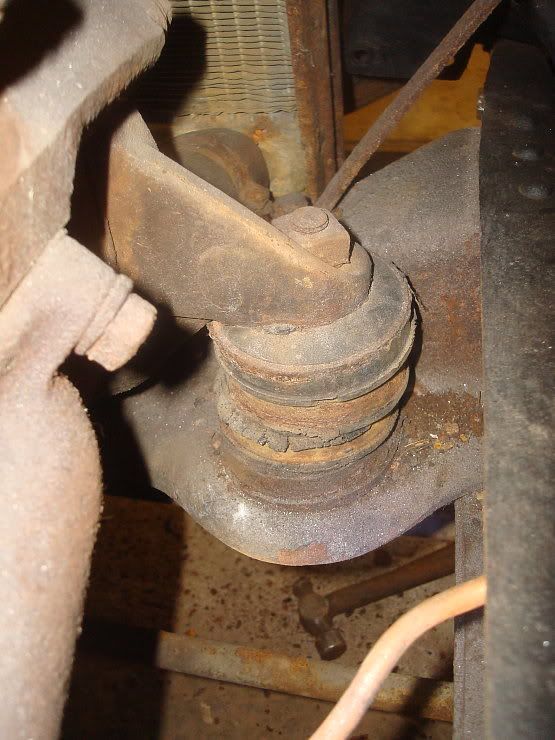 Note the big square headed bolts. Bottom hoses are pretty neat: 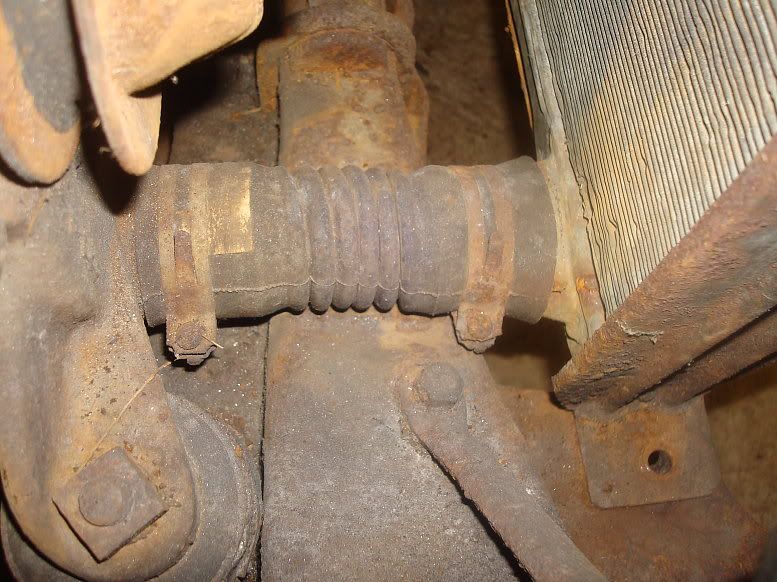 I removed the grille, and removed the two bolts holding the rad. I used the oxy acetalene kit to heat the bolts. They were a bit rusty. I managed to cut through the hose clips on the lower hoses, and got the rad out of there. Positioning of engine looks pretty good.  Removing the dizzy reinforced that the engine has serious issues: 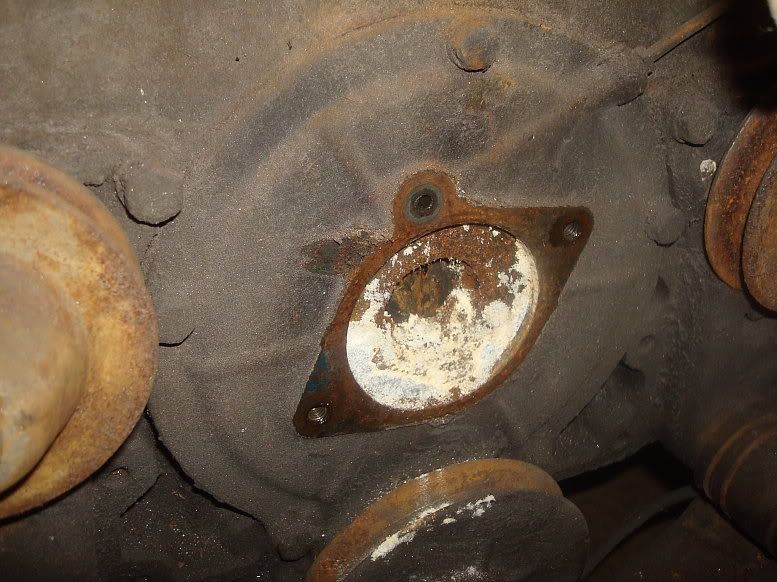 Manifold was stripped then removed. A lot of the bolts were non original and one snapped. 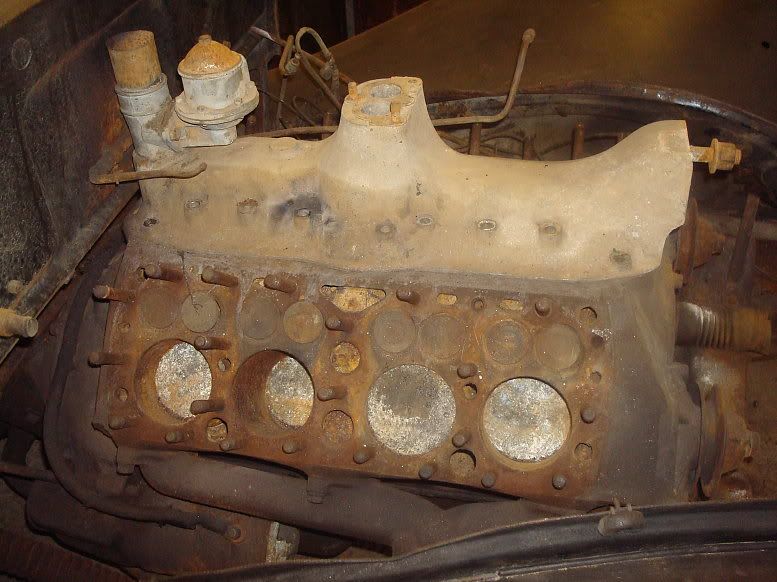 Removing the manifold revealed critter infestation. 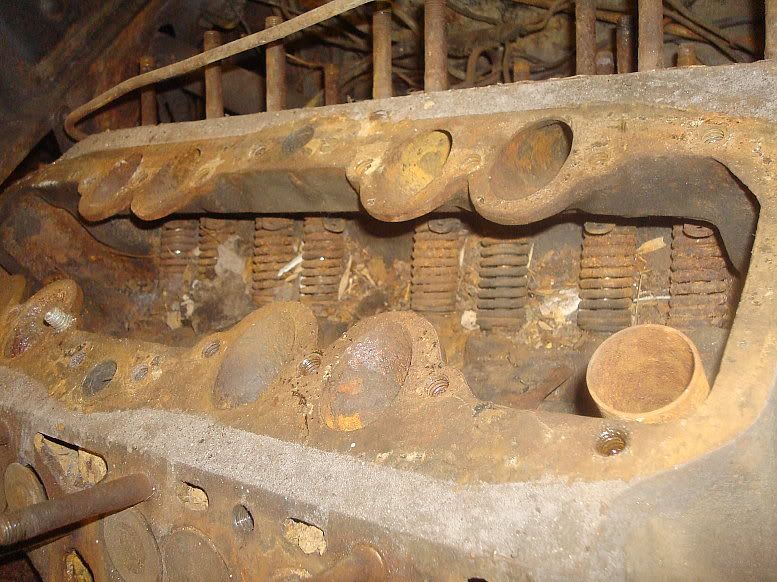 I broke out the oxy again and got the trans cover bolts out, and the cover wiggled off over the levers. 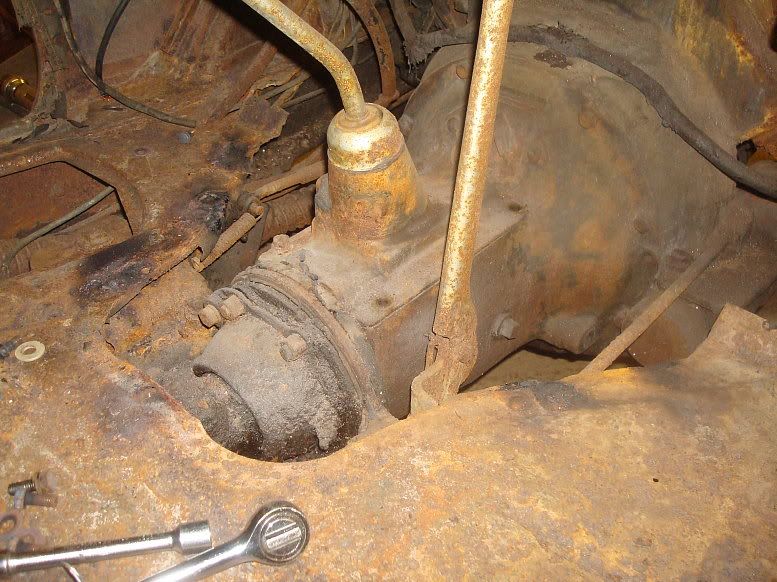 This was necessary to get at all the important bolts.  Couldn't resist pulling the trans top off: Tower looked pretty good: 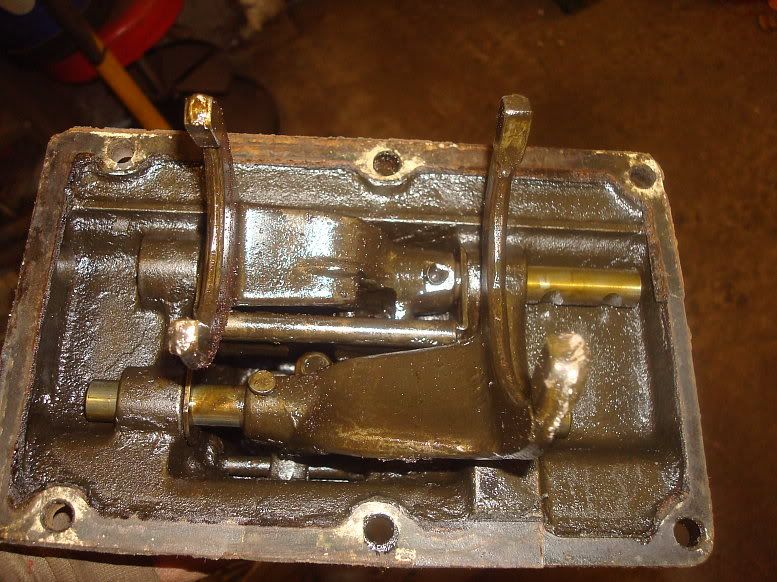 Inside the box some parts looked pretty good, but there was some corrosion and pitting on some of the teeth. 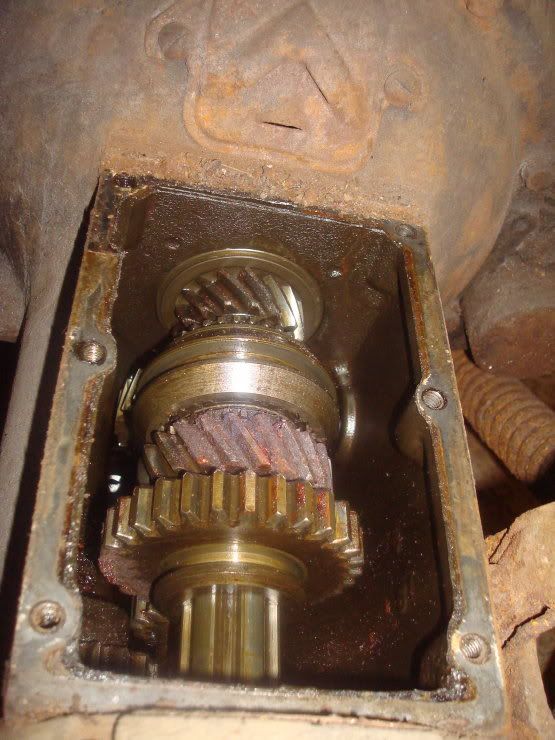 Must admit I've seen far worse though. I put it in a gear, pushed the clutch pedal down, and rocked the car. Amazingly, the input shaft turned, indicating the clutch is not stuck. And that was it for today. Don't get carried away looking at the knackered engine and the rusty bits, the car is pretty sound overall, and I am very very happy with it. Mart |
|
|
|
| Sponsored Links (Register now to hide all advertisements) |
|
|
|
07-16-2012, 04:04 PM
|
#3 |
|
Senior Member
Join Date: May 2010
Location: Solihull, England.
Posts: 8,747
|
4/24/12
Had a good sesh this evening. Last night got the rear of the trans undone, but had to finish early due to family stuff. Tonight I got the engine mounts undone and started to lift the engine out. Rigged up the chains and got the crane in position:  Bit tight at the front but a bit of wiggling got it through the opening 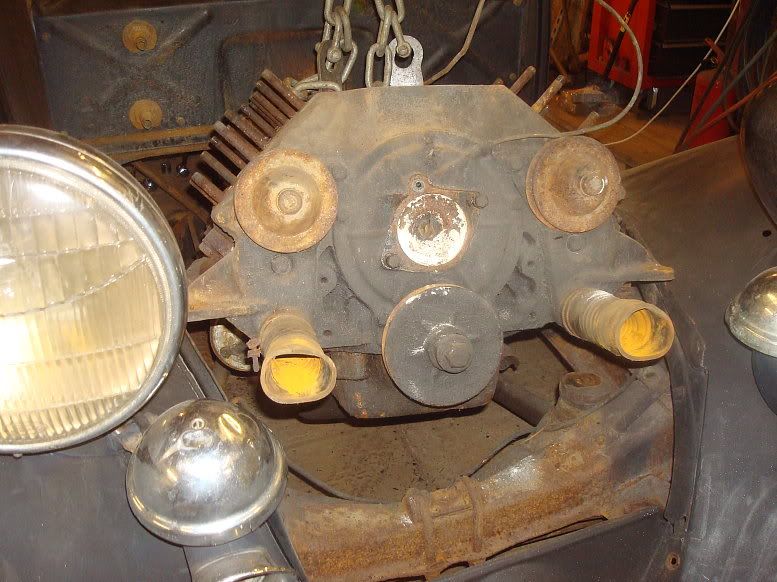 Left side manifold has been modified at the back to give better clearance with the steering box.(might need to get a better pic). 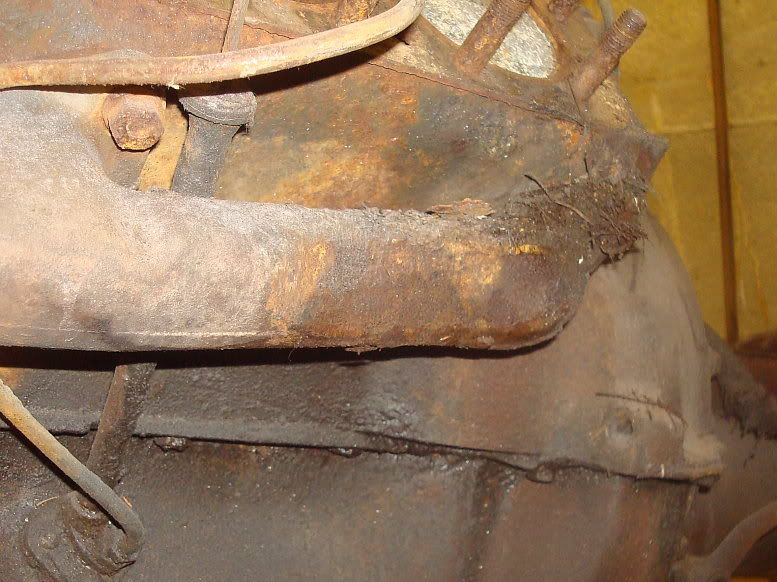 I started to strip off any useful stuff, water pumps, manifolds, clutch etc, and decided to drop the sump. I was curious to look inside. Oh my GOD! What a mess! 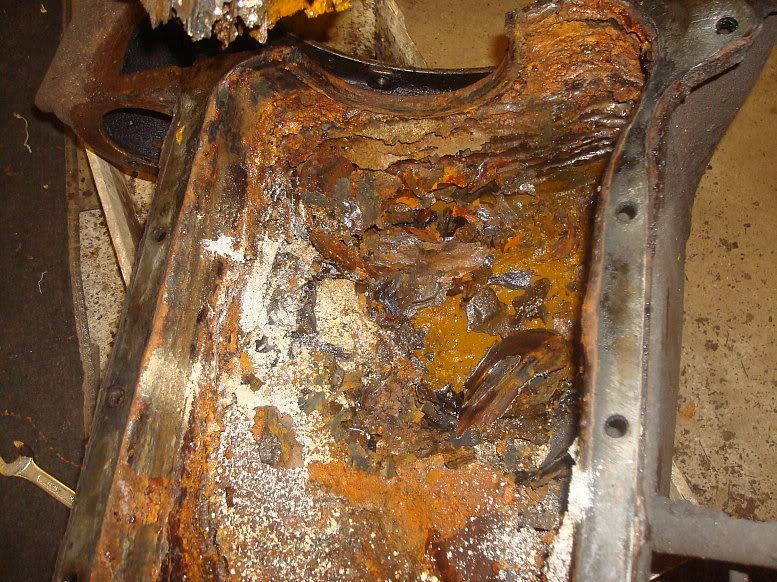 The photo's can't express it! 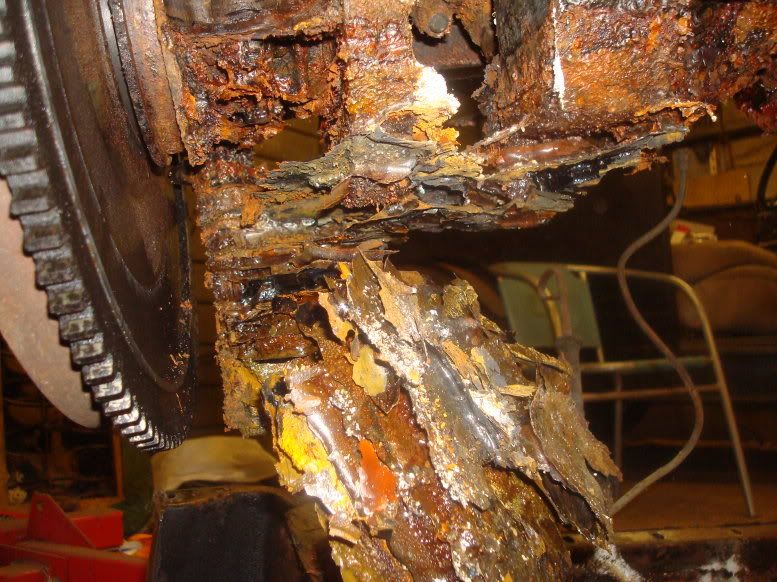 The bit hanging down is the remnant of the filter assembly. Water had got in and had left distinct tide marks, I'm guessing each year. 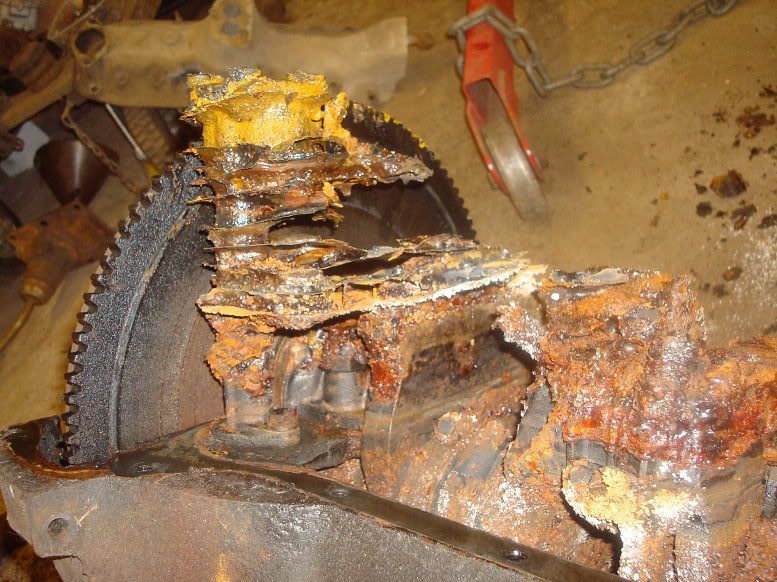 It's just the craziest thing - I've never seen anything like it before. But even the crustiest most fucked up flathead can yield up good useable parts. The water pumps are rebuildable (still turn) and the clutch and flywheel (10") are in excellent shape. 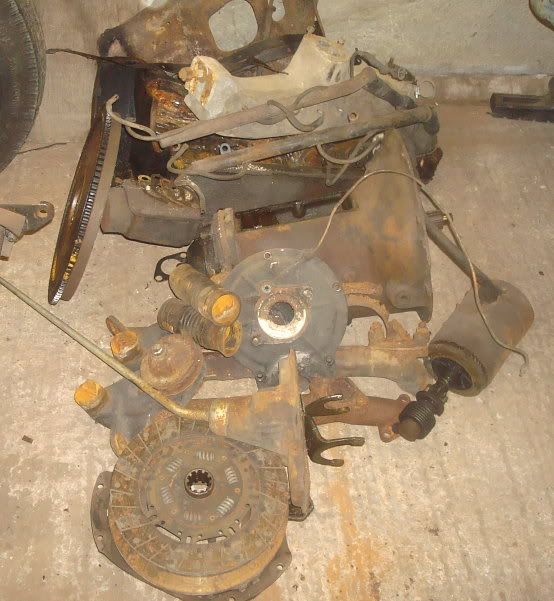 So that was it for the engine. While the engine is out I wanted to go through the front suspension. So up she went on stands: 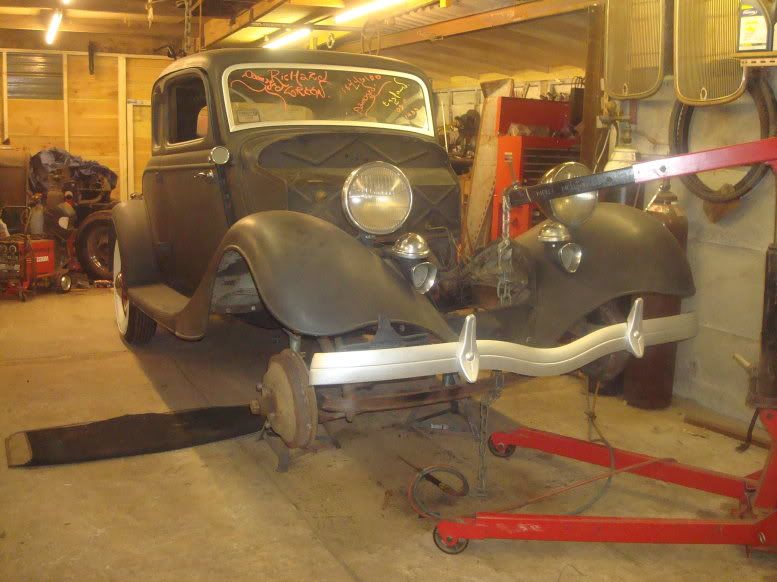 I used the engine hoist to pick the car up, and then lower the axle down. This worked well because I could roll the axle out on the base of the hoist. 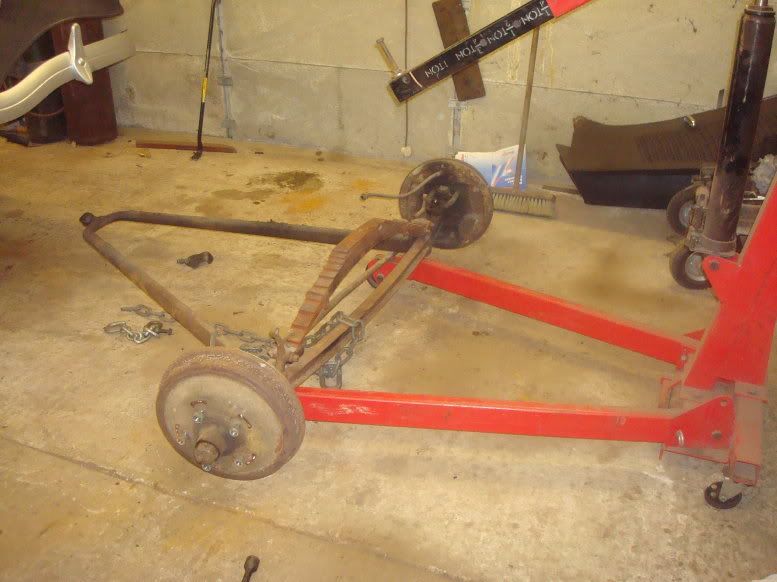 And then a parting shot of the car waiting for the front suspension and replacement engine to go back in. 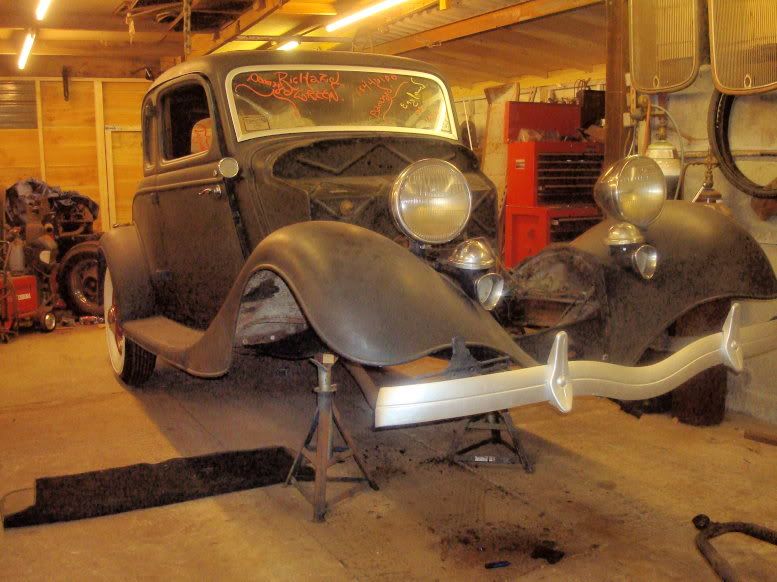 Mart. |
|
|
|
|
07-16-2012, 04:05 PM
|
#4 |
|
Senior Member
Join Date: May 2010
Location: Solihull, England.
Posts: 8,747
|
4/26/12
Pulled the front axle apart last night.All the hubs, brakes and kingpins came off ok. The person that put it together seems to have had an aversion to splitpins. One perch bolt showed signs of fretting, and I got both the nuts off and the fretted one came out easy. It was actually loose and showed a small amount of wear. I have a dropped axle (JD) that I might sling under it, and have a plan to get it all set up using parts I have immediately to hand. I think the front could use a subtle drop (1.5") that will overcome the raising effect of the new bushes I will be fitting, but the other benefit will be a slight decrease in track width bringing the tyres back under the fenders. You have to drop the steering arms down a long way with a 33 wishbone, so I may look at running the track rod above the bones or using two twin hole spindles (one LHD and one RHD) and using the second hole in each, the extra length compensating for the deep drop. Although I didn't intend to do it, I think it will make sense to throw a coat of paint on the parts as they are refurbed and put back on. I need to allocate an area to wirebrushing etc, to try and limit the mess made. Working on the truck absolutely covered everything else in thick brown rust dust, and I want to avoid that if I can. Tonight I looked at the damaged wishbone and set about making it serviceable. I got the tight perch bolt out using a combination of heat and a pneumatic chisel. The chisel did not quite get it started, but I managed to get it to twist and then the chisel managed to push it out. The result of this exercise was that I had: A pair of perches, one slightly worn. 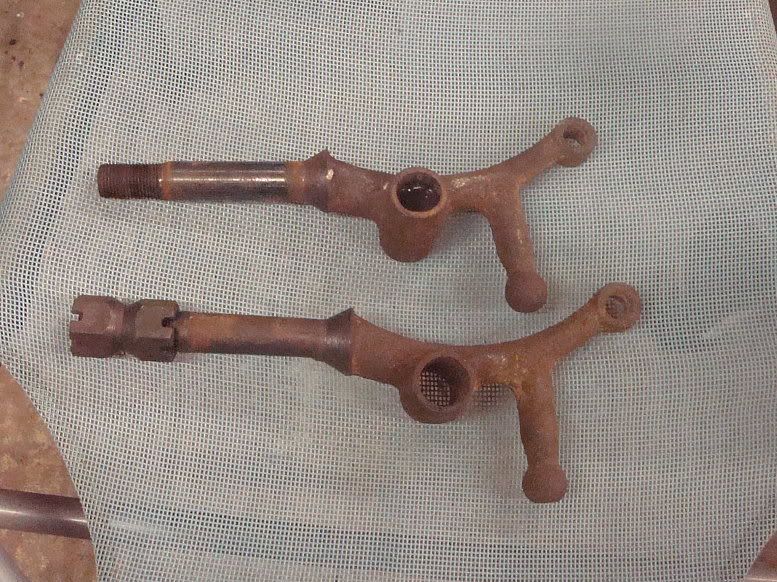 One slightly fucked axle - the hole is oval. (Note dropped axle next to it - I'm going to use that)  And a wishbone with a worn end.  I decided the job stopper was the wishbone, so I tackled that first. I warmed the end with oxy acetalene and laid down a few good beads of mig on the surface.  Then using an old fashioned pair of inside calipers I ground the weld down checking the gap with the calipers as I went. 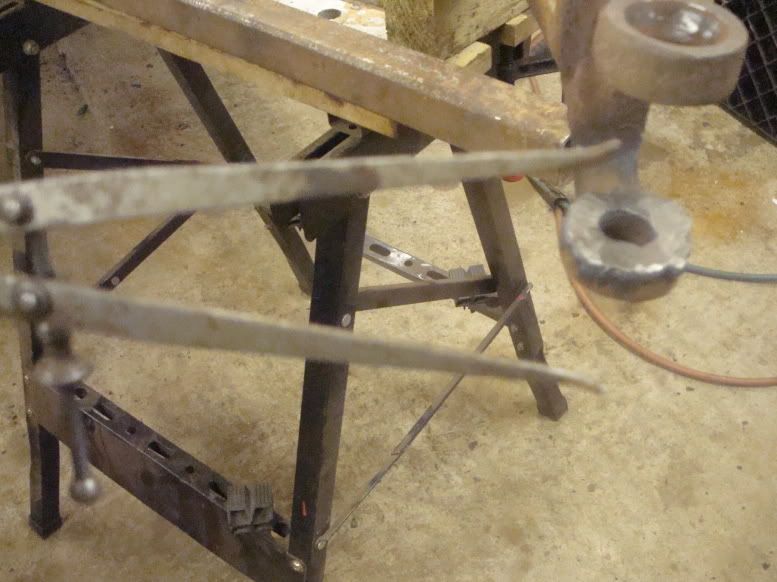 I finished it by hand filing until the fit was acceptable.  This weld booger on the taper: 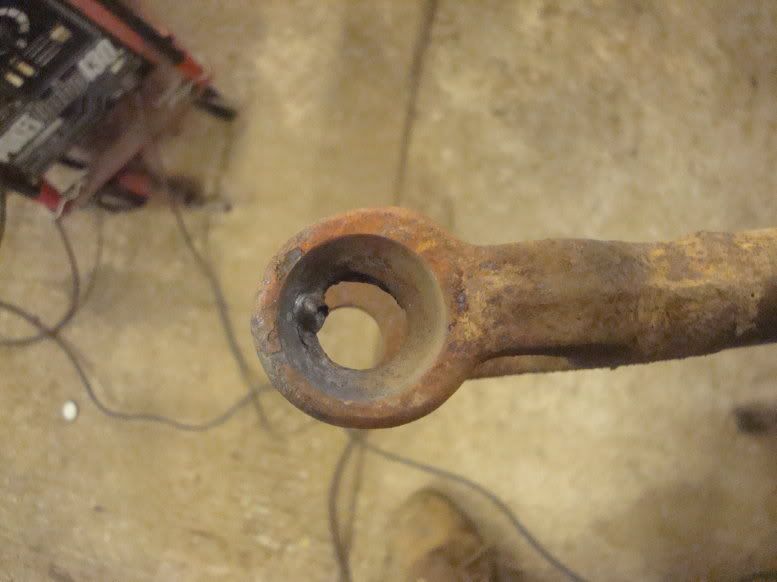 Was ground and then hand filed down until it looked ok. 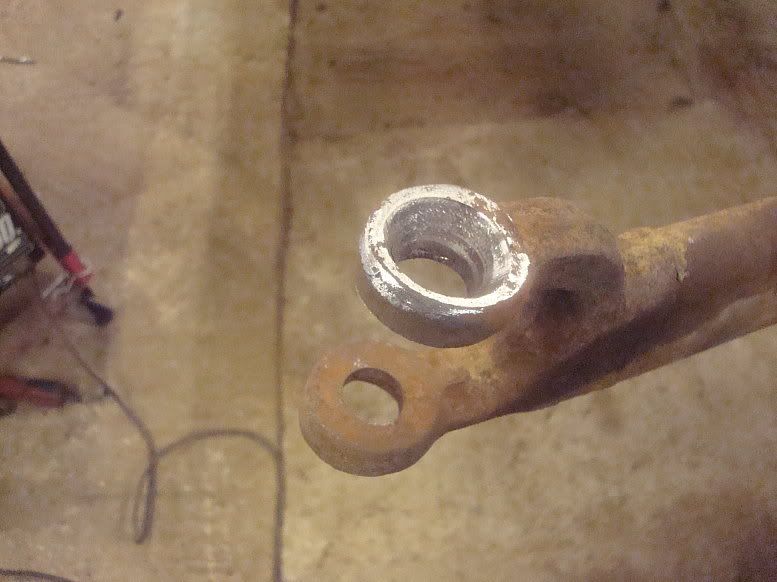 And the good pin test fitted in place. 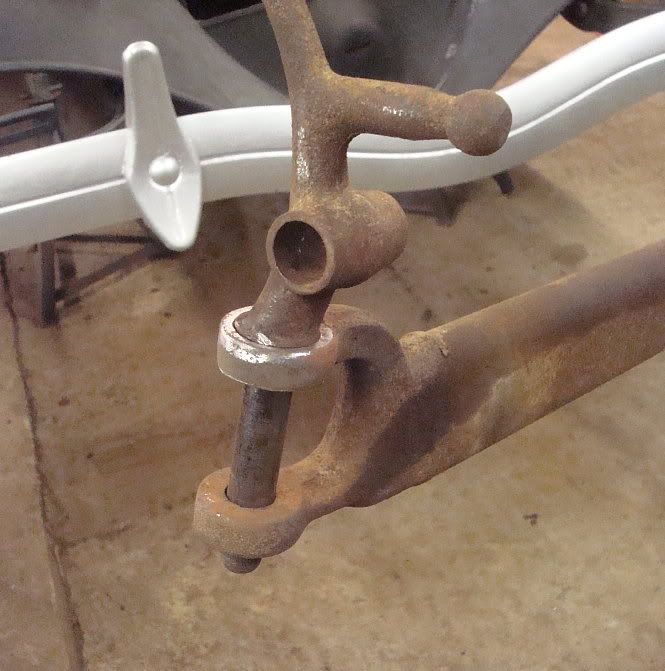 I have built up the worn pin with weld and will see if I can skim it down on the lathe. These are not normally moving parts, but should be a good tight fit. If I can't get it right I'll be looking for a replacement or I do have a pair of street rod ones but I prefer the look of the originals with the brake and shock brackets on them, even though they may be redundant. Mart. |
|
|
|
|
07-16-2012, 04:06 PM
|
#5 |
|
Senior Member
Join Date: May 2010
Location: Solihull, England.
Posts: 8,747
|
4/28/12
Here's a few snaps from the last bit of work. Here's my worn perch bolt built up with weld. 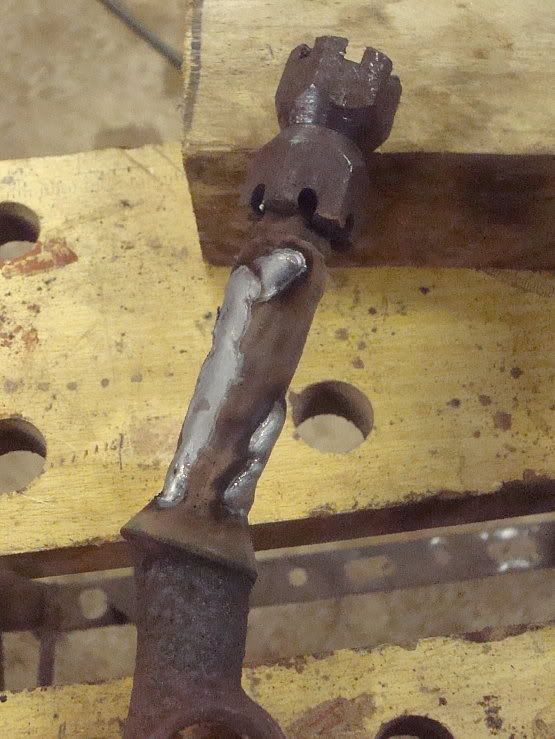 The perch was skimmed up in the lathe and finished to a true surface, the same diameter as the good one.. Then I fitted the shackle bushes. Here are the perches ready for refitting. 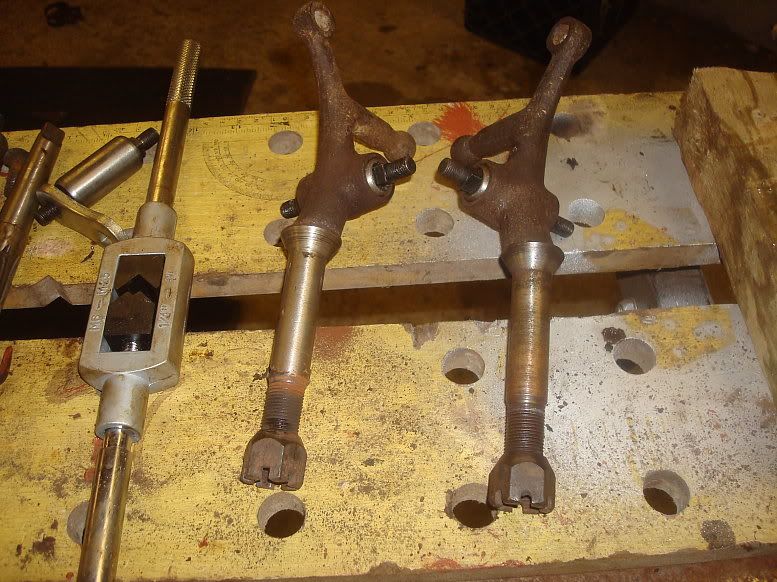 The wishbone was fitted to the axle:  And the spring fitted with new bushes and then fitted to the axle. Was disappointed with the replacement bushes from Macs. There's a thread on Fordbarn on the subject, I'll report my experience on there. (will add link here) Here the axle assembly is ready to be slid under the car.  I cleaned up all the spring mounting hardware and after finding some better nuts, bolted the axle back in. I reset the axle stands under the wishbones in preparation for the next job: reshaping the steering arms. 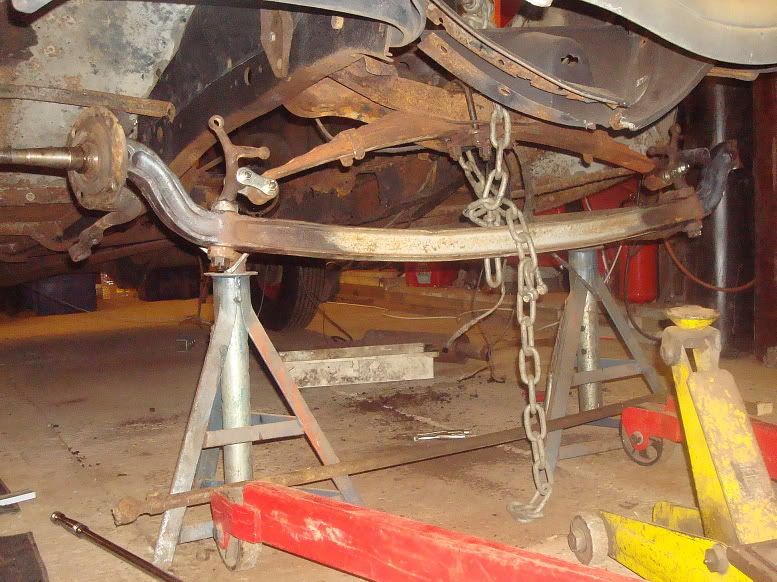 Going with a dropped axle necessitates bending the steering arms. That will be the subject of the next thrilling instalment. Watch this space. Mart. ================================================== = 4/29/12 Little mini update from today's efforts. I decided I was going to run lhd and rhd passenger side spindles, so they both the long steering arms with the two holes. I'm using the end holes normally used for the drag link for the track rod. I couldn't document the mods to the steering arms due to having to wield the oxy kit and big levers, but here is the problem in a nutshell: 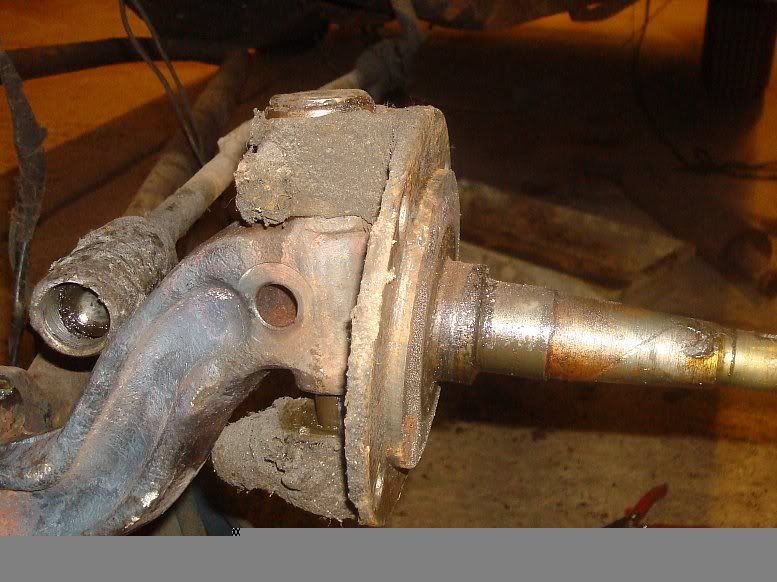 The stock arm fouls the drop in the axle. this one will not turn past the straight ahead. Here are the stock left spindle and the modified rhd left spindle. 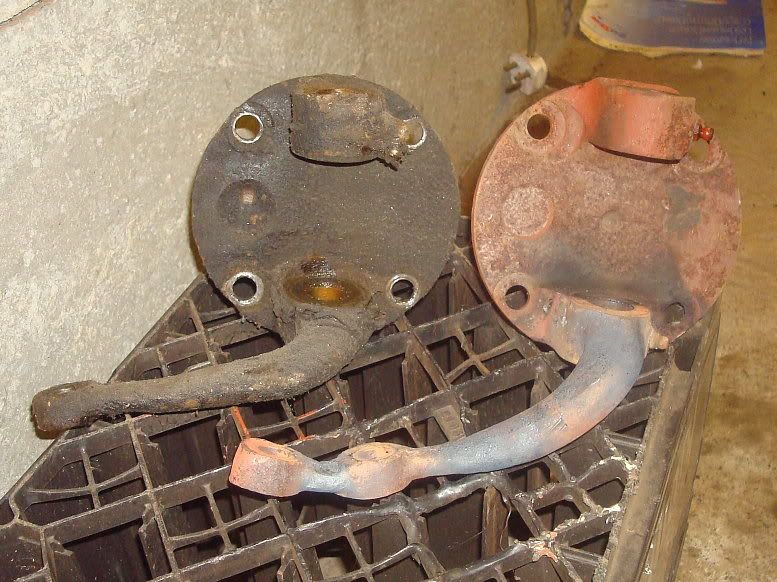 It is bent down considerably. I don't like the streetrod bolt on arms, I rather torture some of Henry's stuff into shape. Here you can see the spindle turning and the arm clearing at the tightest point. 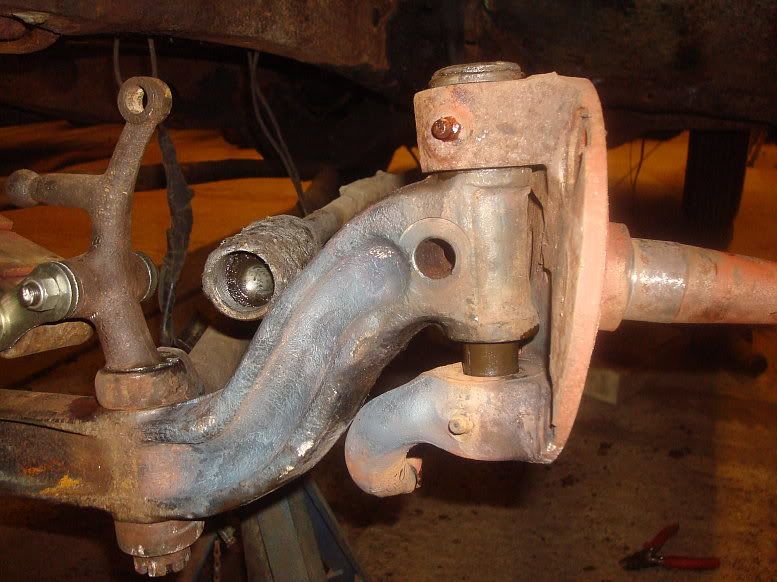 And because it is bent down the arm clears the axle completely all the way to full lock and beyond. 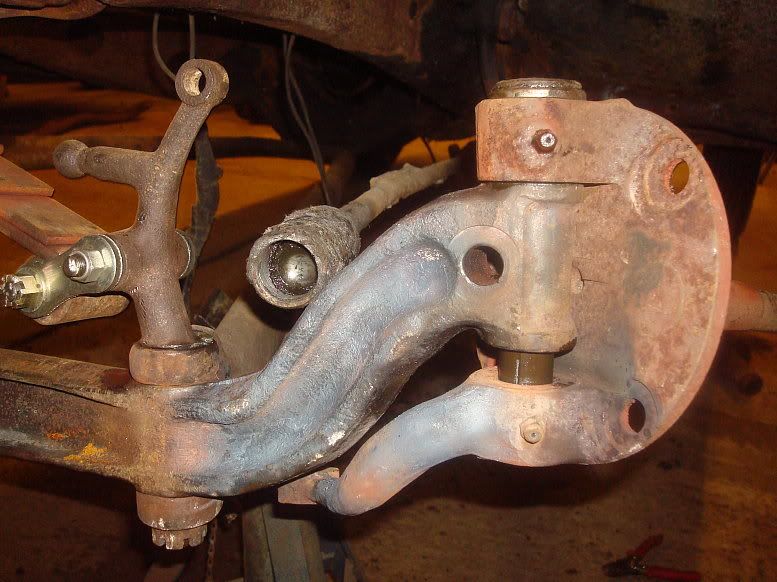 And a shot showing the spindle in situ, showing the advantage of the long arms.. You can get them low enough to clear the 32-34 wishbone. 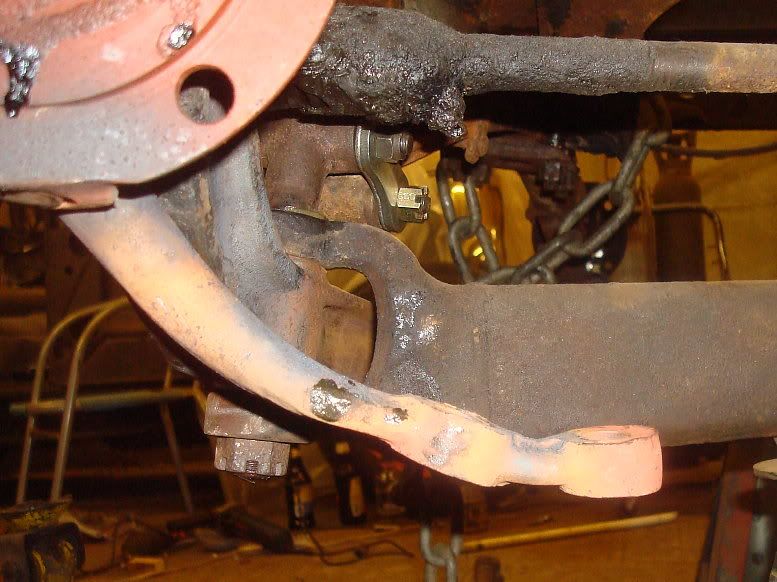 These wishbones were designed to have the track rod above, so the bones are low relative to the axle. Later bones are designed to have the track rod below, so they sit higher relative to the axle. I shortened the track rod (1940??) just a little bit (1/4") and cut a bit off the end of one of the track rod ends to get the toe in close. I was going to do both ends but just doing one was enough. I fitted a new set of kingpins and new bushes. I use a standard reamer and do them one at a time, using the best old bush as a guide for reaming the first bush, then ream the second new one using the first new one as a guide. If you need to do spindles never knock the old bushes out until you know how you are going to ream them. So at close of play tonight I had both spindles fitted with new kingpins and bushes, the arms modified to clear and the trackrod shortened to fit. Quite a good bit of progress I'd say. Mart. ================================================== === 5/1/12 More down n dirty progress at Mart's Garage. While the engine and box are out, I wanted to sort out the pedal box. It's a 39 unit, and was fitted a bit poorly to a hacked x member leg. Here's some pics showing the as fitted condition. The master cylinder fits at a wonky angle and the clutch pedal comes up through the floor. Now the next shot, amazingly enough represents a whole evenings work in the garage.  The rear of the bracket is supported on a spacer bracket, which picks up on the holes in the pedal bracket and the holes drilled in the x member. The front part is bolted direct to the x member but the x member leg was heated locally and the part where the bolt goes through bent to match the angle of the pedal bracket. The bracket took ages, and it was very difficult to get all the holes to align. All this would have been easy working in just a chassis, but doing all working up from underneath just makes it all that much harder. Anyway, It did get done, and this is how I left it last night. 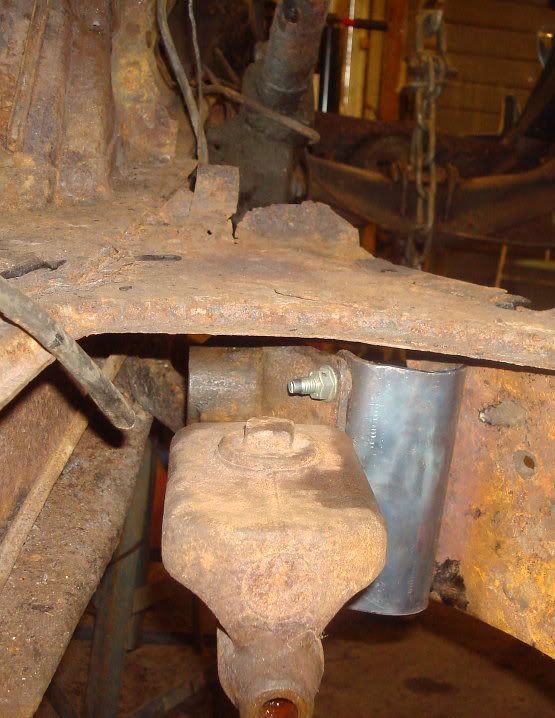 Tonight, I was able to build on the foundation of the properly mounted bracket and heated and bent the pedals to fit better. Didn't take photo's, but while the brake pedal just required a sideways joggle, the clutch required substantial bending to avoid it coming up through the floor like before. Now this is a warts and all report so the next thing to do was to tidy up the hackery to the chassis leg. I intend to do a full body off job on this car sometime down the line, but for now I want to just fix what needs fixing and drive it. Here's the x member leg.  Bit nasty ain't it, but very typical of a job done in the 50's, when this one was done. I cleaned up and ground the edges. 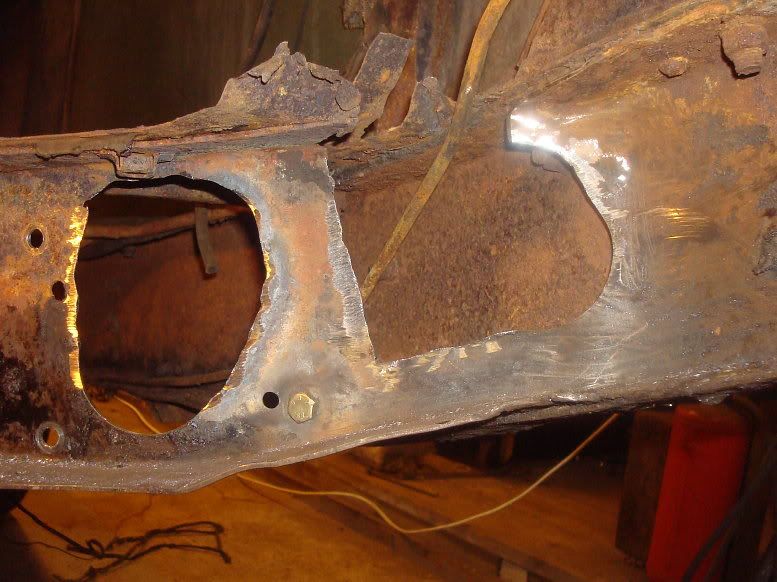 And made up a strengthener from 1/4" plate. I made it bolt in, because I will rework this area sometime in the future. I sort of had in mind doing how it could have been done years ago if they had a mind to do it better. 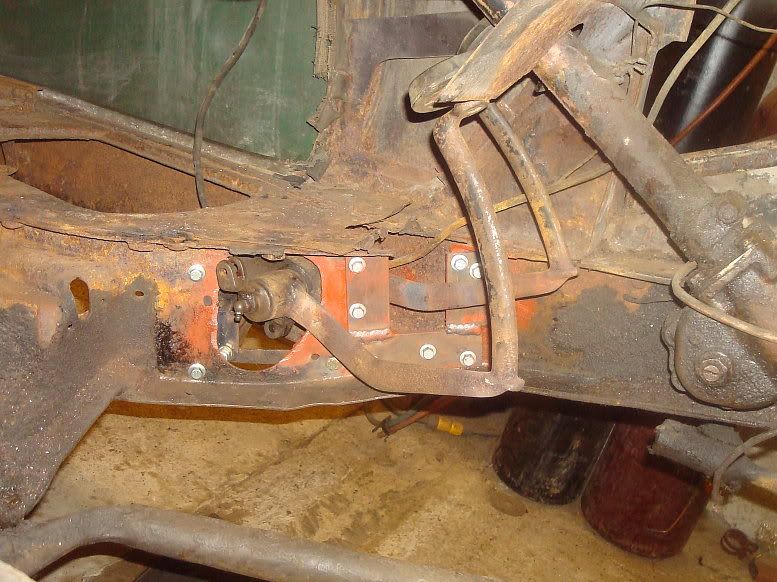 It's not pretty but should add a bit of strength. Here's a shot of the whole shebang with the pedals in place. 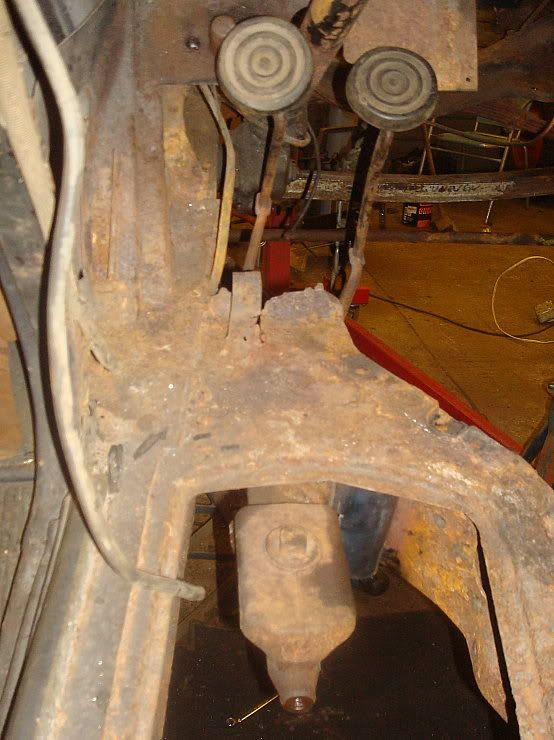 Here's how the car looks as I left the garage tonight. 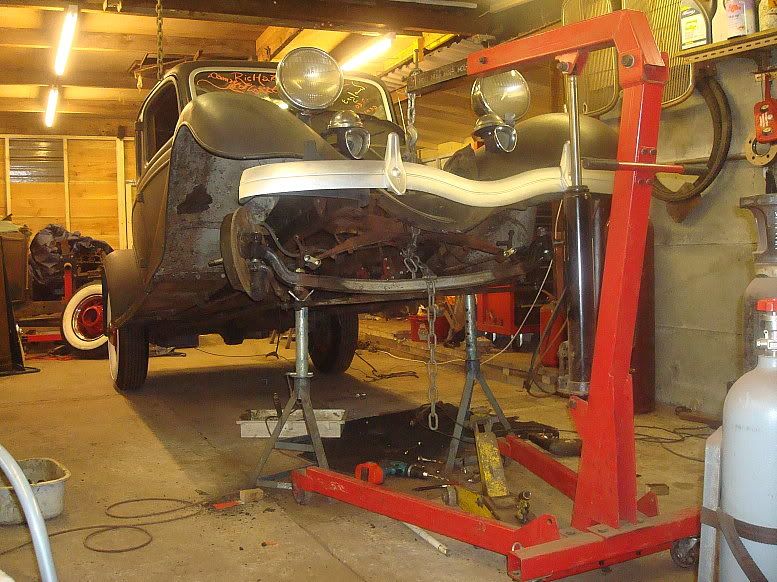 Using the engine hoist as a jack can get it a lot higher than normal, and while I have my biggest and best axle stands in place, having the hoist on there as well adds a little security. Mart. |
|
|
|
|
07-16-2012, 04:09 PM
|
#6 |
|
Senior Member
Join Date: May 2010
Location: Solihull, England.
Posts: 8,747
|
Sponsored Links (Register now to hide all advertisements)
Ok, after getting the master cylinder in place, I could look at what was next best to do. While the front was up nice and high, I went through the front brakes, cleaned the worst of the muck off and replaced the cylinders and shoes as necessary. I cleaned the drums up, cleaned and regreased the bearings and assembled them all up. Here's a couple of shots: 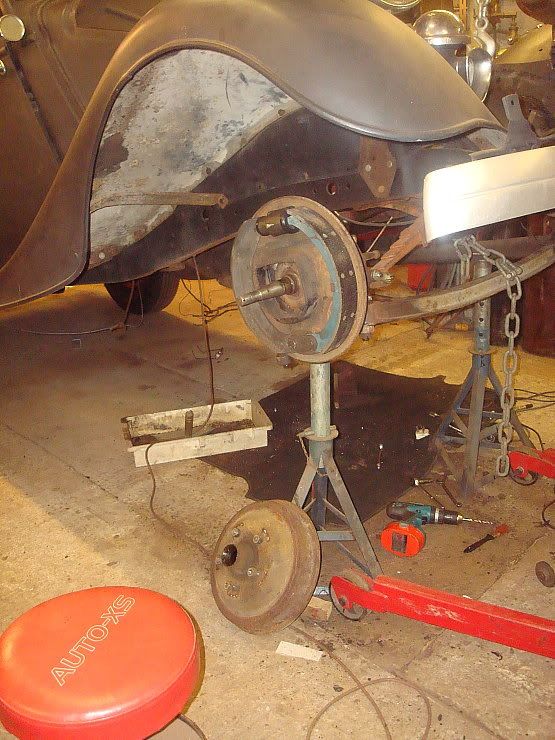 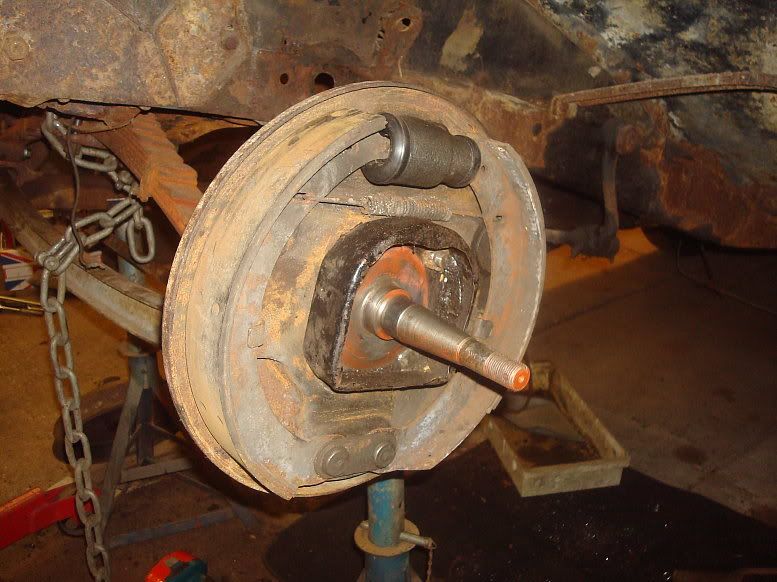 Yes, the grease shield is on upside down, to allow better access to the nuts on the slingshot steering arm. 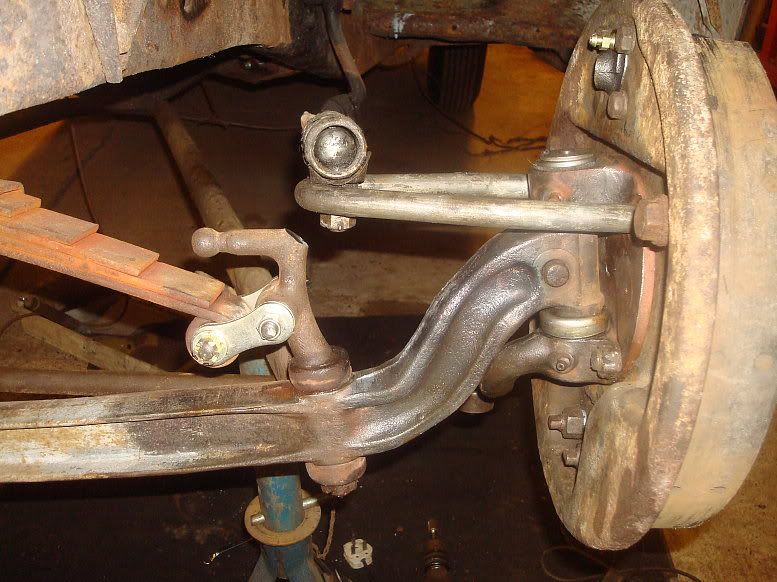 The drag link still needs sorting out, but that can wait a bit. I put the wheels back on with the spacers I got from the swap meet, and dropped the car back on the ground. 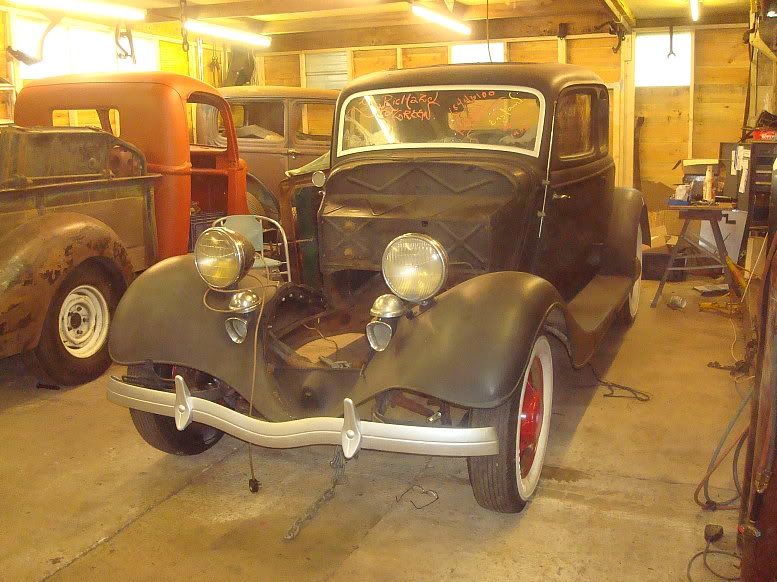 You can see it's a bit lower, even without the engine, rad and sheetmetal on the front. 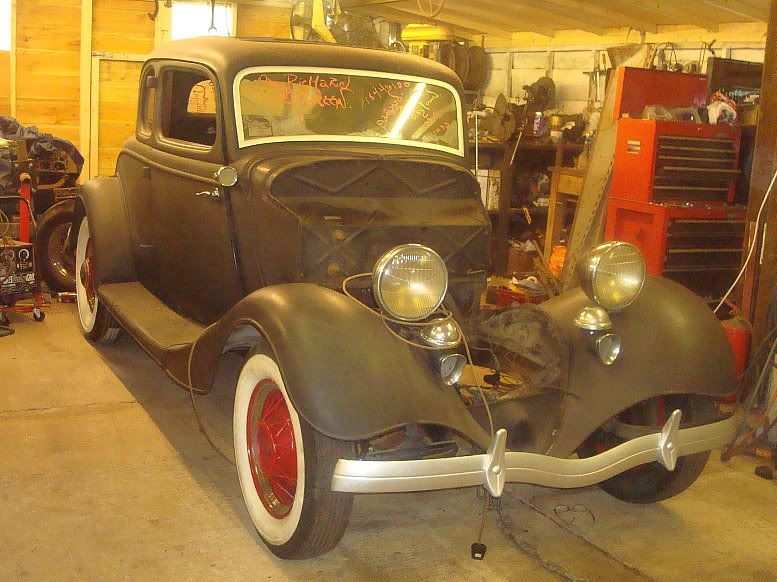 I didn't want to put the engine and box back in yet because the back axle needed to be removed. Easier to do the axle first, so that's what I did. Had a good look underneath, removed the spring u-bolt nuts and got the engine hoist fired up again. 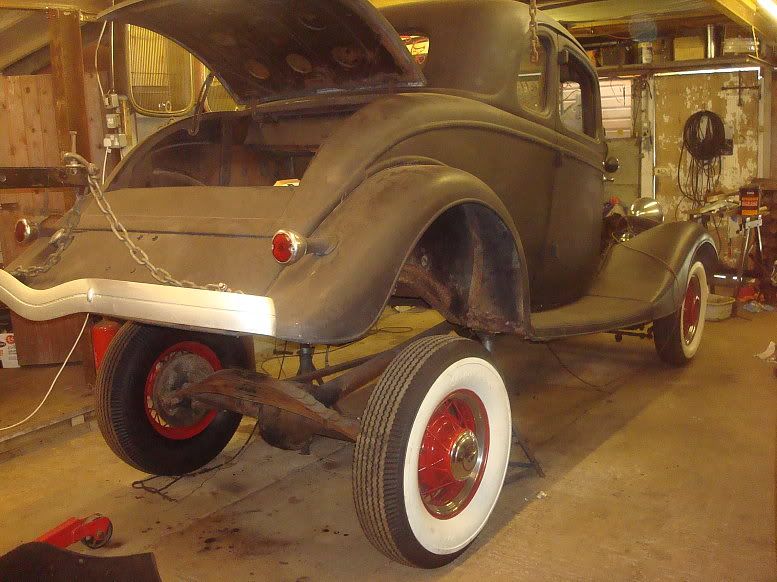 I lifted it up on the bumper brackets. I only lifted the body and frame, remember, the axle remained on the ground. This axle busted my ass at every stage. Nothing went easily on it. 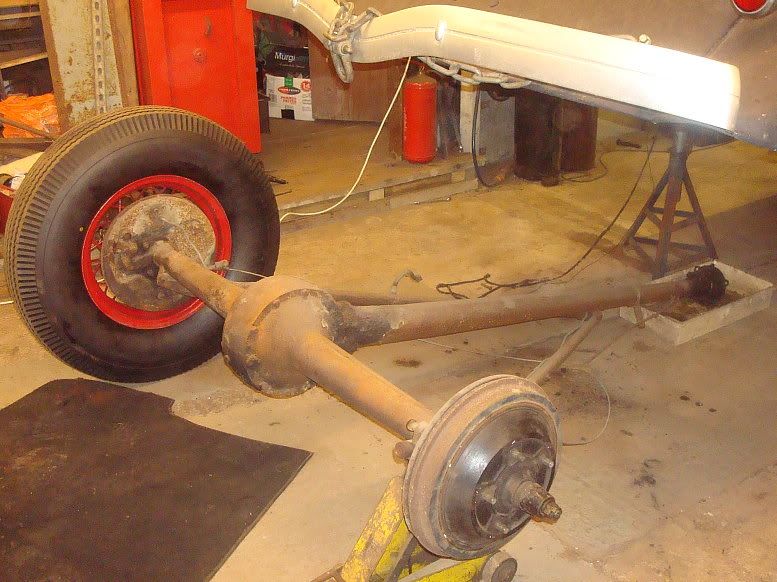 Note the 33 rear drums, these were used with 40 brakes, which I didn't think you could do, but it was done successfully here. 40's backing plates and brakes looking very grungy after a lifetime of neglect. Shoes were down to the rivets, but the drums were good luckily enough. 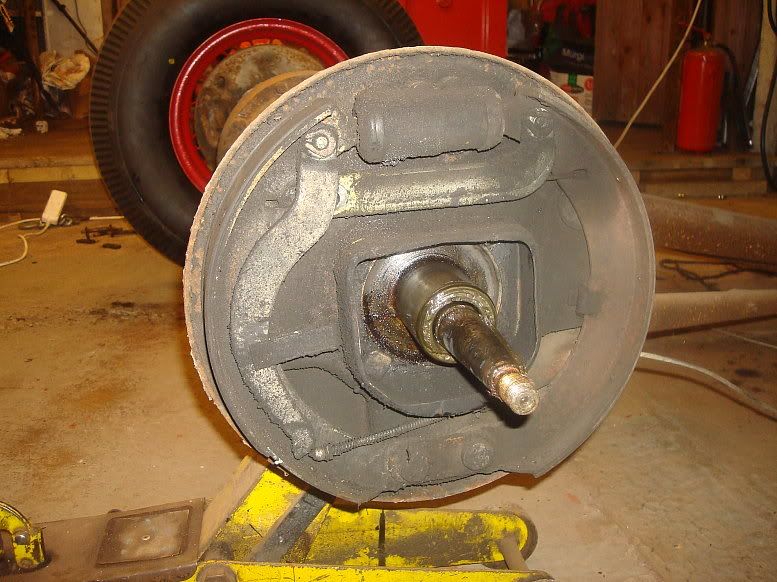 If you look carefully you can see a raised lip on the inside edge, due to the drum not being quite wide enough. When I re-shoe these, I'll put a slight chamfer on the inside edge. When I was trying to remove the backplates, I had a problem with the square head bolts turning. I made up a special spanner from a cheapo 19mm combo spanner, suitable bent and ground to fit. 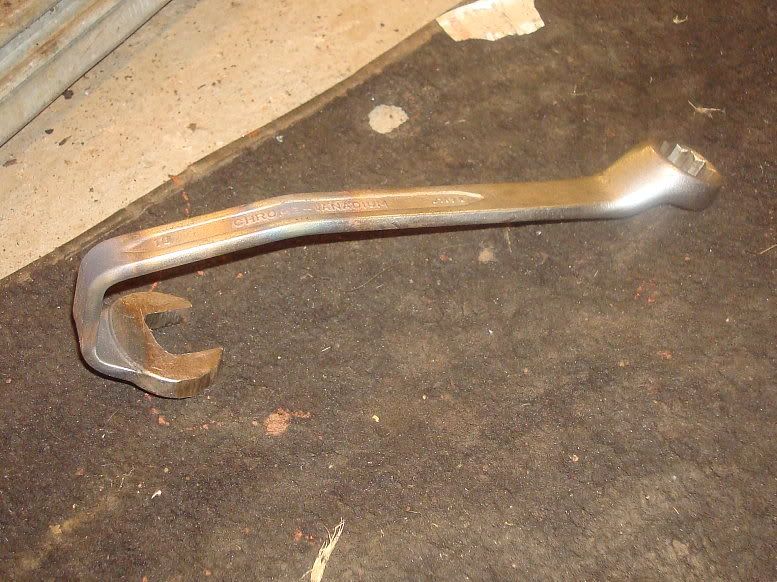 And in situ: 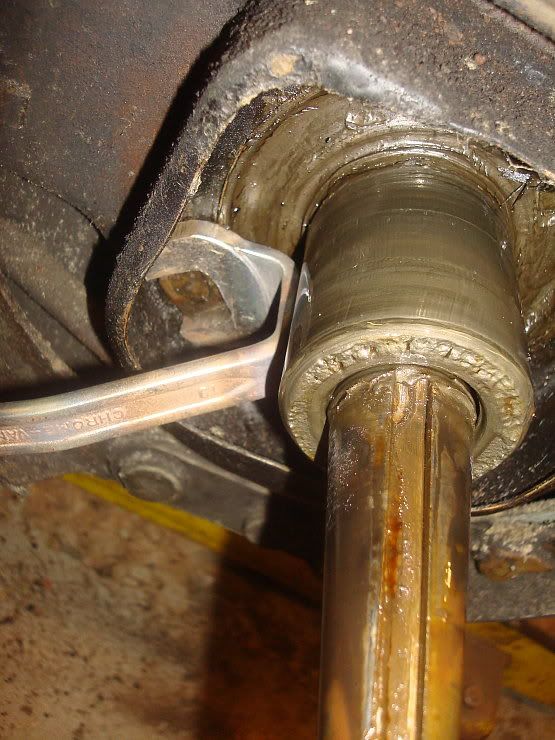 I still had to heat the nuts up, but this new spanner allowed me to get that initial movement on the nut, and then they came off quite easily. Anyone who has messed with early ford shackle bushes knows they are a bastard to get the remnants out. I struggled like fuck to get these out, but did eventually, after carefully sawing through the wall and chiselling the bits out. Getting the new bushes in was no easier. I started hammering the first one in, but it got stuck half way. It's very easy to mushroom the bushes and then it's virtually impossible to get them in. I have done them successfully in the vice, but I couldn't get the axle in the vice. No problem: bring the vice to the axle: 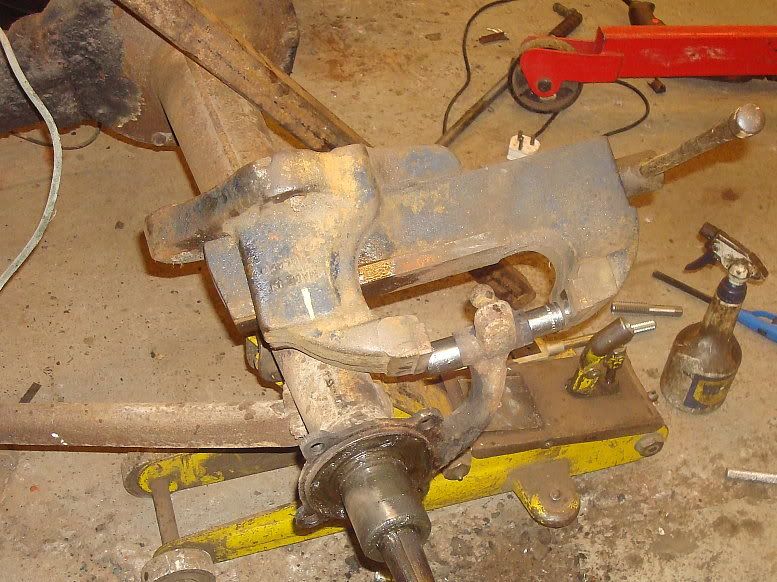 By using various sockets as pushers, I managed to get them in, but even then it was touch and go. Here's another tip. It's easier to get the spring on if the square on the shaft is orientated correctly. Here's a good way of turning it:  The square is 3/8" so just use a shackle plate and use your 3/8" ratchet in the other hole. Next thing about a hydraulic conversion on a 32/33/34 is the close proximity of the adjuster to the perch. 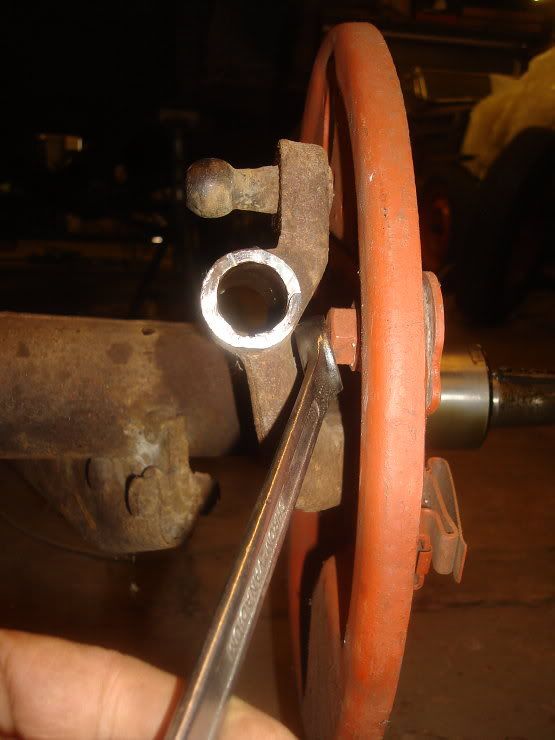 You can't get a ring spanner on it. I decided to pre-empt the situation by grinding the back of the perch a bit: 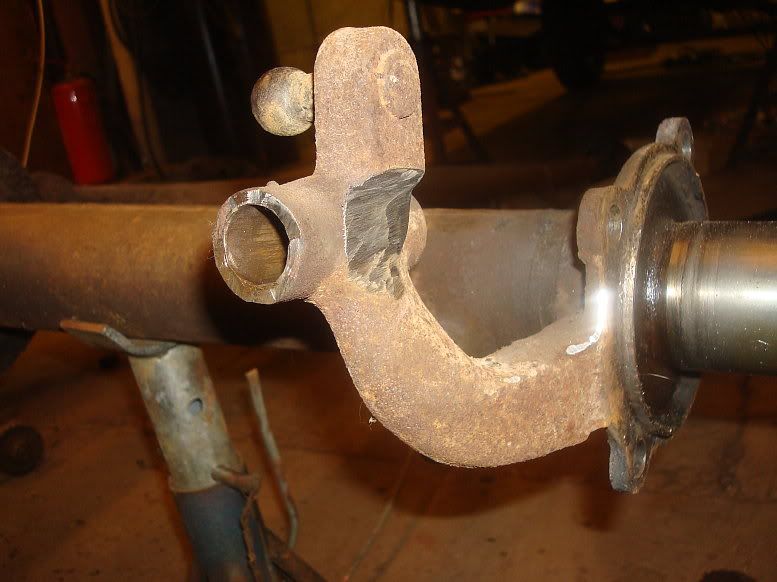 This allows a ring spanner to fit on ok. 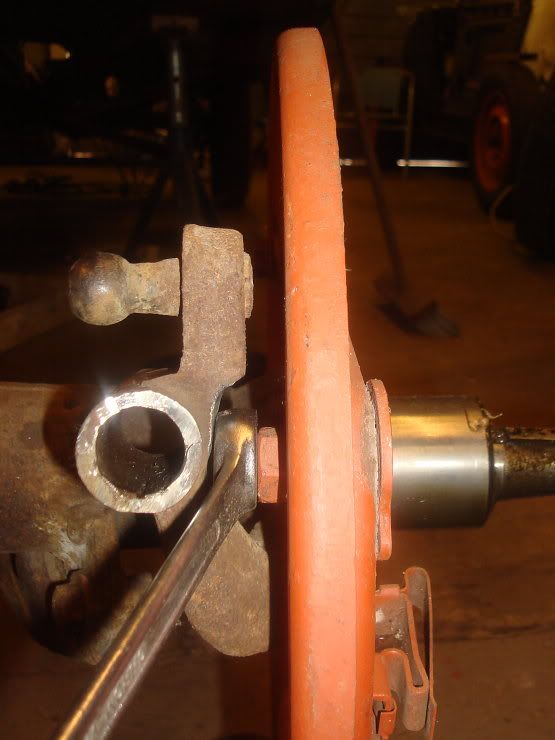 Now, the funny thing is, this didn't work as well on the other side, but I do have a thinned down spanner somewhere that will do the trick. Once all the shackles were sorted out, I reassembled the spring to the axle, using the old technique of just putting the main leaf on first, (even then it took a good pull with a G-Clamp to get it over far enough to get the shackles on), and then assembling the rest of the leaves. 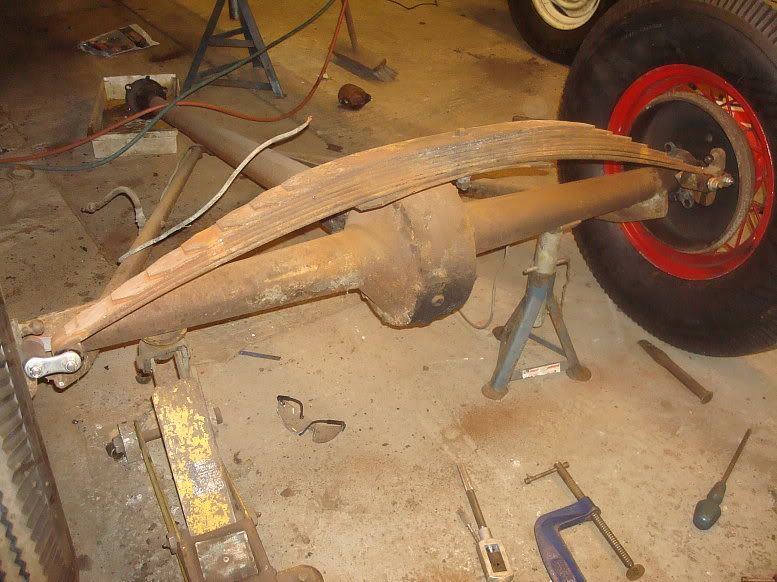 I left two leaves out (short ones that had been fitted under the spring as spacers) so the nuts would go further onto the u-bolts. While the axle was out I removed the rear shocks (siezed solid) and the last remnants of the exhaust. After putting the wheels back on, I slung the whole axle, less brakes under the car, dropped the car back down and bolted it up. ok, so the front suspension is back in place, the rear suspension is back in, and the pedal box has been remounted. No reason not to put the engine and box back in. Recovered this old trooper out of the shed: 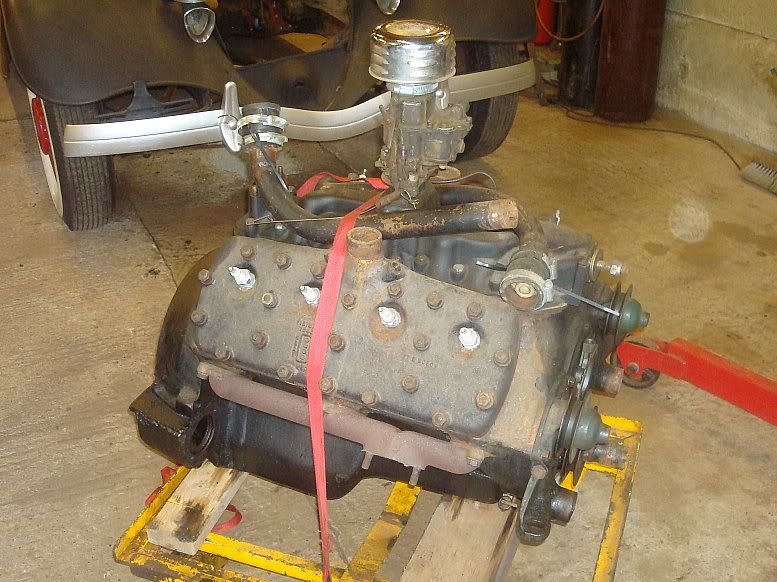 It's the 21stud out of Old Rusty, Prior to that is was in Phil Sparks' roadster and before that I believe it was in a Low Fliers car. I cleaned the rust off the gears in the gearbox that was in the 33. I decided to just run it, and see if it is any good. to be honest it turns very smoothly, and there are no chips on nthe teeth, so why not run it? Using the engine hoist made bolting it up nice and easy. 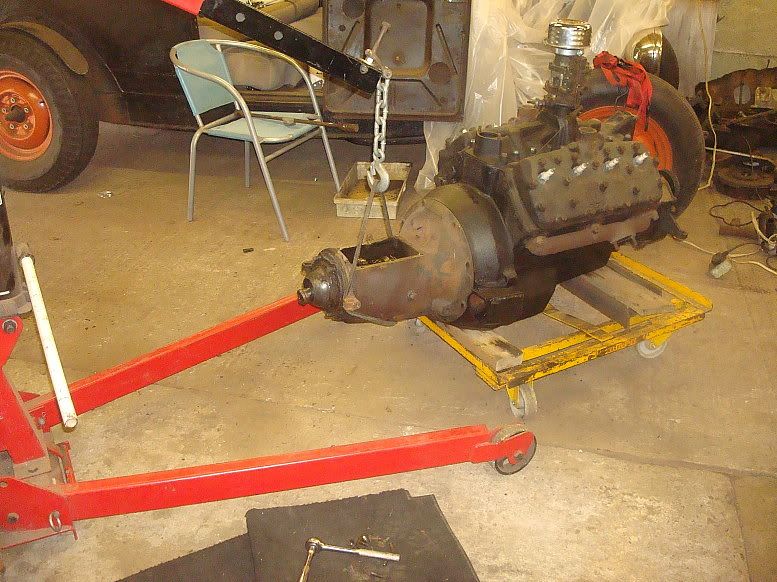 No photo's of the actual fitting, because it was a bit of a struggle, but in it went eventually: 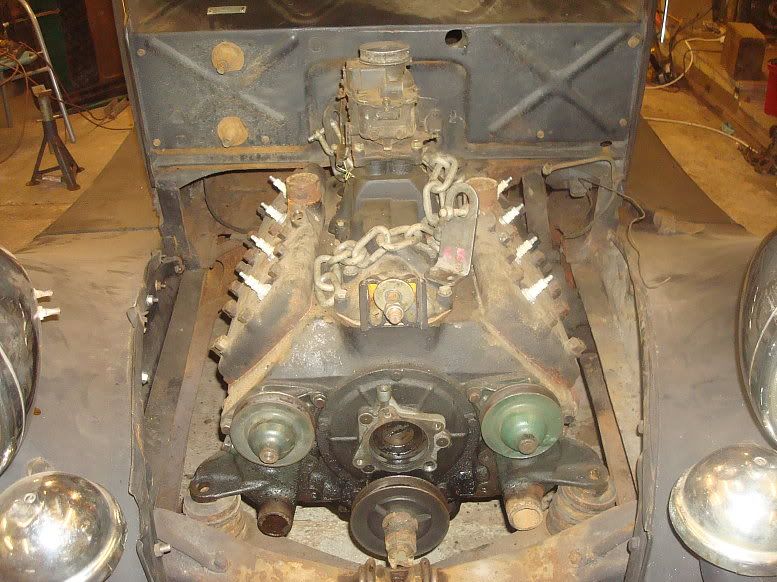 The engine is exactly as it was pulled from the roadster so it is suitably grimy and patinated and looks pretty well at home in the coupe: 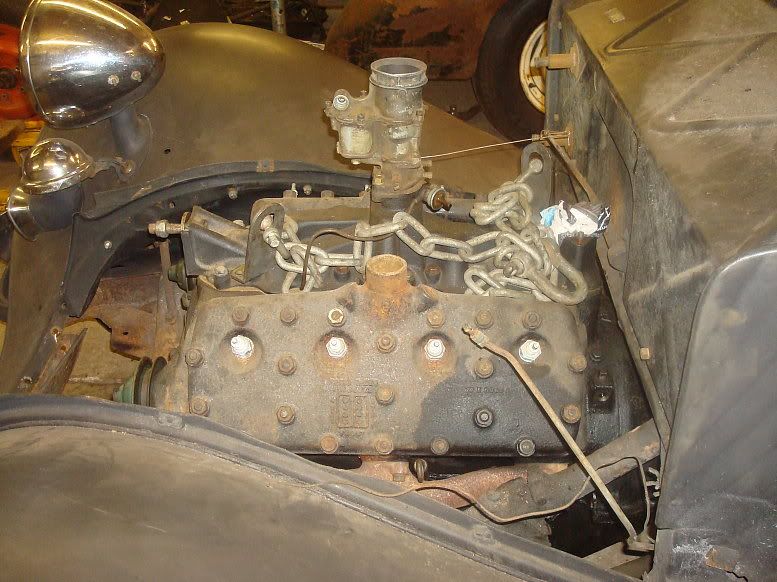
|
|
|
|
|
07-16-2012, 04:10 PM
|
#7 |
|
Senior Member
Join Date: May 2010
Location: Solihull, England.
Posts: 8,747
|
I need to sort out the engine mounts, I just dropped it onto the stack of four mounts the old engine was on. Sits in there nice, almost as if it was designed to go in there:
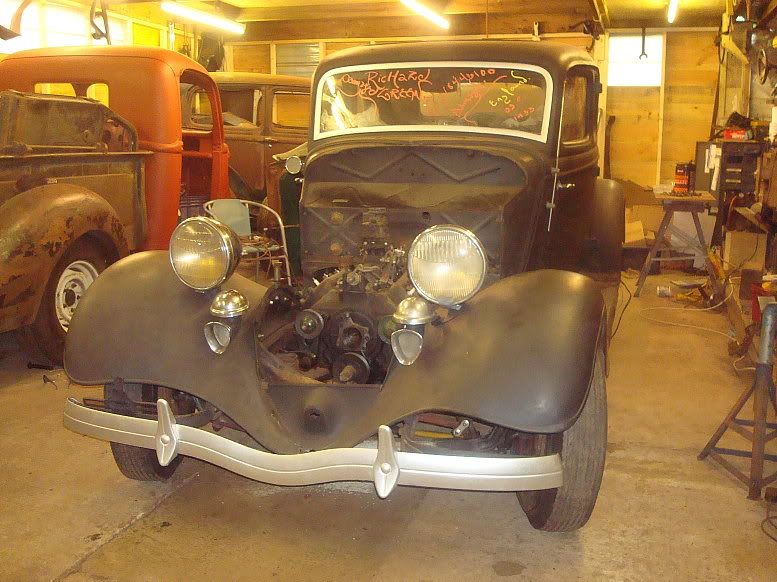 And, as usual a parting shot: 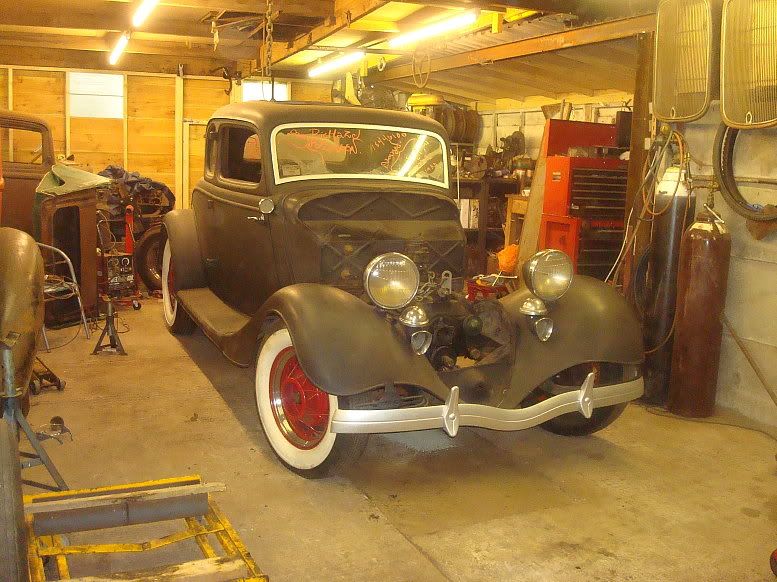 The front end has come down nicely with the extra weight in it, and should settle nicely when the rad and other things are fitted. Quite an epic, and some really hard work in there, but I'm still enjoying it. Mart. ================================================== ========= 5/13/12 This is my Sunday evening update of recent work. I have been doing a bit, so might as well bring the thread up to date. It's all pretty nitty gritty stuff now, nothing that changes the appearance, just all the stuff that's necessary to get something running and driving. After dropping the engine and box in, I cleaned up all the bolts and the captive nuts and bolted the rear mount in place. I took some careful measurements and made up some engine mount spacers. The chassis is on 19" centres, and the engine is on 20" centres, so each raiser has a 1/2" offset built in. 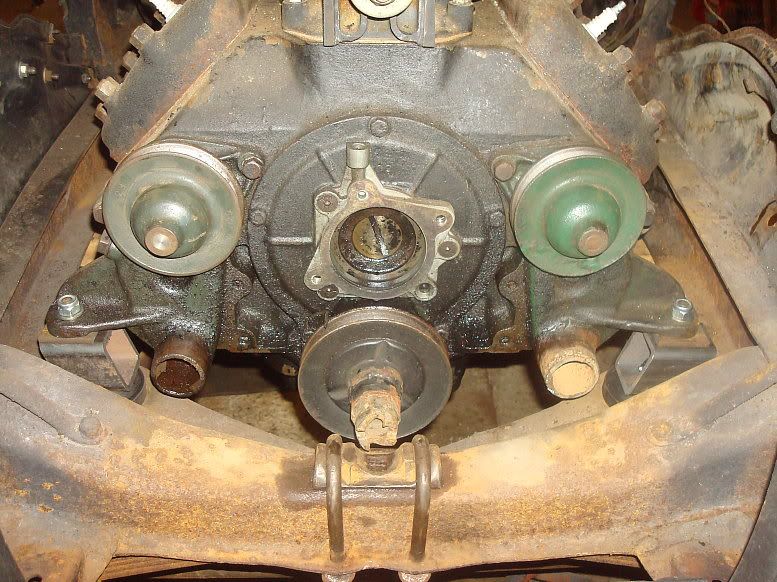 There is enough room to tighten the nut up and get the split pin in. Then the engine drops onto the studs. I jacked the car back up again so I could concentrate on the brakes. I cleaned up and fitted the rear brakes along with a good set of shoes. The ones on this car were very worn and contaminated. Back plates were bolted on and the hubs refitted after greasing the wheel bearings. Axle surfaces were excellent. 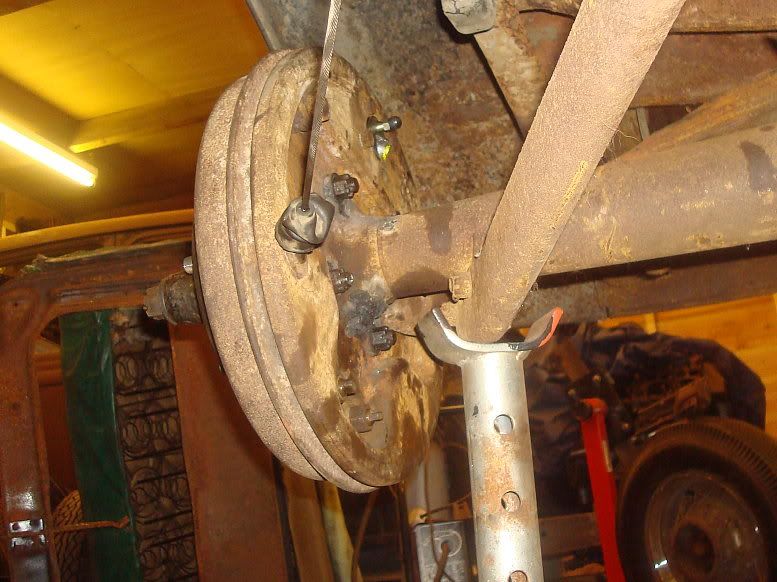 Somewhat unusual, this car did have a fully functioning handbrake. This feature is often missing on some cars. The lever was totally siezed up, but 5 minutes in the vice with wd40 and oil got it freed up nicely. Cleaned up the hardware and bolted it on. I freed off the adjuster and reassembled the linkage as I had taken it off. On this car I'm fixing what needs fixing and this works so it's going back on as it is. 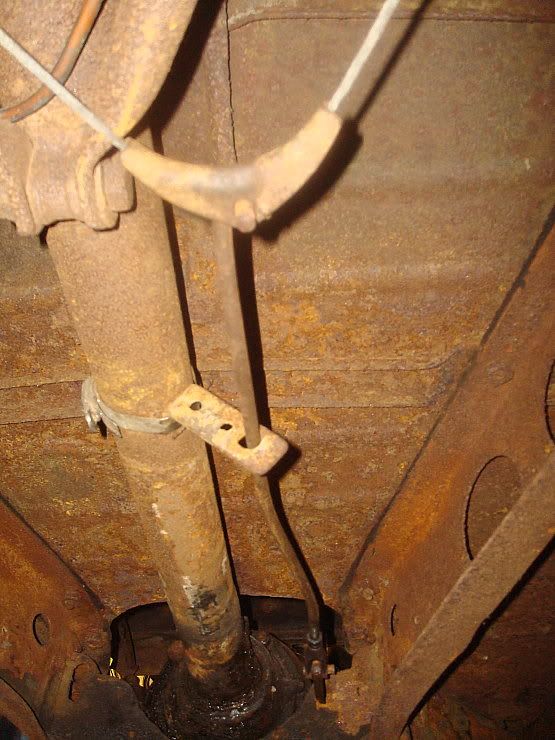 It pulls from a bit off centre, but the brakes don't seem to mind. But can you spot the mistake?? 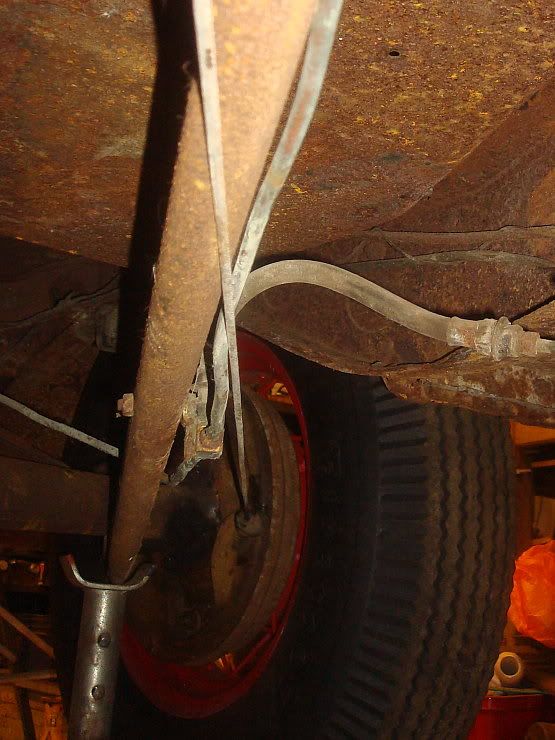 That's right, the cable pulls straight across the brake lines. Brake lines are copper by the way and are still very soft and flexible after all this time. I had already decided to rerun all the lines and replace all the hoses, so off they all came. The pipe ran across the front crossmember, under the rear, right by the pulley so I made a new pipe. Here it is just laid in place. 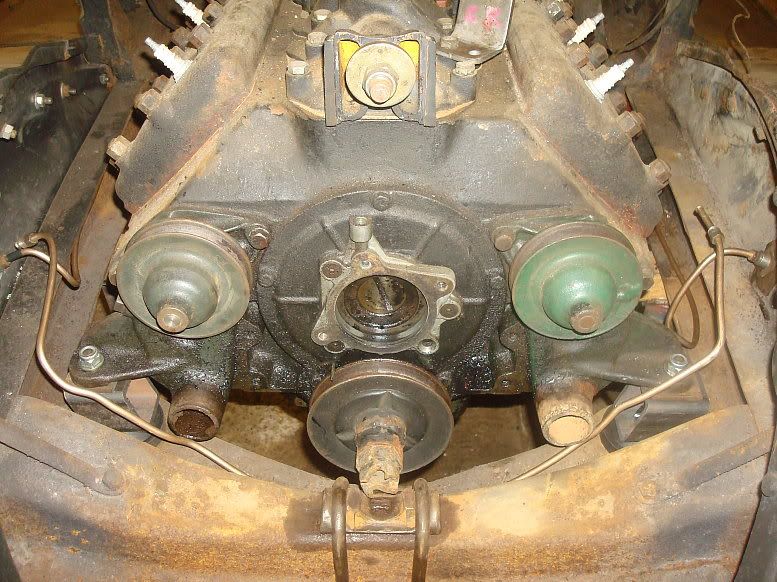 I decided this was a crap idea, the 34 is very cramped around this area, so after a lot of lying under the car I came up with a better idea. (Note old repair to water pump pulley in this pic -not by me, I hasten to add) Left side comes up inside the rail  As does the right side. 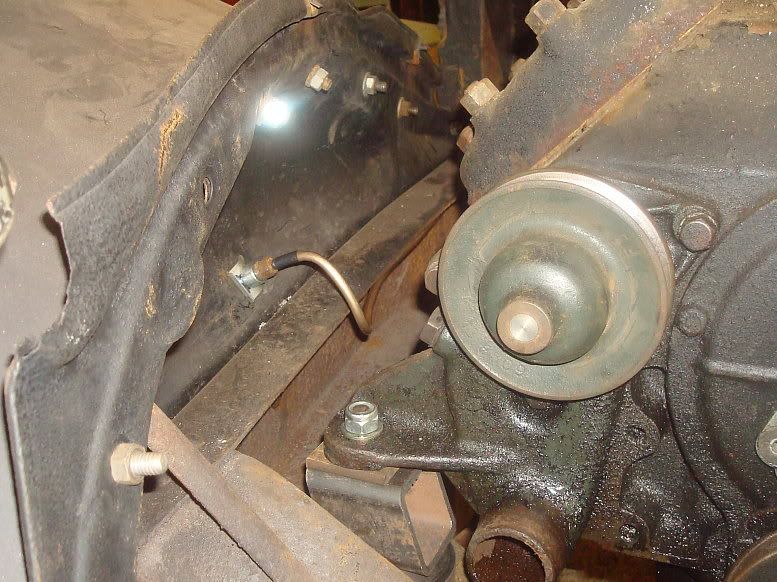 Here's a pic of the master cylinder and the fittings. 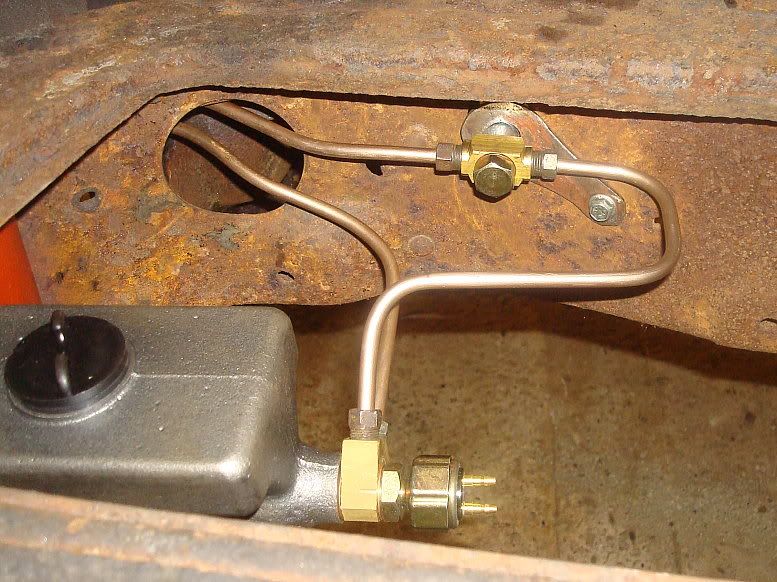 From the junction block on the master cylinder, the front pipes shoot through the round hole in the x-member. One line goes through a t-fitting which feeds the flexy hose going to the back axle. Here are the two front lines coming through the hole that would be used by the handbrake on a rhd model. 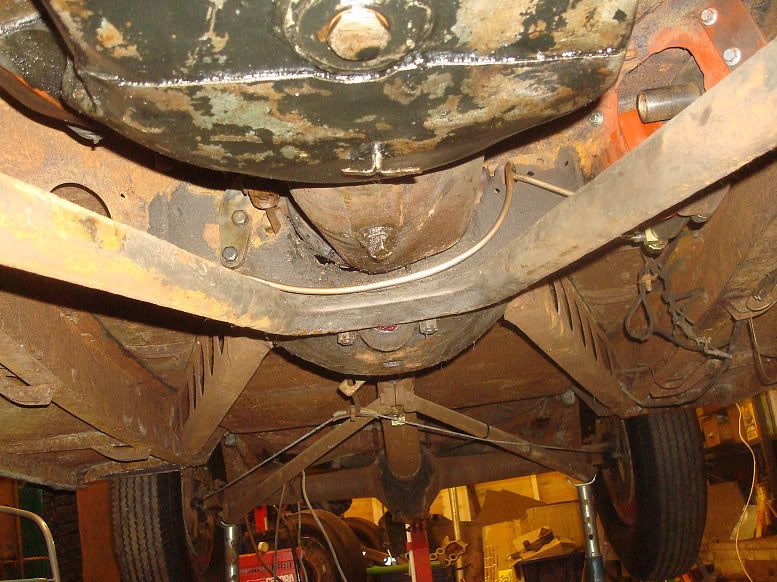 Ok, obviously I need to add a few clips yet. This routing is ideal because the lines are the right side of the x member legs and can run naturally up the inside of each rail. At this point I needed to finalise the design for the rear shocks, so the brake lines, which will run along the radius rods won't clash with the shocks. I have only gone as far as deciding how I'm going to do it and pulling one radius rod off. Here's the first mount roughed into place: 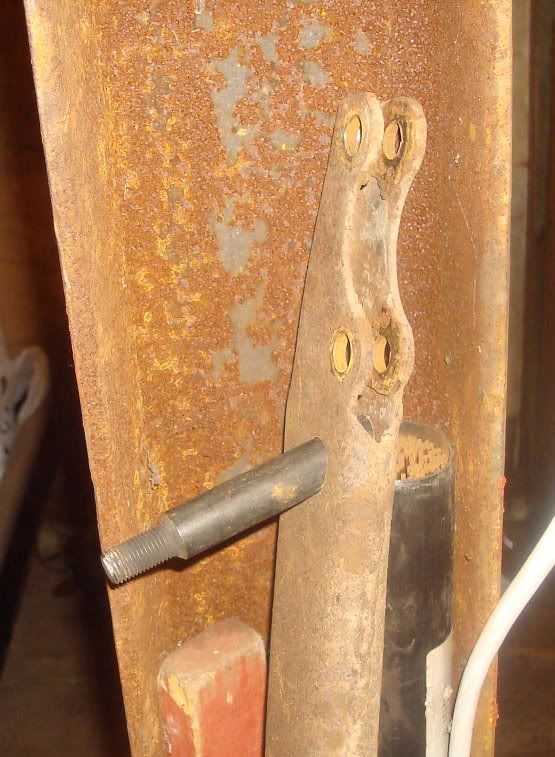 The rod is 5/8" diameter with a 7/16" thread. They are off the old jag independant rears. Once the design for the shocks was settled I could lay the rear pipes in. 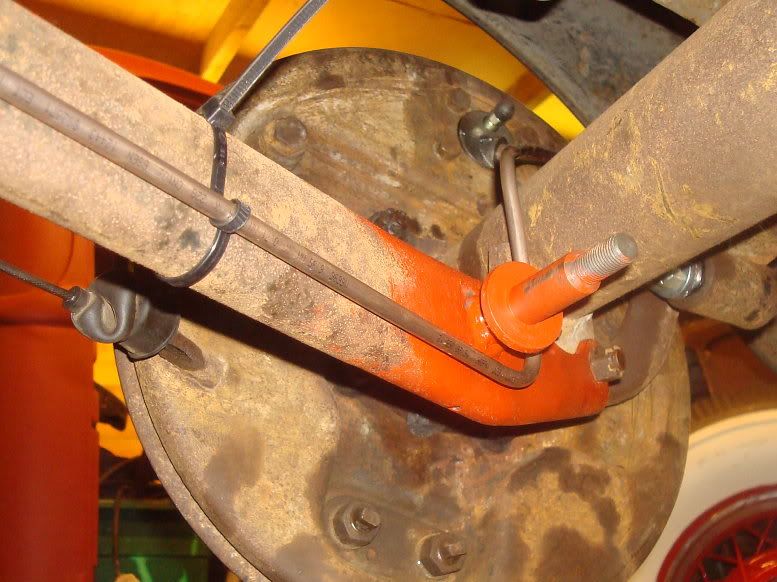 Above you can see why it was important to do the shocks first. The pipe run is nice and simple, and lays in place easily with a minimum of bends. The shocks can be removed and the radius arm bolts accessed without disturbing the pipes. You will also see in the pic above a cable tie holding the brake pipe, I am happy to use these, but a handy tip is to take an extra turn around the pipe, as seen above, this holds the pipe off the surface by the thickness of the tie, reducing chafing and debris buildup between the pipe and surface. I'll deal with the pipes first then come back to the shox. The pipes run up the inside of the radius rods and join into a Tee: 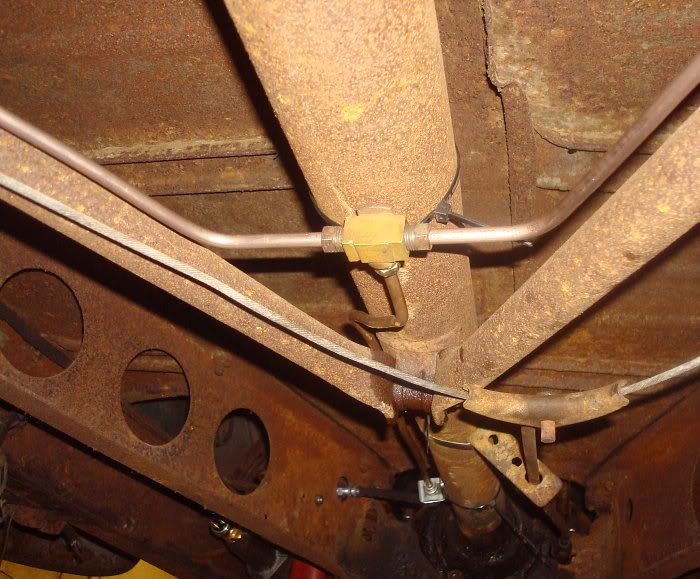 And in this shot you can see the nice simple setup with the short hose going from the frame to an intermediate pipe and then feeding the Tee. 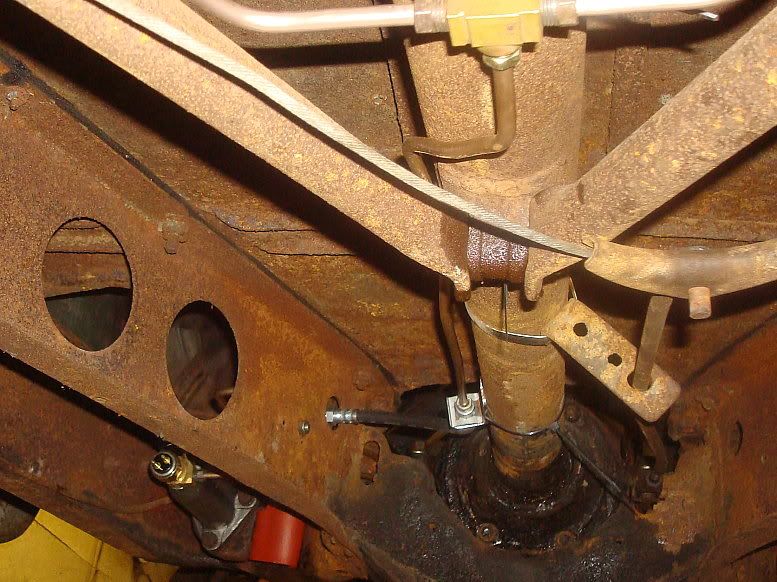 That's it for the brakes, they're all plumbed up, copper washers fitted and everything tightened as necessary. I won't fill the system with fluid and bleed it until I've decided how to do the front shox in case I need to pull the front end again. Right. Back to the rear shox. Upper bracket was fashioned from box section and the other end of the 5/8" shaft. Here you can see the finished left hand bracket and the raw materials that will make up the right hand bracket. 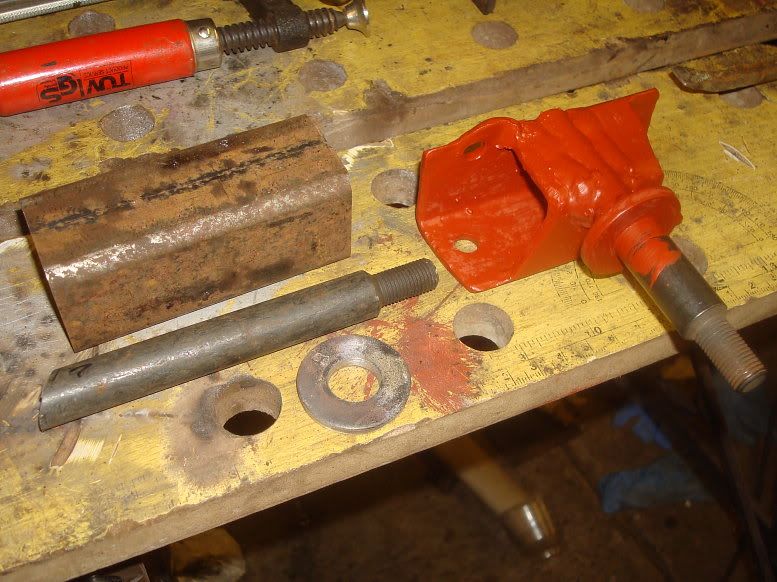 Here's the right hand bracket bolted in place. 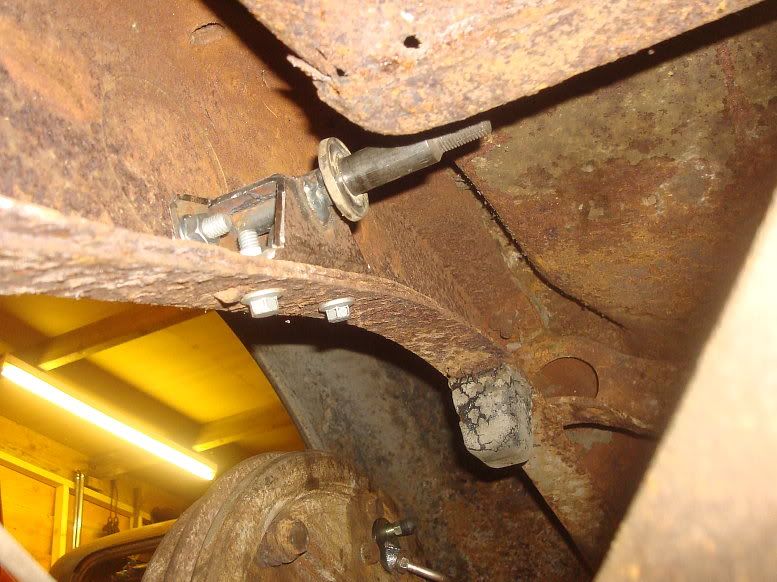 And how the bolts look from the outside on the left.  The upper left hole in this pic is an existing hole in the frame. I had to cheat a bit of extra metal into the side of the tube by building up with weld to give full purchase for the nut. (you can see the extra metal in the pic with the raw material by the side of the finished bracket. If you look right through you can see the shock installed on the opposite side. And here is the shock in place. 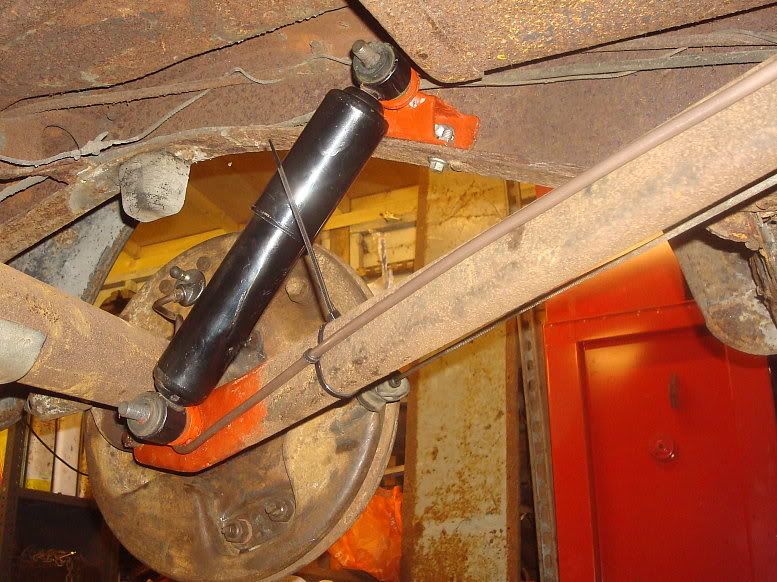 Ok, I know the angle is a bit shallow, but that's what I did to save pushing the shock through the floor. It also means you can use a very short shock, as the travel at an angle is less than vertical. I think they'll be ok, if no good, it's only metal at the end of the day, anything can be reworked. Actually the angle looks shallower than it really is in this pic, due to the angle of the radius arm. The true angle can be seen in the previous pic. That's it for now, feeling one or two steps closer now. Mart. ================================================== ============== And that was the first months work. You can achieve a lot when in that first rush of enthusiasm. Look out for part 2 coming to this forum real soon. Mart. |
|
|
|
|
07-16-2012, 04:43 PM
|
#8 |
|
Senior Member

Join Date: May 2010
Location: Chester Vt
Posts: 8,859
|
Thanks I needed that, God bless.
Ol' Ron |
|
|
|
|
07-16-2012, 05:17 PM
|
#9 |
|
Member

Join Date: Nov 2011
Location: Sacto, Ca
Posts: 85
|
 WOW, some inspiring "can do " attitude with your project here. WOW, some inspiring "can do " attitude with your project here.the xclnt quality photos alone are great , along with some inovated use of modified tools & off the bench engineering. met a clever Kiwi - New Zealander Guy, some time ago who does all this sorta stuff , he calls it, '' making a silk purse out of a sows ear". Great work , have fun on your travels. 
|
|
|
|
|
07-16-2012, 05:34 PM
|
#10 |
|
Senior Member

Join Date: May 2010
Location: Qld, Australia
Posts: 4,215
|
I,m nearly burned out just looking at the pics,
I thought I had a big job painting my 33. Lawrie |
|
|
|
|
07-16-2012, 06:42 PM
|
#11 |
|
Senior Member
Join Date: Jun 2010
Posts: 228
|
I enjoyed your 3month pictorial ! THANKS Dave p.s. Almost forgot nice car!!
|
|
|
|
|
07-16-2012, 07:19 PM
|
#12 |
|
Senior Member

Join Date: May 2010
Location: Irving, Texas
Posts: 598
|
Like your engineering on an interesting project Really enjoyed your project build pics. Ed
|
|
|
|
|
07-16-2012, 07:47 PM
|
#13 |
|
Senior Member

Join Date: May 2010
Location: ⓉⒺXⒶⓈ
Posts: 2,047
|
Love your posts Mart. Congrats on the new ride!!
__________________
-------------- Drive it like you know how to fix it! DMAFC / OILERS CC-MC |
|
|
|
|
07-16-2012, 07:59 PM
|
#14 |
|
Senior Member

Join Date: May 2010
Location: Louisiana
Posts: 866
|
Overcoming adversity with ingenuity at it's best. Good Job.
|
|
|
|
|
07-16-2012, 08:22 PM
|
#15 |
|
Senior Member

Join Date: May 2010
Location: Napier, New Zealand
Posts: 2,001
|
Perfect!
|
|
|
|
|
07-16-2012, 08:40 PM
|
#16 |
|
Senior Member
Join Date: May 2010
Location: Colorado
Posts: 553
|
What a great tutorial. What a great mechanic. Very clever and inventive. Nice car, great job!
|
|
|
|
|
07-16-2012, 09:05 PM
|
#17 |
|
Senior Member

Join Date: May 2010
Location: Above the gnat line in Georgia
Posts: 7,009
|
I can certainly appreciate the work you have done. Great job. Nice car.
|
|
|
|
|
07-16-2012, 09:40 PM
|
#18 |
|
Senior Member

Join Date: May 2010
Location: MN
Posts: 7,053
|
Spot on mart. Every step of the way. Very refreshing in a throw away world.
|
|
|
|
|
07-17-2012, 05:00 AM
|
#19 |
|
Senior Member

Join Date: May 2010
Location: Smithfield, Va
Posts: 822
|
Good work.
Keep workin' Al PS You're making the rest of us feel lazy!
__________________
36 Fords Rule! Visit at www.36fords.com. |
|
|
|
|
07-17-2012, 05:33 AM
|
#20 |
|
Senior Member

Join Date: May 2010
Location: Suth'N Maine
Posts: 1,996
|
Started reading this great little thread this morning, had to make a second cup of coffee and enjoyed it.
Mart it gave me a little more motivation to do some work on my 39 even with this heat/humidity sucking the life outa you  . Scott . Scott
|
|
|
|
|
«
Previous Thread
|
Next Thread
»
 Linear Mode

|
|

| Sponsored Links (Register now to hide all advertisements) |
|
|
All times are GMT -5. The time now is 07:03 AM.