|
|||||||


| Sponsored Links (Register now to hide all advertisements) |
|
|
 |

|
Thread Tools | Display Modes |
 01-30-2017, 11:37 AM
|
#1 |
|
Member
Join Date: Jul 2010
Location: Sugar Land, TX
Posts: 80
|
please advise what is FORD FLATHEAD VALVE AJUSTMENT SEQUENCE
which valves do you ajust with which valve open or closed? |

|

|
|
01-30-2017, 11:55 AM
|
#2 |
|
Senior Member

Join Date: Feb 2013
Location: Eureka Calif.
Posts: 968
|
Maybe this will help.
http://www.btc-bci.com/~billben/flathead.htm |
|
|
|
| Sponsored Links (Register now to hide all advertisements) |
|
|
|
01-30-2017, 12:05 PM
|
#3 |
|
Senior Member

Join Date: Jun 2013
Location: Marana Arizona
Posts: 1,776
|
I adjust INTAKE when same cylinder's EXHAUST starts to open. Set EXHAUST when same cylinder's INTAKE just closes. Suggest that you remove all the sparkplugs to make hand turning of the engine easier.
|
|
|
|
|
01-30-2017, 12:19 PM
|
#4 |
|
Senior Member

Join Date: May 2010
Location: Mesquite, NV / Gurnee, IL
Posts: 298
|
ICE.................as Intake Closes do Exhaust valve
EOI.................as Exhaust Opens do Intake valve That's the way I do. |
|
|
|
|
01-30-2017, 12:21 PM
|
#5 |
|
Senior Member

Join Date: May 2010
Location: Canada Where it snows
Posts: 2,058
|
|
|
|
|
|
01-30-2017, 06:10 PM
|
#6 |
|
Senior Member

Join Date: May 2010
Location: Cincinnati, OH
Posts: 1,361
|
Sponsored Links (Register now to hide all advertisements)
http://www.vanpeltsales.com/FH_web/f...cationpg-1.htm http://www.vanpeltsales.com/FH_web/f...cationpg-2.htm
__________________
VANPELT SALES LLC Cincinnati, Ohio Office: 513-724-9486 www.vanpeltsales.com www.classictransmission.com |
|
|
|
|
01-30-2017, 06:45 PM
|
#7 | |
|
Senior Member

Join Date: May 2010
Location: Long Island, NY
Posts: 1,052
|
Quote:
Two complete turns of the engine, you're done. Doesn't get any easier! Thanks, Gary in N.Y. P.S. This method will allow you to double-check the valves already set by spot-checking all the previously set valves. If any change is felt on any already adjusted simply re-set it at that point!
__________________
http://www.stromberg-bulletin.com/me...berg-equipped/ |
|
|
|
|

|
01-31-2017, 11:01 AM
|
#8 |
|
Senior Member

Join Date: May 2010
Location: ⓉⒺXⒶⓈ
Posts: 2,047
|
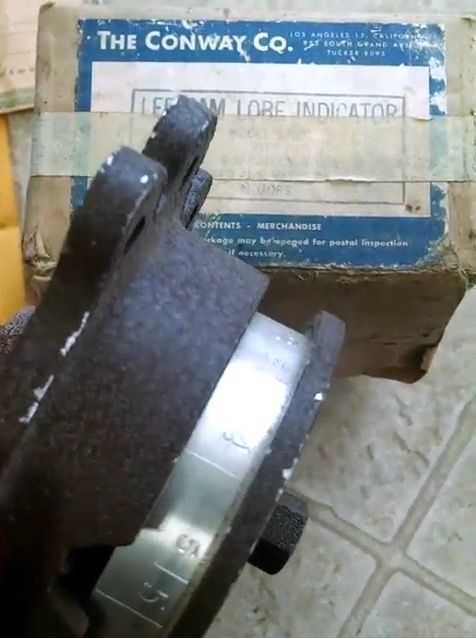
Not absolutely necessary, but very helpful. I used this very rare NOS Lee Cam Lobe Indicator. You attach it to the front like a distributor. It has numbers and an indicator on it. You rotate the engine and it tells you which valve to adjust next. Made the job nice and quick!
__________________
-------------- Drive it like you know how to fix it! DMAFC / OILERS CC-MC Last edited by Jason in TX; 01-31-2017 at 04:25 PM. |
|
|
|
|
01-31-2017, 11:21 AM
|
#9 |
|
Senior Member
Join Date: May 2010
Location: ⓉⒺXⒶⓈ
Posts: 2,047
|
There is a similar tool called "Acra Speed" portrayed on a 1953 hotrod magazine.
   
__________________
-------------- Drive it like you know how to fix it! DMAFC / OILERS CC-MC |
|
|
|
|
01-31-2017, 01:48 PM
|
#10 | |
|
Senior Member
Join Date: May 2010
Location: NJ
Posts: 6,177
|
Quote:
|
|

|
|
|
01-31-2017, 02:47 PM
|
#11 | |
|
Senior Member
Join Date: May 2010
Location: ⓉⒺXⒶⓈ
Posts: 2,047
|
Quote:
__________________
-------------- Drive it like you know how to fix it! DMAFC / OILERS CC-MC |
|
|
|
|
|
05-07-2018, 12:43 PM
|
#12 |
|
Senior Member
Join Date: May 2010
Location: ⓉⒺXⒶⓈ
Posts: 2,047
|
I just got an Acra-Speed over the weekend and included were the instructions. I typed them out below:
Instructions: There are two pointers. The pointer that is at the top of the engine when mounted on either 2 bolt or 3 bolt is the pointer you look at. When installed on a three bolt cover, with the flat side perpendicular to the ground on the left, the pointer that is outside the edge is the pointer. When installed on a two bolt cover, with the flat side at the 7:00 position down toward the ground, the pointer stamped into the base is the pointer you look at. It would have originally come with a short adapter and long adapter on the back for the two lengths of cams. The short adaptor was used whenever the three hole mounted distributor was present. (with the exception of the cam being replaced) The long adaptor was used with the two hole mounted distributor. I'm guessing you only have the short adapter. They also had accessory rotating drums for 6 cyl Fords, 8 cyl fords and 12 cyl fords. Installation of the Acra-Speed "CAM POSITION INDICATOR" 1. Determine the required long or short rear adaptor and install on the drive shaft of the “CAM POSITION INDICATOR.” 2. Install the "CAM POSITION INDICATOR" in place of the distributor in the position as required by the TWO or THREE hole mounting. Use bolts and loosely bolt the indicator to the cam gear cover using the proper holes in the back plate of the "CAM POSITION INDICATOR" Rotate the calibrated drum of the "CAM POSITION INDICATOR" in either direction while also slightly pushing on the cover plate until the offset drive key on the "CAM POSITION INDICATOR" engages the offset drive keyway in the gear end of the cam shaft. It is then necessary only to tighten the cap screws finger tight to put the "CAM POSITION INDICATOR" in service. 3) The TOP pointer on the "CAM POSITION INDICATOR" is now ready to indicate accurately and quickly the exact heel position of any cam on the cam shaft. Two scales are provided on the drum for V type motors. One carries the letter "R" followed by a numeral, while the other scale employs the initial letter "L" followed by a numeral. The "R" index is readable from only the RIGHT side of the motor, while the "L" index is readable only from the LEFT side of the motor. When the "1R" index line on the drum is in line with the top pointer, the first or front valve on the RIGHT side of the motor is on the heel of the cam and in position for checking lifter to valve clearance. The front valve on each side is indicated by "1R" or "1L" and the valves are numbered progressively toward the rear of the motor. WHEN ANY INDEX LINE ON THE DRUM IS AT THE POINTER, THE INDICATED VALVE IS ON THE HEEL POSITION OF THE CAM. Rotation of the cam shaft while the pistons and crank shaft are in the motor must be handled by crank, wrench, fan belt or any available method. During rebuilding or complete overhaul jobs with the crank shaft and pistons removed, the cam shaft can be rotated by means of the drum on the "CAM POSITION INDICATOR" Hope this helps!  - Oiler Elrod
__________________
-------------- Drive it like you know how to fix it! DMAFC / OILERS CC-MC |
|
|
|
|
05-07-2018, 02:55 PM
|
#13 |
|
Senior Member

Join Date: May 2010
Location: Chester Vt
Posts: 8,857
|
I'm basically lazy, so I go with Chap52's method. Been uzing that for decades.
|
|
|
|
|
05-07-2018, 04:10 PM
|
#14 |
|
Senior Member

Join Date: May 2010
Location: Wa.
Posts: 5,407
|
It is absolutely amazing at how much work is expended trying to complicate a very simple job. The easiest way to remember numbers is the sequence they occur in. 1,2,3,4,5,etc.
THE ONLY THING YOU NEED TO REMEMBER WHEN ADJUSTING VALVES IS, IT HAS TO BE DONE ON THE HEEL OF THE CAM. This point is 180 degrees from the toe. (highest lift point) How you arrive at this point doesn't matter. A safe tolerance on this point is plus or minus 5 degrees. Contrary to popular belief, the heel of the cam, (concentric part opposite the toe) can be very narrow, radially, on a performance grind leading to inaccurate adjustment with some adjustment sequences. A very simple and easy method to remember is, start at number 1 and go right down the line NUMERICALLY. That means exhaust on one then intake on one, then do 2 and so on. Rotate the engine so number one exhaust is open all the way. Make a chalk mark at a point on the front pulley. Rotate the crank 1 turn back to the mark. This will put the cam on the heel where you adjust the clearance on that valve. MARK THAT LIFTER BOSS WITH CHALK. RUB THE CHALK MARK OFF THE FRONT PULLEY. Repeat this sequence on the next valve. As a side note, it is a good idea to check the heel runout on any cam before installing. Even the big names screw up quite often. |
|
|
|
|
05-07-2018, 07:04 PM
|
#15 | |
|
Senior Member

Join Date: Aug 2012
Location: Perth, Western Australia
Posts: 2,687
|
Quote:
I'm with you Pete, I'm doing it this way and not using adjustable lifters..
__________________
"Came too close to dying to stop living now!" |
|
|
|
|
|
05-08-2018, 09:07 AM
|
#16 | |
|
Senior Member

Join Date: Jul 2015
Location: Huntington Beach, CA
Posts: 284
|
Quote:
|
|
|
|
|
|
05-08-2018, 01:38 PM
|
#17 |
|
Senior Member

Join Date: Jun 2010
Location: San Antonio, Texas
Posts: 16,422
|
The old Ford info was simple but I don't know if the valves are centered on the heel or not. They may be close enough but I have no idea.
Valves Open /////////////// Adjust 4EX & 1IN---------3EX, 8IN. 6IN, 7EX, 3IN, & 2EX 3EX & 4IN---------1EX, 7IN, 5EX, 2IN, 4EX, & 1IN 1EX & 7IN---------8EX, 5IN, 6EX, & 4IN |
|
|
|
|
05-08-2018, 02:58 PM
|
#18 |
|
Senior Member

Join Date: May 2010
Location: Solihull, England.
Posts: 8,745
|
^ That's the method I use above.
I might try something different next time if the heel can't be guaranteed at any point. Mart. |
|
|
|
|
05-08-2018, 05:15 PM
|
#19 | |
|
Member Emeritus

Join Date: Nov 2012
Location: Wichita KS
Posts: 16,132
|
Quote:
|
|
|
|
|
|
«
Previous Thread
|
Next Thread
»
 Linear Mode

|
|

| Sponsored Links (Register now to hide all advertisements) |
|
|
All times are GMT -5. The time now is 12:25 PM.