I have always been impressed by others on this site who let us into their world of all things Ford by posting their work in the form of words, diagrams, and photos. The craftsmanship and attention to detail is simply amazing. For the past several years, all that I have been able to do is work on sub-assemblies - carburetors, transmissions, engines, etc. Now I have delved into the realm where only the talented and dedicated dwell - an all out assault on your vehicle, by yourself, to do the mechanical, the body work, the paint, etc. At one time I had visions of grandeur on this scale when I put a 55 Sunliner project in the garage. The need for the family budget finally overwhelmed the whole idea, and alas - it was sold piece by piece. The sum total of its parts was definitely worth much more than its package value, but the old gal helped many a man complete his own Sunliner project in places around the globe. Well, all the while a 55 Fairlane sat idly by waiting her turn for attention. Some of you may remember that several years ago this car received a rebuilt 292 that really screamed even though an original Fordomatic was weighing her down and robbing her horsepower.
Here is the plan... to put her back on the road again with the following changes and facelifts:
1. Remove the 292 and check her out on the portable engine run stand.
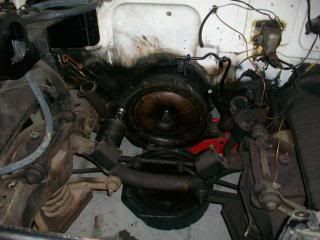
2. Remove the original Fordomatic and lose it in the garage somewhere.
3. Prep and install an original 3 speed/overdrive manual transmission and all associated parts including the column shift.
4. Remove the worn out 55 steering gear and wheel so that I can prep and install a 1956 Steering gear, column, wheel, etc.
5. Remove the entire front end sheet metal to begin the prep for paint. The firewall will come first. Paint with the existing color scheme, SS Urethane red over white. (anyone ever use Summit's paints?)
6. Consider A/C to the mix - the wife is requesting it.

7. Finish the interior - the dash and sheet metal garnish are all painted and ready to back into the car. The headliner is 90% installed. Need to remove the rear glass first.
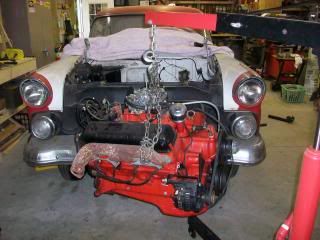
That's enough for now. If you are wondering how I removed the hood by myself, first of all you can see the large blanket there on the cowl. I basically put that all the way across until it bunches up against the rear edge of the hood. Then I put the my engine hoist boom up against the front of the hood near the latch. I unscrew all 6 bolts where the hinges attach the hood to the car and then lower the boom up front. Voila! No scratches and the hood is free. I can then pick up the hood from the front, grabbing both sides and then set it aside. (don't worry, I will have help when I reinstall!
Anyhow, this is what I accomplished this afternoon - the 292 has been removed and has been placed on a run stand. I am going to wire it all up, change the fluids, finish the accessory list, and hopefully fire it up tomorrow. You can see the starter hanging out loose in the Fordomatic. I just unbolted it and left it there before I removed the engine... why frustrate yourself?