|
|||||||


| Sponsored Links (Register now to hide all advertisements) |
|
|
 |

|
Thread Tools | Display Modes |
 10-26-2015, 08:45 PM
|
#1 |
|
Senior Member

Join Date: Oct 2010
Location: Orem, Utah
Posts: 5,762
|
I have been chasing an intermittent stumbling of my engine when under load and have replaced or checked out all ignition components and am now to the coil. I got this diagram from some authoritative source and have always suggested it to others. Primary coil is in the range of the diagram. But when I just checked the resistance of my secondary coil in my stock 47 Ford coil that Skip Haney rebuilt I only get 6,130 ohms, not the 10-11,000 ohms per the diagram. Is that low enough to affect the spark or not? Is the coil bad and needs replaced or just marginal?
__________________
Prof. Henry (The Roaming Gnome)  "It is good to have an end to journey toward; but it is the journey that matters, in the end. *Ursula K. Le Guin in The Left Hand of Darkness |

|

|
|
10-26-2015, 09:26 PM
|
#2 |
|
Senior Member

Join Date: May 2010
Location: Lake Elsinore, CA.
Posts: 413
|
Call Skip.
|
|
|
|
| Sponsored Links (Register now to hide all advertisements) |
|
|
|
10-26-2015, 09:59 PM
|
#3 | |
|
Senior Member
Join Date: May 2010
Location: Florida and Penna.
Posts: 4,471
|
Quote:
__________________
www.fordcollector.com |
|
|
|
|

|
10-26-2015, 11:03 PM
|
#4 |
|
Senior Member

Join Date: May 2010
Location: Qld, Australia
Posts: 4,212
|
Henry, I chased a miss or skip as you call it on the 33 for ages,turned out to be two loose valve guides and those two let oil into the cyl and fouled the plugs ,ran like a train while burning along at 50mph but slow and speed up and the miss was there.
Lawrie |
|
|
|
|
10-26-2015, 11:18 PM
|
#5 |
|
Senior Member
Join Date: Oct 2010
Location: Orem, Utah
Posts: 5,762
|
So far I've replaced all of the spark plugs, the points, condenser, rotor, and coil resistor. All I can think of that's left is the coil so I'll call Skip tomorrow and see what he thinks. I'll also PM Bubbas Ignition since he hasn't commented to see what he thinks of the low resistance secondary coil.
__________________
Prof. Henry (The Roaming Gnome) "It is good to have an end to journey toward; but it is the journey that matters, in the end. *Ursula K. Le Guin in The Left Hand of Darkness |
|
|
|
|
10-27-2015, 06:13 AM
|
#6 |
|
Senior Member

Join Date: May 2010
Posts: 4,743
|
Sponsored Links (Register now to hide all advertisements)
|
|
|
|
|
10-27-2015, 09:00 AM
|
#7 | |
|
Senior Member
Join Date: Oct 2010
Location: Orem, Utah
Posts: 5,762
|
Quote:
__________________
Prof. Henry (The Roaming Gnome) "It is good to have an end to journey toward; but it is the journey that matters, in the end. *Ursula K. Le Guin in The Left Hand of Darkness |
|
|
|
|
|
10-27-2015, 09:08 AM
|
#8 | |
|
Senior Member

Join Date: Jan 2011
Location: Central Ohio
Posts: 5,062
|
Quote:
|
|
|
|
|
|
10-27-2015, 11:22 AM
|
#9 |
|
Senior Member

Join Date: May 2010
Location: Millersport, central ohio
Posts: 668
|
Henry, Is this the same problem that you said leaving the hood open a bit while moving helped some?
|
|
|
|
|
10-27-2015, 11:54 AM
|
#10 | |
|
Senior Member
Join Date: Oct 2010
Location: Orem, Utah
Posts: 5,762
|
Quote:
Right now I'm driving with my timing light taped to the cowl so I can see its flashes through the windshield while I drive. The pickup is on the high tension wire coming out of the coil. I mainly did this to confirm that it is a spark problem, not a fuel problem. Sure enough, when the engine stumbles so does the light flashes. 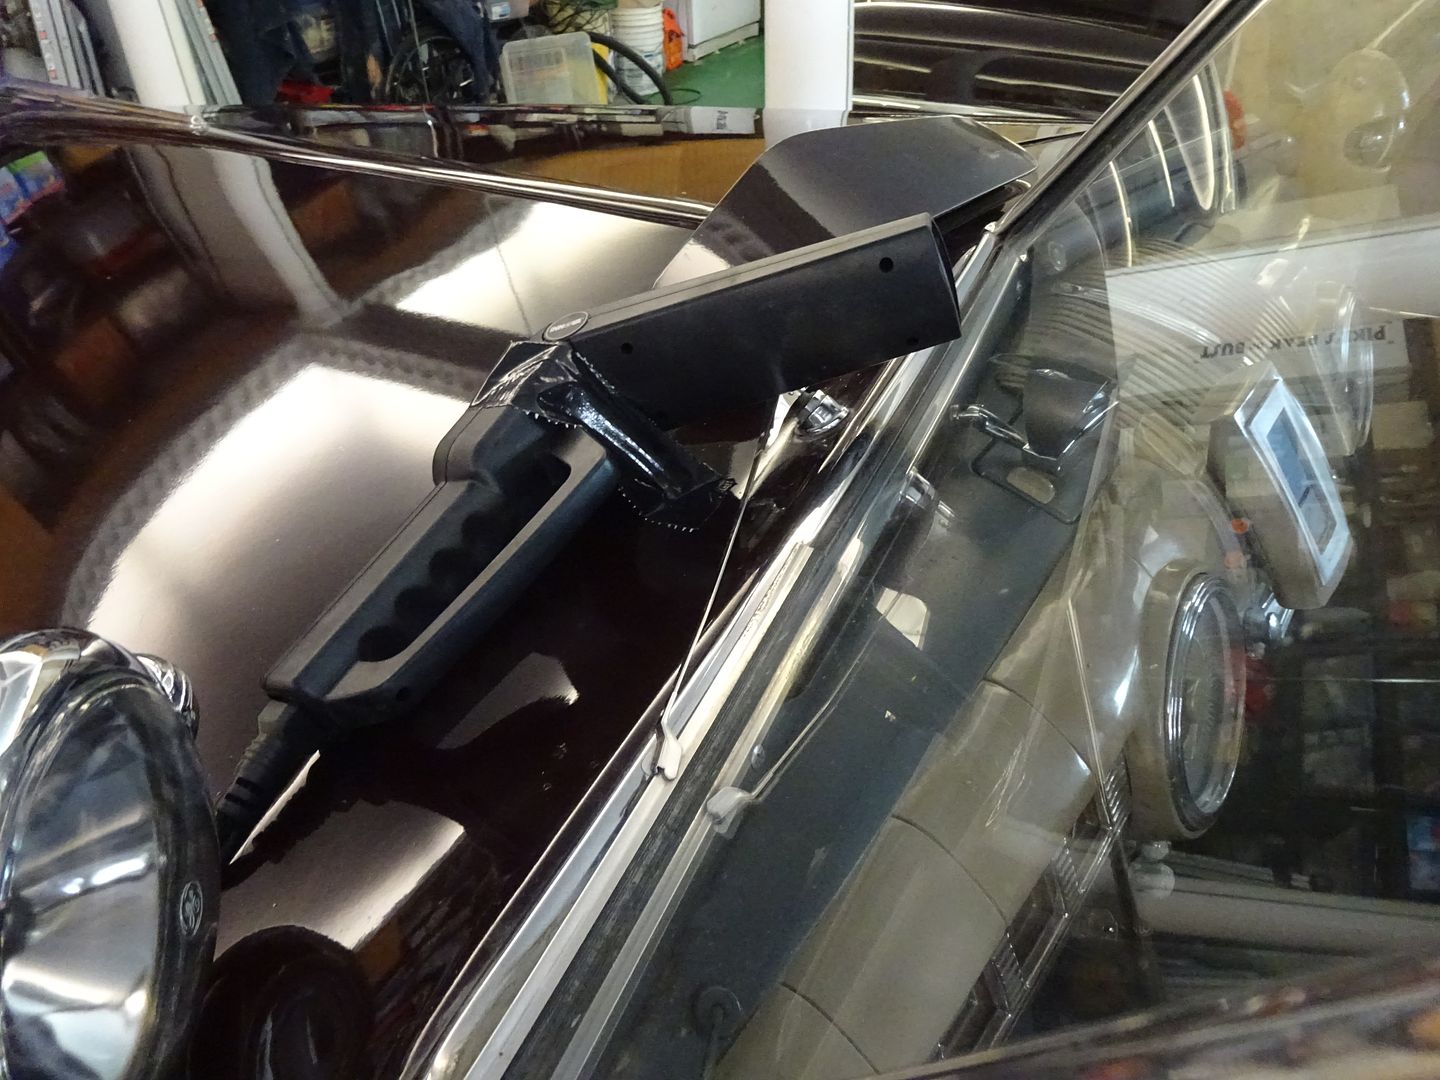
__________________
Prof. Henry (The Roaming Gnome) "It is good to have an end to journey toward; but it is the journey that matters, in the end. *Ursula K. Le Guin in The Left Hand of Darkness Last edited by Old Henry; 10-27-2015 at 12:03 PM. |
|
|
|
|
|
10-27-2015, 11:56 AM
|
#11 | |
|
Senior Member
Join Date: Apr 2015
Location: Sweden
Posts: 3,045
|
Quote:
To be able to calculate output voltage you need the turns ration of the coil. |
|
|
|
|
|
10-27-2015, 12:32 PM
|
#12 |
|
Member Emeritus

Join Date: Nov 2012
Location: Wichita KS
Posts: 16,132
|
Sounds like a loose wire or connection unless it is heat related. Or a vacuum / carb issue on the advance. Are you running the original vacuum only advance distributor?
|
|
|
|
|
10-27-2015, 12:36 PM
|
#13 | |
|
Senior Member
Join Date: Oct 2010
Location: Orem, Utah
Posts: 5,762
|
Quote:
It certainly acts like a loose wire so I bypassed all wiring from the battery to the coil with a jumper from the battery to the coil. Didn't help.
__________________
Prof. Henry (The Roaming Gnome) "It is good to have an end to journey toward; but it is the journey that matters, in the end. *Ursula K. Le Guin in The Left Hand of Darkness |
|
|
|
|
|
10-27-2015, 02:02 PM
|
#14 |
|
Senior Member

Join Date: May 2010
Location: Auckland
Posts: 4,700
 |
Check the spring loaded contact in the distributor if its a crab ,Ted
|
|
|
|
|
10-27-2015, 02:11 PM
|
#15 | |
|
Senior Member

Join Date: Apr 2011
Location: Oregon
Posts: 220
|
Quote:
Any '47 distributor (rabbit ears or crab) can have that problem. |
|
|
|
|
|
10-27-2015, 02:19 PM
|
#16 | ||
|
Senior Member
Join Date: Oct 2010
Location: Orem, Utah
Posts: 5,762
|
Quote:
Quote:
__________________
Prof. Henry (The Roaming Gnome) "It is good to have an end to journey toward; but it is the journey that matters, in the end. *Ursula K. Le Guin in The Left Hand of Darkness Last edited by Old Henry; 10-27-2015 at 06:53 PM. |
||
|
|
|
|
10-27-2015, 02:25 PM
|
#17 |
|
Senior Member
Join Date: Oct 2010
Location: Orem, Utah
Posts: 5,762
|
I think I figured out what you're talking about - the terminal that the wire from the coil connects to that has a spring loaded post that pushes against the points plate? If so, I can take that out and check it. I just removed that plate to replace my points and twisted the plate against that post to position it so hopefully it's OK. Distributor was built by Bubba a year or two ago.
__________________
Prof. Henry (The Roaming Gnome) "It is good to have an end to journey toward; but it is the journey that matters, in the end. *Ursula K. Le Guin in The Left Hand of Darkness Last edited by Old Henry; 02-28-2016 at 11:46 PM. |
|
|
|
|
10-27-2015, 03:07 PM
|
#18 |
|
Senior Member
Join Date: Apr 2011
Location: Oregon
Posts: 220
|
Yes, it is the post for the coil wire.
The only reason I found the problem is that it finally quit totally and I found it was open circuit between the coil wire screw and the inside brass plate. Unscrew the post and then polish the end of the spring loaded pin with emery cloth. You can probably clean up the brass plate with emery cloth too without taking the distributor apart again. My distributor was serviced by Bubba too and he cleans and checks that connection. But for some reason it still failed. See more (and Jim L.'s response) at: https://www.fordbarn.com/forum/showth...52#post1152852 |
|
|
|
|
10-27-2015, 03:11 PM
|
#19 |
|
Senior Member
Join Date: Apr 2011
Location: Oregon
Posts: 220
|
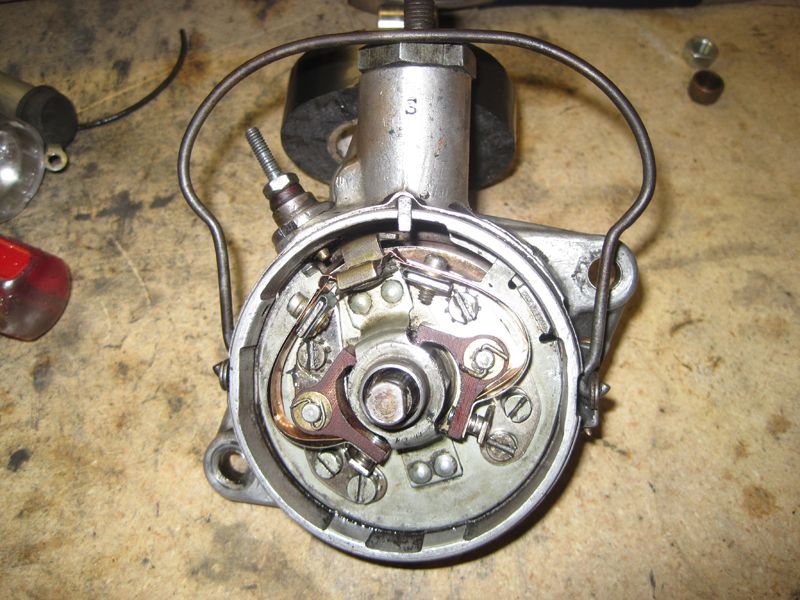
Looking at your distributor photo again, it looks like that pin is way off to one side and hardly making contact. Perhaps the photo is of a different distributor?
|
|
|
|
|
10-27-2015, 03:16 PM
|
#20 | |
|
Senior Member
Join Date: Oct 2010
Location: Orem, Utah
Posts: 5,762
|
Quote:
__________________
Prof. Henry (The Roaming Gnome) "It is good to have an end to journey toward; but it is the journey that matters, in the end. *Ursula K. Le Guin in The Left Hand of Darkness |
|
|
|
|
|
10-27-2015, 03:18 PM
|
#21 |
|
Senior Member

Join Date: May 2010
Location: East Shore of LAKE HOUSTON
Posts: 11,106
|
Way off.......good eye! DD

|
|
|
|
|
10-27-2015, 03:23 PM
|
#22 |
|
Senior Member
Join Date: May 2010
Location: Millersport, central ohio
Posts: 668
|
Kinda "smells" like a defective condensor(capacitor)at least if it were on my 35 distributor.
|
|
|
|
| Sponsored Links (Register now to hide all advertisements) |
|
|
|
10-27-2015, 03:25 PM
|
#23 |
|
Senior Member
Join Date: May 2010
Location: Qld, Australia
Posts: 4,212
|
I can see a problem in the bottom pic,the split pin on the left points looks like its touching the copper strip on points.
Lawrie |
|
|
|
|
10-27-2015, 03:29 PM
|
#24 | |
|
Senior Member
Join Date: Oct 2010
Location: Orem, Utah
Posts: 5,762
|
Quote:
__________________
Prof. Henry (The Roaming Gnome) "It is good to have an end to journey toward; but it is the journey that matters, in the end. *Ursula K. Le Guin in The Left Hand of Darkness |
|
|
|
|
|
10-27-2015, 03:35 PM
|
#25 |
|
Senior Member
Join Date: May 2010
Location: Millersport, central ohio
Posts: 668
|
Good eyes Laurie, it even looks like some discoloration, maybe from a short there.
|
|
|
|
|
10-27-2015, 03:43 PM
|
#26 | |
|
Senior Member
Join Date: Oct 2010
Location: Orem, Utah
Posts: 5,762
|
Sponsored Links (Register now to hide all advertisements)
Quote:
__________________
Prof. Henry (The Roaming Gnome) "It is good to have an end to journey toward; but it is the journey that matters, in the end. *Ursula K. Le Guin in The Left Hand of Darkness |
|
|
|
|
|
10-27-2015, 03:53 PM
|
#27 |
|
Senior Member
Join Date: Jan 2011
Location: Central Ohio
Posts: 5,062
|
If this is your actual distributor, then check the following . . .
Here is the area that Lawrie mentioned - the cotter pin looks loose and could intermittently be grounding out the points - which would cause this sort of issue: 21A-Dist.jpg |
|
|
|
|
10-27-2015, 04:02 PM
|
#28 | |
|
Senior Member
Join Date: Oct 2010
Location: Orem, Utah
Posts: 5,762
|
Quote:
That is 47COE's distributor that somehow got from the post he referenced back in September to this post. It's not my distributor although it looks more like the one I'm currently using than the picture I posted that I previously explained. So, there is no picture in this thread of the distributor I'm currently using in its current condition.
__________________
Prof. Henry (The Roaming Gnome) "It is good to have an end to journey toward; but it is the journey that matters, in the end. *Ursula K. Le Guin in The Left Hand of Darkness Last edited by Old Henry; 10-27-2015 at 04:11 PM. |
|
|
|
|
|
10-27-2015, 04:03 PM
|
#29 |
|
Senior Member
Join Date: May 2010
Location: Auckland
Posts: 4,700
|
Henry ,I have at leased on one occasion drilled a hole beside it and ran a wire by passing it ,or pull it out and rubber grommet the hole with a fresh wire ,its the internal spring were you can get problems also .Ted
|
|
|
|
|
10-27-2015, 04:07 PM
|
#30 |
|
Senior Member
Join Date: May 2010
Location: Auckland
Posts: 4,700
|
Lawry's catch is definitely a potential problem ,Ted
|
|
|
|
|
10-27-2015, 04:11 PM
|
#31 |
|
Senior Member
Join Date: Oct 2010
Location: Orem, Utah
Posts: 5,762
|
Please, people.
What Lawrie saw was a picture of 47COE's distributor in his post back in September, not my distributor. I don't believe that the cotter pin position is causing him any problems as I expect he's been driving his truck for almost two months since then without a problem. My cotter pin does not hang over the fiber lever as in that picture.
__________________
Prof. Henry (The Roaming Gnome) "It is good to have an end to journey toward; but it is the journey that matters, in the end. *Ursula K. Le Guin in The Left Hand of Darkness |
|
|
|
|
10-27-2015, 04:28 PM
|
#32 |
|
Senior Member
Join Date: May 2010
Posts: 468
|
Before you go crazy, try another coil. Beg or borrow one if you don't have a spare (spare coils and condensers should be part of your tool kit). The remote mounted coil like you have could not be easier to change. I have seen this problem before.
Just an opinion |
|
|
|
|
10-27-2015, 04:39 PM
|
#33 | |
|
Senior Member
Join Date: Oct 2010
Location: Orem, Utah
Posts: 5,762
|
Quote:
__________________
Prof. Henry (The Roaming Gnome) "It is good to have an end to journey toward; but it is the journey that matters, in the end. *Ursula K. Le Guin in The Left Hand of Darkness |
|
|
|
|
|
10-27-2015, 06:50 PM
|
#34 |
|
Senior Member
Join Date: Jan 2011
Location: Central Ohio
Posts: 5,062
|
Another idea hit me - how about the grounding of the engine to the frame? Do you have a dedicated ground strap from a head bolt to the firewall (or something similar in your year car)? If there was an intermittent or dirty ground, these types of problems can occur - especially with rust over the years.
|
|
|
|
|
10-27-2015, 06:55 PM
|
#35 | |
|
Senior Member
Join Date: Oct 2010
Location: Orem, Utah
Posts: 5,762
|
Quote:
__________________
Prof. Henry (The Roaming Gnome) "It is good to have an end to journey toward; but it is the journey that matters, in the end. *Ursula K. Le Guin in The Left Hand of Darkness |
|
|
|
|
|
10-27-2015, 07:09 PM
|
#36 |
|
Member Emeritus
Join Date: Nov 2012
Location: Wichita KS
Posts: 16,132
|
You have the engine grounded to the firewall, might try a ground from the engine to the frame directly, the closer to the battery the better. The best would be the same connection the battery is grounded to. Might at least try a temporary ground connection to eliminate that possibly. If it is starting ok that is most likely not the issue, but it is intermittent, so who knows!
|
|
|
|
|
10-27-2015, 07:42 PM
|
#37 |
|
Senior Member
Join Date: Sep 2010
Posts: 349
|
it seems its not your coil but.over the years ive seen many bad coils that ohm out just fine.make sure your plug wires r plugged in the cap real good they can b tricky.hope u find it.
|
|
|
|
|
10-27-2015, 08:08 PM
|
#38 |
|
Senior Member

Join Date: Aug 2010
Location: Blenheim, New Zealand
Posts: 877
 |
Just a thought, have you checked you ignition switch for resistance or worn contacts. I have heard of this dropping the low tension voltage to the coil and causing missing problems.
__________________
I need an 01A 1453 Brkt Spare wheel hold down for my sedan delivery - PLEASE HELP  Gotta love my '42 Sedan Delivery's - Now that I own the only two in New Zealand  https://www.fordbarn.com/forum/album.php?albumid=580 |
|
|
|
|
10-27-2015, 08:08 PM
|
#39 |
|
Senior Member

Join Date: May 2010
Location: Mid coast Maine
Posts: 1,878
|
You could use a 6 volt coil from and Chevy ply buick any 6 volt coil to test that problem.
Any 6 volt coil doesn't need a resister. only ford used them. You could see if you can pull off the end of dist wire maybe held only a few strands, jump direct to coil from battery. check see if you have a loose shaft in dist, and good air gap of .015 |
|
|
|
|
10-27-2015, 08:52 PM
|
#40 |
|
Senior Member
Join Date: Oct 2010
Location: Orem, Utah
Posts: 5,762
|
I found something tonight that could certainly be my problem.
I took a drive moving my timing light pickup between each sparkplug wire (heretofore it was on the coil output wire). The timing light was firing way more than it should have on the first two wires. As I was moving the pickup from the 2nd to 3rd wire with the engine running I got shocked! I thought, "I shouldn't have got shocked. I didn't touch the spark plug." I finished my drive checking the rest of the plugs that all fired way more than they should have and erratically. So, I had the idea that just maybe it was the spark plug wires. They're fairly new but I put a lot of miles on everything very fast and things wear out. When I got home and pulled into the garage I left the engine running with the hood up and turned off all of the lights. Sure enough, there were little just barely visible sparks jumping from each plug to the block and from each wire to the conduit where they exited. It all makes sense to me now. All symptoms now seem consistent with leaking spark plug wires. I'll have a set flown to me tomorrow to put on and bet good money that will fix my problem. Let's all keep our fingers crossed.
__________________
Prof. Henry (The Roaming Gnome) "It is good to have an end to journey toward; but it is the journey that matters, in the end. *Ursula K. Le Guin in The Left Hand of Darkness Last edited by Old Henry; 02-28-2016 at 11:53 PM. |
|
|
|
|
10-27-2015, 10:00 PM
|
#41 |
|
Senior Member

Join Date: May 2010
Location: Oshkosh, Wi
Posts: 4,526
|
Sounds like you've hit the solution.
|
|
|
|
|
10-28-2015, 02:03 AM
|
#42 |
|
Senior Member
Join Date: May 2010
Location: Qld, Australia
Posts: 4,212
|
Henry.I got a couple of GOOD shocks from my snap on timing light ,if the pickup slips down on the spark plug wire and touches the top of the plug were the wire goes on,man you get a big shock,
Lawrie |
|
|
|
| Sponsored Links (Register now to hide all advertisements) |
|
|
|
10-28-2015, 08:26 AM
|
#43 | |
|
Senior Member

Join Date: May 2010
Location: SPEEDWAY INDIANA
Posts: 4,148
|
Quote:

|
|
|
|
|
|
10-28-2015, 08:32 AM
|
#44 |
|
Senior Member
Join Date: May 2010
Location: SPEEDWAY INDIANA
Posts: 4,148
|
Henry , WD40 will help insulate those wires , might try it before replacement. Just spray them down and wipe off the excess......
Worth a try..... Jim |
|
|
|
|
10-28-2015, 08:40 AM
|
#45 |
|
Senior Member
Join Date: Jan 2011
Location: Central Ohio
Posts: 5,062
|
Good news - have had that issue before . . . forgot all about it!
|
|
|
|
|
10-28-2015, 08:55 AM
|
#46 | |
|
Senior Member
Join Date: Oct 2010
Location: Orem, Utah
Posts: 5,762
|
Sponsored Links (Register now to hide all advertisements)
Quote:
__________________
Prof. Henry (The Roaming Gnome) "It is good to have an end to journey toward; but it is the journey that matters, in the end. *Ursula K. Le Guin in The Left Hand of Darkness |
|
|
|
|
|
10-28-2015, 09:08 AM
|
#47 | |
|
Senior Member
Join Date: Apr 2011
Location: Oregon
Posts: 220
|
Quote:
Once upon a time I knew a guy with a Lotus Europa that wouldn't start in wet weather. He fixed it by cleaning the wires and then coating them with corona dope such as: http://www.alliedelec.com/gc-electro...4702/70159781/ Unfortunately in this case, the wires could still be arcing inside the conduits or outer distributor cap. But I'm a believer in trying the easy option first. It might be all you need. Tom |
|
|
|
|
|
10-28-2015, 12:53 PM
|
#48 |
|
Senior Member
Join Date: Oct 2010
Location: Orem, Utah
Posts: 5,762
|
I sprayed the wires down with WD40 before starting this morning. When I started up and pulled out of the garage and down the street the timing light was exactly right and engine running smooth. Unfortunately, that only lasted for a minute before all returned to bad. So, unfortunately, WD40 wasn't even a short term solution.
My recollection of the WD40 trick is when water is a problem, not so much on the wires as the distributor cap. The WD40 displaces the water and eliminates it as a path for spark to short cut. Water wasn't my problem so the WD40 didn't help. Even if it did, as 47COE said, there is still a lot of wire in the conduit that I couldn't spray and could be leaking to that thing. I just ordered the wires to replace them. Gonna have to put on my favorite music to keep me calm during the ordeal of replacing them.  But, if it fixes the problem, it will be well worth the effort. But, if it fixes the problem, it will be well worth the effort.
__________________
Prof. Henry (The Roaming Gnome) "It is good to have an end to journey toward; but it is the journey that matters, in the end. *Ursula K. Le Guin in The Left Hand of Darkness |
|
|
|
|
10-28-2015, 01:50 PM
|
#49 | |
|
Senior Member

Join Date: May 2010
Location: Lithia, FL
Posts: 1,050
|
Quote:
__________________
If it aint broke, don't fix it! Last edited by Steves46; 10-28-2015 at 02:03 PM. |
|
|
|
|
|
10-28-2015, 02:04 PM
|
#50 | |
|
Senior Member
Join Date: Oct 2010
Location: Orem, Utah
Posts: 5,762
|
Quote:
Fortunately, the suffering is only for and hour or two. Then I get to enjoy the authenticity for at least a year or two. I figure I'm no worse off than those that drove this car in the 40's and 50's every time I experience an "authentic" mechanical problem.
__________________
Prof. Henry (The Roaming Gnome) "It is good to have an end to journey toward; but it is the journey that matters, in the end. *Ursula K. Le Guin in The Left Hand of Darkness |
|
|
|
|
|
10-28-2015, 02:35 PM
|
#51 |
|
Senior Member
Join Date: May 2010
Location: Lithia, FL
Posts: 1,050
|
Hang in there and hope the new wire set will resolve the problem. I know you are looking forward to your road trip and we are looking forward to reading about it with some photos.
__________________
If it aint broke, don't fix it! |
|
|
|
|
10-28-2015, 07:06 PM
|
#52 |
|
Senior Member
Join Date: May 2010
Location: Auckland
Posts: 4,700
|
At night I think you will get color (static ) of the wires even new ones .Ted
|
|
|
|
|
10-28-2015, 11:41 PM
|
#53 | |
|
Senior Member
Join Date: Oct 2010
Location: Orem, Utah
Posts: 5,762
|
Quote:
__________________
Prof. Henry (The Roaming Gnome) "It is good to have an end to journey toward; but it is the journey that matters, in the end. *Ursula K. Le Guin in The Left Hand of Darkness |
|
|
|
|
|
10-29-2015, 11:17 AM
|
#54 | |
|
Senior Member
Join Date: Apr 2011
Location: Oregon
Posts: 220
|
Quote:
Besides the clips, the crab cap requires a different rotor with a larger radius: 21A-12200 instead of the usual 59A-12200. |
|
|
|
|
|
10-31-2015, 02:48 PM
|
#55 |
|
Senior Member
Join Date: Oct 2010
Location: Orem, Utah
Posts: 5,762
|
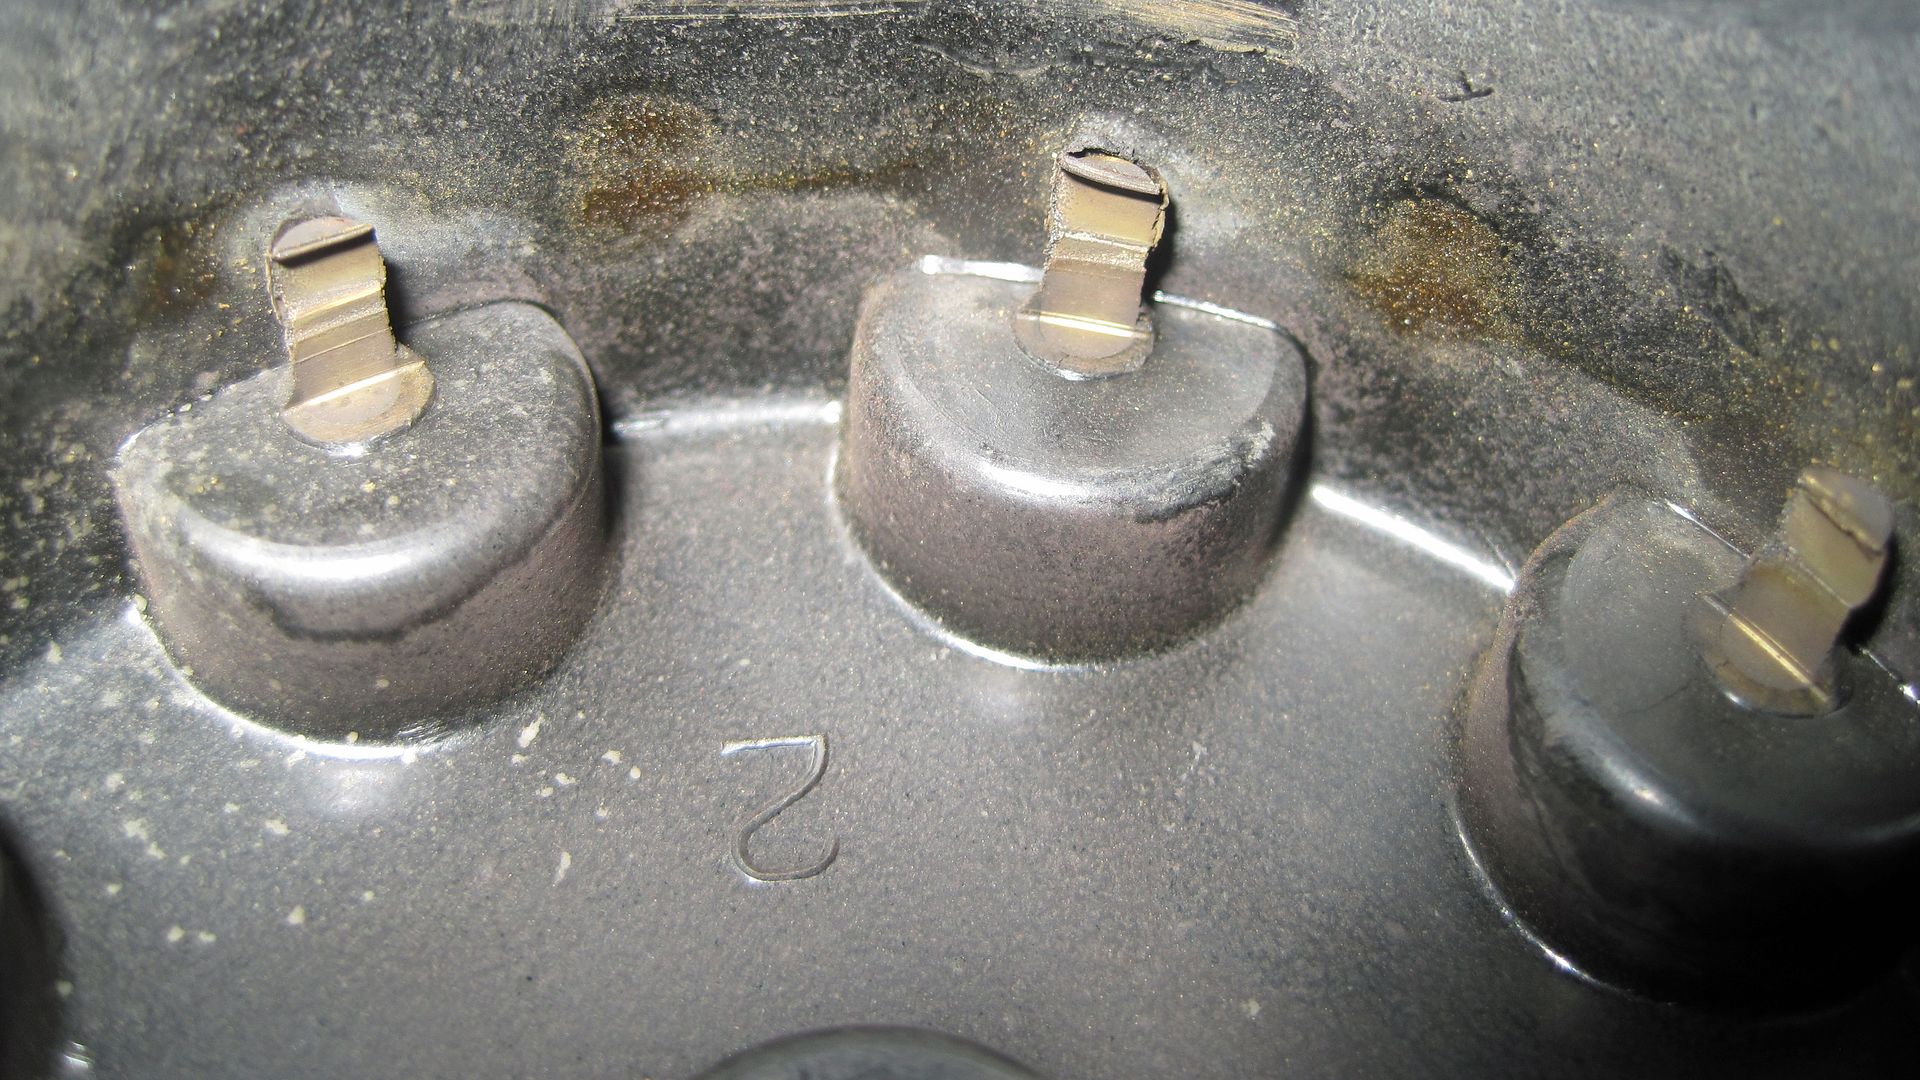
Looks like something's not quite right here. What do you think?
I got the new spark plug wires in and took the old ones off with the inner distributor cap. Here's what the inner distributor cap looks like. 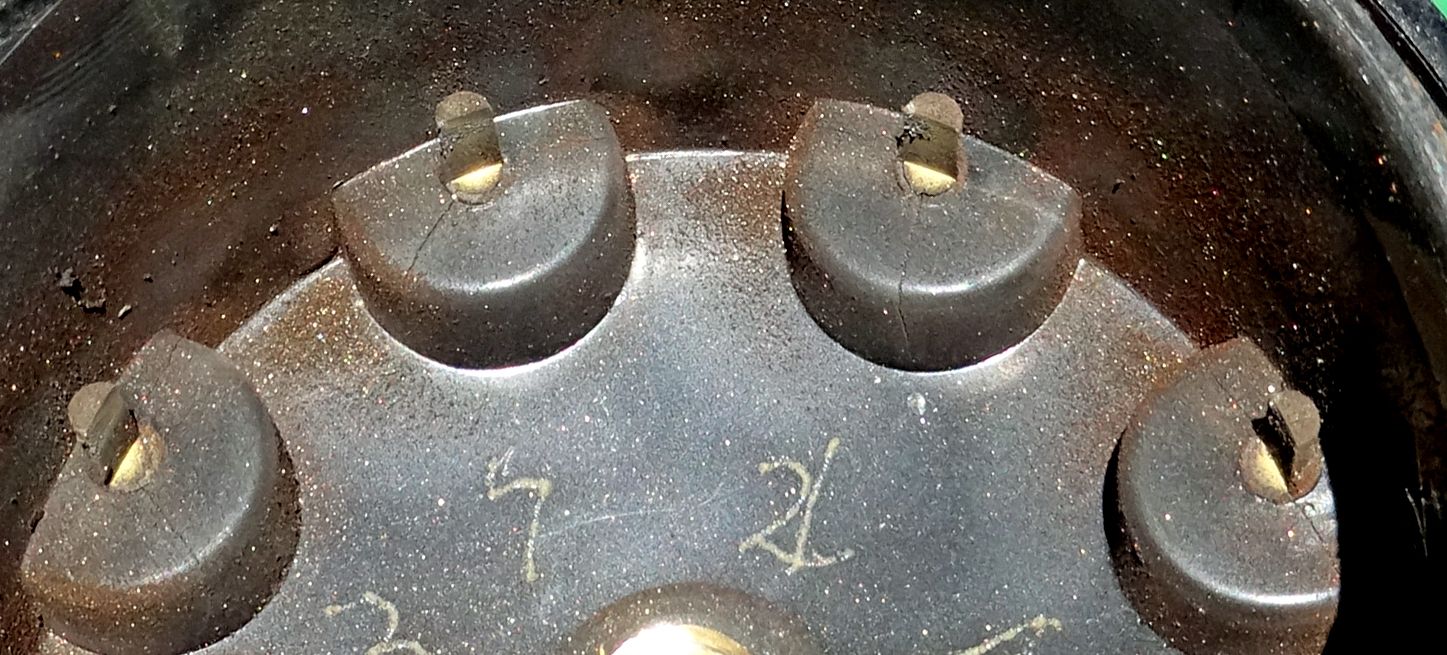 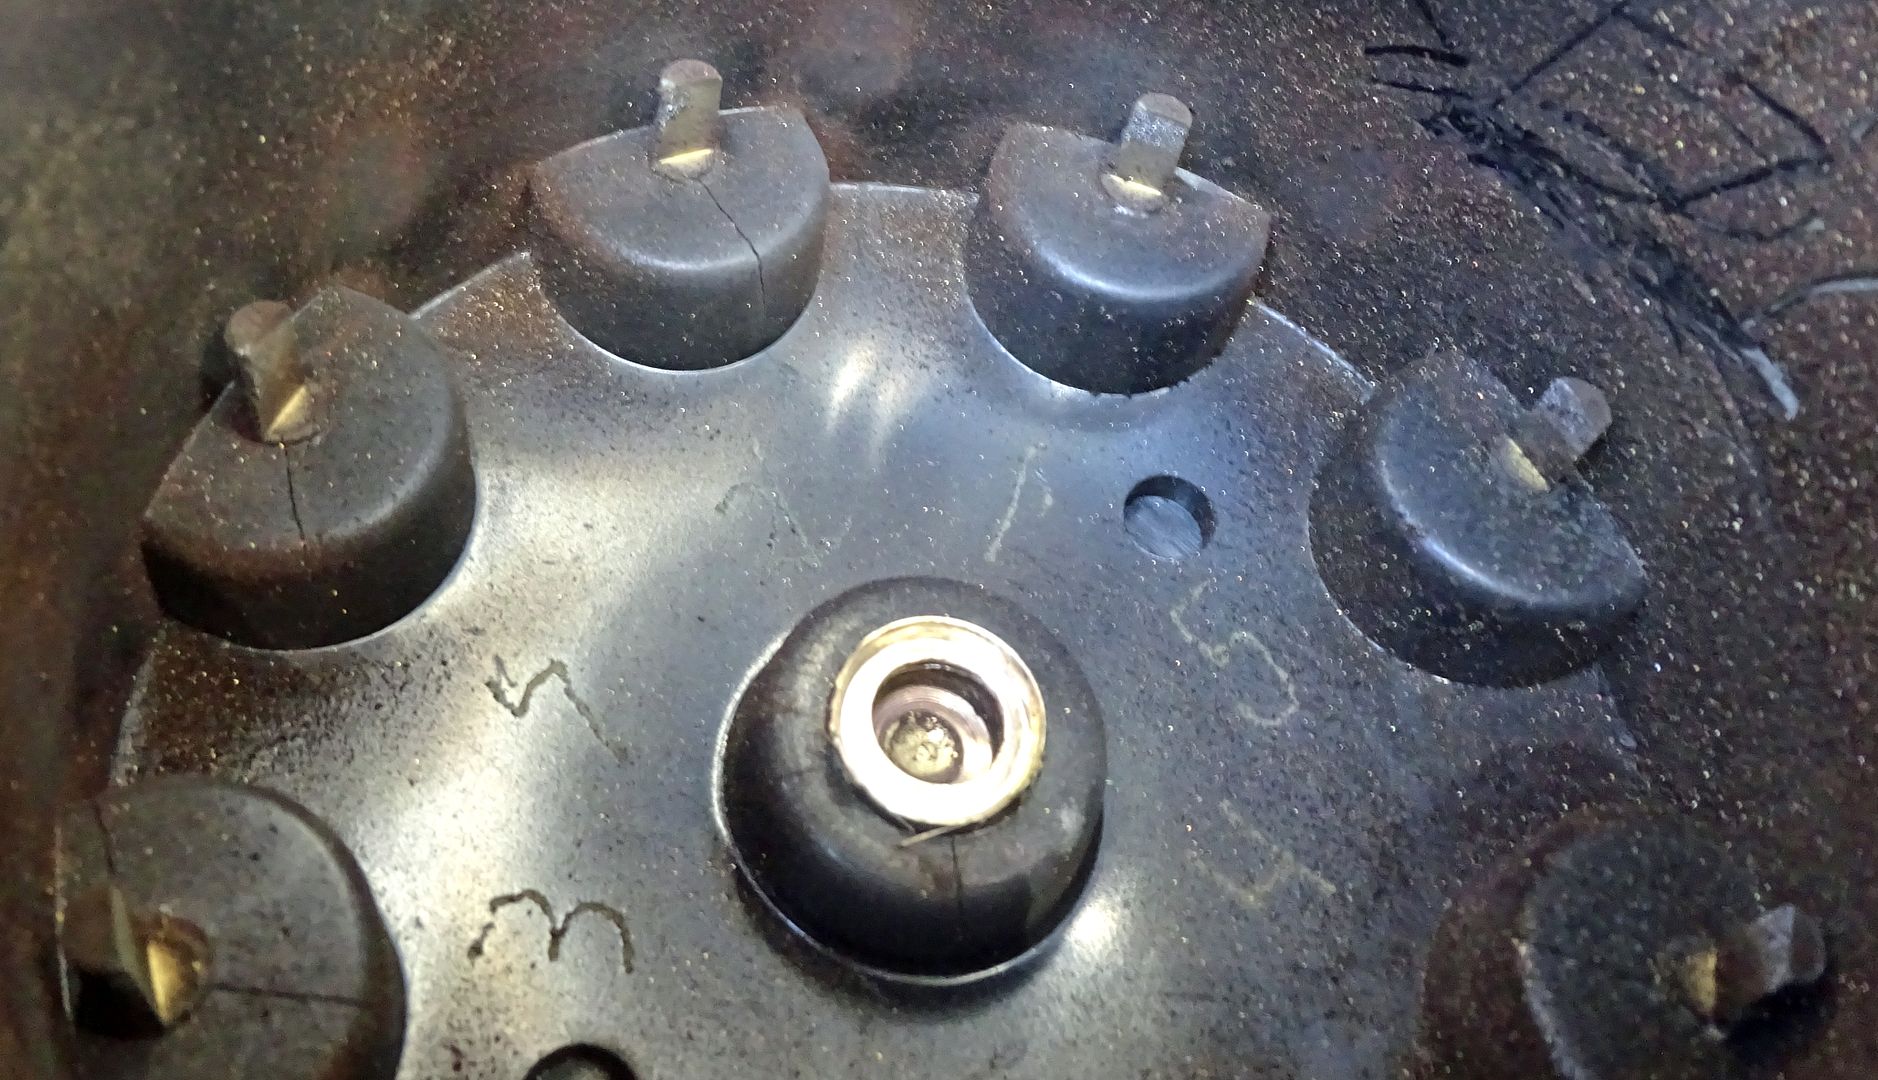 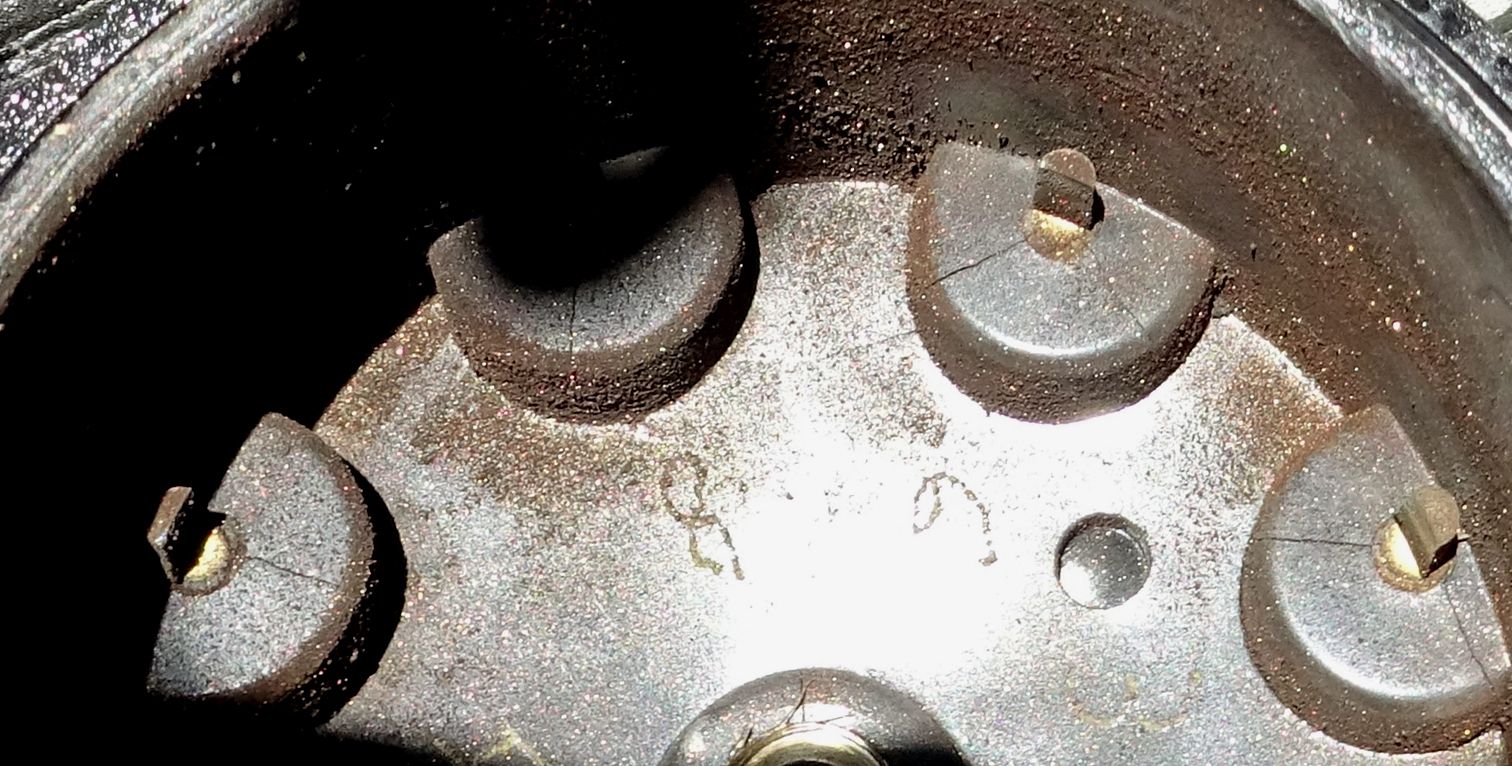 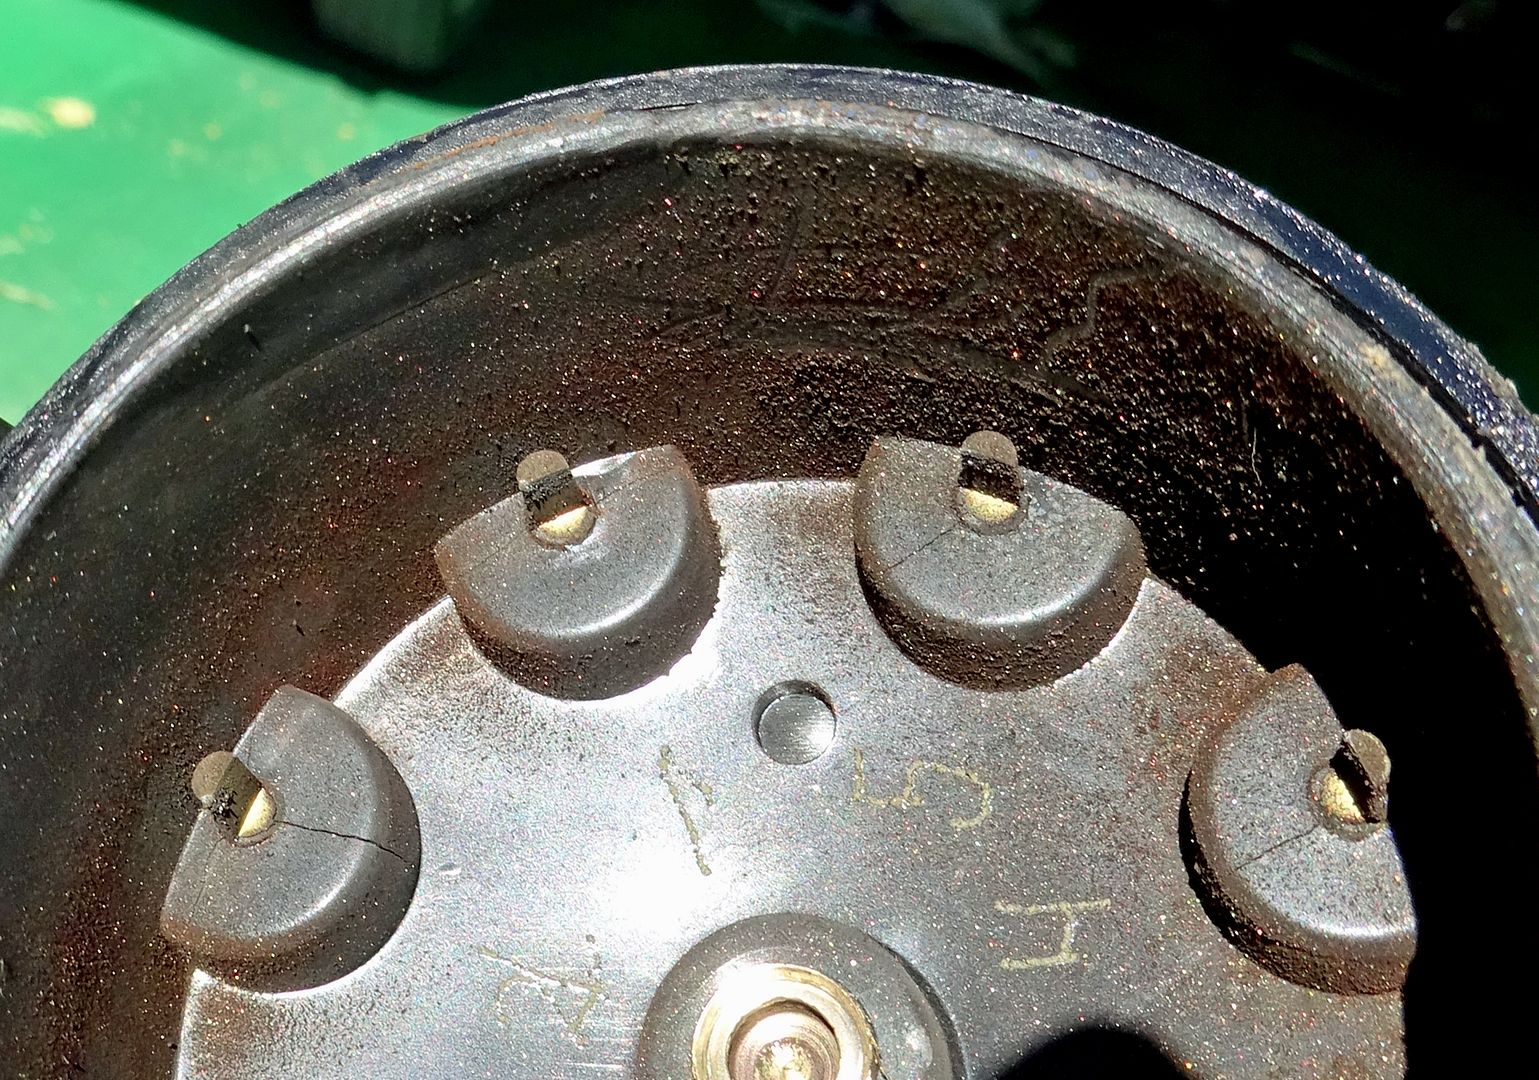 There are all of those metal flakes all over that looks like metal from the distributor posts. And the posts look like they've been worn down by the rotor hitting them. All of those cracks around the posts can't be good either. Here's what the rotor that I just put in looks like: 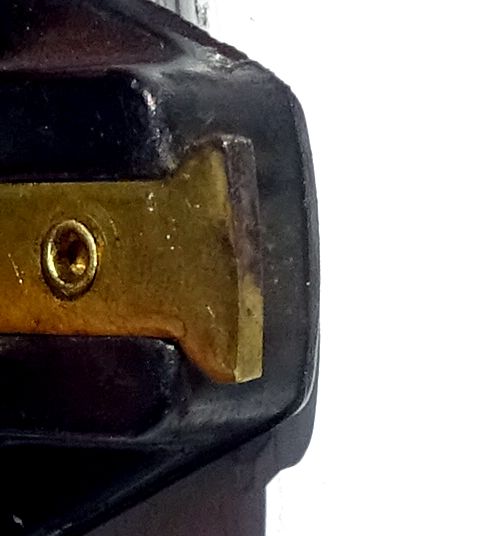 It looks like it has pounded on the distributor posts. So, I checked for play in the distributor shaft and here's what I found: (Video) https://youtu.be/F04Ran7T2MY I've actually had this before, a worn distributor shaft letting the rotor his the cap posts. That's the distributor I traded in for this one from Bubba's. Looks like I need to do it again. What do you think?
__________________
Prof. Henry (The Roaming Gnome) "It is good to have an end to journey toward; but it is the journey that matters, in the end. *Ursula K. Le Guin in The Left Hand of Darkness Last edited by Old Henry; 10-31-2015 at 02:55 PM. |
|
|
|
|
10-31-2015, 03:01 PM
|
#56 |
|
Senior Member
Join Date: Apr 2011
Location: Oregon
Posts: 220
|
It's hard to see from the video. Best would be to pull the distributor and measure the end play. I have a distributor with more than 0.05" of end play vs. another one with less than half that.
I don't know what amount of end play is normal. Tom |
|
|
|
|
10-31-2015, 03:48 PM
|
#57 |
|
Senior Member
Join Date: May 2010
Location: Mid coast Maine
Posts: 1,878
|
I think with 250,000 miles its time for a different dist. and spring for a new cap and rotor.
|
|
|
|
|
10-31-2015, 04:41 PM
|
#58 |
|
Senior Member

Join Date: Dec 2013
Location: Minnesota, Florida Keys
Posts: 10,303
|
After reading all of this, I'm starting to appreciate the "Load-a-matic" on my '51. I hope you can get this solved; it'll be good to know what the actual base problem is.
|

|
|
|
10-31-2015, 09:32 PM
|
#59 |
|
Senior Member
Join Date: Oct 2010
Location: Orem, Utah
Posts: 5,762
|
What a relief! What a blessed relief! - to have Old Henry's heart ticking again just as it should and hasn't for months. It passed the stress EKG with flying colors - no arrhythmia, no tachycardia, no stumbling nor stuttering of any kind. And more power than I've had for months.
The biggest problem I had I didn't notice 'till I got working with that old inner distributor cap some more. See if you can see it. The button that's supposed to be in the middle of it for the rotor blade to run on isn't even there! There was nothing for the rotor blade to run on to get the spark except just sliding over what was left of the base of the button. Add that to all of the other problems with the worn terminals and cracked terminal bases and I think we have the biggest problem there was. I replaced that along with all of the spark plug wires and the engine runs fantastic and powerful in the most harsh acceleration and up the steepest long climb - like it hasn't done for months. Thanks to everyone for all of your help.
__________________
Prof. Henry (The Roaming Gnome) "It is good to have an end to journey toward; but it is the journey that matters, in the end. *Ursula K. Le Guin in The Left Hand of Darkness |
|
|
|
|
10-31-2015, 09:38 PM
|
#60 |
|
Member
Join Date: Nov 2010
Location: NW Wisconsin
Posts: 87
|
Glad you found the problem and Old Henry is ready for another road trip.
|
|
|
|
|
10-31-2015, 09:41 PM
|
#61 | |
|
Senior Member
Join Date: Oct 2010
Location: Orem, Utah
Posts: 5,762
|
Quote:
__________________
Prof. Henry (The Roaming Gnome) "It is good to have an end to journey toward; but it is the journey that matters, in the end. *Ursula K. Le Guin in The Left Hand of Darkness |
|
|
|
|
|
10-31-2015, 09:51 PM
|
#62 |
|
Member Emeritus
Join Date: Nov 2012
Location: Wichita KS
Posts: 16,132
|
Good to hear and have fun on the trip!
|
|
|
|
| Sponsored Links (Register now to hide all advertisements) |
|
|
|
10-31-2015, 11:58 PM
|
#63 | |
|
Senior Member
Join Date: Oct 2010
Location: Orem, Utah
Posts: 5,762
|
Quote:
I'm thinking my problem was really that broken inner distributor cap way more than bad wires. But, the little bit of effort added by threading new wires through the conduit is nothing compared to the effort to get them all plugged into the inner cap then get the outer cap to close on it. So, I might as well have replaced the wires as long as I was replacing the cap. That's what I did and will do in the future when I more routinely replace that inner cap, or, at least inspect it for damage. That's hard to do without at least loosening the conduits so the cap can be turned up to inspect. That's why I haven't done it more routinely in the past. We lives and we learns.
__________________
Prof. Henry (The Roaming Gnome) "It is good to have an end to journey toward; but it is the journey that matters, in the end. *Ursula K. Le Guin in The Left Hand of Darkness Last edited by Old Henry; 11-01-2015 at 12:13 AM. |
|
|
|
|
|
11-01-2015, 01:40 AM
|
#64 |
|
Senior Member
Join Date: May 2010
Location: Melbourne Australia.
Posts: 2,078
|
Hi Craig, That dist cap sure was a mess with cracks and tracking on many cylinders and on whats left of the centre contact too. There is some side play in that front dist bush and it should be replaced. It should have no side movement at all. Also it is generally usual to see a small light show around the leads and plugs at night. Make sure all your spark plugs are really in good condition. If plug centre electrodes are worn away and not square then the spark will have resistance in jumping the gap and will then want to find weak places in the cap and leads to go to ground. Fit new plugs and check that the gaps are correct before fitting. Some spark plugs don't perform very well once they are physically cleaned or sandblasted and seem to fowl up much quicker than new spark plugs. In years past I would clean plugs several times over but now I would maybe only clean them once before replacement. Keep the outside of your spark plugs and leads very clean, wipe them down now and then. Like wise wipe the inside of the dist cap and the rotor now and then. On electrical items "CLEAN IS GOOD". There is no requirement for "HOT" or "PERFORMANCE" ignition coils on standard touring car engines. All they do is place extra voltage pressure on all your high tension components and do nothing to increase power output of the engine. Good luck on your coming trip. Regards, Kevin.
|
|
|
|
|
«
Previous Thread
|
Next Thread
»
 Linear Mode

|
|

| Sponsored Links (Register now to hide all advertisements) |
|
|
All times are GMT -5. The time now is 06:48 PM.