|
|||||||


| Sponsored Links (Register now to hide all advertisements) |
|
|
 |

|
Thread Tools | Display Modes |
 07-30-2011, 07:16 AM
|
#1 |
|
Senior Member

Join Date: Jun 2011
Posts: 890
|
HI: Got a funny q how to take the original dis apart so you can rebuild the parts or replace the parts. But how do you get it apart to do this or is it all bakelite theres a seam that goes down the middle of the top does that come apart. Or do you have to do it all from the inside and is there wires that run from the little tabe for the spark plugs and how do you get them out.And how do you get the bushings out and how many bushings are they're. Mine don't need rebuilding right now but it will sooner or later so I would like to know how to rebuild it. So I know how to do it when the time comes to do it or is there a book that tells you how to do it. Thanks let me know. reggiedog
Last edited by reggiedog; 07-30-2011 at 07:49 AM. |

|

|
|
07-30-2011, 08:31 AM
|
#2 |
|
Senior Member

Join Date: May 2010
Location: Eastern Tennessee
Posts: 11,521
|
Wow, I must confess that when I read your posts I always find myself disecting them word-by-word to comprehend what you are trying to say, so please forgive me if I miss your questions but let me see if I can help you some.
To start with, if you are going to do it correctly there are some specialty tools you will need to have. It might be that someone locally can assist you with this that already has these tools. Also a repair manual would be really beneficial to you too. Yes, the Bakelite distributor body (the thing that the "tabes" attach to) will need to be removed as does the distributor rotor. Also, the entire dist. assy. needs to be removed from the engine. Next the points cam will need to be removed which will allow you to remove the points plate. Once inside you will see the wire you speak of. Once the bradded pin is removed from the shaft and the collar removed, the shaft will come out allowing you to remove the bushings. New bushings will need to be installed and then honed/reamed to have a proper fit to the new distributor shaft. Then it is just a process of reverse order of assembly after each item is inspected, and then restored back to factory tolerances, --or replaced with quality reproduction units. It might be worth noting that several vendors can supply you with a rebuilt distributor if you feel like this is beyond what you want to tackle. Good luck in your endeavors. |
|
|
|
 )
)| Sponsored Links (Register now to hide all advertisements) |
|
|
|
07-30-2011, 09:24 AM
|
#3 |
|
Senior Member

Join Date: May 2010
Location: Camino, CA.
Posts: 3,086
|
To remove the bushings, cut them lengthwise with a small hacksaw and peal them away from the sides of the hole. Don't try to drive them out as you may crack the housing. Buy a kit from one of the parts vendors and follow the instructions in Les Andrews book.
|
|
|
|
|
07-31-2011, 01:57 AM
|
#4 |
|
Senior Member
Join Date: Jun 2010
Location: Queens, NYC
Posts: 212
|
I purchased a new traditional plate distributor from Bratton's and will rebuild the one that came with the car. The original was a modern plate one with the metal contact strip, she shorted out, replaced with the Bratton's one out of frustration. Having a spare seems to be a good idea.
Last edited by cars56; 07-31-2011 at 05:34 AM. |
|
|
|
|
07-31-2011, 06:47 AM
|
#5 |
|
Senior Member
Join Date: May 2010
Location: South East NJ
Posts: 3,398
|
If you really want to be sure you need to pay attention as you assemble the dist.
You need to be sure the main shaft is tight with no side play. The cam you use must fit tight and give even lift on each lobe when installed. Some repros fit loose and will not go on centered, or so I have read since I have only used originals. The upper plate must have a snug fit to the center of the dist housing. Again, if the upper plate does not stay centered to the cam you will get inconsistent gap. The fix is careful use of the ball end of a ball peen hammer to make the upper plate center hole get a bit smaller. You also want to get some high strand count silicon insulated wire used for RC cars and airplanes to connect the two plates. See Vince Falter's website. Remember that original parts properly restored are likely to never need to be touched again. Repro stuff can give you some interesting problems. Most people do not like interesting problems 20 miles from home. One major exception, the modern burn out proof condenser is essential. The dist cam must be very smooth. Some guys have lightly buffed the surface to ensure smoothness. There are two types of cams. The original A cam and the B cam. The B cam gives a longer dwell (hotter spark) and was the only replacement available after the A production from Ford. Do not forget to lube the cam with cam lube or Vaseline. Keep in mind the wear block on the points will wear faster until it matches the cam. The points need to be parallel and inline. Points need to be replaced when the wear block is really worn out unless there is something wrong electrically causing the points to arc. Done right a dist should be good for several generations of your family without being touched much other then lubing and the occasional points adjusting. Anyway, just a few things to consider. |
|
|
|
|
07-31-2011, 07:12 PM
|
#6 |
|
Senior Member

Join Date: May 2010
Location: Mpls, MN
Posts: 27,582
|
Sponsored Links (Register now to hide all advertisements)
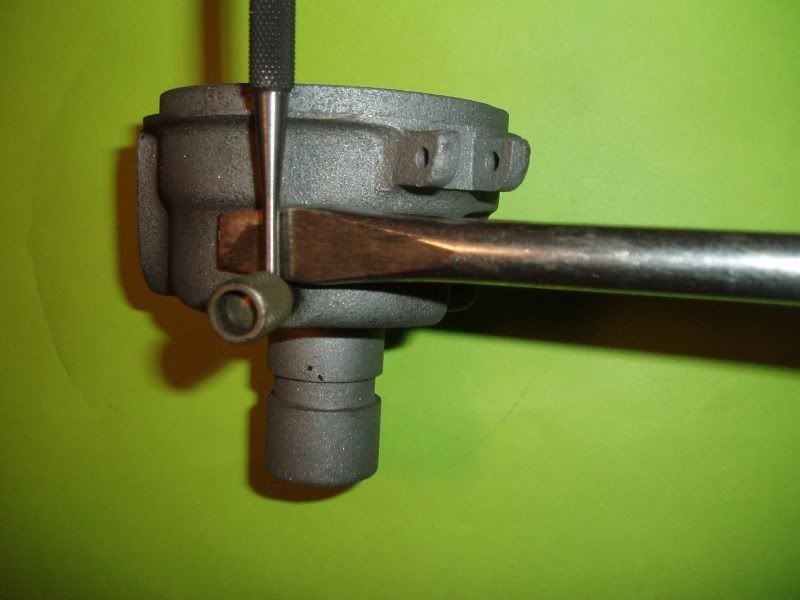 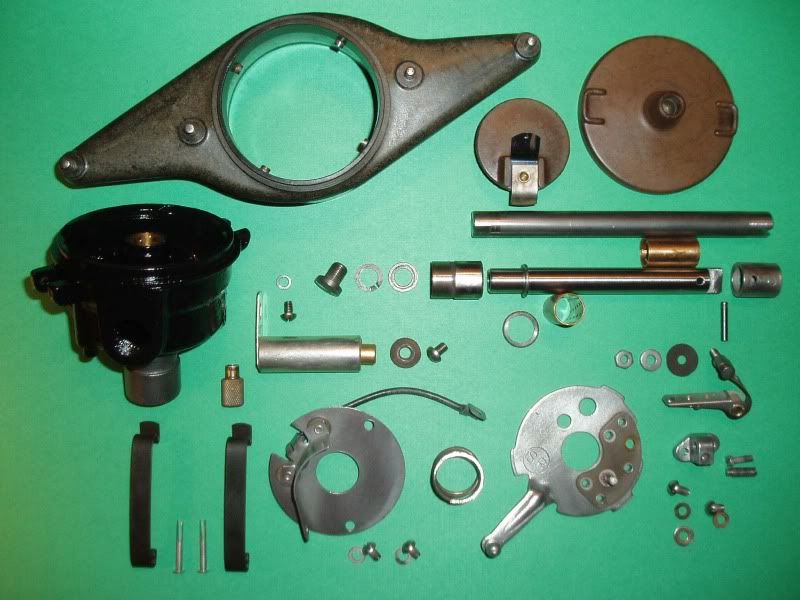 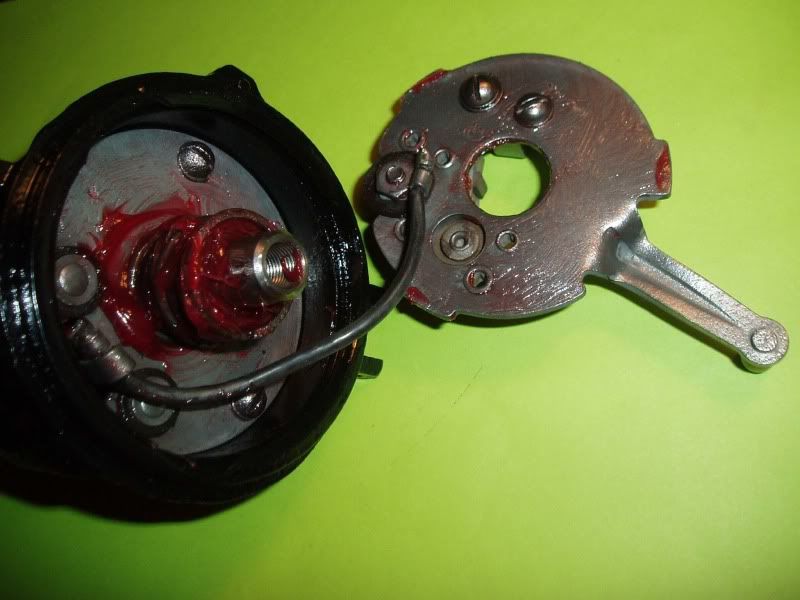 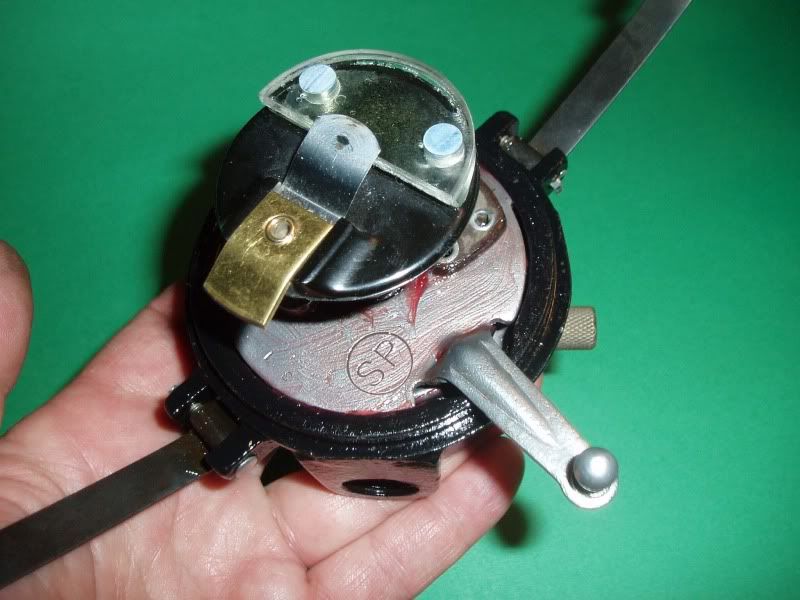 Rebuilding the distributor is easy to do, but try to use as many original parts as possible. I've liked the bushings and shafts I bought from Bratton's in the past. I've never used new points, just the old ones that came in the swap meet distributors I bought, although I do have a set of NOS Ford points in the box for a spare. To remove the oiler, just insert a straight punch the diameter of the oil hole, then put a screwdriver behind it and twist clockwise to pop it out. If it doesn't come, then lift sideways on the screwdriver to pry it out. As you can see, I like to lubricate parts to keep rust away and to keep the wear down. The center hole and 3 tabs on the top plate are wear points, so keep them lubricated, but keep the grease and oil off the points contacts. I put a drop of oil on the points pivot post. I polish the new shaft on my lathe with a fine crocus cloth, then oil the new bushings and spin the shaft into the new bushings to burnish them in. I then remove the shaft and clean everything and reoil the bushings and repolish the shaft and everything fits nice and snug. Be sure to use the good fine stranded wire between the plates. I even balance my rotor as you can see in the picture. |
|
|
|
|
07-31-2011, 09:18 PM
|
#7 |
|
Senior Member

Join Date: Oct 2010
Location: Grafton, MA
Posts: 1,226
|
Nice pictures, Tom. And thanks for the hints!
|
|
|
|
|
08-01-2011, 06:38 AM
|
#8 |
|
Senior Member
Join Date: Jun 2010
Location: Queens, NYC
Posts: 212
|
Tom where do you purchase the red grease/lube you are using? Brand?
|
|
|
|
|
08-01-2011, 06:50 AM
|
#9 | |
|
Senior Member
Join Date: May 2010
Location: Mpls, MN
Posts: 27,582
|
Quote:
It's a nice sticky grease that I use for everything from wheel bearings to chassis lube to water pump lube. Due to the nice red color it's easy to tell when the wheels bearings are dirty and need to be cleaned and repacked. 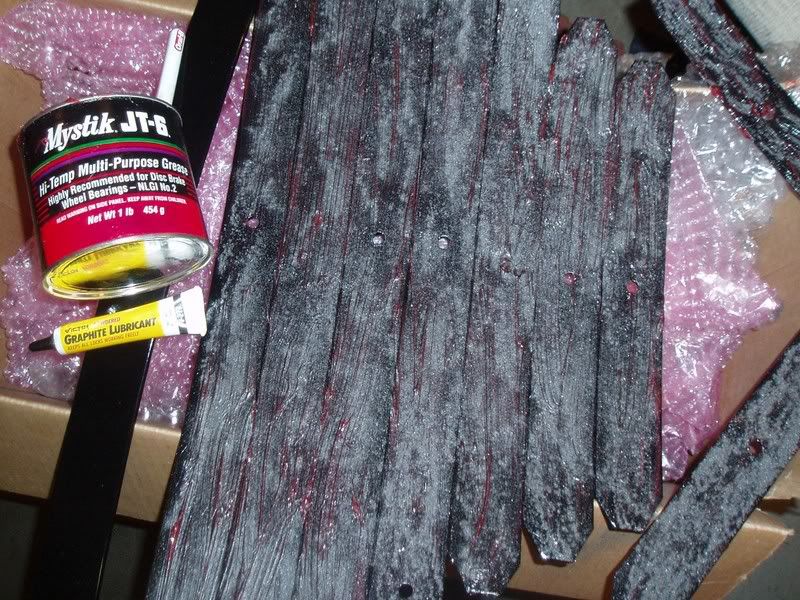 Here's a picture of the grease can. This is a picture of the front spring when I greased the leaves and sprinkled powdered graphite on the grease. Last edited by Tom Wesenberg; 08-01-2011 at 07:29 AM. |
|
|
|
|

|
08-01-2011, 09:22 AM
|
#10 |
|
Senior Member
Join Date: May 2010
Posts: 295
|
Tom:
How do you balance the rotor? Any special tools required? Thanks in advance. Bill Lee/Virginia Peninsula |
|
|
|
|
08-01-2011, 10:30 AM
|
#11 | |
|
Senior Member
Join Date: May 2010
Location: Mpls, MN
Posts: 27,582
|
Quote:
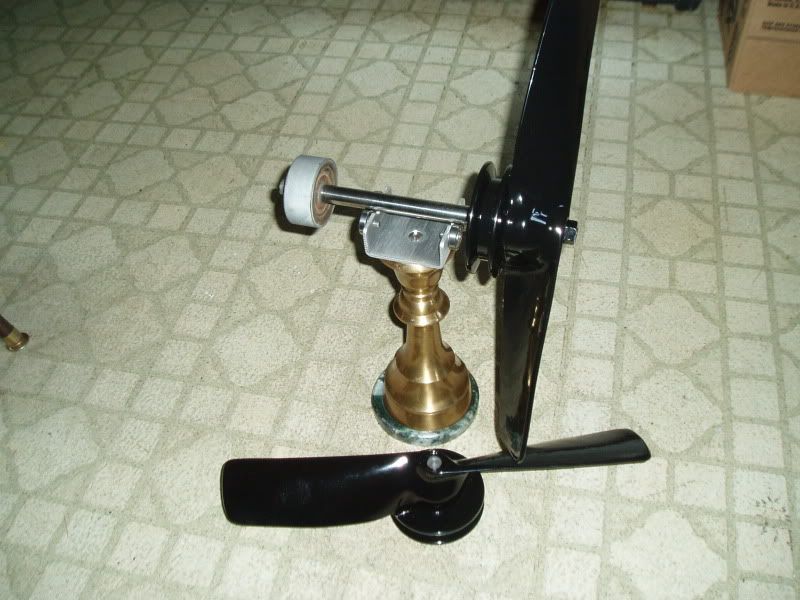 I use the same ball bearing balancer that I use for fan blades. You can also use a pair of parrellel rails, or even a flat level table top. Just slip the rotor onto a distributor shaft with the cam installed, and the heavy brass part of the rotor will go down until you find the correct weight to counterbalance it. I used my hole saw to cut 4 pieces of 1/8" plexiglass for the weights. After 3 years the super glue let loose, so you can see I drilled holes and installed some blue fiberglass rods to lock the plexiglass in. I also used a couple screws and nuts to balance a rotor, and this is much easier to do. Just don't let the drill bit grab the plastic rotor and break off a piece of it when you drill. |
|
|
|
|
|
08-01-2011, 12:12 PM
|
#12 |
|
Senior Member
Join Date: May 2010
Posts: 295
|
Tom:
Thank you for your prompt reply, instructions and advice. Bill Lee/Virginia Peninsula |
|
|
|
|
08-05-2011, 11:37 PM
|
#13 | |
|
Senior Member
Join Date: Jul 2011
Location: Elko Nevada
Posts: 217
|
Quote:
Please give me a mini lesson on just how you go about closing the difference in size between the upper plate and the center shaft. You say that a ball peen hammer is used. Is it used by its self or with a second hammer, all ideas I have will give inconsistent results. The fit in most of the distributors I have looked at is very bad, the new upper plates do not fit correctly and everyone just wants to talk about the bushing and center shaft fit. I believe this is a huge problem and needs much more attention. Keep up the good work and great pictures. |
|
|
|
|
|
08-06-2011, 12:28 AM
|
#14 |
|
Senior Member
Join Date: May 2010
Location: Mpls, MN
Posts: 27,582
|
You have to use a shaft or hammer for a backing of the center hole in the upper plate, then carefullu peen around the hole to work the metal towards the hole to make it smaller. I haven't had a sloppy plate when using original plates, but have seem more play than I like on some repro upper plates.
On the lower plates I also like to use originals, because the repros are made of thinner metal. |
|
|
|
|
08-16-2011, 02:43 PM
|
#15 |
|
Senior Member
Join Date: Jul 2011
Location: Elko Nevada
Posts: 217
|
Thank you for the info, I have noticed a problem with the repro parts and original ones are getting harder to come by,,
|
|
|
|
|
08-18-2011, 04:01 AM
|
#16 | |
|
Senior Member
Join Date: May 2010
Location: Mpls, MN
Posts: 27,582
|
Quote:
|
|
|
|
|
|
08-18-2011, 12:20 PM
|
#17 |
|
Senior Member

Join Date: May 2010
Location: Wauconda, IL
Posts: 3,600
 |
Great shots Tom!
__________________
Mark Maron Ill., Region MARC & MAFCA MARC JSC Member MAFFI Trustee National Facebook Admin. https://www.facebook.com/groups/MARC.group/ A7191-Sport Coupe 29 Roadster 29-Town Sedan 29-Original Special Coupe |
|
|
|
|
08-18-2011, 07:38 PM
|
#18 | |
|
Senior Member
Join Date: May 2010
Posts: 3,099
|
Quote:
 I've posted this several times since I created this image in Photoshop and first posted it about twelve years ago. I use a blunt punch for control and lay the plate on the anvil portion of my bench vise. Be sure to have the rivets of the edge of the anvil so the plate lies flat. My image infers it takes harder peening than it should really require. Additionally I've seen some housings with a slight groove worn at the center. This means a very slight lip around the top edge of the center that should be skimmed off with a small mill file. If not the "fitted" plate will snap on over this lip and either still be a little loose or soon be loose due to a very thin contact area.
__________________
http://www.abarnyard.com/ |
|
|
|
|
|
«
Previous Thread
|
Next Thread
»
 Linear Mode

|
|

| Sponsored Links (Register now to hide all advertisements) |
|
|
All times are GMT -5. The time now is 01:35 AM.