|
|||||||


| Sponsored Links (Register now to hide all advertisements) |
|
|
 |

|
Thread Tools | Display Modes |
 09-20-2021, 09:22 AM
|
#1 |
|
Senior Member

Join Date: Jul 2021
Location: Savannah, Georgia
Posts: 245
|
Going to put a Cigar lighter in my '39 Ford(12V Positive Ground) to charge phones etc and was wondering about this. So I googled it and found the answer. Sharing in case anyone else may be interested............
Negative-Ground Lighter Socket in a Positive-Ground Car. I recently installed a cigarette lighter in my 1960 big Healey, in preparation for a trip that would need my Garmin and cellphone charger. I used the large hole where the windshield washer hand pump used to go (I had replaced that with an electric pump and pushbutton switch).  Then it fortunately occurred to me that reversed polarity from the positive ground would likely be fatal to such things. Although reversing polarity in these cars is easy when they are stock, I have a positive-ground fuel pump and Pertronix ignition, and replacing them with negative-ground units would be expensive. (And I cant use Moss new LED brake lamps either!) Then it fortunately occurred to me that reversed polarity from the positive ground would likely be fatal to such things. Although reversing polarity in these cars is easy when they are stock, I have a positive-ground fuel pump and Pertronix ignition, and replacing them with negative-ground units would be expensive. (And I cant use Moss new LED brake lamps either!)The standard Moss cigarette lighter (142-270) can be isolated from the body, and has a spade connector on the external barrel for the negative connection that we are going to finagle there. 1. First, you need both positive and negative supplies. If you are going to have your lighter supplied through the ignition switch (the usual way), you need to split a live (usually green) wire coming from the switch, or any other ignition-live wire that is handy. Put a 10 or 15-amp inline fuse in this new green line. End it with a female spade connector. For the positive supply, you need to make a black wire that connects to a good chassis ground. On my old Healey, the easiest nearby ground was the right-hand windshield-washer nozzle. End this wire with a female spade again. Since the lighter can carry a heavy load, you might solder your joints in addition to crimping. (At the same time as this job, I replaced my original rattly ignition switch. I was doubtful that it would handle a heavy load like my tire pump without melting. The Moss replacement is 169-108.)  The picture above shows the taped barrel with the O-rings located as they would be when the lighter is installed in the dash, shown by the blade. The picture above shows the taped barrel with the O-rings located as they would be when the lighter is installed in the dash, shown by the blade.2. Unscrew the outer barrel of the lighter, take off the lamp unit and discard it: it has little function. Wrap the upper neck of the internal barrel (right up to and under the front flange) with a 3/8-in-wide strip of insulating tape. One turn only if the lighter body is a tight fit in the dashboard hole. (If its a very tight fit, you will need to get out a round file or Dremel grinder and make the hole a bit larger. It must be large enough that you dont catch on the tape when you insert the barrel, step 4.) Now roll a fairly thick O-ring up the body. I used 3/4 ID x 1/8 thick rings. 3. On the external barrel, file off the little nibs on the front to make the rim smooth. Wrap it completely with tape. This is going to be live, so you dont want it banging into grounded things. 4. Carefully slide the internal barrel, c/w O-ring, through the dash from the front. A dab of grease might help. If you feel the tape catch, stop, enlarge the hole and re-tape. When you have it in place, roll on a second O-ring from the back, up to the top. Now screw on the external barrel from the back, tight enough that the lighter doesnt wobble in the dash; but dont grind through the O-ring. 5. Connect the wires. Green is negative and goes to the spade on the outer barrel. Black is positive and goes to the center spade. The only live (negative) pieces of metal that are still bare are (i) the threads on the back end of the barrel, and (ii) the front flange on the dash. The chances of inadvertent shorting are small.  Here is the lighter installed. The front O-ring is visible but not obtrusive. Here is the lighter installed. The front O-ring is visible but not obtrusive.6. If you have a voltmeter, do two checks. (i) Measuring ohms, ignition off, check that the front flange is isolated from ground. If it is not, stop and redo the tape around the neck of the inner barrel, step 2. (ii) Ignition on, check that the center terminal inside is +12V relative to the flange (not to ground). Any short between the barrel and ground will also be obvious if you turn on the ignition and the inline fuse blows. If all is right, try the lighter. If successful, you now have a negative-ground source of power in your positive-ground car, and can safely plug in your electronic gizmos. The top picture shows the car with my Garmin running. Thats grumpy me in the mirror. (I really dislike the device, particularly the stupid position of the off switch and also its menu arrangements, so my wife usually looks after it from the passengers seat.) The socket also works with a cellphone charger, and presumably anything else.  In case anyone wonders, the two switches above the heater control are a left-right rocker switch that replaces the now-defunct flasher switch on the column, and a push-button for the windshield washer. And this last picture is the car. It is something of a bastard, with a 1960 BT7 Mk I horizontal grille and chassis number (which might be from another car anyway; being screwed to the firewall, not riveted), and a BT7 Mark II tri-carb engine that is missing its engine number plate and almost certainly came out of a 1961 car. But it looks and runs very well, and few people know the details about the tri-carbs anyway! They were the rare ones with the first vertical grille slats, but they retained the older BT7 windshield and had no wind-up windows or fancy dashboardsthose started with the second version of the Mk II, the BJ7, which went back to two carbs, 1¾-inch HS6s. In case anyone wonders, the two switches above the heater control are a left-right rocker switch that replaces the now-defunct flasher switch on the column, and a push-button for the windshield washer. And this last picture is the car. It is something of a bastard, with a 1960 BT7 Mk I horizontal grille and chassis number (which might be from another car anyway; being screwed to the firewall, not riveted), and a BT7 Mark II tri-carb engine that is missing its engine number plate and almost certainly came out of a 1961 car. But it looks and runs very well, and few people know the details about the tri-carbs anyway! They were the rare ones with the first vertical grille slats, but they retained the older BT7 windshield and had no wind-up windows or fancy dashboardsthose started with the second version of the Mk II, the BJ7, which went back to two carbs, 1¾-inch HS6s.By Jo Jesty 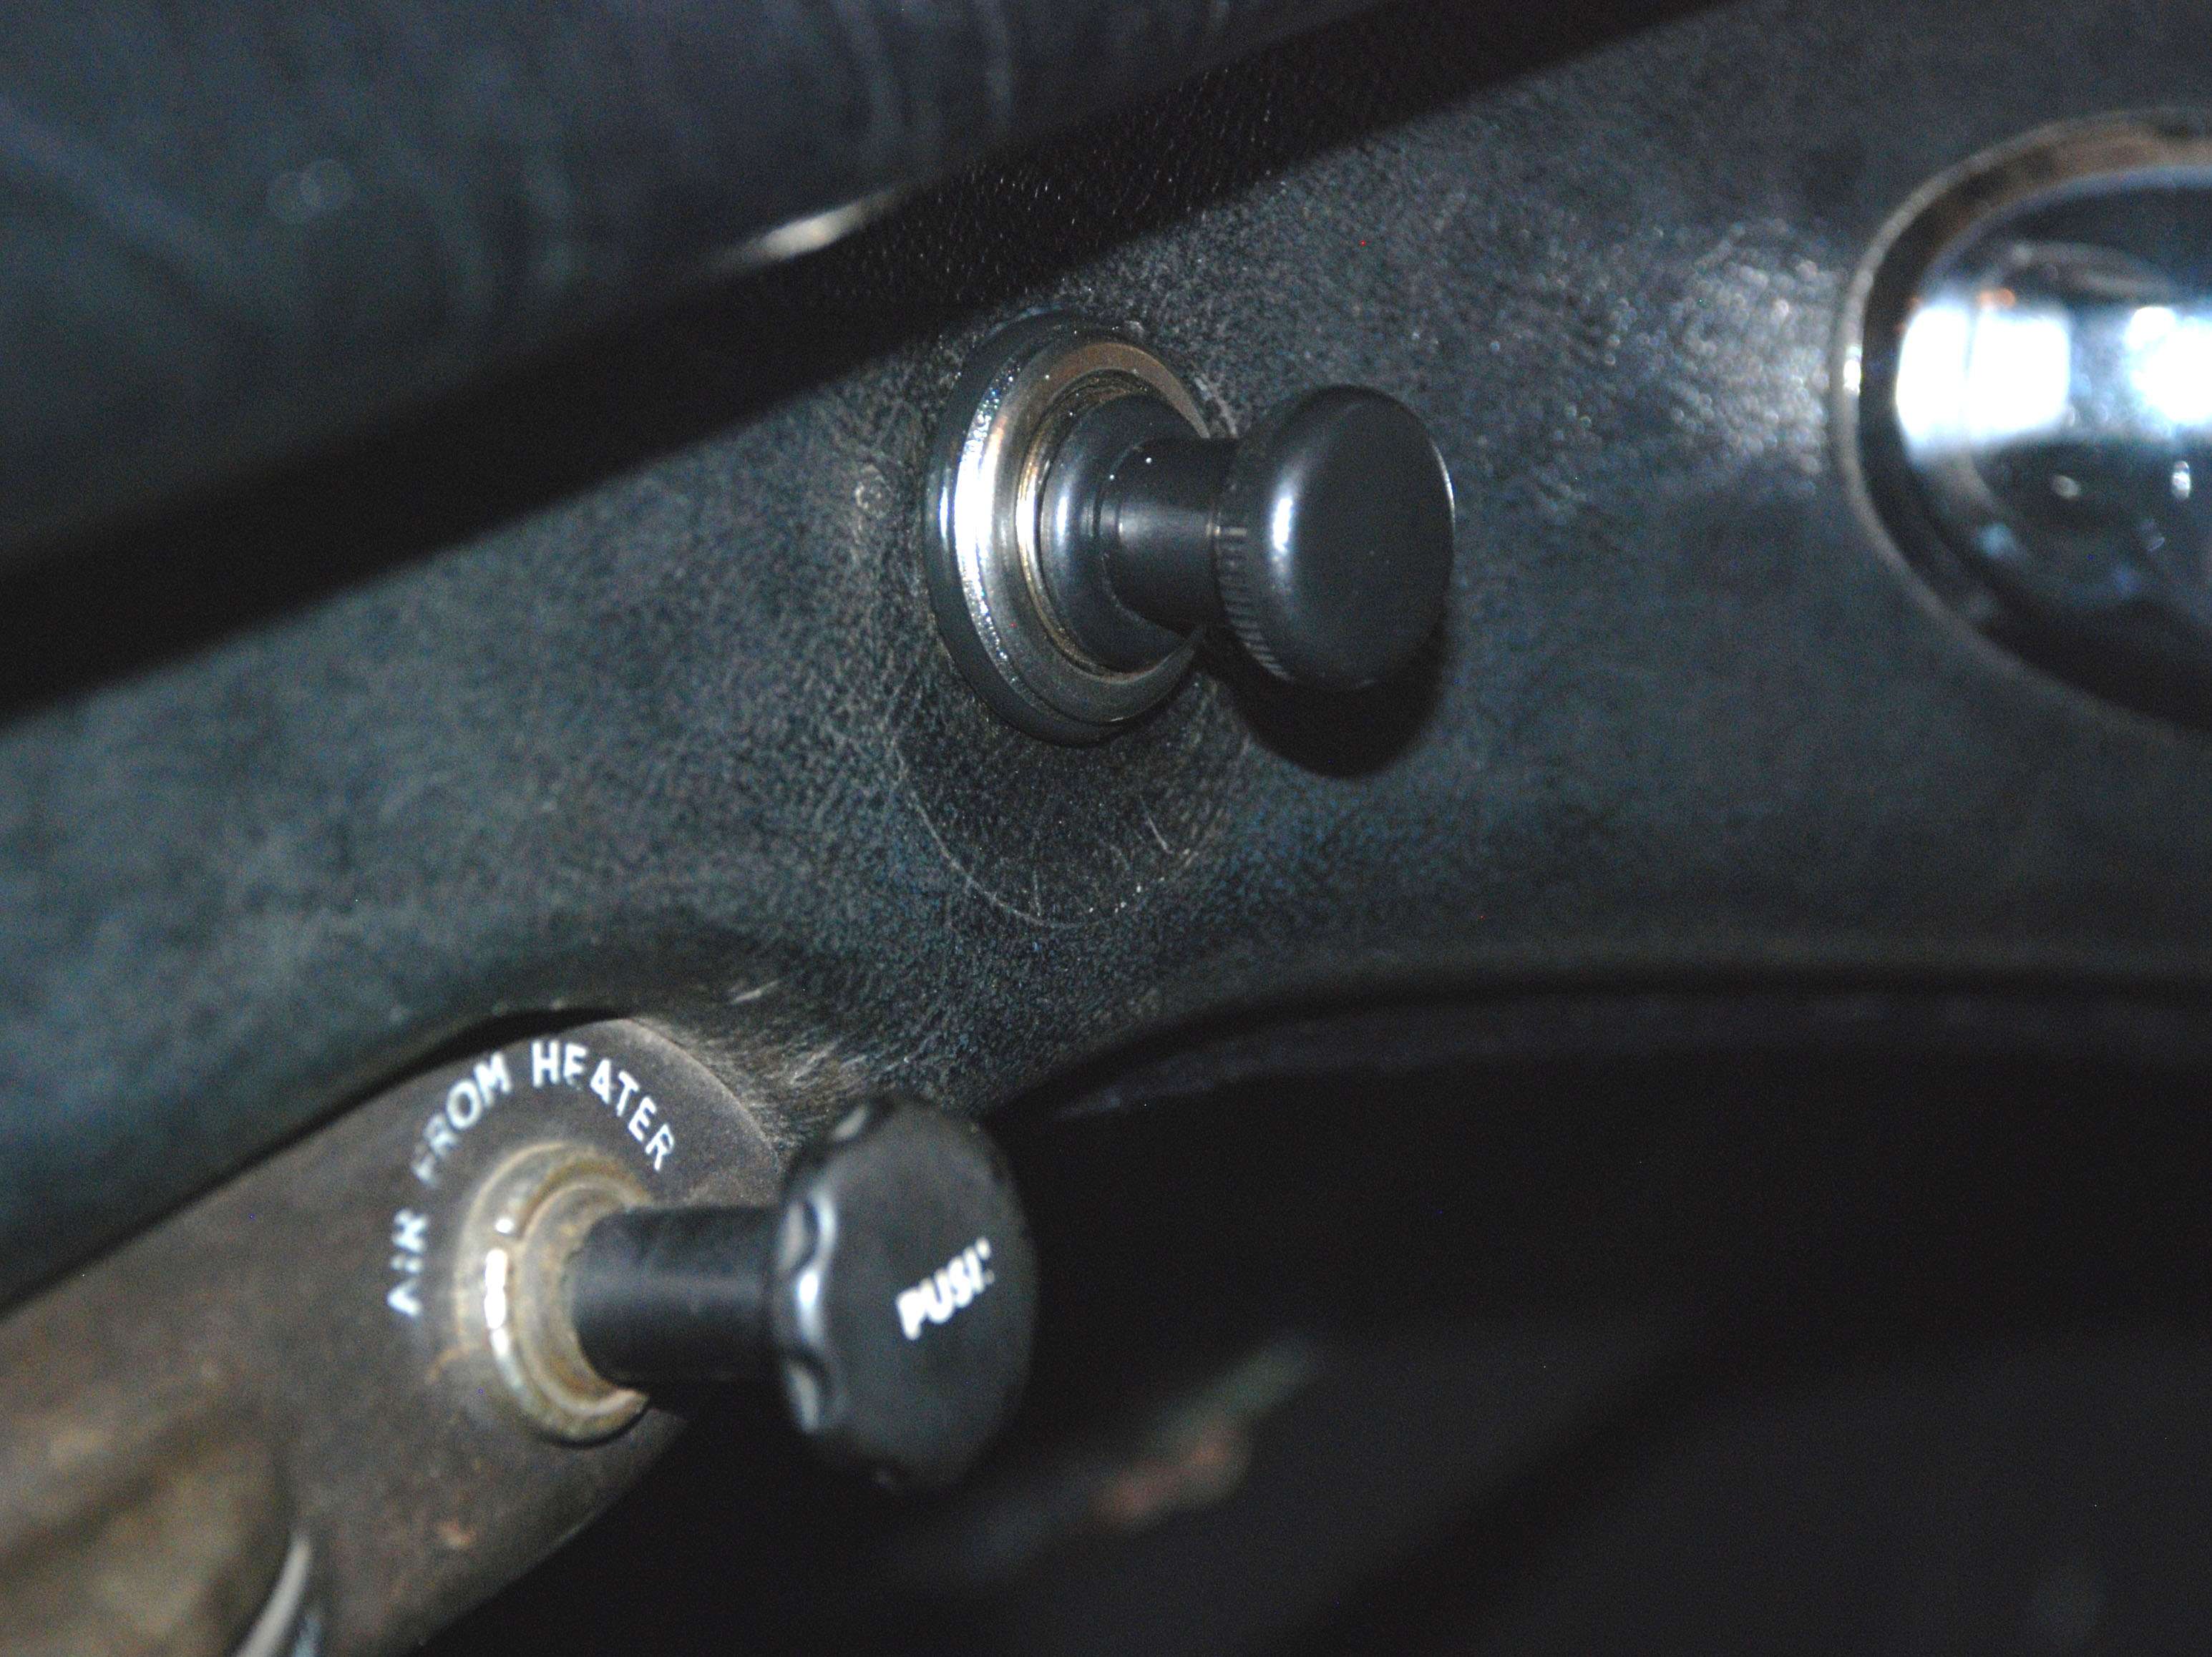 Negative-Ground Lighter Socket in a Positive-Ground Car. I recently installed a cigarette lighter in my 1960 big Healey, in preparation for a trip that would need my Garmin and cellphone charger. I used the large hole where the windshield washer hand pump used to go (I had replaced that with an electric pump and pushbutton switch). Then it fortunately occurred to me that reversed polarity from the positive ground would likely be fatal to such things. Although reversing polarity in these cars is easy when they are stock, I have a positive-ground fuel pump and Pertronix ignition, and replacing them with negative-ground units would be expensive. (And I cant use Moss new LED brake lamps either!)The standard Moss cigarette lighter (142-270) can be isolated from the body, and has a spade connector on the external barrel for the negative connection that we are going to finagle there. 1. First, you need both positive and negative supplies. If you are going to have your lighter supplied through the ignition switch (the usual way), you need to split a live (usually green) wire coming from the switch, or any other ignition-live wire that is handy. Put a 10 or 15-amp inline fuse in this new green line. End it with a female spade connector. For the positive supply, you need to make a black wire that connects to a good chassis ground. On my old Healey, the easiest nearby ground was the right-hand windshield-washer nozzle. End this wire with a female spade again. Since the lighter can carry a heavy load, you might solder your joints in addition to crimping. (At the same time as this job, I replaced my original rattly ignition switch. I was doubtful that it would handle a heavy load like my tire pump without melting. The Moss replacement is 169-108.) The picture above shows the taped barrel with the O-rings located as they would be when the lighter is installed in the dash, shown by the blade.2. Unscrew the outer barrel of the lighter, take off the lamp unit and discard it: it has little function. Wrap the upper neck of the internal barrel (right up to and under the front flange) with a 3/8-in-wide strip of insulating tape. One turn only if the lighter body is a tight fit in the dashboard hole. (If its a very tight fit, you will need to get out a round file or Dremel grinder and make the hole a bit larger. It must be large enough that you dont catch on the tape when you insert the barrel, step 4.) Now roll a fairly thick O-ring up the body. I used 3/4 ID x 1/8 thick rings. 3. On the external barrel, file off the little nibs on the front to make the rim smooth. Wrap it completely with tape. This is going to be live, so you dont want it banging into grounded things. 4. Carefully slide the internal barrel, c/w O-ring, through the dash from the front. A dab of grease might help. If you feel the tape catch, stop, enlarge the hole and re-tape. When you have it in place, roll on a second O-ring from the back, up to the top. Now screw on the external barrel from the back, tight enough that the lighter doesnt wobble in the dash; but dont grind through the O-ring. 5. Connect the wires. Green is negative and goes to the spade on the outer barrel. Black is positive and goes to the center spade. The only live (negative) pieces of metal that are still bare are (i) the threads on the back end of the barrel, and (ii) the front flange on the dash. The chances of inadvertent shorting are small. Here is the lighter installed. The front O-ring is visible but not obtrusive.6. If you have a voltmeter, do two checks. (i) Measuring ohms, ignition off, check that the front flange is isolated from ground. If it is not, stop and redo the tape around the neck of the inner barrel, step 2. (ii) Ignition on, check that the center terminal inside is +12V relative to the flange (not to ground). Any short between the barrel and ground will also be obvious if you turn on the ignition and the inline fuse blows. If all is right, try the lighter. If successful, you now have a negative-ground source of power in your positive-ground car, and can safely plug in your electronic gizmos. The top picture shows the car with my Garmin running. Thats grumpy me in the mirror. (I really dislike the device, particularly the stupid position of the off switch and also its menu arrangements, so my wife usually looks after it from the passengers seat.) The socket also works with a cellphone charger, and presumably anything else. In case anyone wonders, the two switches above the heater control are a left-right rocker switch that replaces the now-defunct flasher switch on the column, and a push-button for the windshield washer. And this last picture is the car. It is something of a bastard, with a 1960 BT7 Mk I horizontal grille and chassis number (which might be from another car anyway; being screwed to the firewall, not riveted), and a BT7 Mark II tri-carb engine that is missing its engine number plate and almost certainly came out of a 1961 car. But it looks and runs very well, and few people know the details about the tri-carbs anyway! They were the rare ones with the first vertical grille slats, but they retained the older BT7 windshield and had no wind-up windows or fancy dashboardsthose started with the second version of the Mk II, the BJ7, which went back to two carbs, 1¾-inch HS6s.By Jo Jesty Negative-Ground Lighter Socket in a Positive-Ground Car. I recently installed a cigarette lighter in my 1960 big Healey, in preparation for a trip that would need my Garmin and cellphone charger. I used the large hole where the windshield washer hand pump used to go (I had replaced that with an electric pump and pushbutton switch). Then it fortunately occurred to me that reversed polarity from the positive ground would likely be fatal to such things. Although reversing polarity in these cars is easy when they are stock, I have a positive-ground fuel pump and Pertronix ignition, and replacing them with negative-ground units would be expensive. (And I cant use Moss new LED brake lamps either!)The standard Moss cigarette lighter (142-270) can be isolated from the body, and has a spade connector on the external barrel for the negative connection that we are going to finagle there. 1. First, you need both positive and negative supplies. If you are going to have your lighter supplied through the ignition switch (the usual way), you need to split a live (usually green) wire coming from the switch, or any other ignition-live wire that is handy. Put a 10 or 15-amp inline fuse in this new green line. End it with a female spade connector. For the positive supply, you need to make a black wire that connects to a good chassis ground. On my old Healey, the easiest nearby ground was the right-hand windshield-washer nozzle. End this wire with a female spade again. Since the lighter can carry a heavy load, you might solder your joints in addition to crimping. (At the same time as this job, I replaced my original rattly ignition switch. I was doubtful that it would handle a heavy load like my tire pump without melting. The Moss replacement is 169-108.) The picture above shows the taped barrel with the O-rings located as they would be when the lighter is installed in the dash, shown by the blade.2. Unscrew the outer barrel of the lighter, take off the lamp unit and discard it: it has little function. Wrap the upper neck of the internal barrel (right up to and under the front flange) with a 3/8-in-wide strip of insulating tape. One turn only if the lighter body is a tight fit in the dashboard hole. (If its a very tight fit, you will need to get out a round file or Dremel grinder and make the hole a bit larger. It must be large enough that you dont catch on the tape when you insert the barrel, step 4.) Now roll a fairly thick O-ring up the body. I used 3/4 ID x 1/8 thick rings. 3. On the external barrel, file off the little nibs on the front to make the rim smooth. Wrap it completely with tape. This is going to be live, so you dont want it banging into grounded things. 4. Carefully slide the internal barrel, c/w O-ring, through the dash from the front. A dab of grease might help. If you feel the tape catch, stop, enlarge the hole and re-tape. When you have it in place, roll on a second O-ring from the back, up to the top. Now screw on the external barrel from the back, tight enough that the lighter doesnt wobble in the dash; but dont grind through the O-ring. 5. Connect the wires. Green is negative and goes to the spade on the outer barrel. Black is positive and goes to the center spade. The only live (negative) pieces of metal that are still bare are (i) the threads on the back end of the barrel, and (ii) the front flange on the dash. The chances of inadvertent shorting are small. Here is the lighter installed. The front O-ring is visible but not obtrusive.6. If you have a voltmeter, do two checks. (i) Measuring ohms, ignition off, check that the front flange is isolated from ground. If it is not, stop and redo the tape around the neck of the inner barrel, step 2. (ii) Ignition on, check that the center terminal inside is +12V relative to the flange (not to ground). Any short between the barrel and ground will also be obvious if you turn on the ignition and the inline fuse blows. If all is right, try the lighter. If successful, you now have a negative-ground source of power in your positive-ground car, and can safely plug in your electronic gizmos. The top picture shows the car with my Garmin running. Thats grumpy me in the mirror. (I really dislike the device, particularly the stupid position of the off switch and also its menu arrangements, so my wife usually looks after it from the passengers seat.) The socket also works with a cellphone charger, and presumably anything else. In case anyone wonders, the two switches above the heater control are a left-right rocker switch that replaces the now-defunct flasher switch on the column, and a push-button for the windshield washer. And this last picture is the car. It is something of a bastard, with a 1960 BT7 Mk I horizontal grille and chassis number (which might be from another car anyway; being screwed to the firewall, not riveted), and a BT7 Mark II tri-carb engine that is missing its engine number plate and almost certainly came out of a 1961 car. But it looks and runs very well, and few people know the details about the tri-carbs anyway! They were the rare ones with the first vertical grille slats, but they retained the older BT7 windshield and had no wind-up windows or fancy dashboardsthose started with the second version of the Mk II, the BJ7, which went back to two carbs, 1¾-inch HS6s.By Jo Jesty Negative-Ground Lighter Socket in a Positive-Ground Car. |

|

|
|
09-20-2021, 09:53 PM
|
#2 |
|
Junior Member
Join Date: Jun 2014
Posts: 10
|
FWIW, this works in 6-volt positive ground cars as well. GPS and phones only need 5 volts.
|
|
|
|
| Sponsored Links (Register now to hide all advertisements) |
|
|
|
09-21-2021, 02:50 AM
|
#3 |
|
Senior Member

Join Date: May 2010
Location: Masterton, New Zealand
Posts: 3,841
|
sorry, I may be missing something here, but wouldn't it have just been easier to convert whole car to 12 volt negative earth? simply reverse wiring through ammeter, polarise generator after reversing bat connections. Job done.
12 volt neg earth is std, very few cars run 12 v pos ground.
__________________
Unfortunately, two half wits don't make a whole wit! |
|
|
|
|
09-21-2021, 04:30 AM
|
#4 |
|
Senior Member

Join Date: May 2010
Location: East Hartford, Ct
Posts: 5,898
|
Sounds simple to me, it's just treating the lighter socket as a stand alone circuit. Not connected to chassis. With it's own fuse. And if you want to turn off with ign., add a relay switch.
Hook it directly to the battery posts and not to the chassis. You can change polarity just by swapping from one post to the other.
__________________
DON'T RECALL DOING SOMETHING FOR MYSELF BASED ON SOMEONE ELSE'S LIKES OR DISLIKES Last edited by 51 MERC-CT; 09-21-2021 at 04:43 AM. |
|
|
|
|
09-21-2021, 08:48 AM
|
#5 |
|
Senior Member

Join Date: Jan 2013
Location: Bend, Oregon
Posts: 514
|
Sponsored Links (Register now to hide all advertisements)
|
|
|
|
|
«
Previous Thread
|
Next Thread
»
 Linear Mode

|
|

| Sponsored Links (Register now to hide all advertisements) |
|
|
All times are GMT -5. The time now is 11:58 PM.