|
|||||||


| Sponsored Links (Register now to hide all advertisements) |
|
|
 |

|
Thread Tools | Display Modes |
 03-12-2017, 02:21 AM
|
#1 |
|
Senior Member
Join Date: Jan 2011
Location: sw minnesota
Posts: 4,577
|
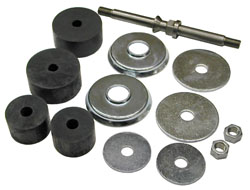
so heres how it went at my house. i post this because i spend a lot of time searching old posts for answers to my questions, and usually the folks here that have been at it way longer than me always have the solutions, thanks for that, and now i hope i can sort of sum up all the old posts with some facts...well, or at least what my tape measure said. here goes- i have been hoarding a set of what i thought was the correct, real ford adapter brackets to mount the newer motors in the older cars. they came to me in a 47 or so big truck that had a 8ba merc motor installed. they are the things with the funny angles in the photo. this project is as the title stated, 59 block in a 34, and i thought i was so cool to have the real ford part. i didnt notice until it was time to set the motor down that the studs that go thru the water pump are 5/8. standard mount bolts are 7/16, the holes in the pump are quite sloppy and would take a 1/2", but not 5/8 without some butchering. too late for butchering when the motor is hanging near ground zero, and i didnt want to wreck the pump cores. i now know those brackets are for 49 mercs and will work if you are using an 8ba block. i had always thought the 8ba with truck pumps puts you on the same plane as a 24stud pump motor mount, but not true? so now with motor hanging i need new adapters. the merc mounts were 1 7/8" tall. still thinking pump heights were the same i made some new U shaped things, and with the aid of my poor mans iron worker (the thing with two 1" shafts welded near each other in the photo) i made them exactly 1 7/8, and perfectly parallel, my mother would be so proud, and then set the motor down to see how much the offset is for the hole location. notice in the photo i have one of the merc mounts set on its side, if you look close you can see that the hole for the bottom rubber mount is centered, and the stud is about 1/2" wider, and about 1/4" toward the front of the car. on a side note, i had seen these adapters on ebay for about 50 bucks. link http://www.ebay.com/itm/371822156037...%3AMEBIDX%3AIT more on that later. so i set the motor down on my new perfect mounts to scribe the offset for the top holes to find that the water pump outlets were lower than the front frame cross member, note the scraper on the right in the photo slid under the pump outlet. so i then made some 3/8 thick washers with a hole saw, see second photo with scraper on left, and just barely had room for the hose to be put on and not rub on the frame. at this point i thought i was done, the crank shaft nut is close to where the crank guide should be (the previous owner thought that part was not needed). the fan seems to be parallel to the radiator, but the radiator outlets are about a 1/2 higher than the frame, and my pump outlets are near the frame. the hoses will give some, but really i think the motor should come up some more. so heres the moral of the story, the merc mounts- 1 7/8. my mounts with spacers-2 1/4, and should go up another 1/4 i think. the mounts on ebay are listed as being for 32 to 36 cars, which as recently discussed are not needed for 35-36, and the seller states they are only 1 1/2" tall, and they have the holes inline, not offset as the should be. not trying to put the guy out of business, but they can not work. more searching showed me an old post here by jseary, always in the know, and it appears he welded a plate on to raise it up, and mart from over the pond, also one our great resources, made mounts of rectangle tube that appear to be higher than the 2 1/4 i am at, and more like the 2 1/2" i think it should be. so, i hope this summery will help the next guy who does a search, and i hope i have not crossed a line in mentioning folks by name, comments welcome as always, end of long ramble, thanks, skip
|

|

|
|
03-12-2017, 10:54 AM
|
#2 |
|
Member Emeritus

Join Date: Nov 2012
Location: Wichita KS
Posts: 16,132
|
"it appears he welded a plate on to raise it up, and mart from over the pond, also one our great resources, made mounts of rectangle tube that appear to be higher than the 2 1/4 i am at, and more like the 2 1/2" i think it should be."
The photo I posted of the welded up mounts was of a "home made" approach that someone else had made up. I used the same adapters you are showing. Your photos of the engine mounded in the frame look close to correct. Are all of the parts present in your motor mount on the frame? Is the rubber part quality and the proper thickness? Last edited by JSeery; 03-12-2017 at 11:01 AM. |
|
|
|
| Sponsored Links (Register now to hide all advertisements) |
|
|
|
03-12-2017, 11:09 AM
|
#3 |
|
Senior Member
Join Date: Jan 2011
Location: sw minnesota
Posts: 4,577
|
yes, the rubber pads are not new, but near new, and they are correct height. also, not mentioned in my ramble, the rear mount and chatter rods are attached so front to back location should be correct
|
|
|
|
|
03-12-2017, 11:56 AM
|
#4 |
|
Member Emeritus
Join Date: Nov 2012
Location: Wichita KS
Posts: 16,132
|
Ok, just when out and took some measurements, well sort of! It's cold out and the mounts are really hard to get to. The adapters (original stock items) are about 1 7/8 and the total height from the frame surface to the bottom of the water pumps is about 3 inches (this is a REALLY rough measurement). I am using about a 1/2 spacer between the top of the adapters and the bottom of the water pumps. If you need better measurements I would need to remove the inter fender panels to get to the mounts. It's not that difficult to remove them, but it would take a little bit of time. My water pump inlets are setting slightly higher than the water outlets on the radiator, maybe a 1/4 higher.
|
|
|
|
|
03-12-2017, 12:25 PM
|
#5 |
|
Senior Member
Join Date: Jan 2011
Location: sw minnesota
Posts: 4,577
|
jseery, thanks for the effort!! it is hard to see and measure with the radiator in place. your notes confirm i could go up a bit more, 1/4" or so. my location at the crank nut looks good to me, but my pump outlets are slightly lower than the radiator outlets. again, 1/4" would help. i hate to keep stacking more spacers in so i think i should start over and make some taller u brackets. i will post a real measurement here when the radiator is out. darn.. almost out of acetylene !
|
|
|
|
|
03-12-2017, 01:25 PM
|
#6 |
|
Senior Member

Join Date: May 2015
Posts: 8,151
|
Sponsored Links (Register now to hide all advertisements)
 https://www.performanceonline.com/19...-Mounts-19352/
__________________
The only thing nice about being imperfect is the joy it brings to others.... "Silver rings, your butt! Them's washers!" "We shot our way out of that town for a dollar's worth of steel holes!" - from 'The Wild Bunch' - 1969 https://www.youtube.com/watch?v=7NReUd2_0u0 |
|
|
|
|
03-12-2017, 01:26 PM
|
#7 |
|
Member
Join Date: May 2010
Location: Ontario,NY
Posts: 83
|
I have a 59AB in my 34 BB truck.
I was lucky enough to have some rubber truck mounts from a Mack truck. I used a grade 8 bolt to bolt it to the frame. Lines up pretty good. |
|
|
|
|
03-12-2017, 02:09 PM
|
#8 | |
|
Member Emeritus
Join Date: Nov 2012
Location: Wichita KS
Posts: 16,132
|
Quote:
|
|
|
|
|

|
03-12-2017, 02:19 PM
|
#9 |
|
Senior Member

Join Date: May 2010
Location: Chester Vt
Posts: 8,860
|
This brings back some old memories. I bought a 33/34 Pu back in 58 with no engine. WE put a 59 engine in it, and I think we used some 1/1/2 water pipe cut off at an angle and welded to the cross member. Then used at stock mount and a long bolt. I like your method better, however the old truck served me well for quite awhile. Wonder what happened to it?
|
|
|
|
|
03-13-2017, 03:07 AM
|
#10 |
|
Senior Member

Join Date: May 2010
Location: Qld, Australia
Posts: 4,218
|
When putting a 99a engine in my 33, I used the u shaped mounts fron b: drake,and new mounts,I then made up soMe spacers under the water ump mounting brackets to get the crank engaging bolt centre with the crank handle hole in the spring ubolt mounting,
Lawrie |
|
|
|
|
03-13-2017, 06:47 AM
|
#11 | |
|
Senior Member

Join Date: May 2010
Location: Near Rising Sun, Maryland
Posts: 10,858
|
Quote:
__________________
John "Never give up on what you really want to do. The person with big dreams is more powerful than one with all the facts". Albert Einstein |
|
|
|
|
|
03-13-2017, 05:25 PM
|
#12 |
|
Senior Member
Join Date: Jan 2011
Location: sw minnesota
Posts: 4,577
|
yup, it would be easier if the crank guide was there to aim at. i have one in my stash and the next thing for this car is to drop the front axle and do king pins etc. i was hoping to make a couple trips up and down my country road to try my new/used transmission, and see if the rear end sounds like its dead or alive before i take any thing more apart. the shop needs a "mid term" clean up badly too, and it would be nice to DRIVE the car out for cleaning!
|
|
|
|
|
03-13-2017, 08:35 PM
|
#13 |
|
Member Emeritus
Join Date: Nov 2012
Location: Wichita KS
Posts: 16,132
|
Engine position shouldn't be critical for a quick test run. You can add or remove spacers to fine tune it later.
|
|
|
|
|
03-19-2017, 09:43 PM
|
#14 |
|
Senior Member
Join Date: Jan 2011
Location: sw minnesota
Posts: 4,577
|
results are in! i put my crank guide in this afternoon and really, my guessing was right on the money. so, at my house 2 1/4 " total rise was correct. i still do not like how the lower hoses do not aim straight into the radiator like they should, but some old postings here show the fix for that is to use the 8ba lower hoses (8ba 8286 b, 49-53) which show to have a slight hump in the shape which would work better than straight hose i have been trying to fit. now on to the next wore out parts of this old wreck. i'll post a photo when its outside, thanks all. best of luck to the next guy looking for the info, skip
|
|
|
|
|
«
Previous Thread
|
Next Thread
»
 Linear Mode

|
|

| Sponsored Links (Register now to hide all advertisements) |
|
|
All times are GMT -5. The time now is 09:15 AM.